Python3.5,Flask,Gunicorn,nginx,CentOS7.1,MySQL5.7.1の構成でサーバ構築したら思った以上にスループットが出たので方法を共有します。インフラ屋ではないので、至らぬ設定が多々あると思います。
ソフトウェア構成
| ソフトウェア | 用途 |
|---|---|
| CentOS7.1 | OS |
| Python3.5 | プログラミング言語 |
| Flask | Python Web フレームワーク |
| Gunicorn | Python WSGI HTTP Server for UNIX |
| nginx | リバースプロキシ |
| MySQL5.7.1 | データベース |
クラウド破産しないためのサービス選び
同じゲームを作った仲間がクラウド破産しそうになりました。個人で破産したくなかったのでこの時点で従量課金制であるAWSとGoogleCloudは除外。さくらかConoHaかなと思っていたのですが、ConoHaがSSDプランを格安で始めていたのでConoHaを選択しました。昨年お仕事で使ってたAWS-RDSのHDDをSSDに切り替えたらCPU使用率とスループットが大幅に改善したのでSSD万能説を信奉することにしました。
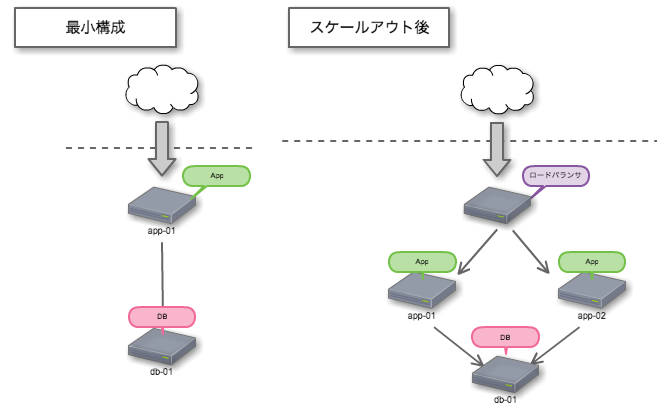
サーバ構成をどう設計するか
オールインワンかDB+APPサーバ構成にするか。サーバを分割した場合DBとAPP間の通信レイテンシが気になります。サーバが異なっていてもconnection poolingをちゃんと設定していれば1-5msで応答が返ってきます。オールインワンで構築すると将来DBサーバとAPPサーバを分割するときDB移管作業がとっても大変になりそうだったので2台構成にしました。
サーバスペックと維持費
ConoHaだとサーバ停止→メモリやCPU増設→サーバ起動でスケールアップできるので、困ったらお金で解決出来る点がポイント高いです。計2650円/月。
| 分類 | 月額 | CPU | メモリ |
|---|---|---|---|
| DB | 900円/月 | 2 | 1GByte |
| APP | 1,750円/月 | 3 | 2GByte |
静的コンテンツの配信
画像データ, css, js といったファイルは動的に変化しないのでユーザの手元にキャッシュさせたいです。HTTP通信時のHEADERにCache-Control: public と Cache-Control: max-age=XXXXXXXXXsec を付与すればブラウザ側で勝手にキャッシュしてくれるのでサーバ負荷の低減に繋がります。HEADERの付与はnginxをリバースプロキシとして動作させて実現しました。
>>> curl --head https://www.destinythegame.com/content/dam/atvi/bungie/dtg-comet/home/hero/debris_planet_ground.png
HTTP/1.1 200 OK
Server: Apache/2.2.15 (Red Hat)
Last-Modified: Tue, 16 Jun 2015 01:56:37 GMT
ETag: "23f40-274485-51898e2845ef1"
Accept-Ranges: bytes
Content-Length: 2573445
Content-Type: image/png
Cache-Control: max-age=3600
Date: Mon, 21 Dec 2015 03:52:54 GMT
Connection: keep-alive
アプリ側からのDBアクセスを最適化する設計
DBアクセスはローカルネットワーク経由で通信するため、速度がミリ秒単位で非常に遅い世界です。そのため段階別のキャッシュを活用して高速化を計りました。DBアクセスをいかに削減するかが高速化の大きなポイントになると思います。
| キャッシュ生存期間 | キャッシュ先 | 保存内容 |
|---|---|---|
| request毎 | メモリ上 | 計算に時間が掛かる処理の結果 |
| 無期限にキャッシュ | gunicornのワーカープロセス上のThreadLocalStorage | DB上のマスターデータ |
サーバ構築
CentOS7.1, MySQL5.7.1, python3.5, Gunicorn, nginxの順に構築していきました。
CentOS7.1のはまりどころ
2015年3月31日頃にCentOS7.1がリリースされました。iptables が無くなっていたりサービス起動がsystemctl になっていたりと色々ハマりました。ConoHaだと最初ほとんどの通信をfirewalld が止める安全な設定になっていたので、一旦停止して疎通確認してからFWを再設定しました。CentOS6 と勝手が違ったところだけメモしておきました。詳細は専門ブログみた方が安全です。
# 外部アクセス制御しているFireWallの停止
systemctl stop firewalld

# nginxの再起動
systemctl restart nginx

# サーバ再起動時にサービスを有効にする
systemctl enable nginx

# nginxのサービス起動時の設定ファイル
/usr/lib/systemd/system/nginx.service
MySQL5.7.1のはまりどころ
2015/10/20にリリースされたMySQL5.7 です。一部機能が5.6系より3倍速になっているらしいですが、罠が多いと悪名高いことでも有名です。詳細は:MySQL 5.7の罠があなたを狙っている
簡単に言うとパスワードポリシーが厳格になって、定期的に変更しないとパスワードが無効になって突然死亡するようになっています。個人PJだったのでパスワードポリシーを無効にし、IPによるアクセス制限を掛けることでセキュリティを担保して回避しました。
# 文字コード設定
character-set-server = utf8
# パスワードポリシーの無効化
validate_password= OFF
※my.confには、これだけ設定して後はデフォルトで動かしています。チューニング余地ありそうです。
###罠:mysqlの最初のログインパスワードがわからない
mysql -u root -p したときにパスワードが判らないときの対策
>>>cat /var/log/mysqld.log |grep password
2015-12-17T09:06:57.427343Z 1 [Note] A temporary password is generated for root@localhost: 8#0Ehxxxxxx
こちらの記事が参考になりました。MySQL5.7で遊んでみよう
###mysqlで外部からのアクセスを有効にする方法
デフォルトだと外部からアクセスできないようになっているので、ローカルネットワークからのアクセスを許可していきます。パスワードリセット方法がgrant文になっていたのを知らなくて半日ハマりました。辛い。
# 接続
mysql -u root -p

# ユーザ一覧
select user,host from mysql.user;

# root のパスワードと192.168.0.%からのアクセスを有効に設定する
grant all privileges on youre_dbname.* to root@"192.168.0.%" identified by 'パスワード' with grant option;

# ユーザ削除
drop user 'testuser'@'192.168.0.%';

# password reset local
set password=‘’;

# password reset for host
grant all privileges on youre_dbname.* to root@"192.168.0.1" identified by '' with grant option;
grant all privileges on youre_dbname.* to root@"192.168.0.%" identified by '' with grant option;
Python3.5のインストール
2.7構築したときとビルド方法変わっていなかったので、比較的楽に構築できました。
# python3.5ビルド準備
yum groupinstall "Development tools"
yum install zlib-devel bzip2-devel openssl-devel ncurses-devel sqlite-devel readline-devel tk-devel gdbm-devel db4-devel libpcap-devel xz-devel
yum install openssl-devel

# python3.5 install
wget https://www.python.org/ftp/python/3.5.0/Python-3.5.0rc4.tar.xz
tar xf Python-3.5.0rc4.tar.xz
cd Python-3.5.0rc4
./configure --prefix=/usr/local --enable-unicode=ucs4 --enable-shared LDFLAGS="-Wl,-rpath /usr/local/lib"
make && make altinstall
/usr/local/bin/python3.5
sudo easy_install pip
sudo easy_install virtualenv
sudo easy_install virtualenvwrapper
pip install pbr
sudo easy_install virtualenvwrapper
export WORKON_HOME=$HOME/.virtualenvs
source `which virtualenvwrapper.sh`
mkvirtualenv --no-site-packages --python=/usr/local/bin/python3.5 your_virtual_env_name
FlaskとGunicornとnginxを繋ぎ込む
nginxでリバースプロキシ立てて、バックエンドでGunicornのWSGI HTTPサーバが応答している構成です。
Flaskと Gunicornを繋ぐ
Gunicorn 、 ‘Green Unicorn’ は、UNIX用のWSGI HTTPサーバーです。 RubyのUnicornプロジェクトから派生したpre-fork workerモデルを採用しています。Flaskでのwsgi対応は簡単なwsgi.py を書くだけと、とっても簡単です。Gunicornはワーカーモデルで動作するためメモリ効率が悪いですが、ThreadLocalStorageをキャッシュに利用しているプログラムを組んでいると、キャッシュがワーカー毎に独立するため設計が単純になります。
# -*- coding: utf-8 -*-
from app import create_app
app = create_app()

if __name__ == "__main__":
     app.run(debug=False)
gunicorn wsgi:app -c .guniconf.py
import multiprocessing

# Server Socket
bind = 'unix:/run/gunicorn.sock'
backlog = 2048

# Worker Processes
workers = multiprocessing.cpu_count() * 2 + 1  # worker数はコア数*2が最適
worker_class = 'sync'
worker_connections = 1000
max_requests = 10000 # メモリリーク対策 特定リクエスト毎にワーカー再起動
timeout = 10
keepalive = 3
debug = True
spew = False

# Logging
logfile = '/var/log/gunicorn/app.log'
loglevel = 'debug'
logconfig = '/xxxx/config/gunicorn/gunicorn-log.conf'

# Process Name
proc_name = 'gunicorn_app'
■ CentOS7.1の罠 UNIXドメインソケットの置き場所
/tmp/xxxx.sockに設置する事例が多く見受けられますが、CentOS7.1 で/tmp 配下にUNIXドメインソケットを設置するとセキュリティ違反で通信してくれません。正しくは/run/xxxx.sockに設置するのが正解みたいです。この罠のせいで日曜日がつぶれたので一生忘れないと思います。
Gunicornとnginxを繋ぐ
nignx をリバースプロキシとし動作させて、UNIXドメインソケットを使ってgunicornと繋ぎます。gzip圧縮有効, /static 配下の静的コンテンツにはブラウザキャッシュ有効にするためにHTTP HEADERにCache-Control: max-age=2592000 を付与しています。
# 普通に起動
nginx --conf-path ./conf.d/my.conf

# systemctlから起動
systemctl start nginx.service

# 停止方法 次の3つのうちどれか
nginx --conf-path ./conf.d/my.conf -s stop
systemctl stop nginx.service
ps -ac|grep nginx して killする。
# For more information on configuration, see:
#   * Official English Documentation: http://nginx.org/en/docs/
#   * Official Russian Documentation: http://nginx.org/ru/docs/

user nginx;
worker_processes auto;
pid /run/nginx.pid;

events {
    worker_connections 1024;
}


http{
    log_format  main  '$remote_addr - $remote_user [$time_local] "$request" '
                      '$status $body_bytes_sent "$http_referer" '
                      '"$http_user_agent" "$http_x_forwarded_for"';

    upstream app_server {
        server unix:/run/gunicorn.sock fail_timeout=0;
        # For a TCP configuration:
    }

    server {
        client_max_body_size 1m;
        server_name *****your domain name*****;
        charset utf-8;

        keepalive_timeout 10;
        sendfile        on;
        tcp_nopush     on;

        #gzip
        gzip_static on;
        gzip on;
        gzip_http_version 1.0;
        gzip_vary on;
        gzip_comp_level 1;
        gzip_types text/plain
                   text/css
                   text/xml
                   text/javascript
                   application/json
                   application/javascript
                   application/x-javascript
                   application/xml
                   application/xml+rss;
        gzip_disable "MSIE [1-6]\.";
        gzip_disable "Mozilla/4";
        gzip_buffers 4 32k;
        gzip_min_length 1100;
        gzip_proxied off;

        #open_file_cache
        open_file_cache max=1000 inactive=20s;
        open_file_cache_valid 30s;
        open_file_cache_min_uses 2;
        open_file_cache_errors on;


        error_log /var/log/nginx/error.log;
        access_log /var/log/nginx/access.log;

        # Flask static file
        location /static/ {
            try_files $uri @proxy_to_app_static;
        }

        # static proxy
        location @proxy_to_app_static {
            proxy_set_header X-Forwarded-For $proxy_add_x_forwarded_for;
            proxy_set_header Host $http_host;
            proxy_redirect off;

            proxy_pass   http://app_server;

            # APPサーバから帰ってきたデータにHEADERを付与
            expires 1M;  # 静的コンテンツのブラウザキャッシュ1ヶ月
            access_log off;
            add_header Cache-Control "public";
        }

        location / {
            # checks for static file, if not found proxy to app
            try_files $uri @proxy_to_app;
        }

        location @proxy_to_app {
            proxy_set_header X-Forwarded-For $proxy_add_x_forwarded_for;
            proxy_set_header Host $http_host;
            proxy_redirect off;

            proxy_pass   http://app_server;
        }
    }
}
■ nginx設定ファイルのさらなる改善案
nginxを静的コンテンツ配布サーバとして運用すると、静的ファイル配信するたびにファイルIOが発生しなくなるため、より高速化するみたいです。設定方法がわかりませんでした...
supervisord でGunicorn をデーモン化する
gunicorn -D wsgi:app でデーモン化できますが、プロセスをkill すると止まってしまいます。gunicornプロセス死亡時に自動で復旧させるためにsupervisord をインストールしてgunicorn をデーモン化しました。supervisord は Python3系では動作しないので、virtualenvをdeactivate で解除してsupervisordを利用しています。
# supervisorctlコマンド長いのでエイリアスを生成
alias sctl='/usr/bin/supervisorctl -c /etc/supervisord.conf'

# プロセスの再読み込み
sctl reload
sctl reread

# 全プロセスの開始、再起動、停止
sctl start all
sctl restart all
sctl stop all

# gunicornプロセスの起動
sctl start gunicorn
supervisordにgunicornプロセスを追加する設定
[program:gunicorn]
command=sh /var/hogexxxxx/scripts/production_server.sh
user=root
autorestart=true
stdout_logfile=/var/log/supervisor/gunicorn-supervisord.log ; 標準出力ログ
stdout_logfile_maxbytes=1MB
stdout_logfile_backups=5
stdout_capture_maxbytes=1MB
redirect_stderr=true
Flaskをgunicornで起動するためのスクリプト
#!/bin/sh

GUNICORN=/root/.virtualenvs/***virtual_env_name***/bin/gunicorn
PROJECT_ROOT=/var/hoge

APP=wsgi:app

cd $PROJECT_ROOT
exec $GUNICORN -c $PROJECT_ROOT/config/gunicorn/guniconf.py $APP
supervisord をサーバ再起動時に自動起動するよう設定する
systemctl にsupervisord を登録して有効にします。
cd /usr/lib/systemd/system
touch supervisord.service
[Unit]
Description=Process Monitoring and Control Daemon
After=rc-local.service

[Service]
Type=forking
ExecStart=/usr/bin/supervisord -c /etc/supervisord.conf
ExecReload=/usr/bin/supervisorctl reload
ExecStop=/usr/bin/supervisorctl shutdown
SysVStartPriority=99


[Install]
WantedBy=multi-user.target
# 設定反映
systemctl daemon-reload

# 起動
systemctl start supervisord
systemctl status supervisord.service

# サーバ再起動時に立ち上がるように設定
systemctl enable supervisord
ベンチマークと負荷試験を実施する
期待通りの性能がでるかApache Benchを利用してベンチマークと負荷試験を実施します。ベンチマークでのスループットも重要ですが、ベンチマークで負荷掛かっている際に、実際にブラウザで自サイトを見て快適に閲覧できるかの観点で確認することが重要です。
またApache Bench側が限界 でサーバの能力を引き出せないことも多いです。2台の端末から同時に負荷を掛け結果がどのように変化する見たり、大規模用のLocust みたいな負荷試験ツールを利用するとよいです。
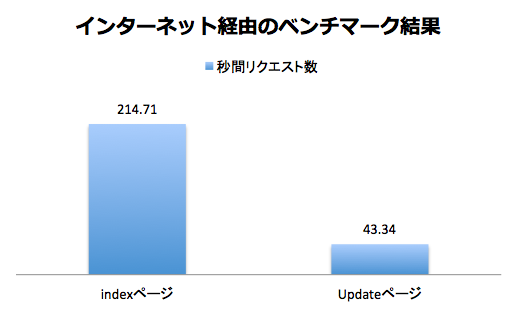
DB UPDATEするviewだと、スループットが伸び悩んでいます。
# 同時100並列で1万回アクセスしてベンチマークを取得
>>> ab -n 10000 -c 100 http://your-site-url/
Server Software:        nginx/1.6.3
Document Length:        43093 bytes

Concurrency Level:      100
Time taken for tests:   46.575 seconds
Complete requests:      10000
Failed requests:        9940
   (Connect: 0, Receive: 0, Length: 9940, Exceptions: 0)
Write errors:           0
Total transferred:      534711748 bytes
HTML transferred:       532891566 bytes
Requests per second:    214.71 [#/sec] (mean)
Time per request:       465.750 [ms] (mean)
Time per request:       4.657 [ms] (mean, across all concurrent requests)
Transfer rate:          11211.59 [Kbytes/sec] received

Connection Times (ms)
              min  mean[+/-sd] median   max
Connect:        2   48 206.2     11    2269
Processing:    41  412 328.4    346   14057
Waiting:       20  173 205.2    135   13702
Total:         46  460 389.5    366   14061
# 同時100並列で1万回アクセスしてベンチマークを取得
>>> ab -n 10000 -c 100 http://your-site-url/update
Server Software:        nginx/1.6.3
Document Length:        52976 bytes

Concurrency Level:      100
Time taken for tests:   230.742 seconds
Complete requests:      10000
Failed requests:        9998
   (Connect: 0, Receive: 0, Length: 9998, Exceptions: 0)
Write errors:           0
Total transferred:      531787037 bytes
HTML transferred:       529967037 bytes
Requests per second:    43.34 [#/sec] (mean)
Time per request:       2307.418 [ms] (mean)
Time per request:       23.074 [ms] (mean, across all concurrent requests)
Transfer rate:          2250.67 [Kbytes/sec] received

Connection Times (ms)
              min  mean[+/-sd] median   max
Connect:        2    3  29.7      2    1207
Processing:   160 2294 219.1   2269    3416
Waiting:      147 2280 217.2   2256    3369
Total:        163 2297 220.9   2271    3684
■ 限界まで負荷を掛けると応答速度は大幅に劣化する結果となった
Time per request: 465.750 [ms] (mean)
1並列実行であればTime per request が 50ms前後ですが、100並列では応答速度が465ms と10倍劣化する結果となりました。
■ ApacheBench のFailed requestsについて
Failed requests: 9998
(Connect: 0, Receive: 0, Length: 9998, Exceptions: 0)
失敗理由がLength になっています。これはサイトのコンテンツ長が一致しているかで判定しています。たとえばサイトのコンテンツを動的に変化させているページでは、コンテンツ長が一致しないため失敗扱いとカウントされてしまいます。
deployコマンドを開発する
手動deploy辛いのでコマンド1つでdeploy出来るようにしました。deploy時の試験には、ページ内のリンク切れ確認を行うテストコード を利用しています。
#!/bin/sh
# エラーなら停止
set -eu

# deploy
echo "deploy start"
ssh -l root conoha "date"
ssh -l root conoha "cd /var/hoge && git pull origin master"
ssh -l root conoha "/usr/bin/supervisorctl -c /etc/supervisord.conf restart gunicorn"
echo "~~~~~~~~~~~~"
echo "deploy finish"
echo "~~~~~~~~~~~~"

# http status check
/hoge/.virtualenvs/env_name/bin/py.test /hoge/tests/tests_deploy.py
echo "~~~~~~~~~~~~"
echo "deploy test finish"
echo "~~~~~~~~~~~~"
HTMLを最適化する
さいごにGoogle DevelopersのPageSpeed Insights でサイトを解析してHTML、CSS、JSのレイヤでページを最適化します。といってもBootstrapといったWebフレームワークを利用していれば、そうそう悪い点数にはならないと思います。

まとめ
平均応答速度50msのサイトを自分のスマホで触ってみると、体感できるレベルで応答が早い!速度は正義だと実感できました。格安でSSDサーバを借りられるなんて良い時代になりましたね。さくらクラウドとConoHaクラウドの値段設定はほぼ同じです。今後も利益が出る範囲で価格競争をして頂ければと思います。
今回は応答速度第一で開発を進めてみました。commit時にローカル環境でApacheBenchが自動で走る設定を組み、応答時間が20msを超えないよう気をつけていました。Flaskは何かと物足りないWebフレームワークなので使っているとあれも足りないこれも足りないとなってしまいましたが、応答速度を考慮しながら足りない機能を追加する過程はパズルみたいで楽しかったです。