もうすぐ正式リリースされるgithub actionsを使ってRailsアプリのCIがそれっぽく組めたので紹介します。
できたyamlは最後に載せています。
ワークフロー構文のドキュメントはこちら。
2021/04 追記
actions/setup-rubyがアーカイブさたため、ruby/setup-rubyを使うように記事を修正しました。
また、その他バージョンアップなど細かな修正を行っています。
実行契機
PUSHの場合に実行します。
ただし、CIを回す必要がないREADMEやDockerfileなどのみ更新した時は動かしたくないのでpaths-ignoreで除外しています。
on:
  pull_request:
    paths-ignore:
      - README.md
      - docs/**
      - Dockerfile
      - docker-compose.yml
チェック内容
RSpecを使って自動テスト、Rubocopを使ってコードの静的解析、Brakemanを使って脆弱性チェックをしています。
一昔前であればrails_best_practiceも入れていたところですが、1年くらい開発が止まっているので外しました。
bundler-auditも昔は入れていましたがgithubがSecurity Alertsを出してくれるようになったので外しました。
3つのチェックをジョブを分けることで並列で実行しています。
jobs:
  rspec:
    ...
  rubocop:
    ...
  brakeman:
    ...
RSpec
実行マシンの設定
まず最初に実行マシンの設定をします。
実行環境には環境変数を3つ設定しています。
RAILS_ENVは言わずもがな。
DB_HOST、DB_PORTは環境変数で設定するとその値を使ってDB接続するようにconfig/database.ymlに記載しています。
2021/04時点でubuntu-latestは20.04になりました。20.04だとMySQL5.7系が正しく動作しないため18.04を指定しています。
  rspec:
    runs-on: ubuntu-18.04
    env:
      RAILS_ENV: test
      DB_HOST: 127.0.0.1
      DB_PORT: 33060
mysqlの設定
DB接続が必要なのでmysqlを立ち上げています。
servicesで立ち上げたコンテナにはホストサーバーからはlocalhostでアクセスできるようです。
ちなみに前述しているDB_HOST: 127.0.0.1はDB_HOST: localhostと書いても良さそうですが、mysqlの仕様でlocalhostだとソケット通信しようとしてしまうので127.0.0.1と指定しています。
portはデフォルトで良かったのですが3306は使われているようでエラーになったので33060にしました。
テスト環境なのでroot/(パスワードなし)
BIND-ADDRESSを設定しないとホストサーバーから接続できないので注意です。
optionsではヘルスチェックを指定しています。
    services:
      db:
        image: mysql:5.7.27
        ports:
          - 33060:3306
        env:
          MYSQL_ALLOW_EMPTY_PASSWORD: yes
          BIND-ADDRESS: 0.0.0.0
        options: --health-cmd="mysqladmin ping" --health-interval=10s --health-timeout=5s --health-retries=3
setup ruby / apt-get
コードのチェックアウト、rubyやライブラリのインストールをします。
以前はactions/setup-rubyが使われていましたが、ruby/setup-rubyが正式版となったのでこちらを使いましょう。
    steps:
    - uses: actions/checkout@v2.3.4
    - name: Set up Ruby 2.7
      uses: ruby/setup-ruby@v1.68.0
      with:
        ruby-version: 2.7.2
        bundler-cache: true
cache
先日github actionsにキャッシュが実装されたのでキャッシュを設定します。
これでyarn installがかなり高速化されます。
細かい設定は公式サイトをご覧ください。
bundlerのキャッシュはruby/setup-rubyが行っているためこちらの指定は不要です。
    - name: Cache node modules
      uses: actions/cache@v2.1.4
      with:
        path: node_modules
        key: ${{ runner.os }}-node-${{ hashFiles('**/yarn.lock') }}
        restore-keys: |
          ${{ runner.os }}-node-
    - name: bundle install
      run: |
        gem install bundler
        bundle install --jobs 4 --retry 3 --path vendor/bundle
    - name: yarn install
      run:  yarn install --check-files
下記のようにキャッシュの有無でかなり実行時間に差が出ます。
・キャッシュなし

・キャッシュあり

migration / rspec
テストDBを生成してRSpecを実行しています。
    - name: migration
      run: |
        bundle exec rails db:create
        bundle exec rails db:test:prepare
    - name: run rspec
      run: bundle exec rspec
Rubocop、Brakeman
Rubocop、Brakemanは静的解析するだけなので、該当するgemだけインストールして実行。
  rubocop:
    runs-on: ubuntu-latest
    steps:
    - uses: actions/checkout@v2.3.4
    - name: Set up Ruby 2.7
      uses: ruby/setup-ruby@v1.68.0
      with:
        ruby-version: 2.7.2
        bundler-cache: true
    - name: run rubocop
      run: |
        gem install rubocop
        rubocop

  brakeman:
    runs-on: ubuntu-latest
    steps:
    - uses: actions/checkout@v2.3.4
    - name: Set up Ruby 2.7
      uses: ruby/setup-ruby@v1.68.0
      with:
        ruby-version: 2.7.2
        bundler-cache: true
    - name: run brakeman
      run: |
        gem install brakeman
        brakeman -6 -A -w 1
結果通知
CIの実行結果を通知して欲しいのでSlack通知を設定しています。
良い記述方法がわからなかったので冗長ですが、成功・失敗の通知ジョブを作っています。
全てのチェックが終わってから通知したいのでneedsに先行ジョブを設定しています。
先行ジョブが1つでも失敗したら後続ジョブは動かないのでsuccess_notifyは全ジョブが成功した時のみ動作します。
failure_notifyはif: failure()をつけているので先行ジョブが1つでも失敗した場合に動作します。
slack通知はマーケットプレイスにあった下記を使いました。
https://github.com/marketplace/actions/slack-notify
細かい設定は公式サイトをご覧ください。
  success_notify:
    needs: [rspec, rubocop, brakeman]
    runs-on: ubuntu-latest
    steps:
    - name: slack notify
      uses: rtCamp/action-slack-notify@v2.1.3
      env:
        SLACK_WEBHOOK: ${{ secrets.SLACK_WEBHOOK }}
        SLACK_MESSAGE: 'Post Content :rocket:'
        SLACK_CHANNEL: ci

  failure_notify:
    if: failure()
    needs: [rspec, rubocop, brakeman]
    runs-on: ubuntu-latest
    steps:
    - name: slack notify
      uses: rtCamp/action-slack-notify@v2.1.3
      env:
        SLACK_WEBHOOK: ${{ secrets.SLACK_WEBHOOK }}
        SLACK_MESSAGE: 'Post Content :rocket:'
        SLACK_CHANNEL: ci
        SLACK_COLOR: '#FF0000'
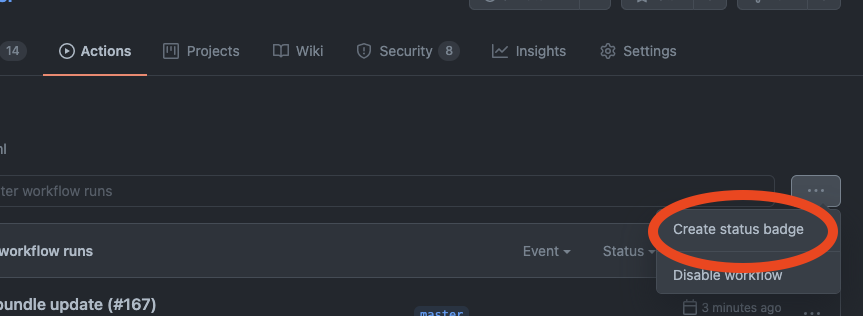
バッジ
せっかくCIを回しているのであればREADMEにバッジをつけたいですよね。
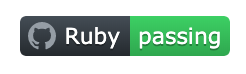
バッジのURLはActionsタブで対象のActionを選び、右上の三点リンクの"Create status badge"で生成できます。
コピーしてREADMEにでも貼っておきましょう。
検証に使ったyaml
name: Ruby

on:
  pull_request:
    branches:
      - 'feature/*'
      - main
    paths-ignore:
      - README.md
      - docs/**
      - Dockerfile
      - docker-compose.yml

jobs:
  rspec:
    runs-on: ubuntu-18.04
    env:
      RAILS_ENV: test
      DB_HOST: 127.0.0.1
      DB_PORT: 33060
    services:
      db:
        image: mysql:5.7.27
        ports:
          - 33060:3306
        env:
          MYSQL_ALLOW_EMPTY_PASSWORD: yes
          BIND-ADDRESS: 0.0.0.0
        options: --health-cmd="mysqladmin ping" --health-interval=10s --health-timeout=5s --health-retries=3
    steps:
    - uses: actions/checkout@v2.3.4
    - name: Set up Ruby 2.7
      uses: ruby/setup-ruby@v1.68.0
      with:
        ruby-version: 2.7.2
        bundler-cache: true
    - name: Cache node modules
      uses: actions/cache@v2.1.4
      with:
        path: node_modules
        key: ${{ runner.os }}-node-${{ hashFiles('**/yarn.lock') }}
        restore-keys: |
          ${{ runner.os }}-node-
    - name: bundle install
      run: |
        gem install bundler
        bundle install --jobs 4 --retry 3 --path vendor/bundle
    - name: yarn install
      run:  yarn install --check-files
    - name: migration
      run: |
        bundle exec rails db:create
        bundle exec rails db:test:prepare
    - name: run rspec
      run: bundle exec rspec

  rubocop:
    runs-on: ubuntu-latest
    steps:
    - uses: actions/checkout@v2.3.4
    - name: Set up Ruby 2.7
      uses: ruby/setup-ruby@v1.68.0
      with:
        ruby-version: 2.7.2
        bundler-cache: true
    - name: run rubocop
      run: |
        gem install rubocop
        rubocop

  brakeman:
    runs-on: ubuntu-latest
    steps:
    - uses: actions/checkout@v2.3.4
    - name: Set up Ruby 2.7
      uses: ruby/setup-ruby@v1.68.0
      with:
        ruby-version: 2.7.2
        bundler-cache: true
    - name: run brakeman
      run: |
        gem install brakeman
        brakeman -6 -A -w 1

  success_notify:
    needs: [rspec, rubocop, brakeman]
    runs-on: ubuntu-latest
    steps:
    - name: slack notify
      uses: rtCamp/action-slack-notify@v2.1.3
      env:
        SLACK_WEBHOOK: ${{ secrets.SLACK_WEBHOOK }}
        SLACK_MESSAGE: 'Post Content :rocket:'
        SLACK_CHANNEL: ci

  failure_notify:
    if: failure()
    needs: [rspec, rubocop, brakeman]
    runs-on: ubuntu-latest
    steps:
    - name: slack notify
      uses: rtCamp/action-slack-notify@v2.1.3
      env:
        SLACK_WEBHOOK: ${{ secrets.SLACK_WEBHOOK }}
        SLACK_MESSAGE: 'Post Content :rocket:'
        SLACK_CHANNEL: ci
        SLACK_COLOR: '#FF0000'