TangoのPointCloudのシェーダーで遊ぼう(前編)の続編です。
最終的な完成形は、こんなイメージ。
pointcloudのモデルに音をつけてみた。tangoでリアルタイムキャプチャしながらBGM音楽をFFT解析してshaderで頂点座標とRGB操作してます。#Tango #SpatialDisco pic.twitter.com/llpphFltZC
— haltyt (@yamaB) 2017年6月17日
現実空間をクラブハウス化するSpatialDisco。楽しすぎて辞められない。#Tango #SpatialDisco pic.twitter.com/HeadF5Dw9h
— haltyt (@yamaB) 2017年6月18日
だいぶ仕上がってきた。スキャンしながら頂点100万でも10FPSぐらいで安定してる。 #Tango #SpatialDisco pic.twitter.com/MuMyKoNSJC
— haltyt (@yamaB) 2017年6月21日
2. PointCloudが保存されるようにする
2-1. TangoDynamicMeshの適用
TangoSDK付属のTangoPointCloudのスクリプトは、カメラ表示エリアが更新されると、一度取得したPointCloudがクリアされるため、例えば部屋全体をスキャンしたい場合には向いていません。ここでは3DReconstructionというGrid単位でPointCloudの生成が行われるしくみを活用したTangoDynamicMeshスクリプトを利用します。
Tango Point Cloud内のTango Point Cloud(Script)を削除して、Add ComponentからTangoSDK付属のTango Dynamic Mesh(Script)を追加します。

Debug情報はこの後別途追加するので、Enable Debug UIはOffにしておきます。
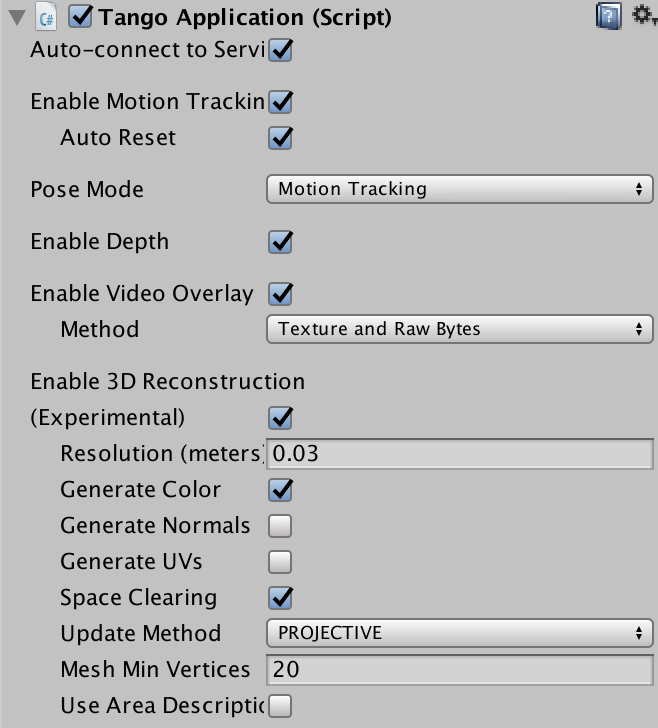
3DReconstructionのWarningが表示されるので、Tango ManagerのEnable 3D ReconstructionをOnにします。

Resolutionはグリッドセルの解像度に値します(0.03の場合は3cmごとにポイント生成される)。解像度が細かいほどCPUやRAMを消費し、パフォーマンスに影響が出るため、適切な値を選択する必要があります。今回はResolutionを0.03に設定。
Generate Colorはカメラ画像のRGB値を取得する場合に必要になります。RGB値を取得する場合は、Enable Video Overlayを有効にして、MethodをRaw BytesまたはTexture and Raw Bytesを選択する必要があります。人物など更新された動的なメッシュ除去を有効にするためにSpace ClearingをOnにします。
※3DRの設定についてはこちらの記事が参考になります。
2-2. TangoDynamicMeshを改良
MeshをPointCloudに変更するためMesh生成用のスクリプトを以下のとおり改変します。
TangoDynamicMesh.csの734行目以下をカスタマイズ
dynamicMesh.m_mesh.Clear();
dynamicMesh.m_mesh.vertices = dynamicMesh.m_vertices;
dynamicMesh.m_mesh.uv = dynamicMesh.m_uv;
dynamicMesh.m_mesh.colors32 = dynamicMesh.m_colors;

// Meshを無効にするためtrianglesは設定しない
//dynamicMesh.m_mesh.triangles = dynamicMesh.m_triangles;

// PointCloud用に頂点数の配列を生成
int[] indices = new int[numVertices];
for (int i = 0; i < numVertices; ++i)
{
	indices[i] = i;
}
// MeshをPointCloudに変更
dynamicMesh.m_mesh.SetIndices(indices, MeshTopology.Points, 0);
MeshTopology.Pointsと設定することでMeshからPointCloud表示に変わります。
2-3. CameraView切り替え
カメラをThirdPersonView、TopDownViewで切り替えできるようにします。
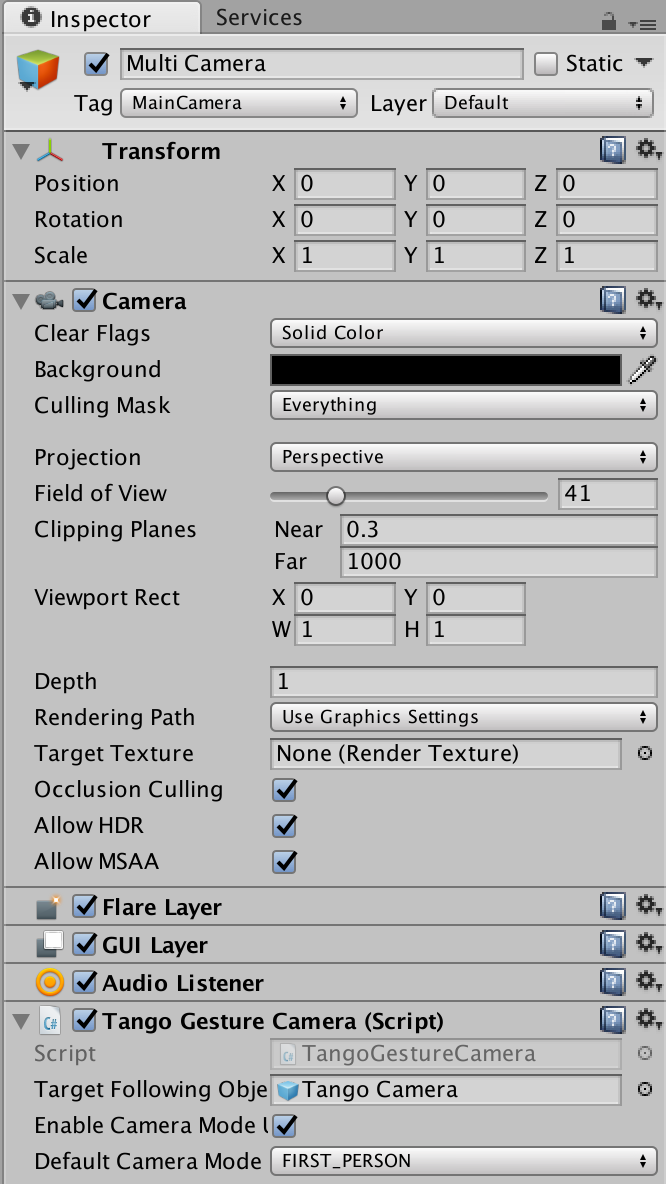
TangoCamera配下にCameraオブジェクトを追加し、名前をMulti Cameraとします。

InspectorのCameraのClear FlagsをSolid Colorに、Backgroundを黒に設定。
CameraのDepthの値を0→1に変更します。これを行わないとカメラを切り替えた際に、切り替えたカメラが前面に現れません。
TangoPrefabからTangoGestureCameraスクリプトを追加します。
Target Following ObjectにHierarchyのTango Cameraをドラッグし、Enable Camera Mode UIをOnにします。

2-4. Debug情報表示
HierachyにGUI Controllerオブジェクトを追加します。

TangoSDK付属のGUI表示用スクリプトPointCloudGUIController.csを改名してGUI Controller.csとしてオブジェクトにAdd Componentし、Tango Pose ControllerにTango Camera、MeshにTango Point Cloudをそれぞれアタッチします。Colorは白を選択します。

public int m_debugTotalMeshVertices;

// Update debug info too.
m_debugTotalVertices = dynamicMesh.m_vertices.Length;
m_debugTotalTriangles = dynamicMesh.m_triangles.Length;

// Update vertex count
m_debugTotalMeshVertices += dynamicMesh.m_vertices.Length;
頂点数をカウントするための変数m_debugTotalMeshVerticesをpublicとします。
//public TangoPointCloud m_pointcloud;
public TangoDynamicMesh m_mesh;

public void OnGUI()
{
	if (m_tangoApplication.HasRequiredPermissions)
	{
		Color oldColor = GUI.color;
		GUI.color = color;

		GUI.Label(new Rect(UI_LABEL_START_X, UI_LABEL_START_Y, UI_LABEL_SIZE_X, UI_LABEL_SIZE_Y),
                      UI_FONT_SIZE + String.Format(UX_TANGO_SERVICE_VERSION, TangoApplication.GetTangoServiceVersion()) + "</size>");

		GUI.Label(new Rect(UI_LABEL_START_X, UI_FPS_LABEL_START_Y, UI_LABEL_SIZE_X, UI_LABEL_SIZE_Y),
                      UI_FONT_SIZE + m_fpsText + "</size>");

		// MOTION TRACKING
		GUI.Label(new Rect(UI_LABEL_START_X, UI_POSE_LABEL_START_Y - UI_LABEL_OFFSET, UI_LABEL_SIZE_X, UI_LABEL_SIZE_Y),
                      UI_FONT_SIZE + String.Format(UX_TARGET_TO_BASE_FRAME, "Device", "Start") + "</size>");

            string logString = String.Format(UX_STATUS,
                _GetLoggingStringFromVec3(m_tangoPoseController.transform.position),
                _GetLoggingStringFromQuaternion(m_tangoPoseController.transform.rotation));

		GUI.Label(new Rect(UI_LABEL_START_X, UI_POSE_LABEL_START_Y, UI_LABEL_SIZE_X, UI_LABEL_SIZE_Y),
                      UI_FONT_SIZE + logString + "</size>");

		//GUI.Label(new Rect(UI_LABEL_START_X, UI_DEPTH_LABLE_START_Y, UI_LABEL_SIZE_X, UI_LABEL_SIZE_Y),
                      UI_FONT_SIZE + "Average depth (m): " + m_pointcloud.m_overallZ.ToString() + "</size>");

		//GUI.Label(new Rect(UI_LABEL_START_X, UI_DEPTH_LABLE_START_Y + (UI_LABEL_OFFSET * 1.0f), UI_LABEL_SIZE_X, UI_LABEL_SIZE_Y),
                      UI_FONT_SIZE + "Point count: " + m_pointcloud.m_pointsCount.ToString() + "</size>");

		//GUI.Label(new Rect(UI_LABEL_START_X, UI_DEPTH_LABLE_START_Y + (UI_LABEL_OFFSET * 2.0f), UI_LABEL_SIZE_X, UI_LABEL_SIZE_Y),
                      UI_FONT_SIZE + "Frame delta time (ms): " + m_pointcloud.m_depthDeltaTime.ToString(UI_FLOAT_FORMAT) + "</size>");

		// 描画頂点数トータル
		GUI.Label(new Rect(UI_LABEL_START_X, UI_DEPTH_LABLE_START_Y + (UI_LABEL_OFFSET * 3.0f), UI_LABEL_SIZE_X, UI_LABEL_SIZE_Y),
				UI_FONT_SIZE + "Vertices count: " + m_mesh.m_debugTotalMeshVertices.ToString() + "</size>");

		GUI.color = oldColor;
	}
}
m_pointcloudの箇所をコメントアウトし、m_meshのm_debugTotalMeshVerticesを表示する箇所を追加します。
3. Shaderをカスタマイズ
PointCloud生成の準備が整いましたので、ここから本題のシェーダーの解説に入ります。
3-1. PointCloudシェーダー解説
まずはTangoSDKのPointCloudシェーダー
Shader "Tango/PointCloud" {
Properties{
        point_size("Point Size", Float) = 5.0
}
  SubShader {
     Pass {
        CGPROGRAM
        #pragma vertex vert
        #pragma fragment frag

        #include "UnityCG.cginc"

        struct appdata
        {
           float4 vertex : POSITION;
        };

        struct v2f
        {
           float4 vertex : SV_POSITION;
           float4 color : COLOR;
           float size : PSIZE;
        };

        float4x4 depthCameraTUnityWorld;
        float point_size;

        v2f vert (appdata v)
        {
           v2f o;
           o.vertex = UnityObjectToClipPos(v.vertex);
           o.size = point_size;

           // Color should be based on pose relative info
           o.color = mul(depthCameraTUnityWorld, v.vertex);
           return o;
        }

        fixed4 frag (v2f i) : SV_Target
        {
           return i.color;
        }
        ENDCG
     }
  }
}
特別なことをしているわけでもなく、注意する点は、PointCloudのサイズを設定して、深度距離に応じて色を調整している箇所です。
o.size = point_size;
o.color = mul(depthCameraTUnityWorld, v.vertex);
depthCameraTUnityWorldはTangoPointCloudスクリプト内で設定した値を参照しています。
m_renderer.material.SetMatrix("depthCameraTUnityWorld", m_mostRecentUnityWorldTDepthCamera.inverse);
3-2. 完成シェーダー
今回作成するシェーダーの全ソースです。
Shader "Custom/VertexColorWave" {
	Properties
	{
		_Speed("Speed", Range(0.01, 10)) = 1
		_TrianglesScale("Triangles Scale", Range(0.01, 10)) = 1
		_RangeScale("Range Scale", Range(0.01, 10)) = 1
		_Center("Center", Vector) = (0.0, -1.0, 3.0, 1.0)
		_Radius("Radius", Range(0.0, 1000)) = 0
		_PointSize("Point Size", Float) = 5.0
		_WaveScaleW("Wave Scale Width", Range(0.0, 1.0)) = 0.1
		_WaveScaleH("Wave Scale Height", Range(0.0, 1.0)) = 0.1
		_WaveDecay("Wave Decay", Range(0.0, 1.0)) = 0.1
		_ZoomScale("Zoom Scale", Range(0.0, 1.0)) = 0.1
		_DiffusionScale("Diffusion Scale", Range(0.0, 1.0)) = 0.1
		_BaseColor ("Base Color", Color) = (0.0, 1.0, 0.0)
		_SpectrumVolume("SpectrumVolume", Range(0.0, 2.0)) = 0.0
	}
	SubShader
	{
		Tags{ "RenderType" = "Opaque" }
		LOD 100

		Pass
		{

		CGPROGRAM
		#pragma vertex vert
		#pragma fragment frag
		#include "UnityCG.cginc"

		#define PI 3.14159265358979

		float _Speed;
		float _TrianglesScale;
		float _RangeScale;
		float4 _Center;
		float _Radius;
		float _PointSize;
		float _WaveScaleW;
		float _WaveScaleH;
		float _WaveDecay;
		float _ZoomScale;
		float _DiffusionScale;
		float _SpectrumVolume;
		float4 _BaseColor;
		float4x4 depthCameraTUnityWorld;

		struct appdata
		{
			float4 vertex : POSITION;
			float2 uv : TEXCOORD0;
			float4 color : COLOR;
			float3 normal : NORMAL;
		};

		struct v2f
		{
			float4 vertex : SV_POSITION;
			float4 uv : TEXCOORD0;
			float4 color: COLOR;
			float size : PSIZE;
		};

		//Wave Effect
		float4 wave(float4 vertex)
		{
			float bend = sin((PI * _Time * 1000 / 45 + length(vertex.xz)) / _WaveScaleW) * _WaveDecay / length(vertex.xz);
			vertex.y += _SpectrumVolume * _WaveScaleH * bend;

			return vertex;
		}

		//Zoom Effect
		float4 zoom(float4 vertex)
		{
			float zoom = _SpectrumVolume * 10;
			vertex.xyz += _ZoomScale * zoom * vertex.xyz;

			return vertex;
		}

		//Diffusion Effect
		float4 diffusion(float3 normal)
		{
			float3 diff = UnityObjectToWorldNormal(normal);
			return float4(diff * _DiffusionScale, 0);
		}

		v2f vert(appdata v)
		{
			//Wave Effect
			v.vertex = wave(v.vertex);

			//Zoom Effect
			v.vertex = zoom(v.vertex);

			//Diffusion Effect
			float4 diff = diffusion(v.normal);

			v2f o;
			//ローカル座標系→ワールド座標系→ビュー座標系→プロジェクション座標系へ変換
			//Transform local coordinate to projection coordinate
			o.vertex = UnityObjectToClipPos(v.vertex);
			o.vertex += diff;

			//ローカル座標系→ワールド座標系へ変換
			//Transform local coordinate to world coordinate
			o.uv = mul(unity_ObjectToWorld, v.vertex);

			o.color = v.color;
			o.size = _PointSize;

			//ローカル座標系→ビュー座標系へ変換
			//Transform local coordinate to view coordinate
			float4 view = mul(UNITY_MATRIX_MV, v.vertex);

			//ビュー座標の深度に応じてPointサイズ変更
			//Change point size based on depth
			//o.size = 20 / fmod(length(mul(depthCameraTUnityWorld, view).xyz), 10);
			//if(o.size > 20)
			//	o.size = 20;

			return o;
		}

		float r(float n)
		{
			return frac(abs(sin(n*55.753)*367.34));
		}

		float r(float2 n)
		{
			return r(dot(n, float2(2.46, -1.21)));
		}

		float3 trianglesColor(float3 pos)
		{
			float variant = _Radius; //_Time.y;

			float a = (radians(60.0));
			float zoom = 0.125;
			float2 c = (pos.xy + float2(0.0, pos.z)) * float2(sin(a), 1.0) / _TrianglesScale;//scaled coordinates
			c = ((c + float2(c.y, 0.0)*cos(a)) / zoom) + float2(floor((c.x - c.y*cos(a)) / zoom*4.0) / 4.0, 0.0);//Add rotations
			float type = (r(floor(c*4.0))*0.2 + r(floor(c*2.0))*0.3 + r(floor(c))*0.5);//Randomize type
			type += 0.3 * sin(variant*5.0*type);

			float l = min(min((1.0 - (2.0 * abs(frac((c.x - c.y)*4.0) - 0.5))),
				(1.0 - (2.0 * abs(frac(c.y * 4.0) - 0.5)))),
				(1.0 - (2.0 * abs(frac(c.x * 4.0) - 0.5))));
			l = smoothstep(0.06, 0.04, l);

			return lerp(type, l, 0.3);
		}


		float3 doMaterial(in float4 vertex, in float4 center, in float4 color)
		{
			float3 pos = vertex.xyz;
			float3 midPos = center.xyz;

			float d = length(pos - midPos);
			d /= _RangeScale;
			float border = fmod(_Time.y * _Speed, _SpectrumVolume * 10);

			// Small rim
			float3 c = float3(1.0, 1.0, 1.0) * smoothstep(border - 0.4, border, d);
			// Small triangle slightly after front
			c += trianglesColor(pos) * smoothstep(border - 0.4, border - 0.6, d);
			// Cutoff front
			c *= smoothstep(border, border - 0.05, d);
			// Cutoff back
			c *= smoothstep(border - 3.0, border - 0.5, d);
			// fade out
			c *= smoothstep(5.0, 4.0, border);

			return color.rgb * 0.7 + _BaseColor * 0.2 + mul(depthCameraTUnityWorld, vertex) * c * 0.3;
		}

		fixed4 frag(v2f i) : SV_Target
		{
			return float4(doMaterial(i.uv, _Center, i.color), 1.0);

		}
		ENDCG
		}
	}
}
下記要点を解説していきます。
3-3. FFT
まずは音源データをフーリエ変換(FFT)して周波数解析するスクリプトを用意します。
UnityでのFFT利用に関してはこちらのブログが詳しいので説明は割愛します。
shader内では以下のスクリプトで取得したスペクトラムデータを参照しています。
GetComponent<AudioSource>().GetSpectrumData(spectrum, 0, FFTWindow.BlackmanHarris);
FFTWindow.BlackmanHarrisは周波数分解能を調節するアルゴリズムに値し、Unityでは他にもいくつか選択肢があるようです。
3-4. Waveform
//Wave Effect
float4 wave(float4 vertex)
{
	float bend = sin((PI * _Time * 1000 / 45 + length(vertex.xz)) / _WaveScaleW) * _WaveDecay / length(vertex.xz);
	vertex.y += _SpectrumVolume * _WaveScaleH * bend;

	return vertex;
}
__SpectrumVolumeは上記FFTで解析した音響スペクトラムのボリューム値。全周波数の合計音量に値します。
__WaveScaleWは波長、_WaveScaleHは振幅、_WaveDecayは波の減衰値に値します。
3-5. Zoom
//Zoom Effect
float4 zoom(float4 vertex)
{
	float zoom = _SpectrumVolume * 10;
	vertex.xyz += _ZoomScale * zoom * vertex.xyz;

	return vertex;
}
音響スペクトラムのボリューム値に応じて頂点座標全体をスケールしています。
_ZoomScaleプロパティで調整できます。
3-6. カスタムリム
波のエフェクト輪郭部分をいい感じに整えます。
以前HoloLens用に書いたshaderを活用しています。
#Hololens spatial mappingのshaderいじってサイバー感を演出 pic.twitter.com/nQX9dVI1tN
— haltyt (@yamaB) 2017年3月3日
HoloLens scanning effect in Unity
shaderの元ネタはこちらのブログを参考にしています。
3-7. PerlinNoise
後日追加予定
3-8. パーティクル拡散
//Diffusion Effect
float4 diffusion(float3 normal)
{
	float3 diff = UnityObjectToWorldNormal(normal);
	return float4(diff * _DiffusionScale, 0);
}
法線ベクトル方向に頂点を拡散しています。
3-9. Pointにテクスチャ反映
Tutorial: Processing Point Cloud Data with Unity
pointcloudにテクスチャを反映する場合は、こちらのブログが参考になります。
pointcloudの形状は四角形ですが、sketchfabのように円形にしたいといった場合、メッシュ上にアルファ付きの円形テクスチャを貼り付けることで実現できそうです。
上記ブログではgeometry shaderを使ってpointcloudの頂点を中心とした法線ベクトル方向に面した三角形の頂点を描画し、そこにテクスチャ反映しています。
※Phab2ProのGPUはSnapdragon652 Adreno510(OpenGL ES3.2)なのでgeometry shader対応してるはずですが、Unityのbuild settingをandroidにするとなぜかビルドできませんでした...
3-10. Bloom
最後にエフェクトをかけるためUnity提供のPostProcessing Assetを適用します。
PostProcessingとはすべてのレンダリングが完了した後に処理されるエフェクトです。
カメラにアタッチすることで最終的なカメラ画像にエフェクトが追加されます。
スクリプト内でOnRenderImageを呼び出すことでレンダリングパイプラインに渡す仕組みになっています。
Unity PostProcessingを使うとBuild時にエラーが発生する。
Shader error in 'Hidden/Post FX/Screen Space Reflection': '' : compilation terminated at line 141 (on vulkan)

Compiling Vertex program
Platform defines: UNITY_ENABLE_REFLECTION_BUFFERS UNITY_PBS_USE_BRDF1 UNITY_SPECCUBE_BOX_PROJECTION UNITY_SPECCUBE_BLENDING SHADER_API_DESKTOP


Shader error in 'Hidden/Post FX/Screen Space Reflection': 'z' : vector field selection out of range at line 141 (on vulkan)

Compiling Vertex program
Platform defines: UNITY_ENABLE_REFLECTION_BUFFERS UNITY_PBS_USE_BRDF1 UNITY_SPECCUBE_BOX_PROJECTION UNITY_SPECCUBE_BLENDING SHADER_API_DESKTOP
vulkanのバグらしく、Unity2017.1ではfix済みとのことでUnityのバージョンを上げて確認したところ、Unity2017.1でBuild後、androidで実行するとエラー発生。原因不明。
その後、Unity5.6.1f1に戻してからPostProcessingを無効にしてBuildすると下記エラー発生
InvalidOperationException: Operation is not valid due to the current state of the object
System.Collections.Stack.Pop () (at /Users/builduser/buildslave/mono/build/mcs/class/corlib/System.Collections/Stack.cs:329)
UnityEngine.GUILayoutUtility.EndLayoutGroup () (at /Users/builduser/buildslave/unity/build/Runtime/IMGUI/Managed/GUILayoutUtility.cs:323)
UnityEditor.HostView.EndOffsetArea () (at /Users/builduser/buildslave/unity/build/Editor/Mono/HostView.cs:190)
UnityEditor.HostView.InvokeOnGUI (Rect onGUIPosition) (at /Users/builduser/buildslave/unity/build/Editor/Mono/HostView.cs:238)
UnityEditor.DockArea.OnGUI () (at /Users/builduser/buildslave/unity/build/Editor/Mono/GUI/DockArea.cs:346)
UnityEditor.HostView:OnGUI()

Error building Player: InvalidOperationException: Operation is not valid due to the current state of the object
解決方法が見つからなかったのでしかたなく再度1からプロジェクトを作成し直す羽目に。。
エラーの原因となっているシェーダーファイル
PostProcessing/Resources/Shaders/ScreenSpaceReflection
を削除して確認したところ、問題なく起動しました。
以上、TangoのPointCloudで色々調査した結果のまとめでした。
TangoSDKは未だ開発段階でDeprecatedが頻繁にあるので、今後UI等変わる可能性大ですが、根本的なしくみは参考になるかと思います。