Alexa でユーザーの自由発話に対して何かしらのロジックで答える Alexa Skill を作る方法です。

サンプルとして以下のような会話をするスキルを作ってみましょう。
ユーザー:「こんにちは」
Alexa:「こんにちはって聞こえたよ」
ユーザー:「合ってる」
Alexa:「合ってるって聞こえたよ」
これができればユーザーの発話に対してどう答えるかをプログラムすることで、雑談対話的なスキルもできるでしょう。
サクサクいけば1時間くらいでできると思います。
用語
Amazon Echo (Alexa) のSkillの開発に必要な基本概念を押さえる あたりを読んでおくとよいです。
- 呼び出し名(Invocation name): そのスキルを呼び出す名前。
- インテント(Intent): そのスキルにたいするユーザーの意図、もしくは実行できるアクションの定義。
- サンプル発話: 各インテントに対して定義する、それを呼び出す発話サンプルの文字列。
- スロット: インテントに渡せる引数。
概要
Alexa Skill を作るには以下の2つの実装(設定)が必要です。
- スキルの各種設定
-
Amazon 開発者コンソールの Alexa スキルから
- 呼び出し名の設定
- インテント、スロット、サンプル発話の設定他
-
Amazon 開発者コンソールの Alexa スキルから
- 対話のバックエンド
-
AWS Lambda 等で
- インテント毎にどのような処理を行うかのロジック
-
AWS Lambda 等で
スキルの各種設定(その1)
Amazon 開発者コンソールの Alexa スキル にアクセスします。
Echo と紐付いている Amazon のアカウントでログインしてください。
「新しいスキルを追加する」から作成します。
スキル情報
- スキルの種類:ただの会話の場合
カスタム対話モデルを選びます。 - 言語:当然日本語
- スキル名:適当に
- 呼び出し名:「アレクサ、ほげほげを開いて」というときのほげほげです。呼び出し名。
対話モデル
ここでは自由発話を聞き取るための対話モデルを作ります。
ちゃんとしたインテントやスロットの仕組み・使い方は Alexaスキル開発トレーニングシリーズ 第2回 対話モデルとAlexa SDK を参照してください。
インテントスキーマ
ユーザーがどのような意図(インテント)の発話を行いうるかの設定です。
下記のようなものを入れます。
{
  "intents": [
    {
      "intent": "DialogueIntent",
      "slots": [
        {
          "name": "utterance",
          "type": "any"
        }
      ]
    },
    {
      "intent": "AMAZON.HelpIntent"
    },
    {
      "intent": "AMAZON.StopIntent"
    },
    {
      "intent": "AMAZON.CancelIntent"
    }
  ]
}
- DialogueIntent: 自分たちで作るオリジナルな インテント (発話意図) です。
- slots: Intent に含まれる変数です。発話内容をまるっと utterance 変数に格納したい気持ちです。
- name: スロットの名前
- type: スロットの型。 any というのは後で自前で定義する型です。
- slots: Intent に含まれる変数です。発話内容をまるっと utterance 変数に格納したい気持ちです。
- AMAZON.***Intent: 元々組み込まれているインテントです。ここに書くことでそれを有効にすることを宣言できます。
- 詳しくは:一般的標準インテント
- これらのインテントはバックエンドで自前でハンドリングしなくても自動で処理される?っぽいです(未確認)
カスタムスロットタイプ
ユーザーの自由発話を受け取るために any というカスタムスロットタイプを作りましょう。
以下の様にいれてください。
- タイプ:
any - 値:
ほげほげ
なぜこれで任意になるのか・・は Alexaで自由テキストをつかむ方法 ー おうむ返しくんの場合 ー を読んで下さい。
サンプル発話
発話例を与えることで Alexa がどのインテントがどのように発話されるかを学習してくれます。
以下のサンプルを入れてください。
書式は [インテント名] 発話例 です。 {} で囲われた値はスロット(変数)になります。
DialogueIntent {utterance}
これによって DialogueIntent は utterance つまり任意の発話がただやってくるんだな・・やってきたのは全部 utterance に突っ込めば良いんだなと学習してくれます。
本来は OshieteIntent {target}について教えて とか言うふうに書いておくと「インコについて教えて」と聞くと OshieteIntent が発火する、のような仕組みを作るためのものです。
設定
- サービスエンドポイントのタイプ: AWS Lambda を使うのが楽なのでそのようにしましょう
- デフォルト: Lambda の arn を入れます。まだ Lambda を作っていないのでいれられません!
この先は Lambda を作るまでは進むことができないので、一旦ここでスキルの各種設定は中断します。
画面の上の方にうっすらスキルの ID が表示されます。これをどこかにコピーしておきましょう。
ID: amzn1.ask.skill.*********** みたいなやつです。
対話のバックエンド
AWS Lambda に行き、関数の作成を行います。
作成
- 関数の作成:一から作成
- 名前:
alexaDialogueClientとか適当なものを。後から変更できないので注意。 - ランタイム: python 3.6
- ロール:適当なものが無ければ「カスタムロールの作成」 -> 特に何もいじらず「許可」
- ただし、 VPC 内のリソースにアクセスしたいなどの場合別途 VPC へのアクセス等を追加する必要があったりします。
以上で作成を押します。
関数の実装
トリガ
- Designer/トリガの追加 から
Alexa Skill Kitをクリック- 下部に「トリガの設定」が現れるので、前章でコピーした「スキルの ID」を貼り付けます。
- 追加をクリック
関数の実装
- Designer のラムダアイコン部分(関数名が書かれてる)をクリック
- 下部に「関数コード」が現れるので以下の内容をコピペ
WELCOME_MESSAGE = 'お話しよう'
BYE_MESSAGE = 'バイバイ'


def dialogue(user_utterance):
    # ここに会話ロジックを書きます。
    # user_utterance: ユーザーの発話内容のテキスト。
    return user_utterance + 'って聞こえたよ'

# --------------- Helpers that build all of the responses ----------------------

def build_speechlet_response(title, output, reprompt_text, should_end_session):
    return {
        'outputSpeech': {
            'type': 'PlainText',
            'text': output
        },
        'card': {
            'type': 'Simple',
            'title': "SessionSpeechlet - " + title,
            'content': "SessionSpeechlet - " + output
        },
        'reprompt': {
            'outputSpeech': {
                'type': 'PlainText',
                'text': reprompt_text
            }
        },
        'shouldEndSession': should_end_session
    }


def build_response(session_attributes, speechlet_response):
    return {
        'version': '1.0',
        'sessionAttributes': session_attributes,
        'response': speechlet_response
    }


# --------------- Functions that control the skill's behavior ------------------

def get_welcome_response():
    """ If we wanted to initialize the session to have some attributes we could
    add those here
    """

    session_attributes = {}
    card_title = "Welcome"
    speech_output = WELCOME_MESSAGE
    reprompt_text = None
    should_end_session = False
    return build_response(session_attributes, build_speechlet_response(
        card_title, speech_output, reprompt_text, should_end_session))


def handle_session_end_request():
    card_title = "Session Ended"
    speech_output = BYE_MESSAGE
    # Setting this to true ends the session and exits the skill.
    should_end_session = True
    return build_response({}, build_speechlet_response(
        card_title, speech_output, None, should_end_session))


def get_dialogue_response(intent, session):
    session_attributes = {}
    reprompt_text = None
    should_end_session = False
    card_title = 'Dialogue'
    user_utterance = intent['slots']['utterance']['value']

    system_utterance = dialogue(user_utterance)

    return build_response(session_attributes, build_speechlet_response(
        card_title, system_utterance, reprompt_text, should_end_session))

# --------------- Events ------------------

def on_session_started(session_started_request, session):
    """ Called when the session starts """

    print("on_session_started requestId=" + session_started_request['requestId']
          + ", sessionId=" + session['sessionId'])


def on_launch(launch_request, session):
    """ Called when the user launches the skill without specifying what they
    want
    """

    print("on_launch requestId=" + launch_request['requestId'] +
          ", sessionId=" + session['sessionId'])
    # Dispatch to your skill's launch
    return get_welcome_response()


def on_intent(intent_request, session):
    """ Called when the user specifies an intent for this skill """

    print("on_intent requestId=" + intent_request['requestId'] +
          ", sessionId=" + session['sessionId'])

    intent = intent_request['intent']
    intent_name = intent_request['intent']['name']
    print('intent:' + str(intent))
    print('session:' + str(session))


    # Dispatch to your skill's intent handlers
    if intent_name == "DialogueIntent":
        return get_dialogue_response(intent, session)
    elif intent_name == "AMAZON.HelpIntent":
        return get_welcome_response()
    elif intent_name == "AMAZON.CancelIntent" or intent_name == "AMAZON.StopIntent":
        return handle_session_end_request()
    else:
        raise ValueError("Invalid intent")


def on_session_ended(session_ended_request, session):
    """ Called when the user ends the session.

    Is not called when the skill returns should_end_session=true
    """
    print("on_session_ended requestId=" + session_ended_request['requestId'] +
          ", sessionId=" + session['sessionId'])
    # add cleanup logic here


# --------------- Main handler ------------------

def lambda_handler(event, context):
    """ Route the incoming request based on type (LaunchRequest, IntentRequest,
    etc.) The JSON body of the request is provided in the event parameter.
    """
    print("event.session.application.applicationId=" +
          event['session']['application']['applicationId'])

    """
    Uncomment this if statement and populate with your skill's application ID to
    prevent someone else from configuring a skill that sends requests to this
    function.
    """
    # if (event['session']['application']['applicationId'] !=
    #         "amzn1.echo-sdk-ams.app.[unique-value-here]"):
    #     raise ValueError("Invalid Application ID")

    if event['session']['new']:
        on_session_started({'requestId': event['request']['requestId']},
                           event['session'])

    if event['request']['type'] == "LaunchRequest":
        return on_launch(event['request'], event['session'])
    elif event['request']['type'] == "IntentRequest":
        return on_intent(event['request'], event['session'])
    elif event['request']['type'] == "SessionEndedRequest":
        return on_session_ended(event['request'], event['session'])
ちなみに Lambda の公式のサンプル(alexa-skills-kit-color-expert-python)をいじったものです。
できたら「保存」をクリックします。
右上に lambda の arn (IDみたいなもの)が表示されているのでコピーします。
arn:aws:lambda:****** みたいなやつです。
スキルの各種設定(その2)
さて、 Lambda ができたので、スキルに Lambda のロジックをつなぎこみます。
設定(続き)
先程の arn をエンドポイントの「デフォルト」欄に貼り付けます。
次へ。
テスト
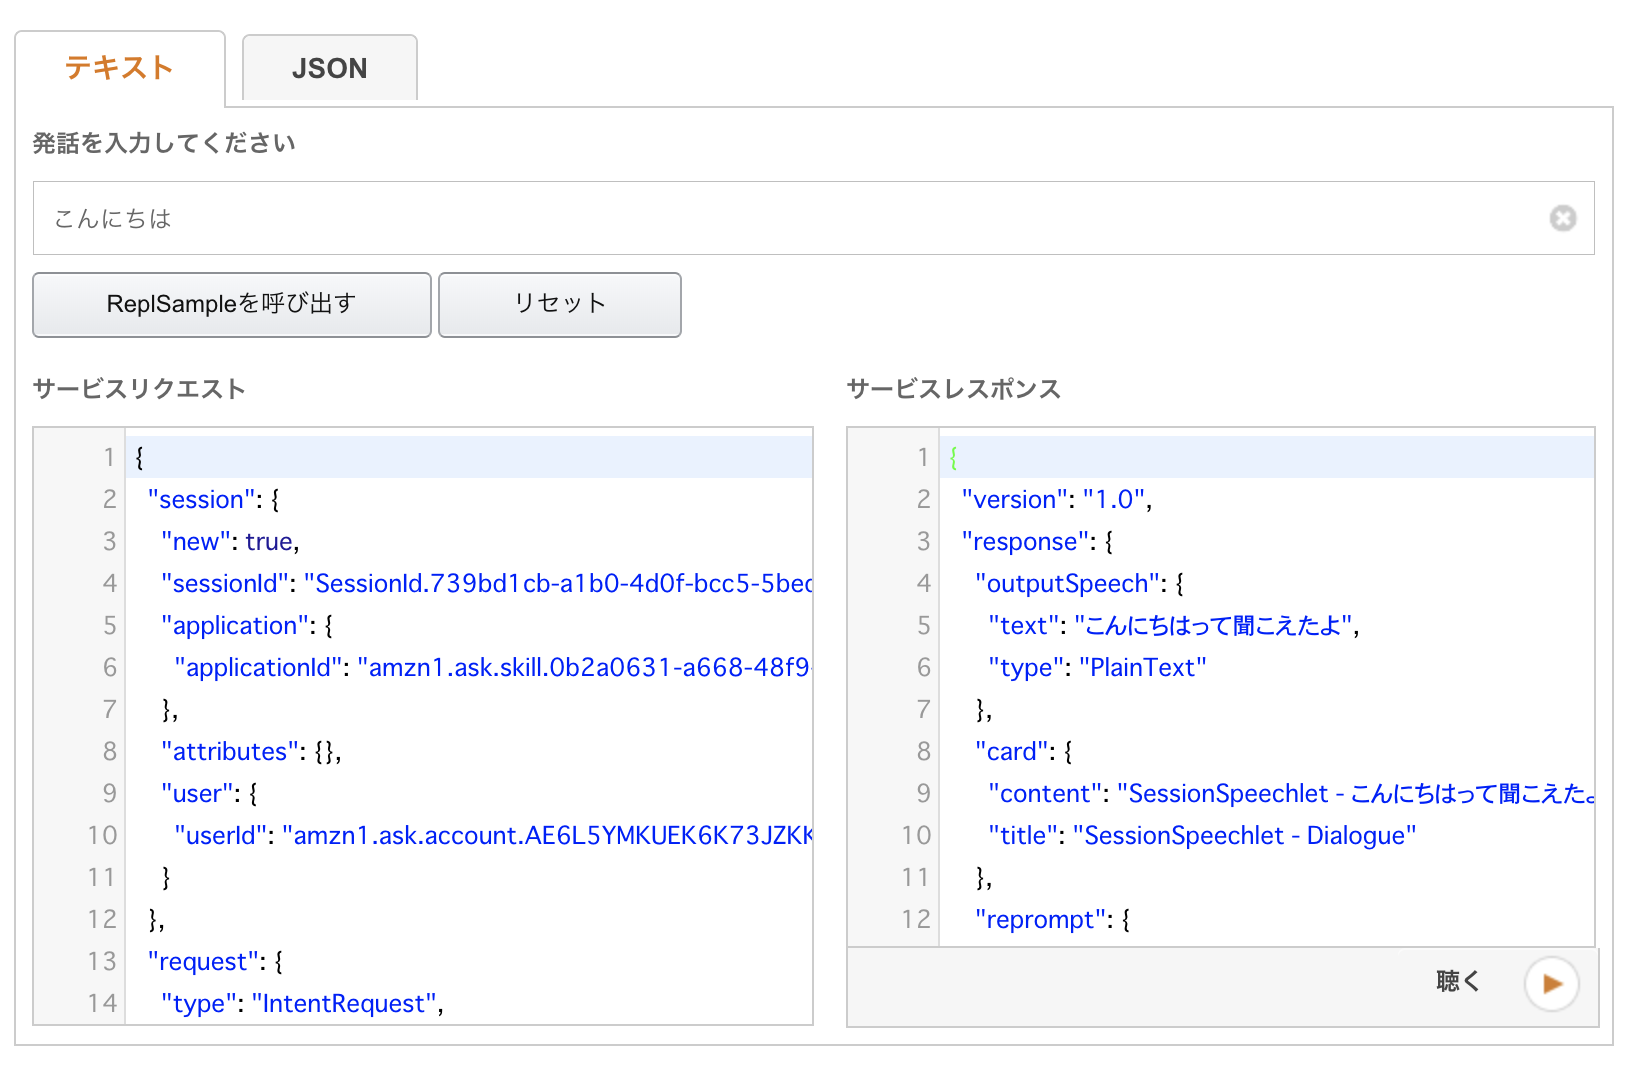
「サービスシミュレーター」のテキストに「こんにちは」などと入れてみましょう。
サービスレスポンスの json の中に「こんにちはって聞こえたよ」と入っていれば OK です!
ここで表示されたサービスリクエストの json はコピーしておきましょう。
あとで会話ロジックを Lambda で修正するときに Lambda 内で完結したテストをするのに便利なのです。

次へ。
公開情報・プライバシーとコンプライアンス
スキルを公開しないでクローズにテストをする場合でも一旦ここは埋めないといけないようです。
てきとうにうめてください。
アイコンは108pxのものと512pxのものを仮で作らないといけません。
作るのが面倒だという人は以下のダミーを使ってください。
108x108なpng
512x512なpng
公開しない場合、申請するは押さないでください。
ベータテスト
左の「スキルのベータテスト」をクリック。
画面の内容を埋めてベータテストを開始します。
ここで Amazon と紐付いたメールアドレスを入力すれば自分以外でもスキルのベータテストに誘うことができます。(後でもできます。)
あとは、メールが送られてくるので開いて Alexa でスキルが有効化されるようしてください。
Alexa で試す
呼び出し名で呼び出してください。例えば「会話マシン」だとしたら、
「アレクサ、会話マシンを開いて」と言えばそのモードになってくれます。
あとは自由発話を楽しみましょう。
ロジックを改修する
Lambda を修正することで任意の会話ロジックを作れます。
Lambda の画面の右上の「テスト」を押すことで、そのロジックをテストできます。
Alexa からの入力の json を与えて、正しい出力をできるかどうかの確認ができます。
入力の json は上の方ででコピーした json を使いましょう。