環境
- Ubuntu 20.04 (AWS)
- node v10.19.0 (npm 6.14.4)
- npm packages
- wrtc 0.4.7 (node-webrtc)
- mkdirp 1.0.4
- chokidar 3.5.2
- dateformat 4.5.1
作ったもの
- WebRTCのデータチャンネルを使って文字列データのやり取りをするサンプル
- オファー側、アンサー側、共に
node.jsで実装、コマンドで実行 - P2Pを始めるまでの情報のやり取りをファイルシステム経由で行っている
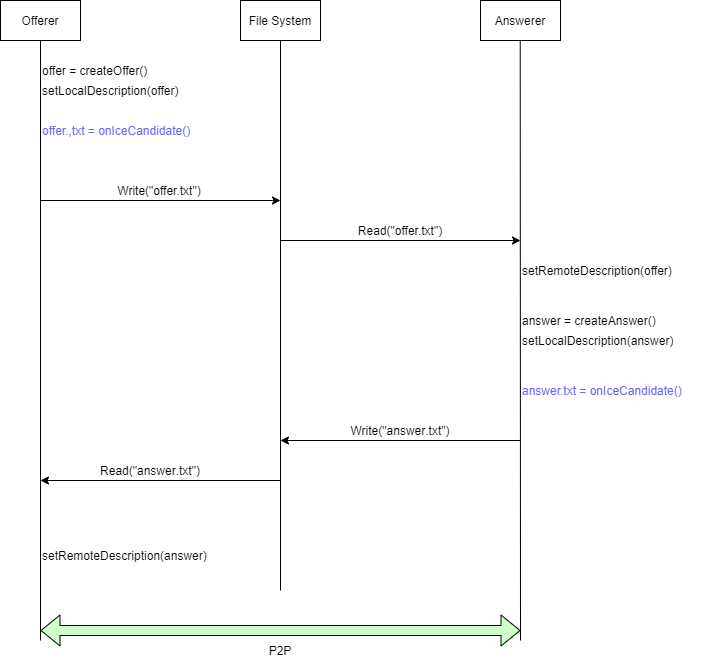
WebRTCでP2P通信をする流れ
- オファー側とアンサー側の2つあったり、イベントハンドラが複数あったりして混乱しがちだが、
-
setLocalDescription()、setRemoteDescription()、createOffer()、createAnswer()の4つのメソッドとonicecandidateイベントハンドラ をおさえれば、通信確立の全体像をつかみやすい - 以下はフローを図にまとめたもの
コード
- 上記のフロー図について、コードのコメントで処理の内容をまとめる
- オファー側とアンサー側でP2P通信を確立する部分に焦点を絞った(全体の流れを俯瞰して理解できる)コードになるように努めた
- イベントハンドラの処理を隠蔽している
- イベントハンドラなどの処理については、、githubのコードで確認できる
オファー側
const RTCPeerConnection = require('wrtc').RTCPeerConnection;
const RTCPeerConnectionUtils = require('./libs/RTCPeerConnectionUtils')
const DataChannelEventListenerForOffer = require('./libs/DataChannelEventListenerForOffer')
const SDPFileForOffer = require('./libs/SDPFileForOffer')

const rtcPeerConnection = new RTCPeerConnection({})
const dataChannelEventListenr = new DataChannelEventListenerForOffer("channel", rtcPeerConnection)
const sdpFile = new SDPFileForOffer();

(async () => {
    console.log("This is OFFERER.")

    // 通信の確立に焦点を当てているため、データチャンネル関連のイベントを隠蔽
    dataChannelEventListenr.listen();

    // シグナリングをファイルでやりとりするための前処理
    await sdpFile.setUp();

    // 経路の候補(ICE Candidates)一覧を取得するプロミスオブジェクトを生成
    const candidates =  [];
    const waitAllCandidates =
        RTCPeerConnectionUtils.createPromiseWaitAllCandidates(rtcPeerConnection, candidates);

    // オファーを作成
    const offer = await rtcPeerConnection.createOffer();

    // オファーを設定(設定するとICE Candidatesのイベントが発火する)
    await rtcPeerConnection.setLocalDescription(offer);

    // 経路の候補(ICE Candidates)一覧がすべて取得できるまで待つ
    await waitAllCandidates;

    // 経路の候補(ICE Candidates)一覧をファイルに書きだす(※1)
    sdpFile.writeOffer(JSON.stringify(candidates));

    // アンサーがファイルに書かれるのを待つ(answer.js側の処理)(※2の処理を待つ)
    const answer = await sdpFile.waitAnswer();

    // アンサー情報を設定(オファーからみてリモート側)
    rtcPeerConnection.setRemoteDescription(answer[answer.length - 1]);
})();
アンサー側
const RTCPeerConnection = require('wrtc').RTCPeerConnection;
const RTCPeerConnectionUtils = require('./libs/RTCPeerConnectionUtils')
const SDPFileForAnswer = require('./libs/SDPFileForAnswer')
const DataChannelEventListenerForAnswer = require('./libs/DataChannelEventListenerForAnswer')

const rtcPeerConnection = new RTCPeerConnection({})
const sdpFileForAnswer = new SDPFileForAnswer();
const dataChannelEventListener = new DataChannelEventListenerForAnswer(rtcPeerConnection);

(async () => {
    console.log("This is ANSWERER.")

    // 通信の確立に焦点を当てているため、データチャンネル関連のイベントを隠蔽
    dataChannelEventListener.listen()

    // シグナリングをファイルでやりとりするための前処理
    await sdpFileForAnswer.setUp();

    // オファーがファイルに書かれるのを待つ(offer.jsの処理)(※1の処理を待つ)
    const offer = await sdpFileForAnswer.waitOffer();

    // オファー情報を設定(アンサーからみてリモート側)
    await rtcPeerConnection.setRemoteDescription(offer[offer.length - 1]);

    // 経路の候補(ICE Candidates)一覧を取得するプロミスオブジェクトを生成
    const candidates =  [];
    const waitAllCandidates =
        RTCPeerConnectionUtils.createPromiseWaitAllCandidates(rtcPeerConnection, candidates);

    // アンサーを作成
    const answer = await rtcPeerConnection.createAnswer();

    // アンサーを設定(設定するとICE Candidatesのイベントが発火する)
    await rtcPeerConnection.setLocalDescription(answer);

    // 経路の候補(ICE Candidates)一覧がすべて取得できるまで待つ
    await waitAllCandidates;

    // アンサーをファイルに書く(※2)
    sdpFileForAnswer.writeAnswer(JSON.stringify(candidates));
})();
ソースコード