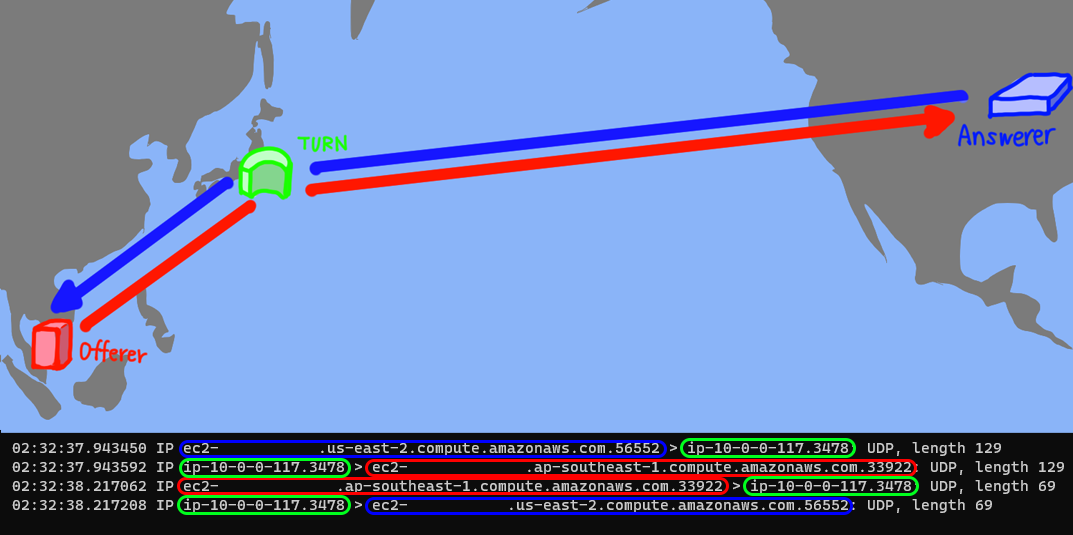
試したこと
- AWSの異なるリージョンに
webRTCのクライアントを設置 - tcpdumpでパケットを確認して、
- TURNサーバーが、パケットをリレーしていることを確認
環境
オファー側
- AWS Region: Singapore
- Linux Ubuntu 20.04
- node-webrtc
- データチャンネルで通信するサンプルを作成 *1
アンサー側
- AWS Region: Ohio
- Linux Ubuntu 20.04
- node-webrtc
- データチャンネルで通信するサンプルを作成 *1
TURNサーバー
- AWS Region: Tokyo
- Linux Ubuntu 20.04
- Coturn-4.5.2
- tcpdump version 4.9.3
データチャンネルで通信するサンプル(node-webrtc) *1
WebRTCのクライアントの設定
-
ブラウザのJavaScriptで実装する場合は、RTCPeerConnectionの第1引数に設定を渡す
-
node-webrtcで実装する場合も、まったく同じなので、かなり実装が簡単 -
TURNサーバーの設定
const rtcPeerConnection = new RTCPeerConnection({
    iceServers: [
        {
        urls: "turn:{TURN Server Global IP}:{Port}",
        username: "username",
        credential: "password"
        }
    ]
});
- TURNサーバーの設定(ICE Candidatesのtypeをrelayだけにする)(必ずTURNサーバーを使うようになるはず)
-
iceTransportPolicy: "relay"を指定 - (2021/9/9 追記)
const rtcPeerConnection = new RTCPeerConnection({
    iceServers: [
        {
        urls: "{TURN Server Global IP}:{Port}",
        username: "username",
        credential: "password"
        }
    ],
    iceTransportPolicy: "relay"
});
- STUNサーバーの設定(今回は無関係)
const rtcPeerConnection = new RTCPeerConnection({
    iceServers: [
        {
        urls: "stun:stun.l.google.com:19302"
        }
    ]
});
TURNサーバーのインストール
- バージョンなどのこだわりがなければ、
aptでインストールできる - 筆者は、ソースからビルドした
sudo apt install coturn
ソースコードからビルドする場合
テスト用にTURNサーバーの設定ファイルを編集(読み飛ばし可能)
- 起動時にコマンドのオプションとしても指定が可能なので、オプションで指定する場合は不要
設定ファイルの準備
-
/usr/local/etc/turnserver.conf.defaultにデフォルト設定があるので、リネームして適当な場所に保存 -
/etc/turnserver.confに配置すると、自動で読み込んでくれそう(2021/9/9 パスが間違っていたので編集)
設定ファイルの設定項目
-
lt-cred-mechのコメントアウトを外してlong-term credential mechanismを有効にする -
no-tlsno-dtlsのコメントアウトを外して、TLSとDTLSを要求しないように設定 -
realmuserlistening-iplistening-portexternal-ipなどを設定する-
userは、Static ユーザーアカウントを設定する、long term credentials mechanismが有効のときに使える
-
/etc/turnserver.conf
# Uncomment to use long-term credential mechanism.
# By default no credentials mechanism is used (any user allowed).
#
lt-cred-mech

# Uncomment if no TLS client listener is desired.
# By default TLS client listener is always started.
#
no-tls

# Uncomment if no DTLS client listener is desired.
# By default DTLS client listener is always started.
#
no-dtls

# The default realm to be used for the users when no explicit
# :
# :
realm=your_organization.jp

# 'Static' user accounts for the long term credentials mechanism, only.
# This option cannot be used with TURN REST API.
# 'Static' user accounts are NOT dynamically checked by the turnserver process,
# so they can NOT be changed while the turnserver is running.
#
user=username:password

# TURN listener port for UDP and TCP (Default: 3478).
# Note: actually, TLS & DTLS sessions can connect to the
# "plain" TCP & UDP port(s), too - if allowed by configuration.
#
listening-port=3478

# Listener IP address of relay server. Multiple listeners can be specified.
# If no IP(s) specified in the config file or in the command line options,
# then all IPv4 and IPv6 system IPs will be used for listening.
#
listening-ip={Local IP}

# For Amazon EC2 users:
#
# TURN Server public/private address mapping, if the server is behind NAT.
# :
# :
external-ip={Global IP}/{Local IP}
コマンド実行
設定ファイルを読み込む場合
- 必要に応じて、
-vで Verbouseを指定してログを確認する -
/etc/turnserver.confを利用 - 大文字のブイ
-Vにするとさらに詳細に確認できる(Extra verbose mode) - Extra verboseにしてもパケットを受け取ったときにリレーする様子のログは表示はされないようだ
sudo turnserver -v
sudo turnserver -V
- 設定ファイルのパスを指定する場合(2021/9/9 編集)
sudo turnserver -c /usr/local/etc/turnserver.conf
設定ファイルで設定しない場合(設定ファイルの項目を読み飛ばした場合)
- 手っ取り早くテストするならば、コマンドのオプションを指定した方が簡単
sudo turnserver --no-tls --no-dtls --lt-cred-mech -u username:password -r your_organization.jp -p 3478 -L {Local IP} -X {Global IP}/{Local IP}
パケットの確認
tcpdump のインストール
- TURNサーバーのLinuxに tcpdump をインストールする
sudo apt install -y tcpdump
TURNサーバーのパケットのモニタリングのコマンド
- TURNサーバー上で、以下の
tcpdumpコマンドを実行 - IPアドレスやポート番号でフィルタリングできるが
- 今回は、UDPでフィルタリングした(他にUDPのパケットが飛んでなさそうなので)
sudo tcpdump udp
- シンガポールからのパケットが、
- 東京のTURNサーバーが受け取り
- USのオハイオにリレーする様子が確認できた
遭遇したエラーメッセージ
- 以下のエラーメッセージが出ていて、
- 本当にTURNサーバーが動いているか気になった
- 以下のリンクによると、ネゴシエーションのプロセスで、発生するとのことだが、理解を深める必要がある
44: : session 000000000000000001: realm <****> user <>: incoming packet message processed, error 401: Unauthorized
401 message is a legitimate message during negotiations.
感想
- 今回、TURNサーバーを設置して、
- NAT配下にある、異なるリージョンにある、複数のEC2インスタンスでWebRTCの通信テストを行い、パケットをモニタリングして、TURNサーバーがパケットをリレーする様子を確認した
- リレーの負荷が高いと推測できるので、負荷対策などを今後、考えていく

