Windows 10でPython使ってOpenpose動かしてみます
初歩的な説明・チュートリアルに書いてる説明は割愛しますのでご了承ください
(OpenPoseのREADMEは内容が頻繁に変更されるので,本記事はあくまで参考程度とお考え下さい)
一応、下のチュートリアルに公式の解説が載っていますが、手順通りで上手くいかない点もありましたので解説します
https://github.com/CMU-Perceptual-Computing-Lab/openpose/blob/master/doc/python_api.md
手順1:OpenPose取得
https://github.com/CMU-Perceptual-Computing-Lab/openpose.git
をCloneします
手順2:pybindの取得
openpose/3rdparty
の中に pybind11というフォルダがあると思いますが、空になっていると思います
そのフォルダを
https://github.com/pybind/pybind11.git
がらcloneしたものに置き換えましょう
手順3:プロジェクトファイル作成(Cmake)
https://github.com/CMU-Perceptual-Computing-Lab/openpose/blob/master/doc/installation/README.md
こちらの「Compiling and Running OpenPose from Source on Windows, Ubuntu, and Mac」の項目に沿って「Compilation」の前まで終わらせてください
私はチュートリアルにもあるように、Cmake GUIを使いました
重要なのが、途中、BUILD_PYTHONにチェックを入れることです
(デフォでチェックが外れています)

手順4:ビルド(Visual Studio使用)
続いて、出来上がったopenpose/buildフォルダの中のOpenPose.slnをVisual Studioで起動します。
私はVisual Studio 2017を使用しました(CMakeで設定したものを使用して下さい)
ここで、一つ注意があります
公式チュートリアルには
CMake-GUI alternative (recommended): Open the Visual Studio solution (Windows), called build/OpenPose.sln. Then, set the configuration from Debug to Release and press the green triangle icon (alternatively press F5).
とありますが、これではPython APIを使うには不十分でした。
(OpenPoseを動かすための最低限のビルドしか行われませんでした)
ですので、Visual Studioの上のツールバーの
ビルド - ソリューションのビルド
を選択して、ビルドを行ってください。
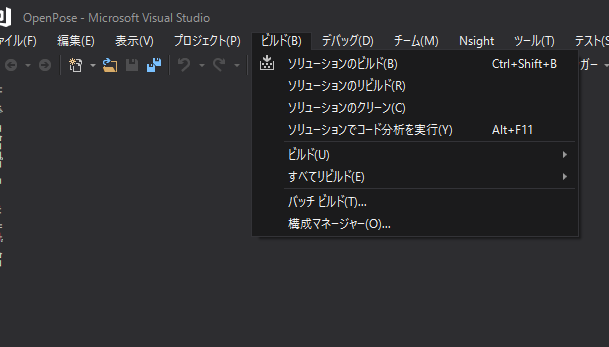
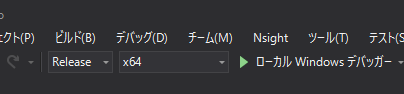
この時、Releaseモードでビルドしましょう
手順5:Pythonモジュールが生成されているか確認
ビルド終了後、
openpose\build\python\openpose\Release
を確認してください。
pyopenpose.cp37-win_amd64.pyd
pyopenpose.exp
pyopenpose.lib
が生成されているかと思います。
(環境によってファイル名が多少違う場合があります。そもそもReleaseフォルダがない場合、何がが間違っています。)
この時、
pyopenpose.cp37-win_amd64.pyd
のcp37はpython 3.7用であるということを示しています。
これを他のpythonバージョンで読み込もうとすると「pyopenpose読み込めないよ」的なエラーが発生するかと思います
ですので
- pythonスクリプト実行時(次の手順)のpyhonバージョンcp○○のものに合わせる
- CMakeの際に指定されるPythonのバージョンを変更する(cp ○○の部分が変わります)
のどちらかを実行する必要があります。
手順6:Pythonファイルの実行
openpose\build\examples\tutorial_api_python
に移動して、適当にサンプルファイルを実行します
(01_body_from_image.py等)
この際、numpyやopencv-pythonが必要になります
前手順で述べたように、Pythonのバージョンにも気を付けてください
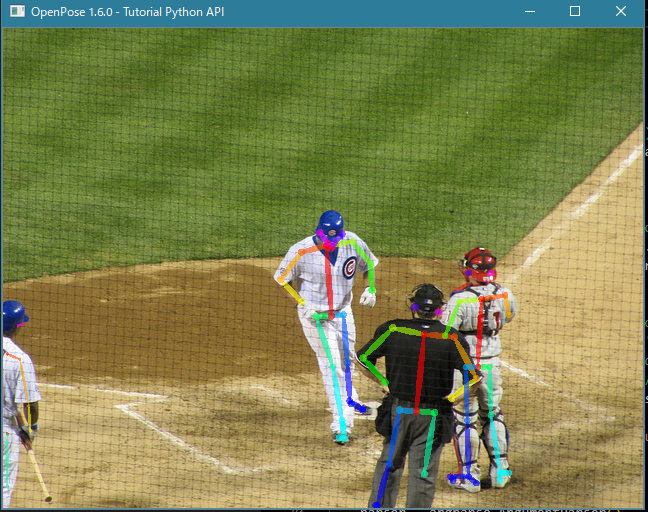
上手くいけば、下のようにサンプル画像での姿勢推定結果が表示されます
Python APIの具体的な内容と使い方は以下で紹介しています
https://qiita.com/hac-chi/items/9afe46be287316e8bb58
番外編:tutorial_api_pythonディレクトリの外でAPIを使用する方法
以下のコードで分るように、buildディレクトリ配下のpythonディレクトリやx64/Releaseディレクトリ、binディレクトリのパス、さらにモデルのパスをしっかり指定(あるいは移動)してあげれば、とこにソースコードがあっても問題なく実行できました
try:
    # Import Openpose (Windows/Ubuntu/OSX)
    dir_path = os.path.dirname(os.path.realpath(__file__))
    try:
        # Windows Import
        if platform == "win32":
            # Change these variables to point to the correct folder (Release/x64 etc.)
            sys.path.append(dir_path + '/../../python/openpose/Release');
            os.environ['PATH']  = os.environ['PATH'] + ';' + dir_path + '/../../x64/Release;' +  dir_path + '/../../bin;'
            import pyopenpose as op
        else:
            # Change these variables to point to the correct folder (Release/x64 etc.)
            sys.path.append('../../python');
            # If you run `make install` (default path is `/usr/local/python` for Ubuntu), you can also access the OpenPose/python module from there. This will install OpenPose and the python library at your desired installation path. Ensure that this is in your python path in order to use it.
            # sys.path.append('/usr/local/python')
            from openpose import pyopenpose as op
    except ImportError as e:
        print('Error: OpenPose library could not be found. Did you enable `BUILD_PYTHON` in CMake and have this Python script in the right folder?')
        raise e

params["model_folder"] = "../../../models/"