こんにちは、SRE所属の @h_amakasu です。
この記事は、All About Group(株式会社オールアバウト) Advent Calendar 2019 23日目の記事です。
GCP を本格的に触るようになって随分たち、リソースがかなり多くなってきました。
将来はさらに増えていくのは確実なので、自動でリスク判定とかできないかなーと思ってたところ、掲題の Security Command Center がGAしたので導入してみました。
本記事では、このSecurity Command Centerと機能拡張(スケジューリング、メール通知)の導入手順をまとめてみました。
これを導入のきっかけにしてもらえれば幸いです。
Security Command Center ってなに?
GCPのセキュリティサービスを統括するサービスで、セキュリティおよびデータリスクを把握するためのリスクデータベースです。
2019年12月時点では導入により Cloud Anomaly Detection, Web Security Scanner, Event Treat Detection 等が標準で有効化され、これらを統一したセキュリティダッシュボードで管理することが可能になります。
また、GCPの他セキュリティサービスである Cloud DLPデータ検出 や Security Health Analytics や、サードパーティのセキュリティソリューションを追加して統合管理することも可能です。
公式が Security Command Center の機能として謳っているのは以下になります。
- クラウド資産のインベントリを表示および監視
- 機密データのスキャン
- 一般的なWebアプリケーションの脆弱性検出
- GCPリソースのアクセス権制御ポリシーの確認と変更検出
- GCPリソース内での異常動作検出(ボットネット、暗号通貨マイニング、異常再起動、疑わしいネットワークトラフィックなどの検出、など)
- 脆弱性への対処方法のアドバイザー
AWSのサービスでは GuardDuty、 Inspector などが近い機能のようです。
[公式サイト]
https://cloud.google.com/security-command-center/?hl=ja
準備するもの
- 組織に紐づいたGCPアカウント
- Cloud-SCC-Tools を展開するためのGCPプロジェクト(1つ)
- SENDGRIDのアカウント
Security Command Center を有効化する
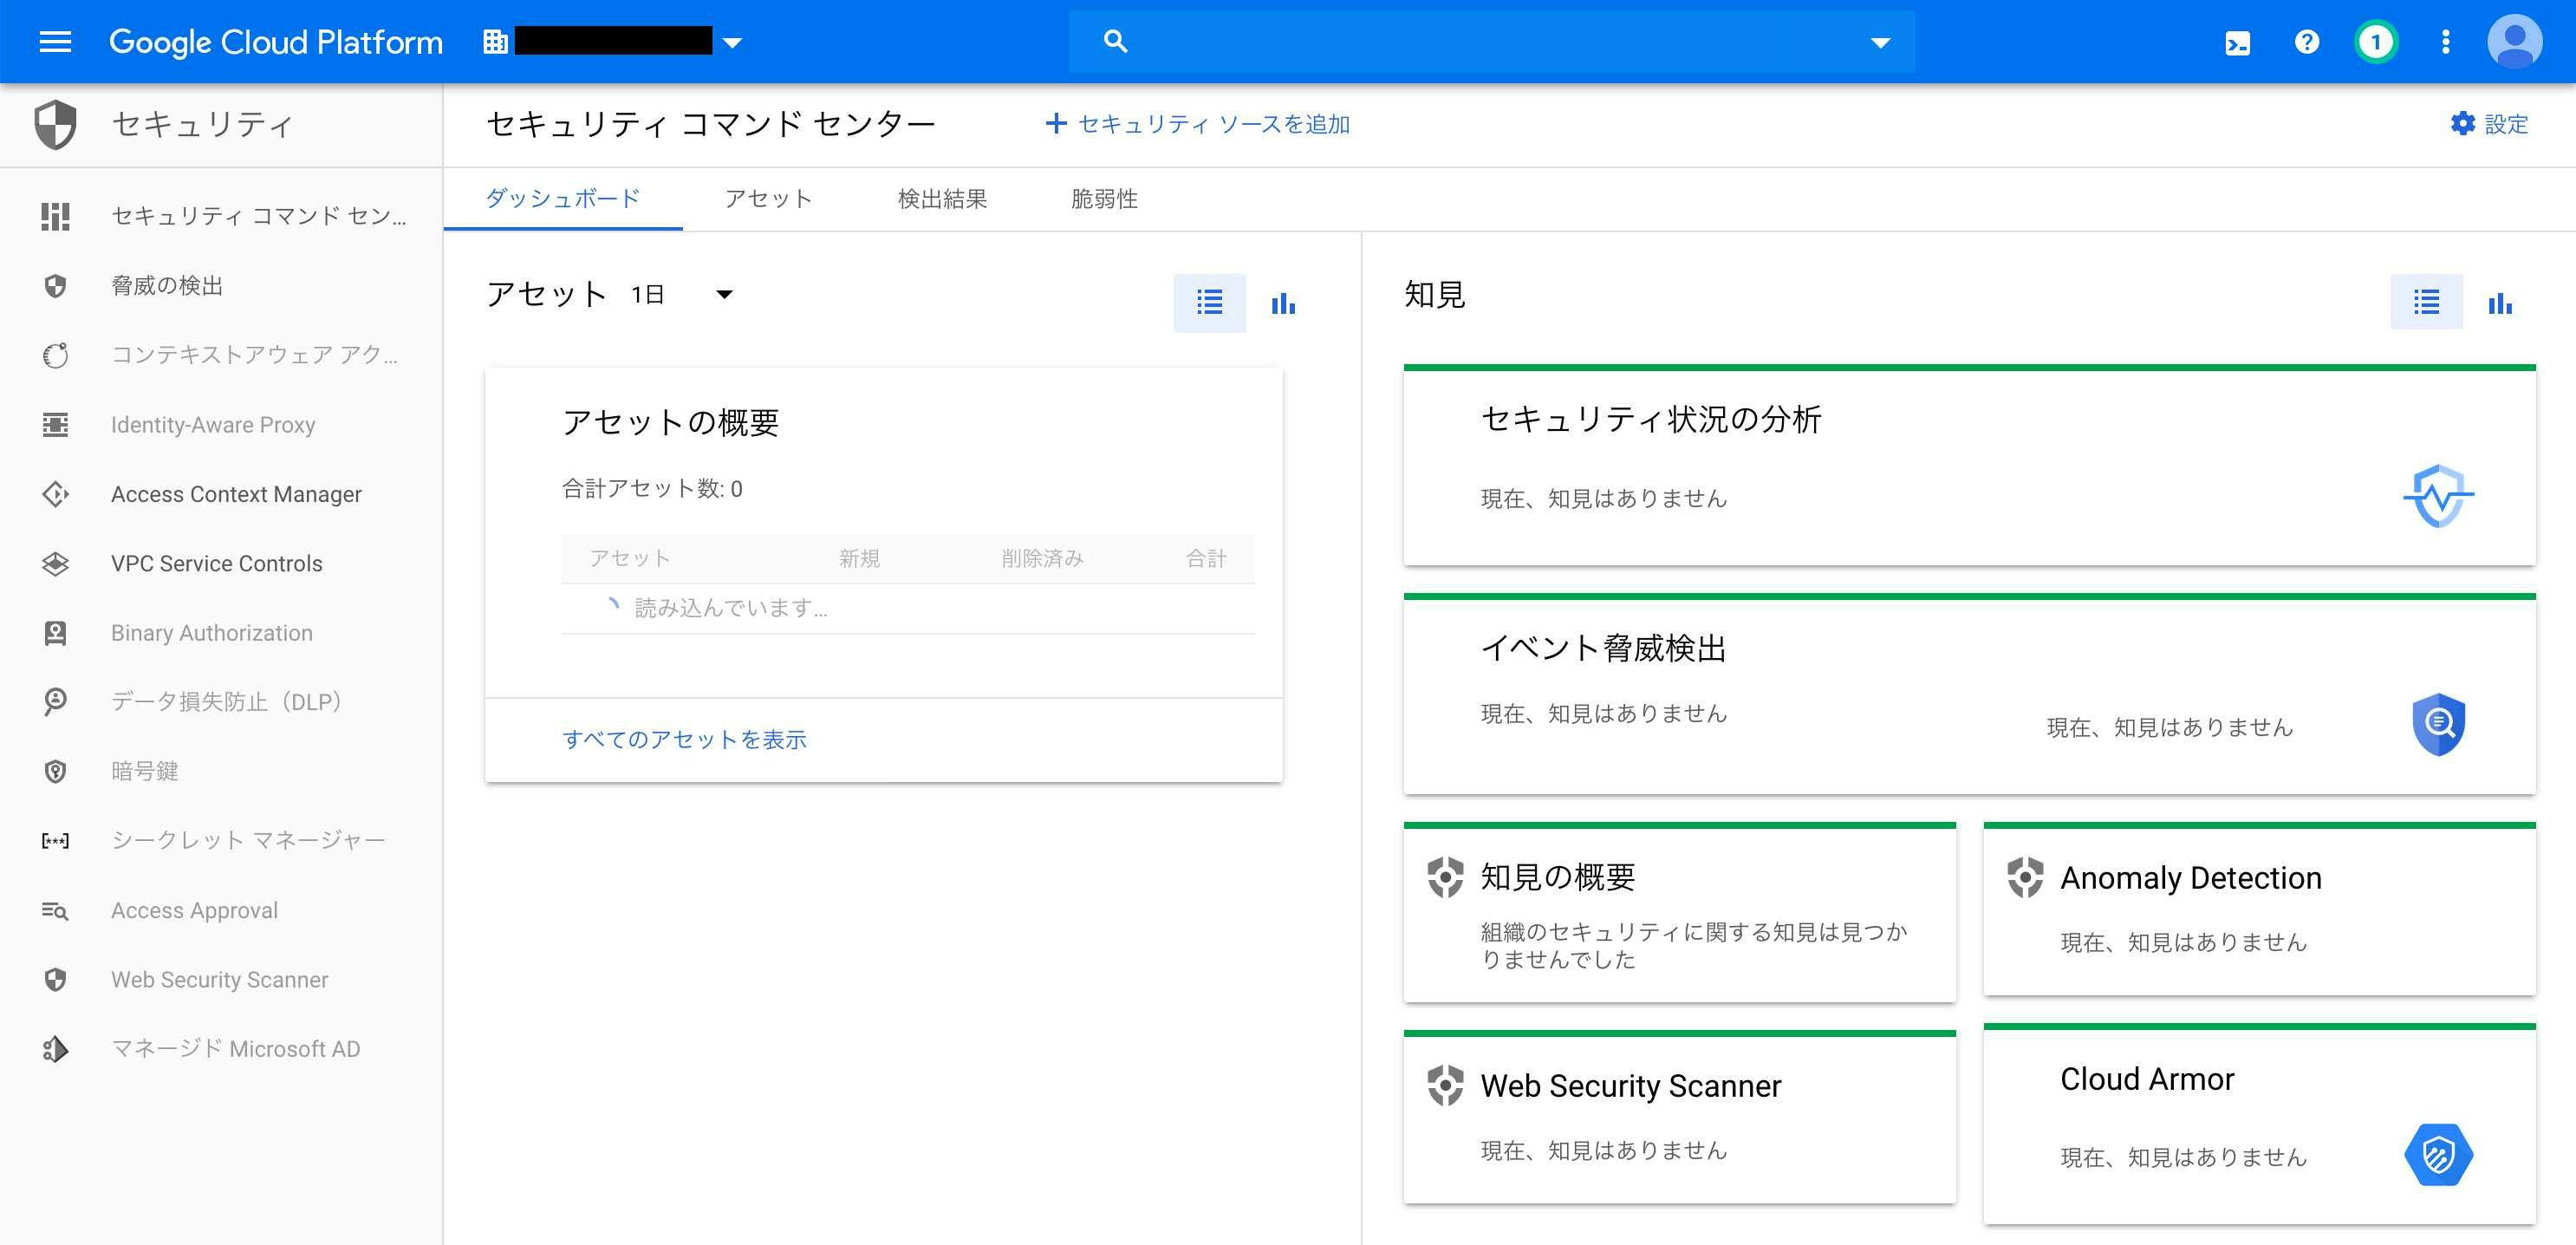
メニューから「セキュリティ」→「セキュリティ コマンドセンター」を選択します。
(組織を選ぶよう促された場合は組織を選択してください)
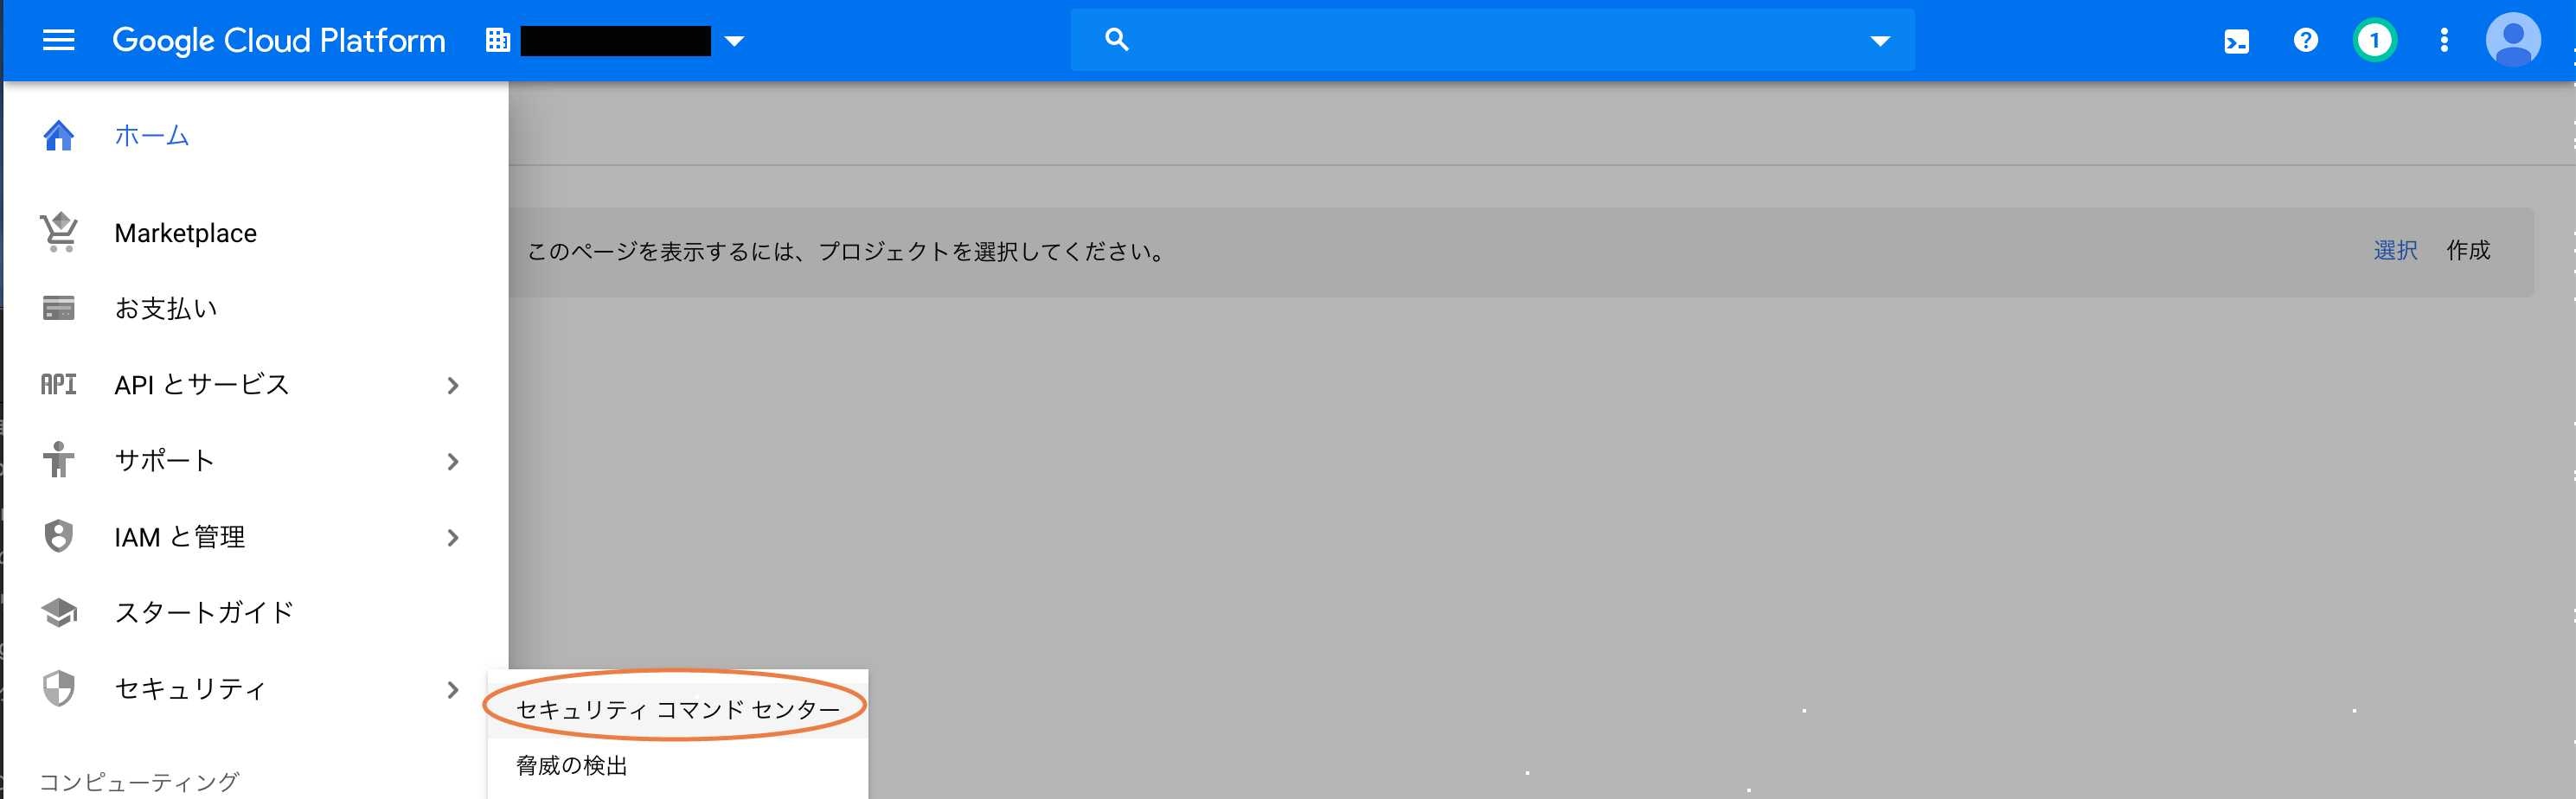
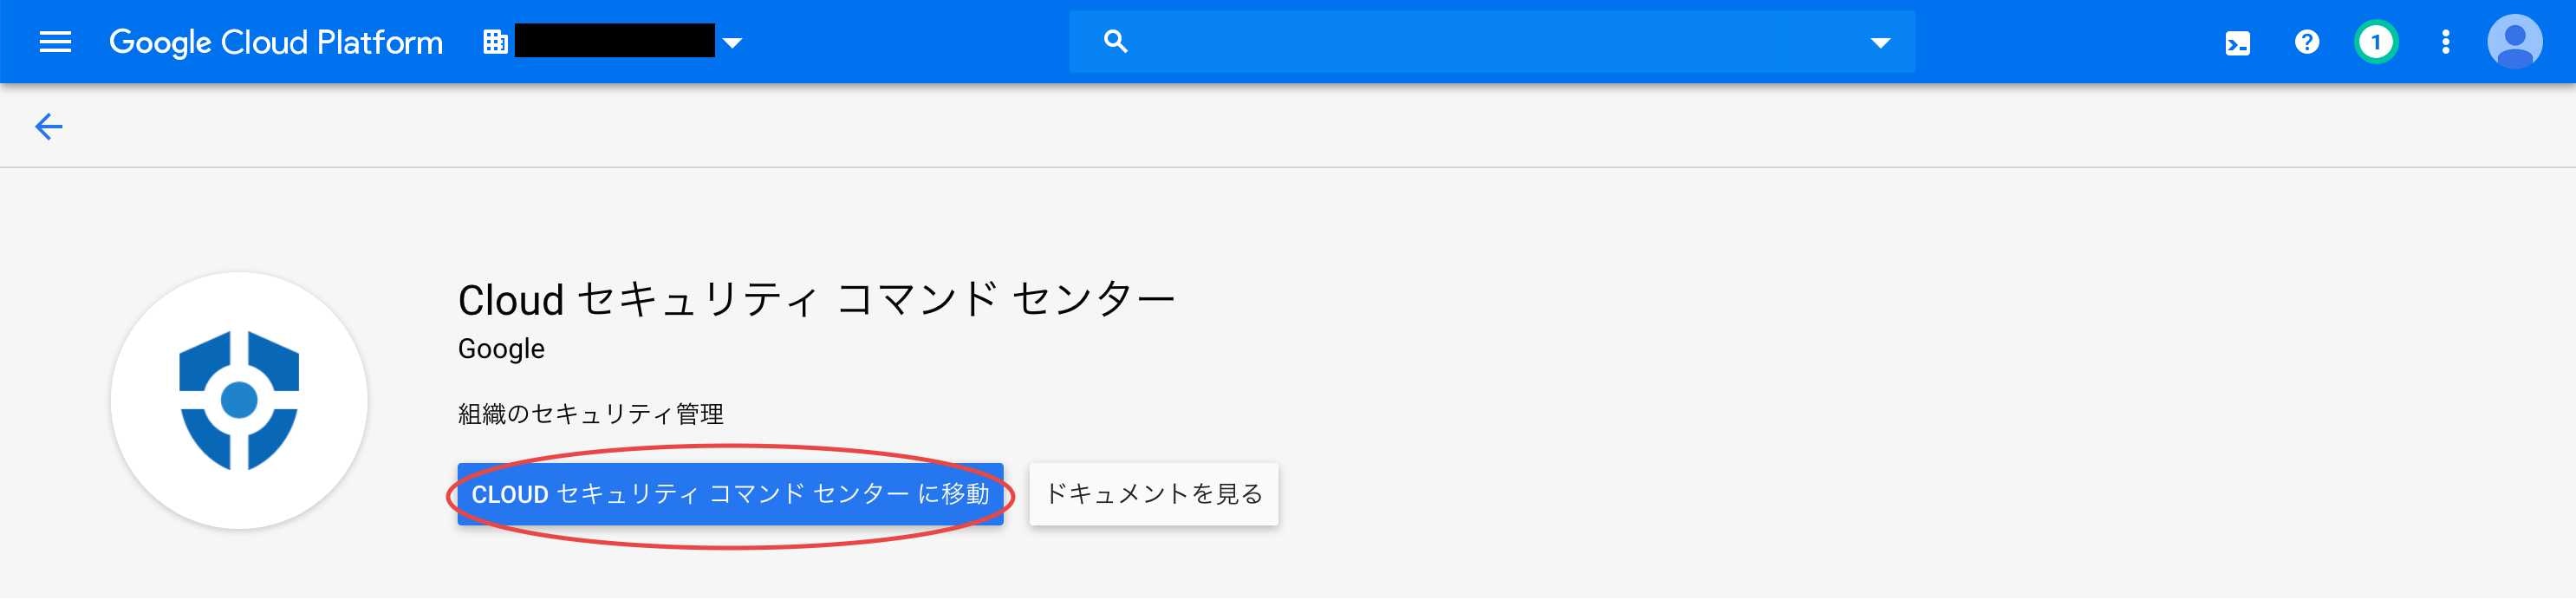
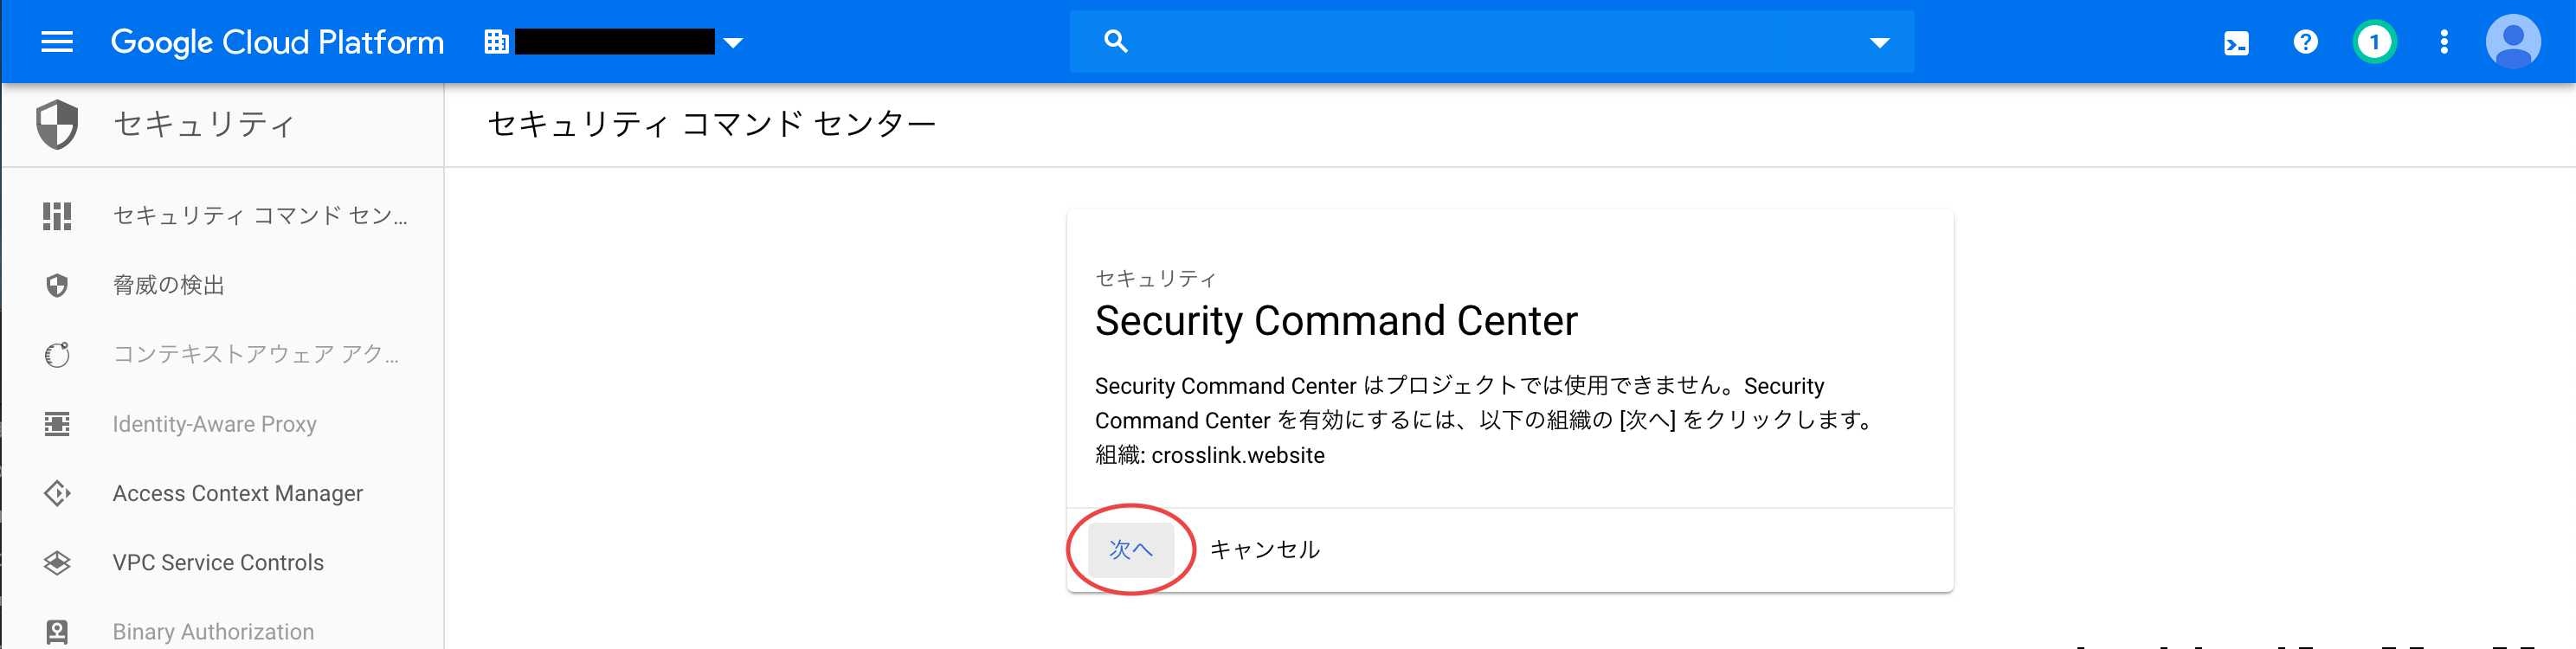
以下、有効化の流れです。
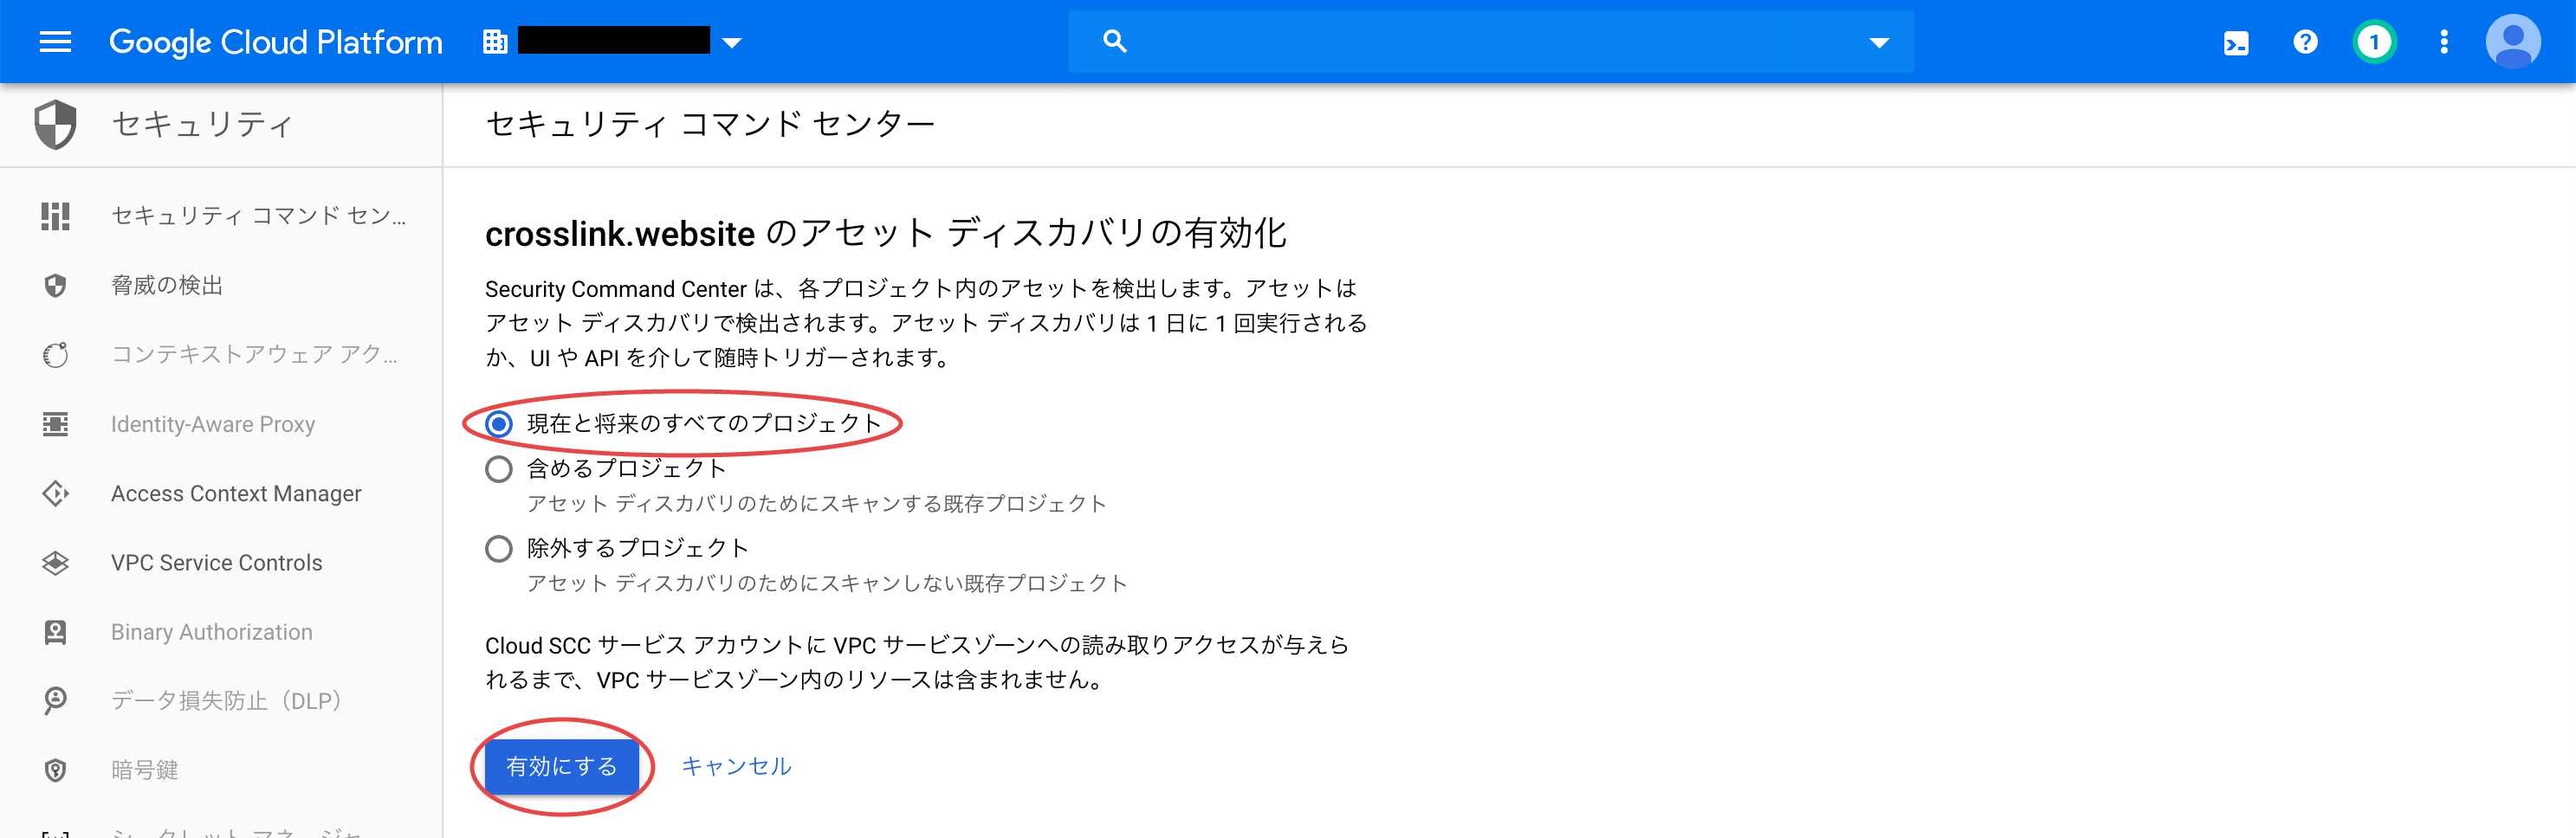
画像のように Security Command Center を有効化します。
今回は、現状と今後全てのプロジェクトが対象となるようにしました。
ただ、有効化するプロジェクトを個別に指定することも可能です。
以上で Security Command Center の導入は完了です。
しばらく時間がたてばアセットの読み込みが完了し、現状の組織やプロジェクトなどがリストアップされます。
Cloud-SCC-Tools を使おう
Security Command Center は便利なのですが、通知機能がありません。
ずっと張り付いて見ているわけには行きませんので、周辺ツールとして提供されている Cloud-SCC-Tools を使い、定期的なスキャンと結果通知の機能を実装します。
Cloud-SCC-Tools は複数の機能がありますが、今回は定期スキャンと通知のみなので Creator と Notifier のみを構築します。
以下は今回構築する Creator と Notifier を含めた Cloud-SCC-Tools の全体関係図となります。
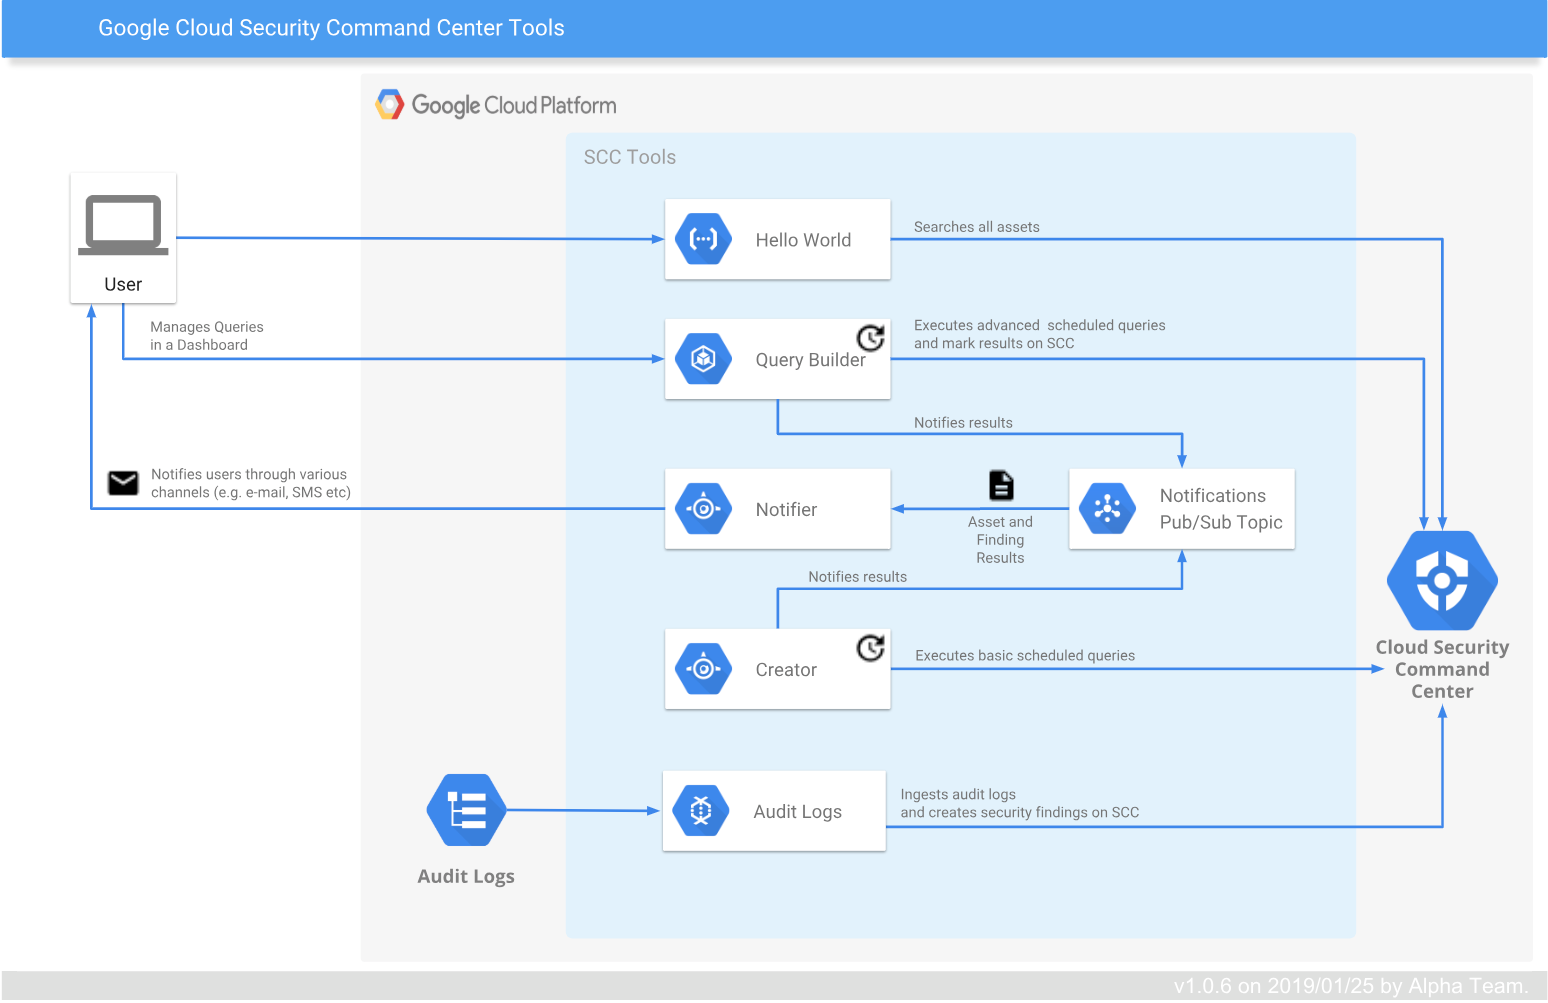
※上記構成図は以下の公式サイトからの引用です。
[公式サイト]
https://cloud.google.com/security-command-center/docs/how-to-cloud-scc-tools?hl=ja
SCC Creator について
以下が SCC Creator のアーキテクチャです。
図の通り、Cloud Scheduler が App Engine で稼働する SCC Creator 経由で Security Command Center の内容を確認させ、結果を Cloud Pub/Sub になげる仕組みです。
 ※上記構成図はドキュメント「scc-creator-README-5.0.7.pdf」から抜粋
SCC Creator のセットアップ
事前準備
以下から構築手順となりますが、構築は Cloud Shell で行います。
Cloud Shell は以下画像の赤枠部分をクリックすれば起動できます。

※Cloud Shellを初期化してからやる場合は、末尾の初期化手順を確認ください。
Cloud-SCC-Tools の入手
いくつかのバージョンが確認できると思いますが、5.0.7以上を推奨します。
(古いバージョンだと動きませんでした)
$ export version=5.0.7
$ export working_dir=${HOME}/scc-tools-install

$ cd ${HOME}

$ gsutil ls gs://cloud-scc-beta-example-apps-download/
$ gsutil cp gs://cloud-scc-beta-example-apps-download/5.0.7-20191029T181827Z-001.zip 5.0.7.zip

$ unzip 5.0.7.zip
$ unzip -qo ${HOME}/5.0.7/scc-creator/scc-creator-${version}.zip -d ${working_dir}

$ echo "export PATH=\${HOME}/.local/bin:\$PATH:$(pwd)" >> ${HOME}/.bashrc
$ export PATH=${HOME}/.local/bin:$PATH:$(pwd)
python3-devとpipenvの設定
$ sudo apt-get install python3-dev
$ pip3 install --user pipenv

$ cd ${working_dir}

$ (cd setup; \
  pipenv --python 3.5.3; \
  pipenv install --ignore-pipfile)
プロジェクト関連の設定
組織IDと Cloud-SCC-Tools を展開するプロジェクト名をそれぞれ指定します。
$ export organization_id=<your_org_id>
$ export creator_project_id=<your_creator_project_id>

$ gcloud config set project ${creator_project_id}
GAE の初期設定
今回の検証ではすべて東京準拠で構築しています。
東京以外の場合は、GAE REGIONの値は読み替えてください。
$ export gae_region=asia-northeast1

$ gcloud app create --region ${gae_region} --project ${creator_project_id}

$ (cd ${working_dir}/setup; \
  python3 ensure_default_service.py \
  --gae_project_id ${creator_project_id})
Google API の有効化
$ gcloud services enable \
  securitycenter.googleapis.com \
  servicemanagement.googleapis.com \
  cloudresourcemanager.googleapis.com \
  appengine.googleapis.com \
  cloudscheduler.googleapis.com \
  compute.googleapis.com \
  pubsub.googleapis.com \
  cloudbuild.googleapis.com \
  storage-component.googleapis.com \
  container.googleapis.com \
  appengineflex.googleapis.com \
  --project ${creator_project_id}
SCC Creator アプリケーション用のサービスアカウントの設定
$ cd ${working_dir}

$ gcloud iam service-accounts create creator-sa \
  --display-name "SCC Tools - Creator Service Account" \
  --project ${creator_project_id}

$ (cd setup; \
  gcloud iam service-accounts keys create \
  service_accounts/creator-sa-${creator_project_id}.json \
  --iam-account creator-sa@${creator_project_id}.iam.gserviceaccount.com)

$ export sa_email=creator-sa@${creator_project_id}.iam.gserviceaccount.com

$ gcloud beta organizations add-iam-policy-binding ${organization_id} \
  --member="serviceAccount:${sa_email}" \
  --role='roles/securitycenter.assetsViewer'

$ gcloud beta organizations add-iam-policy-binding ${organization_id} \
  --member="serviceAccount:${sa_email}" \
  --role='roles/securitycenter.findingsViewer'

$ gcloud projects add-iam-policy-binding ${creator_project_id} \
  --member="serviceAccount:${sa_email}" \
  --role='roles/pubsub.publisher'

$ gcloud projects add-iam-policy-binding ${creator_project_id} \
  --member="serviceAccount:${sa_email}" \
  --role='roles/pubsub.subscriber'

$ gcloud projects add-iam-policy-binding ${creator_project_id} \
  --member="serviceAccount:${sa_email}" \
  --role='roles/pubsub.viewer'

$ (cd setup; \
  export service_account_email=creator-sa@${creator_project_id}.iam.gserviceaccount.com; \
  export output_file=service_accounts/creator-sa-${creator_project_id}.json; \
  gcloud iam service-accounts keys create ${output_file} --iam-account=${service_account_email})
SCC Creator アプリケーション用の GCS バケットの作成
$ export creator_bucket=config-creator-${creator_project_id}
$ export creator_bucket_location=asia-northeast1

$ gsutil mb \
  -p ${creator_project_id} \
  -c regional \
  -l ${creator_bucket_location} \
  gs://${creator_bucket}
SCC Creator アプリケーションのデプロイ
結構時間がかかります。(5分〜10分)
$ export creator_sa_file=${working_dir}/setup/service_accounts/creator-sa-${creator_project_id}.json;

$ (cd setup; \
  pipenv run python3 run_setup_creator.py \
  --organization_id ${organization_id} \
  --creator_project ${creator_project_id} \
  --creator_sa_file ${creator_sa_file} \
  --creator_bucket ${creator_bucket} \
  --version ${version} \
  --no-simulation)
SCC Notifierについて
SCC Notifier のアーキテクチャは以下となります。
Cloud PubSub からメッセージを受け取り、コンフィグ設定に応じて、メール等での通知を行います。
本稿ではSENDGRIDを使ったメール送信を前提に設定します。

※上記構成図はドキュメント「scc-notifier-README-5.0.7.pdf」から抜粋
SCC Notifier のセットアップ
セットアップは SCC Creator の続きから行います。
$ export notifier_project_id=$creator_project_id

$ cd ${HOME}

$ mv scc-tools-install creator-scc-tools-install
$ unzip -qo ${HOME}/5.0.7/scc-notifier/scc-notifier-${version}.zip -d ${working_dir}

$ cd ${working_dir}
Google API の有効化
$ gcloud services enable \
  cloudfunctions.googleapis.com \
  --project ${notifier_project_id}
SCC Notifier アプリケーション用の GCS バケットの作成
$ export notifier_bucket_location=asia-northeast1
$ export notifier_cloud_functions_bucket=cf-notifier-${notifier_project_id}
$ export notifier_bucket=config-notifier-${notifier_project_id}

$ gsutil mb \
  -p ${notifier_project_id} \
  -c regional \
  -l ${notifier_bucket_location} \
  gs://${notifier_cloud_functions_bucket}

$ gsutil mb \
  -p ${notifier_project_id} \
  -c regional \
  -l ${notifier_bucket_location} \
  gs://${notifier_bucket}
SCC Notifier アプリケーションのデプロイ
途中でデプロイの確認がでるので、「y」キーを入力して承認してください。
そのあと、SCC Creator と同様に結構時間がかかります。(5分〜10分)
$ (cd setup; \
  pipenv run python3 run_setup_notifier.py \
  --organization_id ${organization_id} \
  --notifier_bucket ${notifier_bucket} \
  --notifier_cloud_functions_bucket ${notifier_cloud_functions_bucket} \
  --notifier_cloud_functions_bucket_location ${notifier_bucket_location} \
  --notifier_appengine_version ${version} \
  --notifier_project ${notifier_project_id} \
  --no-simulation)
SENDGRID経由でメール通知してみる
導入した SCC Creator と SCC Notifier は利用環境にあわせてコンフィグファイルの修正が必要です。
手順に進む前に、SENDGRIDでAPIキーを取得しておいてください。(送るだけなので権限はMail Sendのみでよいです。)
SCC Creator アプリケーションのコンフィグ設定
初期設定ではデモモードとなっているので、コンフィグを修正して、プロダクションモードに変更します。
(変更しないと Cloud PubSub への通知がされません。)
SCC Creator アプリケーションのコンフィグファイルの更新
GCS にコンフィグファイルが生成されているので、以下コマンドで入手します。
$ gsutil cp gs://${creator_bucket}/creator-config.yaml creator-config.yaml
ダウンロードしたファイルの末尾を以下のように変更 (DEMO から PRODUCTION に)
$ cd ${HOME}
$ vi creator-config.yaml
変更前> mode: DEMO
変更後> mode: PRODUCTION
修正したファイルで GCS のファイルを上書きして完了です。
$ gsutil cp creator-config.yaml gs://${creator_bucket}/creator-config.yaml
SCC Notifier のコンフィグ設定
SCC Notifier のコンフィグファイルの入手
$ gsutil cp gs://${notifier_bucket}/configuration.yaml configuration.yaml
$ vi configuration.yaml
ダウンロードしたファイルのchannels箇所を、以下のようにSENDGRIDと送信先情報に適宜変更します。
〜〜 略 〜〜
channels:
  - name: 'SENDGRID'
    active: 'TRUE'
    properties:
      API_KEY: '**********************************************'
      FROM_EMAIL: 'from@example.com'
      REPLYTO_EMAIL: 'reply@example.com'
〜〜 略 〜〜
さらに同じファイルの下の方にある、users箇所を受信者情報に変更します。
※追加要素がある場合は、propeties以下に記載すればよいようです。
〜〜 略 〜〜
users:
  - email: 'receive@example.com'
〜〜 略 〜〜
SCC Notifier のコンフィグファイルの更新
SCC Creator と同様に GCS 上のコンフィグファイルを上書きすれば更新完了です。
$ gsutil cp configuration.yaml gs://${notifier_bucket}/configuration.yaml
アプリケーション間連携の有効化
SCC Notifier と SCC Creator を Cloud PubSub で連携させます。
$ (cd setup; \
  export notifier_pubsub_path=https://scct-notifier-main-dot-${notifier_project_id}; \
  export notifier_push_endpoint=${notifier_pubsub_path}.appspot.com/_ah/push-handlers/receive_message; \
  pipenv run python3 add_subscription.py \
  --topic_name publish_processing \
  --topic_project ${creator_project_id} \
  --subscription_name publishprocessing-notifier \
  --subscription_project ${notifier_project_id} \
  --push_endpoint ${notifier_push_endpoint})
クエリの追加
SCC Creator が実行するためのクエリを追加します。
クエリは GCS 上のcreator-queries配下にまとめて保存します。
※サンプルクエリ
サンプルクエリが gs://${creator_bucket}/creator-query-samples/samples/ にもあります。
以下のサンプルクエリも含まれていたと思います。
サンプルクエリの作成
$ vi sample.yaml
以下クエリを作成します。(24時間以内に作成されたプロジェクトを検出するクエリです)
---
- name: "find Assets of type PROJECT in the last day."
  joins:
    - field: security_center_properties.resource_name
      kind: ASSET
      order: 1
      type: SINGLE
  steps:
    - kind: ASSET
      order: 1
      duration: 1d
      where: "security_center_properties.resource_type = \"google.cloud.resourcemanager.Project\""
  threshold:
    operator: gt
    value: 0
  topic: "publish_processing"
サンプルクエリのアップロード
$ gsutil cp sample.yaml gs://${creator_bucket}/creator-queries/
ジョブの実行(クエリの実行)
メニューから Cloud Scheduler を呼び出し、以下画像の赤枠から「今すぐ実行」を実施します。

SCC Notifier のコンフィグ設定で指定した受信者のメールアドレスに、以下のような件名でメールが来ます。(本文は長めなので割愛します)
<メール件名>
Query "find Assets of type PROJECT in the last day." returned 1 asset(s) for <project_name> - asset id : organizations/<organizatoin_id>/assets/******** ADDED.
終わりに
Security Command Center の有効化と Cloud-SCC-Tools を使ったスケジューラとメール通知までをまとめてみました。
この Seucurity Command Center を上手く使えば、セキュリティまわりはかなり改善できるシーンがあるんじゃないかと思います。
今回の検証にあたっては、いくつか躓きがあったので一部を以下にまとめます。
上手く行かない場合
Security Command Centerが有効にできない
Security Command Centerは組織アカウントでないと有効にできません。
組織アカウントじゃない場合は、以下の画面で組織の選択から進めません。

Cloud Shell を初期化する
Cloud Shell の環境をいじりすぎて失敗しているんじゃ、、、の場合は、以下手順で初期化できます。
$ sudo rm -rf ~/
上記実施後に、 Cloud Shell の右上メニューから「再起動」を実施します。

Cloud Shell の再起動メニューで「VMの状態をクリーンにしたい」にチェックし、「再起動」で初期化完了です。

セットアップはうまくいったのに動かない
古いバージョンではうまく動作しないようです。(少なくともv5.0.0はNG)
今回の手順で記載した「5.0.7」は動作確認とれてます。
Cloud Schedulerのジョブを変更したら動かなくなった
変更した時に、サービス名が空欄になるので「 scct-creator-main 」を入力する必要があります。
クエリの書き方がわからない
Cloud-SCC-Toolsの導入の際にダウンロードした gs://cloud-scc-beta-example-apps-download/5.0.7-20191029T181827Z-001.zip に含まれている「scc-creator-USER_GUIDE-5.0.7.pdf」に詳しく記載されているので、そちらの参照を推奨します。