概要
ShardingはShardキーの値によってデータを格納するShardを決定して分散化を図ります。
以下のURLに古い資料ですが、日立がShardingの性能評価をした資料(PDF)があります。参考にしてください。
https://www.ospn.jp/osc2016-fall/PDF/OSC2016_TokyoFall_Hitachi.pdf
下記の図は https://docs.mongodb.com/manual/sharding/ からの引用で、Shardingの構成を表しています。
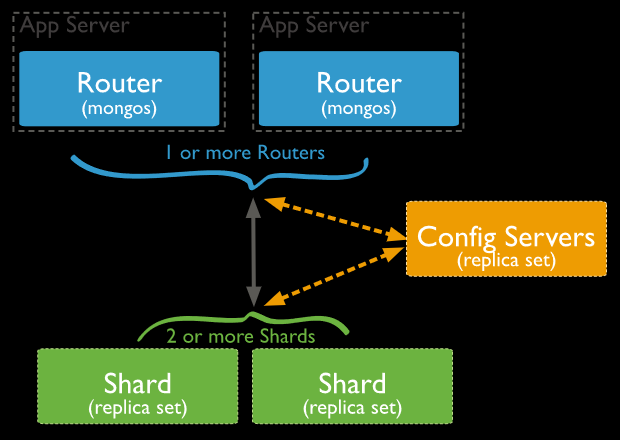
構成要素の解説
- Router
- mongosを使います
- Config Serverにアクセスして、どのShardにアクセスするか決めます
- mongoやアプリケーションはmongosに接続します
- mongosは複数立てられます
- Config Servers
- mongodを使います
- Shardingの設定内容を保持します
- Replica Set構成
- Shard
- mongodを使います
- データを保存します
- Replica Set構成
MongoDBのShardingはReplica Setが基本単位なので、2 Shard構成だと最低9つのmongodを立ち上げ、1つのmongosを立ち上げなければなりません。
「MongoDB スタンドアロンでもReplica Setは有用」で述べたようにReplica Setを1台構成でShardingを構成すると3つのmongodと1つのmongosで簡便に試せます。この構成でShardingを体験してみます。
環境
- Windows10
- MongoDB 4.2.0
初期設定
設定パラメータ値
- Config Servers
- --dbpath confdb
- --port 27019
- --replSet conf
- Shard1
- --dbpath shard1db
- --port 27027
- --replSet shard1Repl
- Shard2
- --dbpath shard2db
- --port 27037
- --replSet shard2Repl
- mongos
- --port 27017
- --configdb conf/localhost:27019
Config Servers
mongod --dbpath confdb --configsvr --replSet conf --port 27019
Replica Set の初期化
mongo --port 27019
> rs.initiate()
{
        "info2" : "no configuration specified. Using a default configuration for the set",
        "me" : "localhost:27019",
        "ok" : 1,
        "$gleStats" : {
                "lastOpTime" : Timestamp(1569565719, 1),
                "electionId" : ObjectId("000000000000000000000000")
        },
        "lastCommittedOpTime" : Timestamp(0, 0),
        "$clusterTime" : {
                "clusterTime" : Timestamp(1569565719, 1),
                "signature" : {
                        "hash" : BinData(0,"AAAAAAAAAAAAAAAAAAAAAAAAAAA="),
                        "keyId" : NumberLong(0)
                }
        },
        "operationTime" : Timestamp(1569565719, 1)
}
conf:SECONDARY>
conf:PRIMARY>
Shard1
mongod --dbpath shard1db --shardsvr --replSet shard1Repl --port 27027
Replica Set の初期化
mongo --port 27027
> rs.initiate()
{
        "info2" : "no configuration specified. Using a default configuration for the set",
        "me" : "localhost:27027",
        "ok" : 1,
        "$clusterTime" : {
                "clusterTime" : Timestamp(1569566184, 1),
                "signature" : {
                        "hash" : BinData(0,"AAAAAAAAAAAAAAAAAAAAAAAAAAA="),
                        "keyId" : NumberLong(0)
                }
        },
        "operationTime" : Timestamp(1569566184, 1)
}
shard1Repl:SECONDARY>
shard1Repl:PRIMARY>
Shard2
mongod --dbpath shard2db --shardsvr --replSet shard2Repl --port 27037
Replica Set の初期化
mongo --port 27037
> rs.initiate()
{
        "info2" : "no configuration specified. Using a default configuration for the set",
        "me" : "localhost:27037",
        "ok" : 1,
        "$clusterTime" : {
                "clusterTime" : Timestamp(1569566273, 1),
                "signature" : {
                        "hash" : BinData(0,"AAAAAAAAAAAAAAAAAAAAAAAAAAA="),
                        "keyId" : NumberLong(0)
                }
        },
        "operationTime" : Timestamp(1569566273, 1)
}
shard2Repl:SECONDARY>
shard2Repl:PRIMARY>
mongos
mongos --configdb conf/localhost:27019 --port 27017
Shardingの設定
Shard1, Shard2をShardingのメンバーとして登録
mongo
mongos> sh.addShard("shard1Repl/localhost:27027")
{
        "shardAdded" : "shard1Repl",
        "ok" : 1,
        "operationTime" : Timestamp(1569566640, 5),
        "$clusterTime" : {
                "clusterTime" : Timestamp(1569566640, 5),
                "signature" : {
                        "hash" : BinData(0,"AAAAAAAAAAAAAAAAAAAAAAAAAAA="),
                        "keyId" : NumberLong(0)
                }
        }
}
mongos> sh.addShard("shard2Repl/localhost:27037")
{
        "shardAdded" : "shard2Repl",
        "ok" : 1,
        "operationTime" : Timestamp(1569566652, 4),
        "$clusterTime" : {
                "clusterTime" : Timestamp(1569566652, 4),
                "signature" : {
                        "hash" : BinData(0,"AAAAAAAAAAAAAAAAAAAAAAAAAAA="),
                        "keyId" : NumberLong(0)
                }
        }
}
mongos>
Sharding設定内容を確認
mongos> sh.status()
--- Sharding Status ---
  sharding version: {
        "_id" : 1,
        "minCompatibleVersion" : 5,
        "currentVersion" : 6,
        "clusterId" : ObjectId("5d8dac1aad5a1dc288287830")
  }
  shards:
        {  "_id" : "shard1Repl",  "host" : "shard1Repl/localhost:27027",  "state" : 1 }
        {  "_id" : "shard2Repl",  "host" : "shard2Repl/localhost:27037",  "state" : 1 }
  active mongoses:
        "4.2.0" : 1
  autosplit:
        Currently enabled: yes
  balancer:
        Currently enabled:  yes
        Currently running:  no
        Failed balancer rounds in last 5 attempts:  0
        Migration Results for the last 24 hours:
                No recent migrations
  databases:
        {  "_id" : "config",  "primary" : "config",  "partitioned" : true }

mongos>
Sharding対象のコレクションを作る
- データベース名:test
- コレクション名:col
- Shardキー名: keyItem
まずはデータベース名testをSharding設定可能にします。
mongo
mongos> sh.enableSharding("test")
{
        "ok" : 1,
        "operationTime" : Timestamp(1569568421, 6),
        "$clusterTime" : {
                "clusterTime" : Timestamp(1569568421, 6),
                "signature" : {
                        "hash" : BinData(0,"AAAAAAAAAAAAAAAAAAAAAAAAAAA="),
                        "keyId" : NumberLong(0)
                }
        }
}
Statusを確認します
mongos> sh.status()
--- Sharding Status ---
  sharding version: {
        "_id" : 1,
        "minCompatibleVersion" : 5,
        "currentVersion" : 6,
        "clusterId" : ObjectId("5d8dac1aad5a1dc288287830")
  }
  shards:
        {  "_id" : "shard1Repl",  "host" : "shard1Repl/localhost:27027",  "state" : 1 }
        {  "_id" : "shard2Repl",  "host" : "shard2Repl/localhost:27037",  "state" : 1 }
  active mongoses:
        "4.2.0" : 1
  autosplit:
        Currently enabled: yes
  balancer:
        Currently enabled:  yes
        Currently running:  no
        Failed balancer rounds in last 5 attempts:  0
        Migration Results for the last 24 hours:
                No recent migrations
  databases:
        {  "_id" : "config",  "primary" : "config",  "partitioned" : true }
                config.system.sessions
                        shard key: { "_id" : 1 }
                        unique: false
                        balancing: true
                        chunks:
                                shard1Repl      1
                        { "_id" : { "$minKey" : 1 } } -->> { "_id" : { "$maxKey" : 1 } } on : shard1Repl Timestamp(1, 0)
        {  "_id" : "test",  "primary" : "shard2Repl",  "partitioned" : true,  "version" : {  "uuid" : UUID("c06ff167-c16c-4a30-944f-7282d4b16db5"),  "lastMod" : 1 } }

mongos>
最終行にtestデータベースの情報で"partitioned" : trueが確認できます。
次にコレクション名colをSharding設定します
mongos> sh.shardCollection("test.col",{keyItem:1})
{
        "collectionsharded" : "test.col",
        "collectionUUID" : UUID("160d1ba8-7d9c-4ce2-b904-c94e1b007d02"),
        "ok" : 1,
        "operationTime" : Timestamp(1569572864, 13),
        "$clusterTime" : {
                "clusterTime" : Timestamp(1569572864, 13),
                "signature" : {
                        "hash" : BinData(0,"AAAAAAAAAAAAAAAAAAAAAAAAAAA="),
                        "keyId" : NumberLong(0)
                }
        }
}
mongos>
mongos> st.status()
~省略~
                test.col
                        shard key: { "keyItem" : 1 }
                        unique: false
                        balancing: true
                        chunks:
                                shard2Repl      1
                        { "keyItem" : { "$minKey" : 1 } } -->> { "keyItem" : { "$maxKey" : 1 } } on : shard2Repl Timestamp(1, 0)
大量(100万件)のテストデータを挿入
データはChunkという単位で管理されます。Chunkのデフォルトサイズは64MBなので少なくとも64MB以上のデータを挿入すればChunkがShard1, Shard2に自動的に振り分けられます。
{
	let docs=[]
	for(let i=0; i< 1000000;i++) {
		let data = Math.random()
		data = Math.floor(data*100000000)
		docs.push({keyItem:data, i: i, text:"aaaaaaaaaaaaaaaaaaaaaaaaaaaaaaaaaaaaaaaaaaaaaaaaaaaaaaaaaaaaa"})
		if (docs.length == 1000) {
			db.col.insert(docs)
			docs = []
		}
	}
	if (docs.length != 0) {
		db.col.insert(docs)
	}
}
Statusを確認します
mongos> sh.status()
~省略~
                test.col
                        shard key: { "keyItem" : 1 }
                        unique: false
                        balancing: true
                        chunks:
                                shard1Repl      2
                                shard2Repl      3
                        { "keyItem" : { "$minKey" : 1 } } -->> { "keyItem" : 206 } on : shard1Repl Timestamp(2, 0)
                        { "keyItem" : 206 } -->> { "keyItem" : 37055477 } on : shard1Repl Timestamp(3, 0)
                        { "keyItem" : 37055477 } -->> { "keyItem" : 73830661 } on : shard2Repl Timestamp(2, 3)
                        { "keyItem" : 73830661 } -->> { "keyItem" : 89707569 } on : shard2Repl Timestamp(2, 4)
                        { "keyItem" : 89707569 } -->> { "keyItem" : { "$maxKey" : 1 } } on : shard2Repl Timestamp(3, 1)
chunkが5個ありshard1,shard2に均等になるように2,3個のchunkがそれぞれ配置されています。keyItemの範囲によってどこのshardに格納されているかが分かります。
**count()**を実行すると実際の挿入件数と合いませんので、全件対象になるように条件を指定して実行します。
mongos> db.col.count()
1370781
mongos> db.col.count({keyItem:{$exists:true}})
1000000
~20分後~
mongos> db.col.count()
1000000
最初の**count()**で正確な値がでないのは、chunkが一杯になり2つのchunkに分割する際chunkをコピーするため、それぞれのchunkで不要なったドキュメントが即時に削除されないためだと思われる。いずれにしても、**count()**は大まかな件数を知るためにだけ使ってください。
終わりに
簡単にとは表題で書きましたが、記事にしてみると結構面倒でした。
今回はさわりだけなので、設定が全てauto設定になっていますが、もちろんChunkの分割やChunkをどのShardに配置するかなど全て手作業でも可能です。
sh.shardCollectionを使わないで作成したコレクションはSharding対象になりませんので通常のコレクションと同じ扱いになります。このtestに作ったコレクションはどこに配置されるかはsh.status()で表示されるtestデータベース情報のprimary項目です。この記事の場合はshard2Replになります。