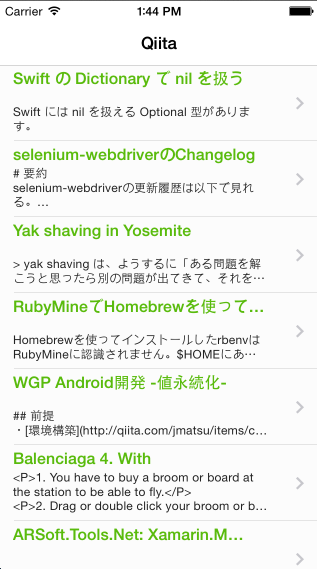
前から気になっていたRestAPI Adapterを触る機会が増えてきて利用方法がなんとなくわかってきたので、QiitaのWebAPIから投稿情報を取得してTableView使って表示するすごく簡易的なビューワーアプリを作ってみました。
自分の環境
- OS X
- 10.9.5
- Titanium SDK
- 3.4.0.GA
- XCode
- 6.0.1
- Node.js
- v0.10.13
- alloy
- 1.4.1
- CoffeeScript
- 1.7.1
開発前の事前準備
Alloy用の RestAPI Sync Adapter の配置
- PROJECT_FOLDER/app/assets配下に、alloyフォルダを作成して、その中にsyncフォルダを作成します
- Alloy用の RestAPI Sync AdapterというのがGitHubにあるのでダウンロードして、上記作成したsyncフォルダに配置します。最終的には、PROJECT_FOLDER/app/assets/alloy/sync/restapi.js
alloy.jmkの準備(任意)
自分はCoffeeScriptで書くことが多いので、PROJECT_FOLDER/app/alloy.jmkを作成して、以下のように記述してます。
task("pre:compile", function(event,logger) {
  logger.info('pre compile start!');
  var wrench = require("wrench"),
      fs = require("fs"),
      path = require("path"),
      controller_root = event.dir.controllers,
      model_root = event.dir.models,
      coffee = require("coffee-script");
  wrench.readdirSyncRecursive(controller_root).forEach(function(controller){
    if (controller.match("coffee$")) {
      fs.writeFileSync(
        path.join(controller_root,controller.replace("coffee", "js")),
        coffee.compile(
          fs.readFileSync(path.join(controller_root, controller)).toString(),
          { bare: true }));
    }
  });

  wrench.readdirSyncRecursive(model_root).forEach(function(model){
    if (model.match("coffee$")) {
      fs.writeFileSync(
        path.join(model_root,model.replace("coffee", "js")),
        coffee.compile(
          fs.readFileSync(path.join(model_root, model)).toString(),
          { bare: true }));
    }
  });
});

task("post:compile",function(event,logger){
  logger.info('compile finish');
});
PROJECT_FOLDER/appのフォルダ構成で関連しそうなところだけ抜粋すると以下のようになります。
├── alloy.jmk
├── alloy.js
├── assets
│   ├── alloy
│   │   └── sync
│   │       ├── restapi.js
│   ├── android
│   ├── blackberry
│   ├── iphone
│   └── mobileweb
├── config.json
├── controllers
│   ├── index.coffee
│   └── index.js
├── models
│   ├── qiita.coffee
│   └── qiita.js
├── styles
│   └── index.tss
└── views
    └── index.xml
実際の開発の流れ
WebAPIと連携するアプリ開発はTitaniumの得意な所かと思うのですが、Alloy用の RestAPI Sync Adapterを使うことで、これまで以上に開発が捗るかと想います。
実際の開発手順を順番に示していきます。
QiitaのWebAPIにアクセスするためのModelの開発
RestAPI Sync Adapterを使うことで、Web APIとの連携処理がだいぶスッキリ書けるようになります。
Alloy用の RestAPI Sync AdapterのHow To Useを見ればおおまかに利用方法がわかるかと思いますがシンプルにアクセスするだけというような状況でしたら
- Web APIのエンドポイントURLを指定
- collection_nameを指定
という所がポイントになります。
今回は、
- Web APIのエンドポイントURL
- collection_name
- qiita
という形にして、app/models/qiita.coffeeを以下のように作成しました。
exports.definition =
  config:
    URL: "https://qiita.com/api/v1/items"
    adapter:
      type: 'restapi'
      collection_name: 'qiita'
    extendModel: (Model) ->
      _.extend Model.prototype, () ->
        return Model

    extendCollection: (Collection) ->
      _.extend Collection.prototype, () ->
        return Collection
注)Modelのファイル名とcollection_nameは同じ形にしておかないとエラーになります。
Controllerを作成
Controllerから上記作成したModelを呼び出すには
qiitaItems = Alloy.createCollection 'qiita'
qiitaItems.fetch
  success: () ->
    # 任意の処理
  error: () ->
    # エラーの時の処理
という形にします。今回は簡易的なビューワーアプリを目指して作ったので、QiitaのWebAPIからパブリックな投稿情報を取得して、TableView使って表示することにしたので以下のようにしました。
$.index.open()

$.activityIndicator.show()
qiitaItems = Alloy.createCollection 'qiita'
qiitaItems.fetch
  success: () ->
    $.activityIndicator.hide()
    _stringify = JSON.stringify(qiitaItems) # 注1
    items = JSON.parse(_stringify)
    return refreshMainMenu items

  error: () ->
    $.activityIndicator.hide()
    Ti.API.info "error"


# Qiitaから取得したデータをTableViewにセットする処理
refreshMainMenu = (items) ->
  rows = []
  for item in items
    Ti.API.info item.title

    row = $.UI.create "TableViewRow",
      classes: "itemRow"
      data: item

    titleLabel = $.UI.create "Label",
      text:item.title
      classes: "titleLabel"

    bodyLabel = $.UI.create "Label",
      text:item.raw_body
      classes: "body"

    row.add titleLabel
    row.add bodyLabel
    rows.push row

  return $.mainMenu.setData rows
注1
本来はstringify→parseは全く意味がない処理なんですが、restapi Adapter使うと何故かわからないのですが、JSONのパース処理でエラーになります。
何か不要な文字か制御コードが含まれているようなのですがJSON.stringifyで文字列化して、その文字列化したものをJSON.parseすることで回避できます。
Viewの生成
取得した投稿情報を表示するためにXMLとTSSを以下のように準備しました。
index.xml
<Alloy>
  <TabGroup>
    <Tab id="tabOne">
      <Window id="mainWindow" class="container" title="Qiita">
        <ActivityIndicator id="activityIndicator" message="Loading.." />
        <TableView id="mainMenu" />
      </Window>
    </Tab>
  </TabGroup>
</Alloy>
index.tss
"#mainWindow":{
    statusBarStyle:0,
    translucent:false,
    navTintColor:"#0066ff",
    backgroundColor:"#fcfcfc",
    tabBarHidden:true
}
"#mainMenu":{
    backgroundColor:"#fcfcfc",
    separatorColor: '#cccccc',
    width:Ti.UI.FULL,
    height:Ti.UI.FULL,
    left:0,
    top:0,
    zIndex:1

}

"#activityIndicator":{
    top:"50%",
    left:"20%",
    textAlign:'center',
    backgroundColor:"#222",
    font:{
        fontSize:18
    },
    color:'#fff',
    zIndex:10
}

".itemRow":{
    width:Ti.UI.FULL,
    height:"15%",
    hasChild:true,
    backgroundColor:"#fcfcfc"
}

".titleLabel":{
    width:"90%",
    height:"20%",
    top:"5%",
    left:"5%",
    textAlign:'left',
    color:'#59BB0C',
    font:{
        fontWeight:'bold',
        fontSize:16
    }

}
".body":{
    width:"90%",
    height:"70%",
    top:"25%",
    left:"5%",
    textAlign:'left',
    color:'#222',
    font:{
        fontSize:12
    }

}
最後に
QiitaのようなWeb APIや、Titaniumの開発元が提供してるACSと連携するようなアプリ開発をする場合のサーバーとの通信部分の処理でAlloy+napp.alloy.adapter.restapiを使うことですごくスッキリ書けるように思います。
投稿数を絞って取得したい場合にはクエリーパラーメーターを付与する必要があるのですが、その辺りについてはまた別の機会に書きたいと思います。