はじめに
前回、MediaPipeを用いて静止画から手の座標取得を行うという記事を投稿しました。
ありがたい事にカメラからリアルタイムでの座標取得を行いたいというコメントを頂きましたので、公式ドキュメントに記載のサンプルとほぼほぼ似たような内容になりますが、投稿したいと思います。
やること
- PCカメラで取得中の映像に対してのリアルタイムでの手の座標取得
- 座標を描画した画像の表示
コード
とりあえずコード全体を記載します。
import cv2
import numpy as np
import mediapipe as mp

mp_drawing = mp.solutions.drawing_utils
mp_drawing_styles = mp.solutions.drawing_styles
mp_hands = mp.solutions.hands

# カメラキャプチャの設定
camera_no = 0
video_capture = cv2.VideoCapture(camera_no)
video_capture.set(cv2.CAP_PROP_FRAME_WIDTH, 640)
video_capture.set(cv2.CAP_PROP_FRAME_HEIGHT, 360)

if __name__ == '__main__':
    with mp_hands.Hands(static_image_mode=True,
            max_num_hands=2, # 検出する手の数(最大2まで)
            min_detection_confidence=0.5) as hands:

        try:
            while video_capture.isOpened():
                # カメラ画像の取得
                ret, frame = video_capture.read()
                if ret is False:
                    print("カメラの取得できず")
                    break

                # 鏡になるよう反転
                frame = cv2.flip(frame, 1)

                # OpenCVとMediaPipeでRGBの並びが違うため、
                # 処理前に変換しておく。
                # CV2:BGR → MediaPipe:RGB
                image = cv2.cvtColor(frame, cv2.COLOR_BGR2RGB)
                image.flags.writeable = False

                # 推論処理
                hands_results = hands.process(image)

                # 前処理の変換を戻しておく。
                image.flags.writeable = True
                write_image = cv2.cvtColor(image, cv2.COLOR_RGB2BGR)

                # 背景を黒にする場合は下記コメントアウトを外してください。
                # img_h, img_w, _ = frame.shape
                # blank = np.zeros((img_h, img_w, 3))
                # write_image = blank

                # 有効なランドマーク(今回で言えば手)が検出された場合、
                # ランドマークを描画します。
                if hands_results.multi_hand_landmarks:
                    for landmarks in hands_results.multi_hand_landmarks:
                        mp_drawing.draw_landmarks(
                            write_image,
                            landmarks,
                            mp_hands.HAND_CONNECTIONS,
                            mp_drawing_styles.get_default_hand_landmarks_style(),
                            mp_drawing_styles.get_default_hand_connections_style())

                # ディスプレイ表示
                cv2.imshow('hands', write_image)

                key = cv2.waitKey(1)
                if key == 27: # ESCが押されたら終了
                    print("終了")
                    break
        finally:
            video_capture.release()
            cv2.destroyAllWindows()
ほぼ公式ドキュメントと前回の記事の流用なので、あまり書ける事が無いですが…
前回との静止画からの座標取得との違いとしては、
OpenCVにてカメラからの画像取得をして、ループさせるという点になります。
# カメラキャプチャの設定
camera_no = 0
video_capture = cv2.VideoCapture(camera_no)
video_capture.set(cv2.CAP_PROP_FRAME_WIDTH, 640)
video_capture.set(cv2.CAP_PROP_FRAME_HEIGHT, 360)

# ====省略====
        try:
            while video_capture.isOpened():

# ====省略====
                # ディスプレイ表示
                cv2.imshow('hands', write_image)

# ====省略====
        finally:
            video_capture.release()
            cv2.destroyAllWindows()
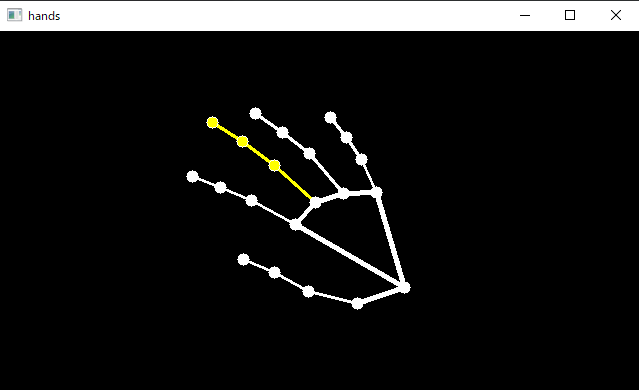
途中のコメントアウトを外すことで黒い画像に座標のランドマークだけが描画できます。
                # 背景を黒にする場合は下記コメントアウトを外してください。
-                # img_h, img_w, _ = frame.shape
-                # blank = np.zeros((img_h, img_w, 3))
-                # write_image = blank
+                img_h, img_w, _ = frame.shape
+                blank = np.zeros((img_h, img_w, 3))
+                write_image = blank
おわりに
普段の業務では違う分野の作業をしていまして、OpenCVとかもあまり触ったことないのですが、知らない分野のライブラリ使う事も新鮮で楽しいですね。
取得した座標情報から機械学習とかできたら面白そうだなと思っています。