はじめに
前回はこちら
Nuxt.js + Vuetify でポートフォリオ作りたい その1
だいぶ前回から間が空いてしまいました…。単純に本業であまり時間がとれなかったり、世界救ってたり、~~一狩りしてたり~~でなかなか手が動かなかったのですが、ちょこちょことポートフォリオの続きを進めてみました。
前回から手を加えたのは以下のポイントです。
- ツールバー周りを少しオシャレにする。
- コンテンツをざっくりと作り込む。
- プロフィール用のページを作成。
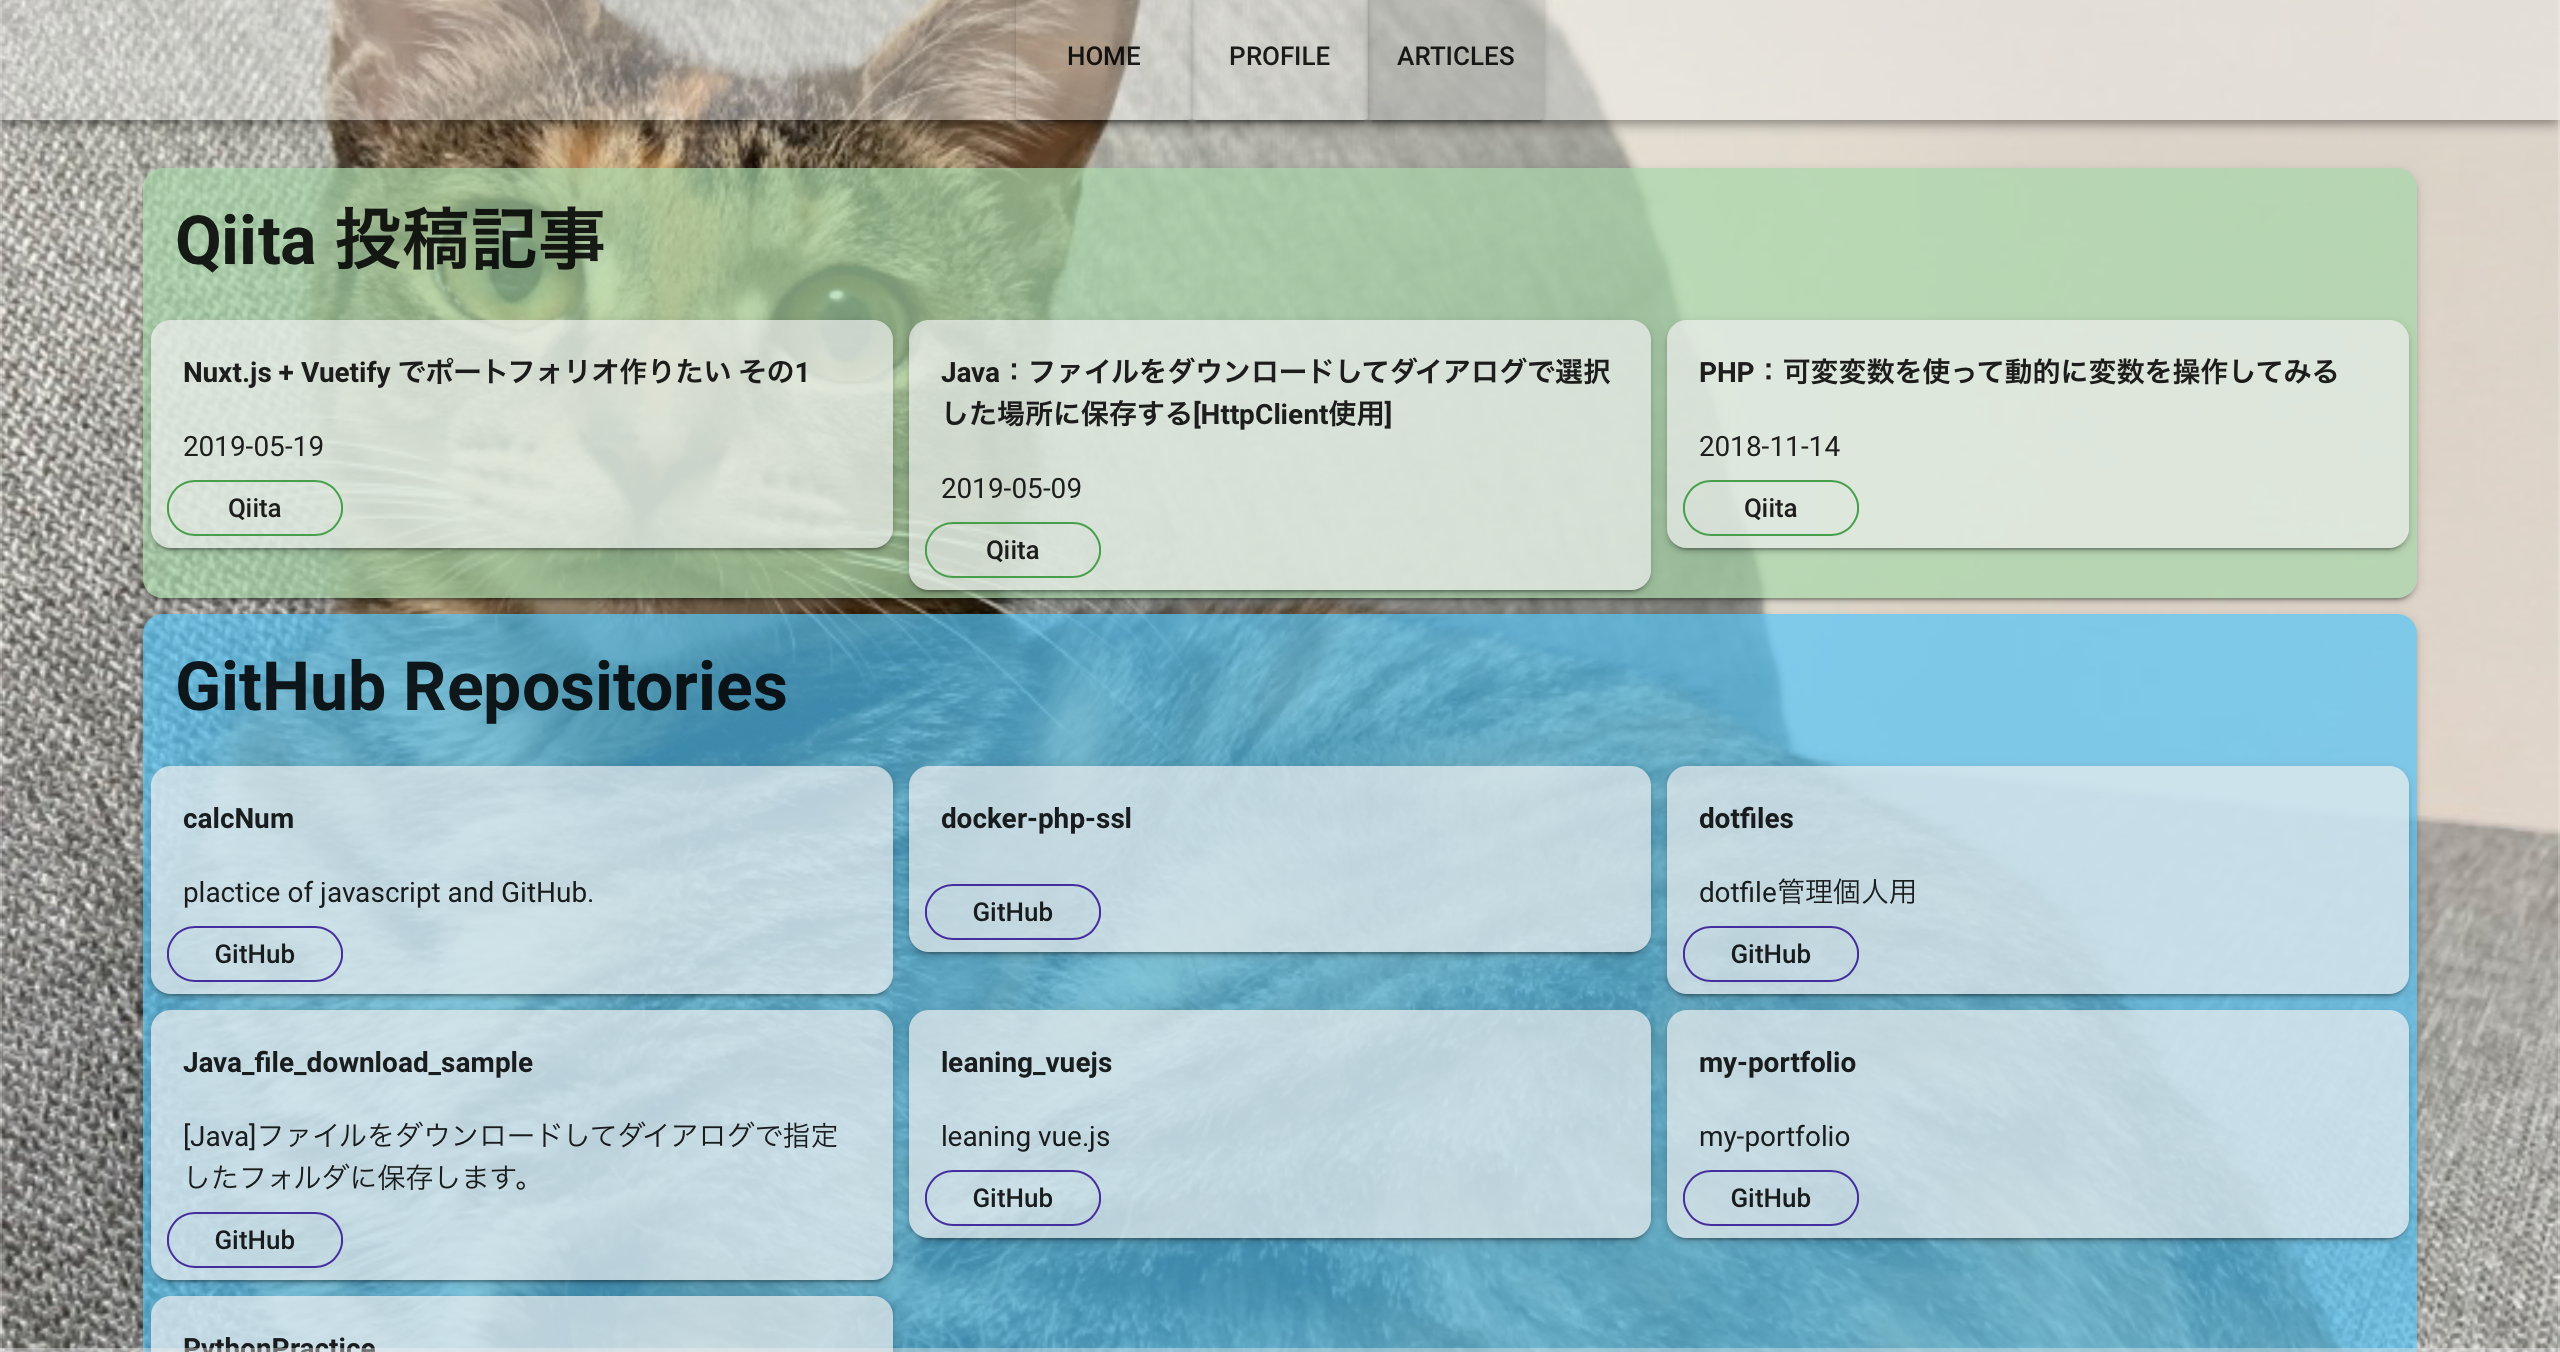
- GitHubとQiitaのAPIから自分のアウトプットを取得して一覧表示。
ここまででできたページが以下となります。
https://my-portfolio-31932.web.app/

ツールバーを弄る
ツールバー周りをデフォルトのデザインから少し弄ってみました。
修正するソースはlayouts/default.jsとなります。
<template>
<v-app>
<v-navigation-drawer
v-model="drawer"
:mini-variant="miniVariant"
:clipped="clipped"
:fixed="fixed"
floating
app
height="auto"
>
<v-list>
<v-list-tile
v-for="(item, i) in items"
:key="i"
:to="item.to"
router
exact
@click="drawer = !drawer"
>
<v-list-tile-action>
<v-icon>{{ item.icon }}</v-icon>
</v-list-tile-action>
<v-list-tile-content>
<v-list-tile-title v-text="item.title" />
</v-list-tile-content>
</v-list-tile>
</v-list>
</v-navigation-drawer>
<v-toolbar :clipped-left="clipped" app :color="barColor">
<v-toolbar-side-icon class="hidden-md-and-up" @click="drawer = !drawer" />
<v-spacer />
<v-toolbar-items class="hidden-sm-and-down">
<v-btn
v-for="(item, i) in items"
:key="i"
:to="item.to"
text
small
color="transparent"
>
{{ item.title }}
</v-btn>
</v-toolbar-items>
<v-spacer />
</v-toolbar>
<nuxt />
<v-footer :fixed="fixed" app :color="barColor">
<span>© 2019 h-ueno</span>
</v-footer>
</v-app>
</template>
<script>
export default {
data() {
return {
barColor: 'rgba(240,240,240,0.4)',
clipped: true,
drawer: false,
fixed: false,
items: [
{
icon: 'home',
title: 'Home',
to: '/'
},
{
icon: 'person',
title: 'Profile',
to: '/profile'
},
{
icon: 'list_alt',
title: 'Articles',
to: '/articles'
}
],
miniVariant: false,
title: 'H-UENO'
}
}
}
</script>
<style lang="scss">
.v-content {
background: hsl(0, 0%, 97%) url('~assets/cat.jpg');
background-position: center center;
background-repeat: no-repeat;
background-size: cover;
height: 100vh;
}
</style>
- ツールバーのカラーは
v-toolbarコンポーネントのcolor属性に設定することで変更できます。
<v-toolbar :clipped-left="clipped" app :color="barColor">
コンテンツを作る
とりあえずガワは出来てきたような気がするので次にポートフォリオの中身となるコンテンツを作っていきたいと思います。
ひとまずサクッと出来そうなのは
- 自分の簡単なプロフィール
- アウトプットとしてこれまでの成果物があったほうが良いかも
- 今はまだ少ないけど今後増やしていこう!という意思表示を込めてGitHubリポジトリとQiitaの投稿一覧を表示してみる。
の2点を作ってみました。
プロフィールページ
とりあえずプロフィールページを作っていきます。
- 簡単な個人の情報
- 生年月日とかなのでとりあえず固定で良いことにします。
- 履歴書がわりのこれまでの経歴
- 形式化出来そうなので今後のメンテのことを考えてテキストファイルのJSONから引っ張ってくるようにします。
大元のページをpages/profile.vueとして作成します。
<template>
  <v-content>
    <v-container class="contents-container">
      <v-layout wrap justify-center>
        <v-flex xs12 md10>
          <pesonal-info class="mb-2" />
          <history-info :histories="histories" />
        </v-flex>
      </v-layout>
    </v-container>
  </v-content>
</template>

<script>
import PersonalInfo from '~/components/molecule/PersonalInfo.vue'
import HistoryInfo from '~/components/molecule/HistoryInfo.vue'

export default {
  components: {
    'pesonal-info': PersonalInfo,
    'history-info': HistoryInfo
  },
  asyncData({ store }) {
    return {
      histories: store.getters['json/getHistories']
    }
  }
}
</script>
大きく分けて2つのコンポーネントに分けています。
- 個人情報を扱う
PersonalInfo - 経歴を扱う
HistoryInfo
jsonデータの読み取りはNuxt.js(v2)で静的なJSONファイルを読み込み、いろんな所で使う。
の記事を参考にさせていただいています。
asyncData({ store }) {
    return {
      histories: store.getters['json/getHistories']
    }
import historyJson from '~/assets/json/history.json'

// State
export const state = () => ({
  histories: historyJson
})

// getters
export const getters = {
  getHistories(state) {
    return state.histories
  }
}
JSONファイルから読み込んだ情報はHistoryInfoコンポーネントに渡して表示させます。
<template>
  <v-card class="rounded-card pa-1" color="rgba(255, 167, 38, 0.7)">
    <v-card-title class="font-weight-bold display-1 my-0">History</v-card-title>
    <history-card
      v-for="(history, index) in histories"
      :key="index"
      :year="history.year"
      :month="history.month"
      :title="history.title"
      :description="history.description"
    />
  </v-card>
</template>

<script>
import HistoryCard from '~/components/atom/HistoryCard.vue'

export default {
  components: {
    'history-card': HistoryCard
  },
  props: {
    histories: {
      type: Array,
      required: true
    }
  }
}
</script>
<template>
  <v-card class="ma-40" color="rgba(238, 238, 238, 0.8)">
    <v-card-title class="mb-0 pb-0 title">
      {{ year }}年{{ month }}月
    </v-card-title>
    <v-card-title class="title">
      {{ title }}
    </v-card-title>
    <v-card-text class="subtitle-1">{{ description }}</v-card-text>
  </v-card>
</template>

<script>
export default {
  name: 'HistoryCard',
  props: {
    year: {
      type: String,
      default: ''
    },
    month: {
      type: String,
      default: ''
    },
    title: {
      type: String,
      default: ''
    },
    description: {
      type: String,
      default: ''
    }
  }
}
</script>
作ってみて思った課題としては以下となります。
- 履歴情報に外部リンクを貼るなど詳細を表示できるようにしたい。
- 在学時代の論文や特許情報へのリンクを貼りたい。
- スキルシート見たいなのがあったほうがよさそう。
記事ページ
記事ページではGitHubとQiitaのAPIを叩いて取得した情報を表示してみます。

まずはpages/artcles.vueを作成します。
<template>
  <v-content>
    <v-container class="contents-container">
      <qiita-articles class="mb-2"></qiita-articles>
      <git-repositories></git-repositories>
    </v-container>
  </v-content>
</template>

<script>
import GitRepositories from '~/components/molecule/GitRepositories.vue'
import QiitaArticles from '~/components/molecule/QiitaArticles.vue'
export default {
  components: {
    'git-repositories': GitRepositories,
    'qiita-articles': QiitaArticles
  }
}
</script>
構成としては次の二つのコンポーネントに分かれています。
- Gitのリポジトリ情報の取得と表示を行う
GitRepositories - Qiitaの記事情報の取得と表示を行う
QiitaArticles
両者ともAPIへのアクセスはaxiosを使用しています。
<template>
  <v-card v-if="hasData" class="rounded-card" color="rgba(79, 195, 247, 0.7)">
    <v-card-title class="font-weight-bold display-1">
      GitHub Repositories
    </v-card-title>
    <v-layout row wrap>
      <v-flex v-for="(item, index) in items" :key="index" md4 sm6 xs12>
        <git-repository :item="item"></git-repository>
      </v-flex>
    </v-layout>
  </v-card>
</template>

<script>
import axios from 'axios'
import GitRepository from '~/components/atom/GitRepository.vue'
const baseUri = 'https://api.github.com/users/h-ueno2/repos'
export default {
  components: {
    'git-repository': GitRepository
  },
  data() {
    return {
      items: []
    }
  },
  computed: {
    hasData() {
      return this.items.length > 0
    }
  },
  async created() {
    // GitのAPIにアクセス
    this.items = await axios.get(baseUri).then(res => {
      return res.data
    })
  }
}
</script>
<template>
  <v-card v-if="hasData" class="rounded-card" color="rgba(165, 214, 167, 0.7)">
    <v-card-title class="font-weight-bold display-1">
      Qiita 投稿記事
    </v-card-title>
    <v-layout row wrap>
      <v-flex v-for="(item, index) in items" :key="index" md4 sm6 xs12>
        <qiita-article :item="item"></qiita-article>
      </v-flex>
    </v-layout>
  </v-card>
</template>

<script>
import QiitaArticle from '~/components/atom/QiitaArticle.vue'
import axios from 'axios'
// qiita api URL
const baseUri = 'https://qiita.com/api/v2/users/h-ueno2/items'
export default {
  components: {
    'qiita-article': QiitaArticle
  },
  data() {
    return {
      items: []
    }
  },
  computed: {
    hasData() {
      return this.items.length > 0
    }
  },
  async created() {
    // APIへのアクセス
    this.items = await axios.get(baseUri).then(res => {
      return res.data
    })
  }
}
</script>
作ってみての課題としてはasync周りがまだあまり理解しきれていない感がありますなぁ。とりあえず動いてみたけど、どういう仕組みなのか人に説明できるほど理解しきれていない状態...。
余力があれば読み込み中のクルクルとかつけてみたい。
参考資料
作成する上で表示に助けていただいた記事の方々になります!