電話(Amazon Connect)をかけてRPA(UiPath)を遠隔起動してBMI値を書き込んでみました。
UiPathのオーケストレーターを使って、外部から叩けるREST API経由でUiPathを遠隔実行します。
完成動画
百聞は一見にしかずこちらの動画をご確認ください
Amazon ConnectでBMI測定をして、その結果をUiPathが受けてExcelに書き込むデモです。電話をかけるだけでロボが自動起動するのは便利ですね!#UiPath #AmazonConnect #RPALT pic.twitter.com/7Nv44B8WY8
— がおまる@技術書典7 す23D (@gaomar) September 5, 2019
1. UiPathでロボを作る
まず、UiPath StudioでExcelに書き込むためのロボを設定しておきます。
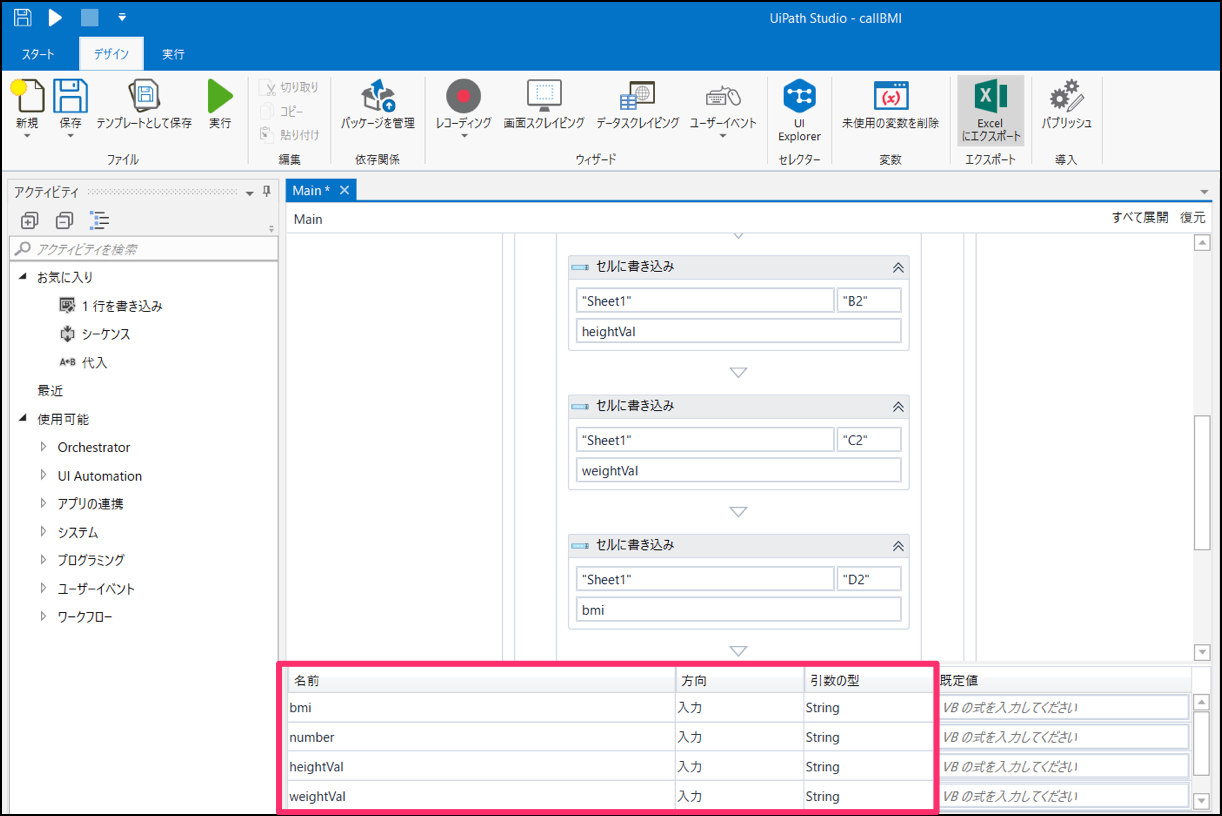
1-1. 入力変数を設定する
AWS Lambdaから飛んでくるパラメータを取得するための変数を設定しておきます。
| 名前 | 入力 | 引数の型 | 備考 |
|---|---|---|---|
| bmi | 入力 | String | BMIの値を格納する |
| number | 入力 | String | 診察券番号を格納する |
| heightVal | 入力 | String | 身長データを格納する |
| weightVal | 入力 | String | 体重データを格納する |
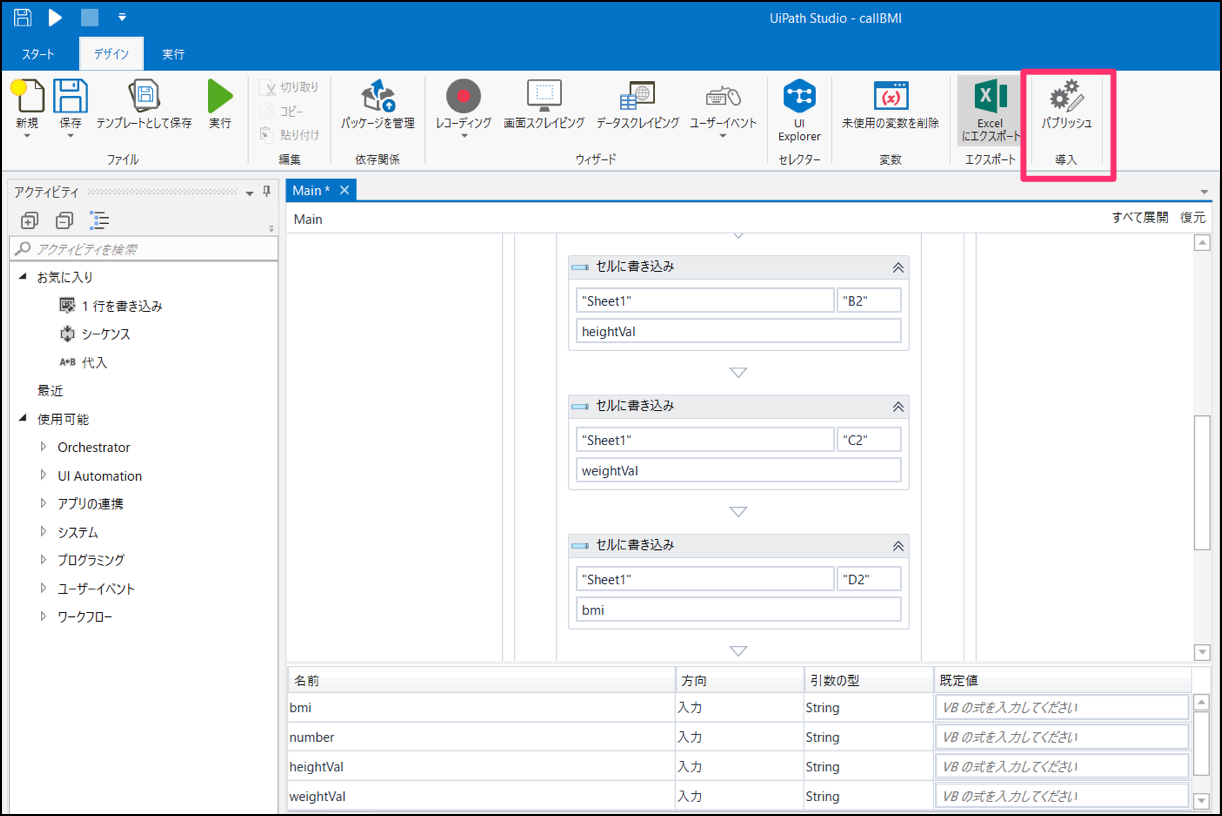
1-2. パブリッシュする
作ったロボをUiPathオーケストレーターで管理するためにクラウドにアップします。
右上のパブリッシュボタンを押せば、連携しているUiPathの管理ページにアップロードされます。
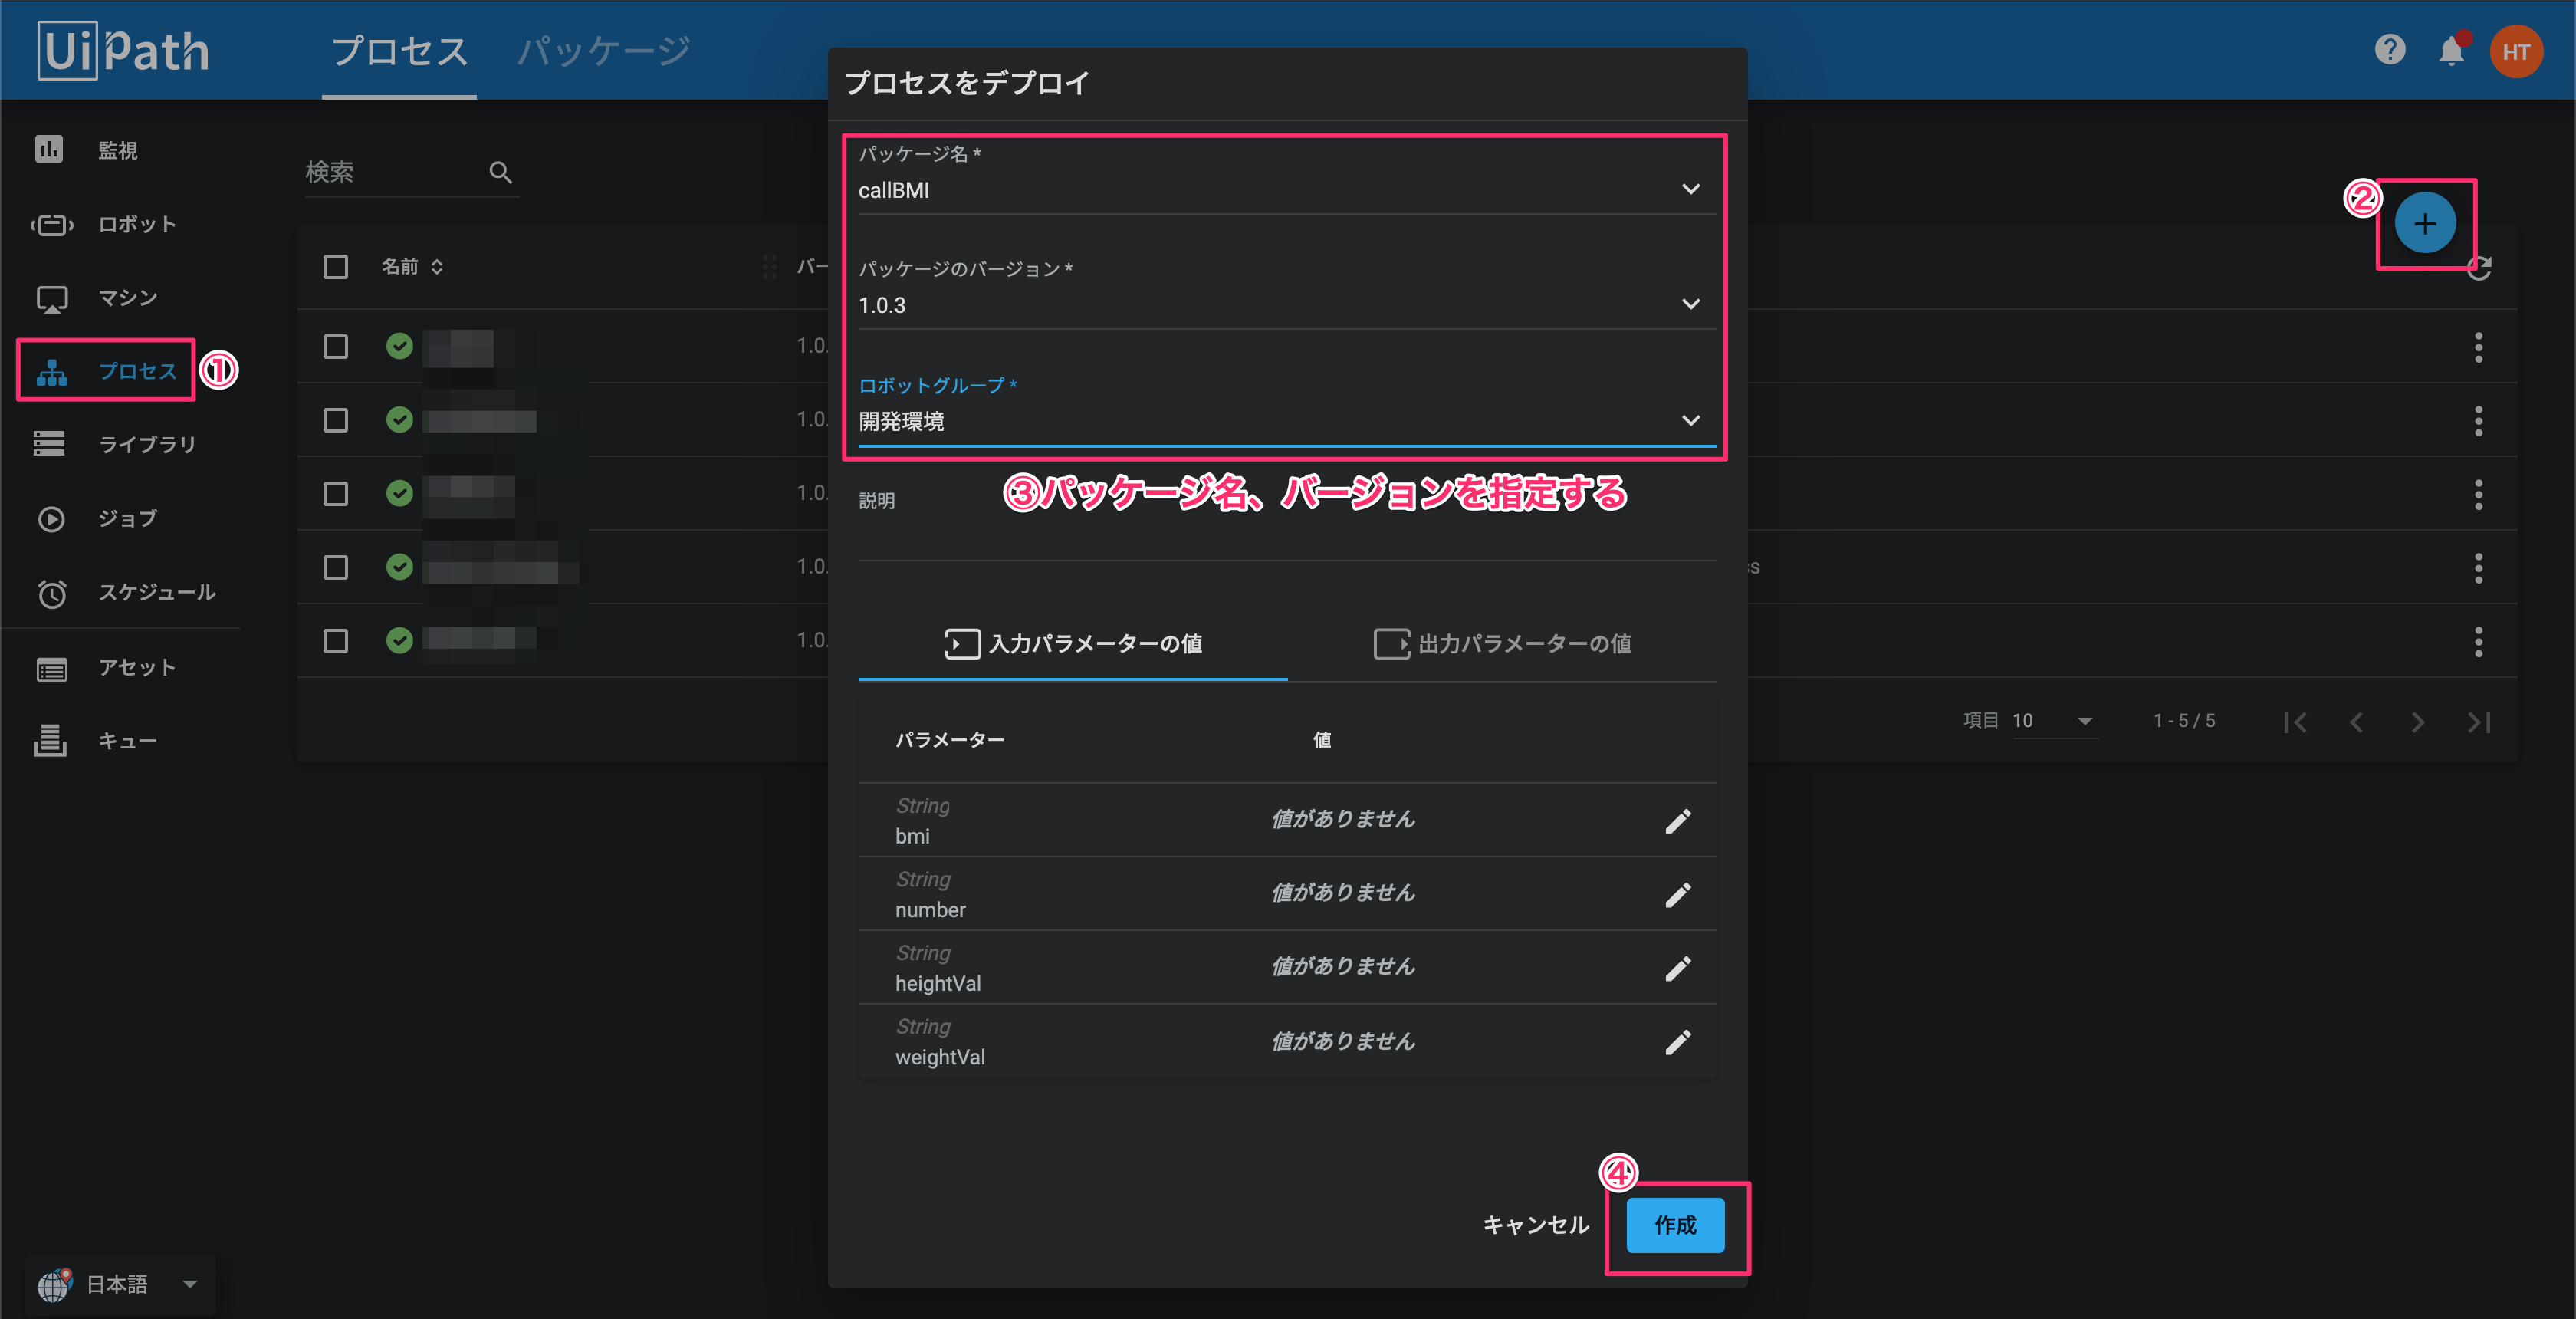
1-3. UiPathオーケストレーターの設定
パブリッシュしたUiPathのプロセスをデプロイしておきます。
アップロードしたパッケージ名やバージョンを正しく指定します。
2. UiPathの遠隔ジョブ実行の流れ
具体的なUiPathでの流れはこちらを参考にすればある程度できると思います。
順番に流れをやっていきます。
https://docs.uipath.com/orchestrator/v2019/reference#consuming-cloud-api
2-1. APIの呼び出しで使用するトークンを取得する
下記URLにアクセスする。
index.jsにコードを貼り付ける
function base64URLEncode(str) {
  return str.toString('base64')
    .replace(/\+/g, '-')
    .replace(/\//g, '_')
    .replace(/=/g, '');
}

function sha256(buffer) {
  return crypto.createHash('sha256').update(buffer).digest();
}

console.log("Generating challenge and Verifier");
var cryptoResult = crypto.randomBytes(32);
var verifier = base64URLEncode(cryptoResult);
var challenge = base64URLEncode(sha256(verifier));
console.log("Code challenge: " + challenge)
console.log("Code verifier: " + verifier);
実行して出力されたCode challengeとCode verifierをメモする
Generating challenge and Verifier
Code challenge: XXXXXXXXXXXXXXXXXXXXXXXXXXXXXXXXXX-XXXXXX
Code verifier: XXXXXXXXXXXXXXXXXXXXXXXXXXXXXXXXXXXXXXXXXX
=> undefined
下記URLの [Code challenge] 部分を取得したものに書き換える
https://account.uipath.com/authorize?response_type=code&nonce=b0f368cbc59c6b99ccc8e9b66a30b4a6&state=47441df4d0f0a89da08d43b6dfdc4be2&code_challenge=[Code challenge]&code_challenge_method=S256&scope=openid+profile+offline_access+email &audience=https%3A%2F%2Forchestrator.cloud.uipath.com&client_id=5v7PmPJL6FOGu6RB8I1Y4adLBhIwovQN&redirect_uri=https%3A%2F%2Faccount.uipath.com%2Fmobile
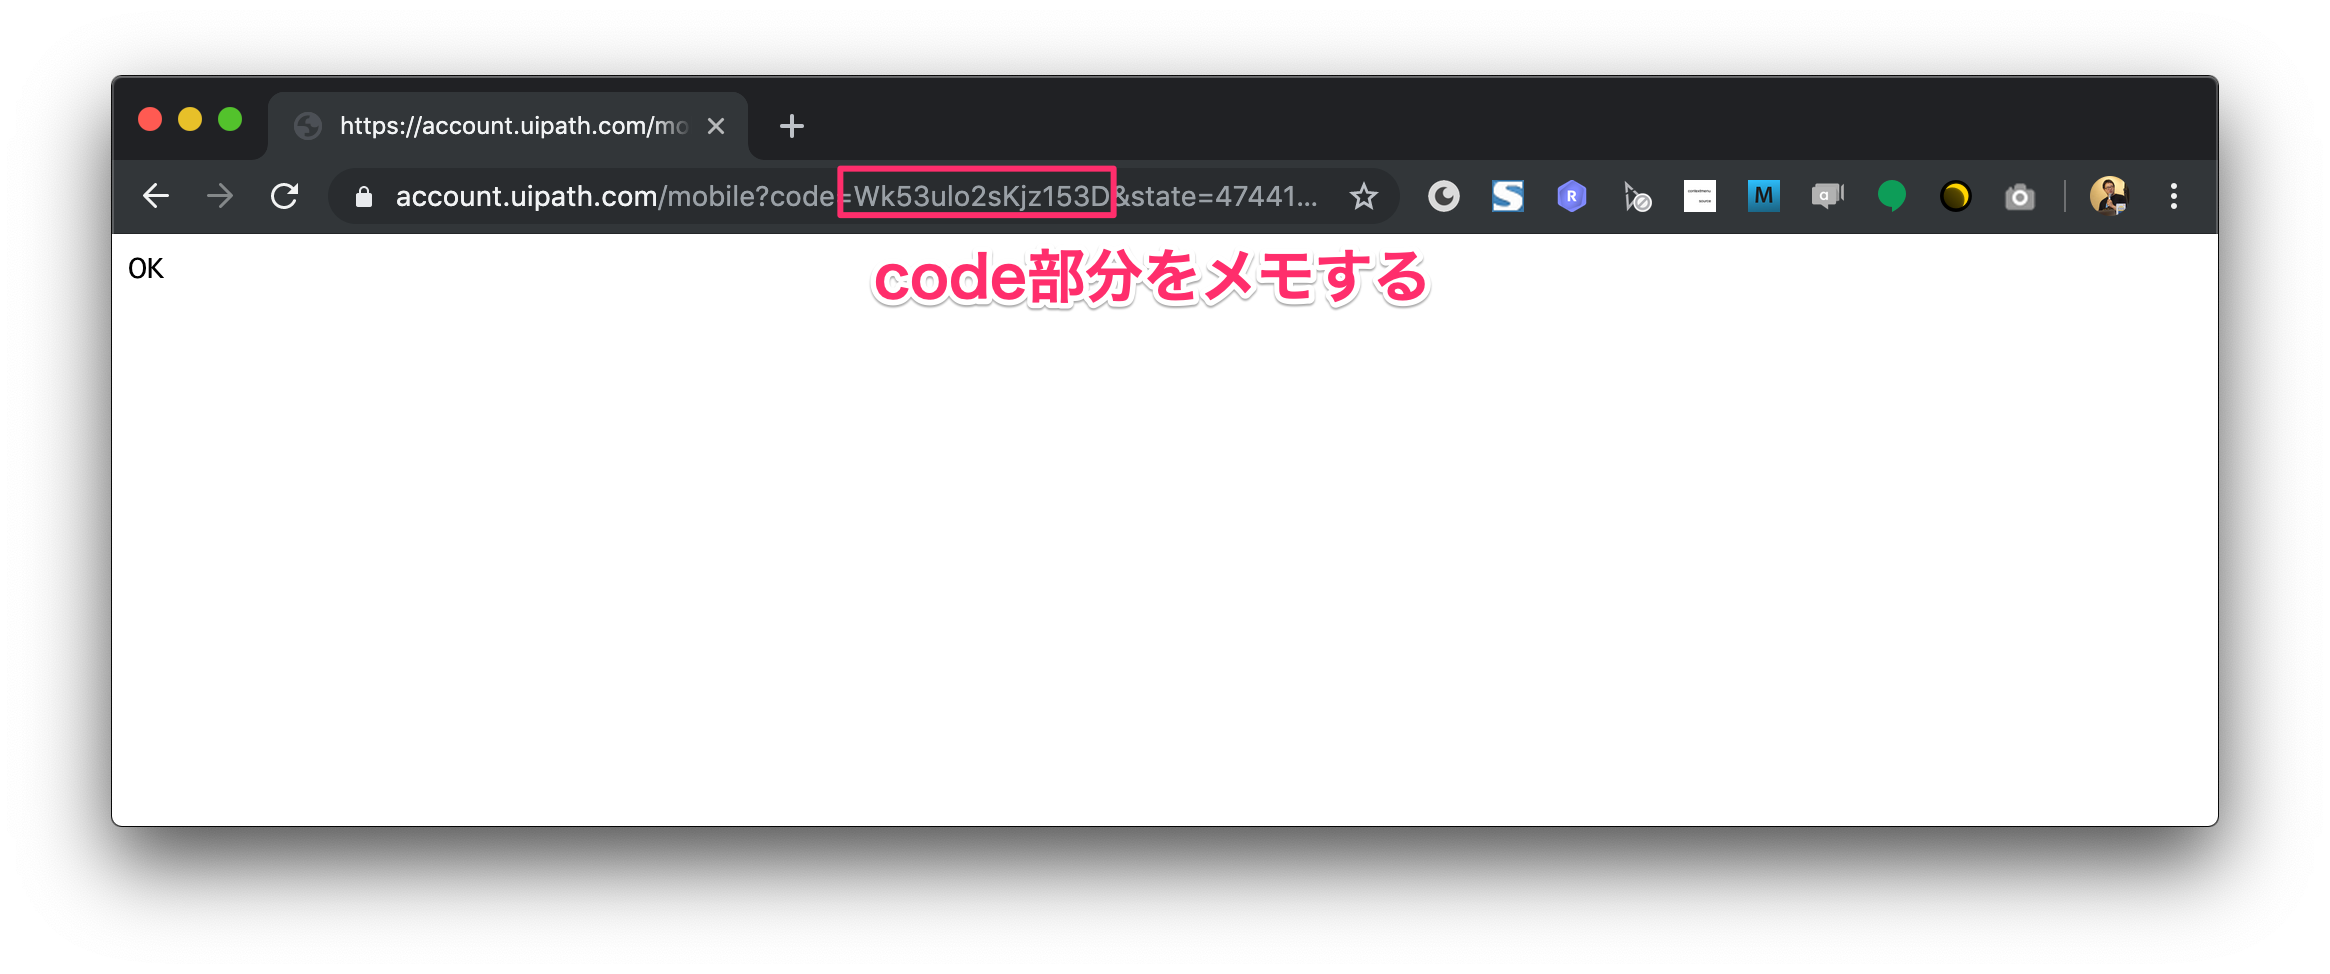
書き換えたURLをブラウザに貼り付ける。画面に「OK」が出れば成功。
リダイレクトされたURLが表示され、下記のような形式になります。
https://account.uipath.com/mobile?code=[Authorization code]&state=47441df4d0f0a89da08d43b6dfdc4be2
[Authorization code]は後で使うのでメモしておきます。
2-2. トークンの取得
POSTでhttps://account.uipath.com/oauth/tokenを実行します。
先程1で取得した、[Authorization code]と[Code verifier]の値を反映します。
Content-Type: application/json

{
    "grant_type": "authorization_code",
    "code": "[Authorization code]",
    "redirect_uri": "https://account.uipath.com/mobile",
    "code_verifier": "[Code verifier]",
    "client_id": "5v7PmPJL6FOGu6RB8I1Y4adLBhIwovQN"
}
{
  "access_token": "[access token]",
  "refresh_token": "[refresh token]",
  "id_token": "[id token]",
  "scope": "openid profile email offline_access",
  "expires_in": 86400,
  "token_type": "Bearer"
}
アクセストークンは24時間有効です。
※有料プランだと24時間制限はない模様
[access token] [refresh token] [id token]をそれぞれメモしておきます。
2-3. トークンリフレッシュ
24時間でトークンが切れるので、再発行する必要があります。
POSTで下記URLを実行し、[refresh token]を設定します。
POST https://account.uipath.com/oauth/token
Content-Type: application/json
client_id値は固定なので、そのまま使ってください
{
    "grant_type": "refresh_token",
    "client_id": "5v7PmPJL6FOGu6RB8I1Y4adLBhIwovQN",
    "refresh_token": "[refresh token]"
}
{
  "access_token": "[access token]",
  "refresh_token": "[refresh token]",
  "id_token": "[id token]",
  "scope": "openid profile email offline_access",
  "expires_in": 86400,
  "token_type": "Bearer"
}
2-4. UiPathアカウントとサービスインスタンス識別子取得
GETでURLを実行します。
GET https://platform.uipath.com/cloudrpa/api/getAccountsForUser
Authorization: Bearer [id_token]
{
  "userEmail": "[user_email]",
    "accounts":[
        {
            "accountName": "[account_name]",
            "accountLogicalName": "[account_logical_name]"
        }
    ]
}
[account_logical_name]は後で使用するためにコピーします。
2-5. サービスインスタンスの論理名の取得
GETでURLを実行します。
GET https://platform.uipath.com/cloudrpa/api/account/[account_logical_name]/getAllServiceInstances
[account_logical_name]は先程4で取得したものを指定します。
Authorization: Bearer [id_token]
[
    {
        "serviceInstanceName": "[service_instance_name]",
        "serviceInstanceLogicalName": "[service_instance_logical_name]",
        "serviceType": "ORCHESTRATOR",
        "serviceUrl": "[service_url]"
    }
]
[service_instance_logical_name]をメモしておきます。
2-6. ジョブReleaseKeyを取得する
GETで下記URLを実行します。
GET https://platform.uipath.com/odata/Releases
Bearerの値は[access token]になるので気をつけましょう。
Authorization: Bearer [access token]
X-UIPATH-TenantName: [service_instance_logical_name]
{
    "@odata.context": "https://platform.uipath.com/odata/$metadata#Releases",
    "@odata.count": 1,
    "value": [
        {
            "Key": "[ReleaseKey]",
            "ProcessKey": "XXXXXXXX",
            "ProcessVersion": "1.0.0",
            "IsLatestVersion": false,
            "IsProcessDeleted": false,
            "Description": "",
            "Name": "XXXXXXXXXXXXXX",
            "EnvironmentId": XXXXXX,
            "EnvironmentName": "XXXXXX",
            "InputArguments": null,
            "Id": XXXXXX,
            "Arguments": {
                "Input": null,
                "Output": null
            },
            "ProcessSettings": null
        }
    ]
}
responseで発行された[ReleaseKey]をメモしておきます。
2-7. ジョブの実行
POSTで下記URLを実行します。
POST https://platform.uipath.com/odata/Jobs/UiPath.Server.Configuration.OData.StartJobs
Authorization: Bearer [access token]
X-UIPATH-TenantName: [service_instance_logical_name]
{
  "startInfo": {
    "ReleaseKey": "[ReleaseKey]",
    "Strategy": "All",
    "RobotIds": [],
    "NoOfRobots": 0
  }
}
これでUiPathのロボが実行すると思います。
2-8. ジョブに引数を指定する
Ui Studio側で入力変数を宣言する。
| 名前 | 方向 | 引数の型 |
|---|---|---|
| bmi | 入力 | String |
ジョブの実行はrequest bodyにInputArgumentsを追加する
{
  "startInfo": {
    "ReleaseKey": "[ReleaseKey]",
    "Strategy": "All",
    "RobotIds": [],
    "NoOfRobots": 0,
    "InputArguments": "{\"bmi\":\"あなたのBMIは24.5です。\"}"

  }
}
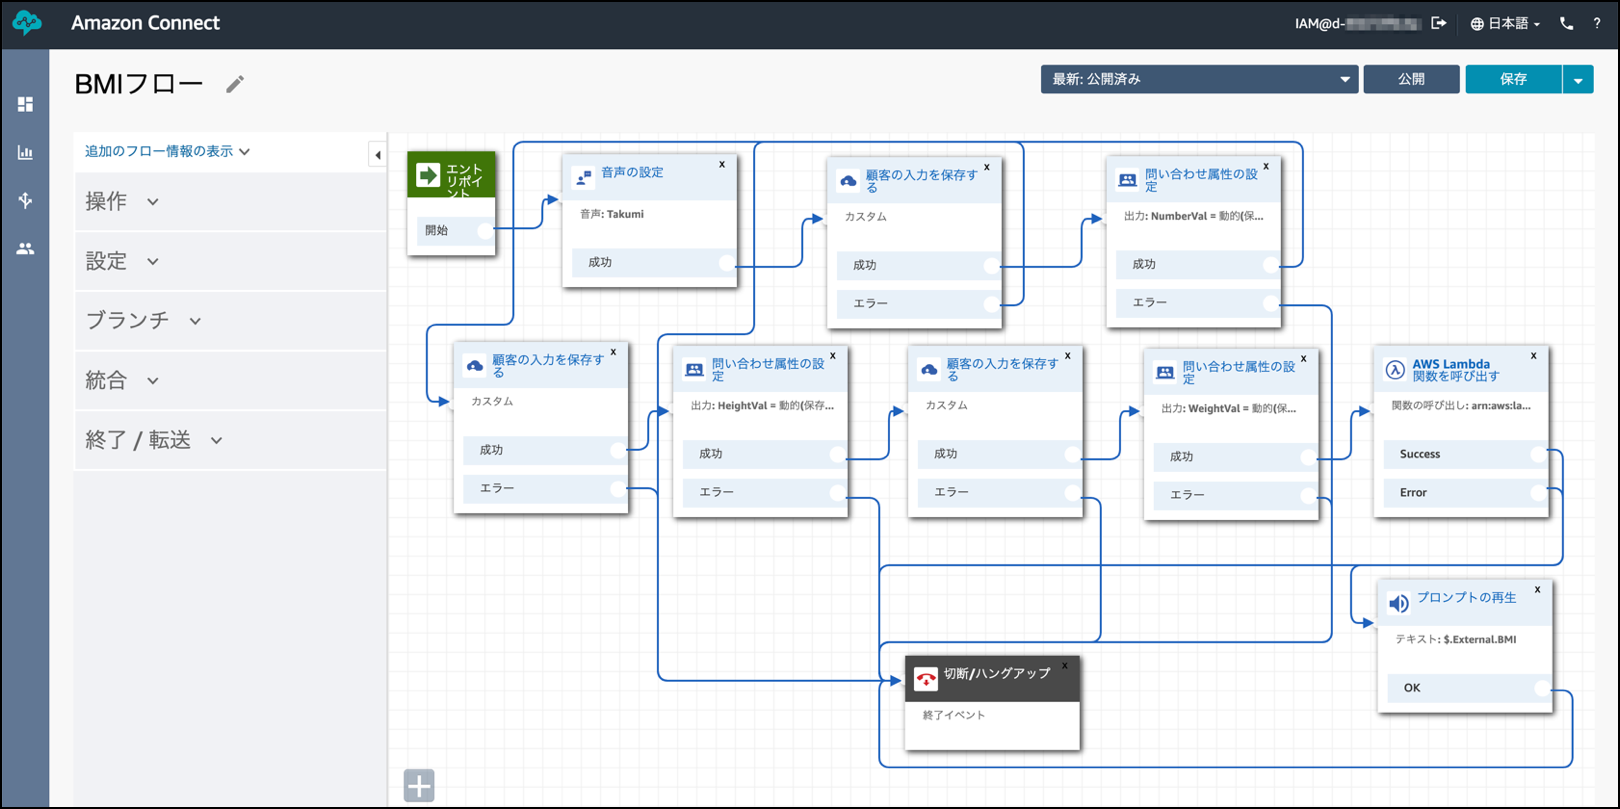
3. Amazon Connectの設定
Amazon Connect側は特に解説はしません。詳しい解説はこちらのハンズオン資料を参照してください。
4. AWS Lambda側の設定
AWS Lambda側の処理も難しいことはしていません。Amazon Connectから送られてきた、
身長と体重のパラメータを取得して、BMI値を計算してUiPathのAPIを叩いているだけです。
※ 途中にあるrequestのライブラリはAWS Lambda Layerですでにzipファイルをアップロードしています。
ここの解説はしていません。
'use strict';
const Util = require('./util.js');

exports.handler = async (event) => {

    var response = {
        statusCode: 200,
        body: JSON.stringify('true'),
    };

    // Amazon Connectから送られてきたパラメータ
    const numberVal = event.Details.ContactData.Attributes.NumberVal;
    const heightVal = event.Details.ContactData.Attributes.HeightVal;
    const weightVal = event.Details.ContactData.Attributes.WeightVal;

    // BMI計算
    const bmiVal = (parseFloat(weightVal) / (parseFloat(heightVal)/100 * parseFloat(heightVal)/100)).toFixed(1);

    // 標準体重
    const stdWeight = (22 * (parseFloat(heightVal)/100 * parseFloat(heightVal)/100)).toFixed(1);

    // RPAにわたす内容
    const speechText = `あなたのBMIは${bmiVal}です。標準体重は${stdWeight}kgです。`;

    // ロボを実行する
    await Util.sendRPA(numberVal, heightVal, weightVal, speechText);

    response = {"BMI": speechText};

    return response;
};
const request = require('request');

const headers = {
  'Content-Type': 'application/json',
  'Authorization': `Bearer ${process.env.RPA_TOKEN}`,
  'X-UIPATH-TenantName': `${process.env.RPA_TENANTNAME}`
};


module.exports.sendRPA = async function sendRPA(numberVal, heightVal, weightVal, message) {

    // UiPathに渡すパラメータ
    const bmi =
    {
      "number": numberVal,
      "heightVal": heightVal,
      "weightVal": weightVal,
      "bmi": message
    };

    // オプションを定義
    const jsonData =
    {
      "startInfo": {
        "ReleaseKey": process.env.RPA_RELEASEKEY,
        "Strategy": "All",
        "RobotIds": [],
        "NoOfRobots": 0,
        "InputArguments": JSON.stringify(bmi)
      }
    };

    const payload = JSON.stringify(jsonData);
    const options = {
      url: process.env.RPA_URL,
      method: 'POST',
      headers: headers,
      body: payload
    };

    return new Promise(function (resolve, reject) {
      request(options, function (error, response, body) {
        if (!error) {
          resolve(true);
        } else {
          console.log('error: ' + response + body);
          resolve(true);
        }
      });
    });
};
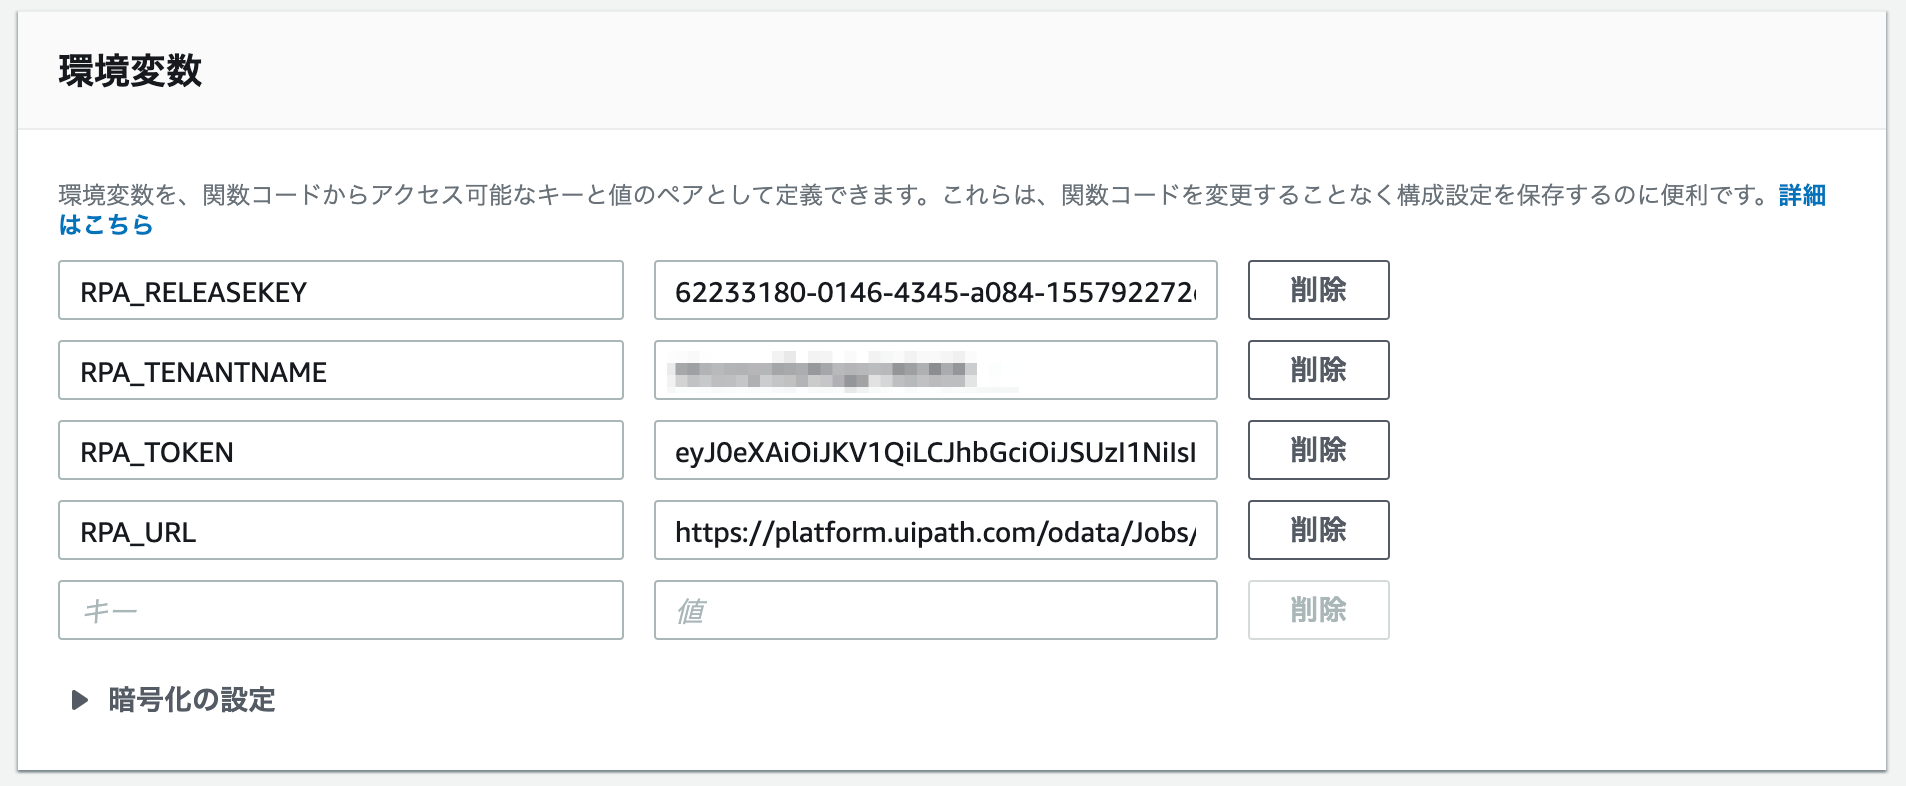
環境変数の設定は以下の通り
| キー名 | 値 |
|---|---|
| RPA_RELEASEKEY | 2-6で取得した [ReleaseKey] |
| RPA_TENANTNAME | 2-5で取得した [service_instance_logical_name] |
| RPA_TOKEN | 2-2や2-3で取得した [access token] |
| RPA_URL | https://platform.uipath.com/odata/Jobs/UiPath.Server.Configuration.OData.StartJobs |
まとめ
UiPathのロボを遠隔実行することができました。これで様々なトリガーをキッカケにロボを起動することができます。
様々な連携を駆使して良きRPAライフを!
システム化のご検討やご相談は弊社までお問い合わせください。
https://i-enter.co.jp/contact/