HoloLensを使ってドローンを遠隔操作してみました。
環境
- HoloLens
- Unity 1.2
- MixedRealityToolkit-Unity for Unity v1.2017.2.0
- Node.js v8.8
- Firebase
- Raspberry Pi Zero W
- node-rolling-spider
- Parrot MAMBO
動作デモ
HoloLensでドローンを操作してみました。 #HoloLensJP #HoloLens #MR #ドローン https://t.co/nyvnEcs3kK
— がおまる@HoloLens研究者 (@gaomar) 2017年11月21日
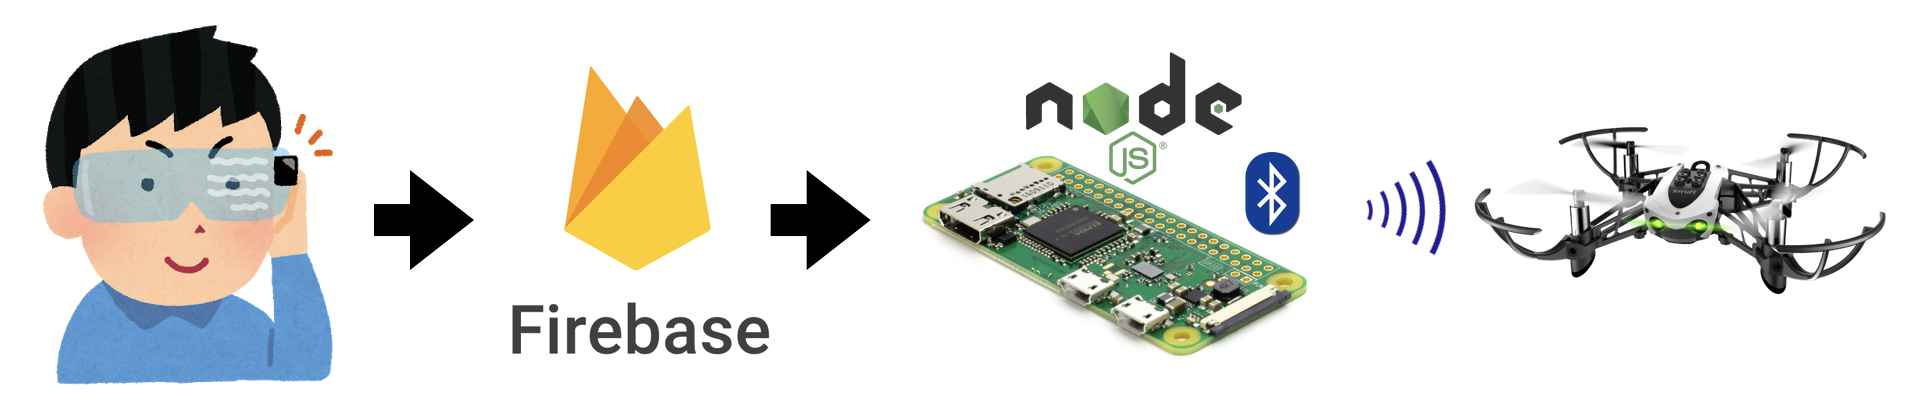
処理の流れ
導入
Raspberry Piにドローンプログラムを導入します。
Raspberry Pi Zero WはBluetoothとWi-Fiが既に内蔵されていますので、直ぐに使うことが出来ました。
OS環境構築は割愛させて頂きます。
Raspberry PiにNode.jsとnpmをインストール
$ sudo apt-get install -y nodejs npm
node-rolling-spiderをインストール
$ mkdir work/drone
$ cd work/drone
$ npm install rolling-spider --save
途中このようなエラーが出た場合はインストールします。
fatal error: libudev.h
$ sudo apt-get install libudev-dev
Firebaseをインストール
$ npm install firebase --save
Raspberry Piからドローンを操作してみる
ここまで環境が出来たら、Raspberry Piから制御出来るか確認してみましょう。
work/droneの直下にapp.jsファイルを作成してプログラムを書いてみます。
※ドローンの操縦コマンドはコチラを参照してください。
https://github.com/voodootikigod/node-rolling-spider/blob/master/README.md
// モジュール読み込み
const Drone = require("rolling-spider");
const drone = new Drone();

// 各種変数
drone.isActive = false;                           // ドローンがアクティブか否か

// ドローンの初期設定
drone.connect( () => {                            // BLE でドローンに接続し、接続できたらコールバック
  drone.setup( () => {                            // ドローンを初期設定してサービスや特徴を取得、その後コールバック
    drone.flatTrim();                             // トリムをリセット
    drone.startPing();                            // 継続的に接続させる
    drone.flatTrim();                             // トリムをリセット
    drone.isActive = true;                        // ドローンをアクティブ状態にする
    console.log(drone.name + " is ready.");       // 準備OKなことをコンソール出力

    // 離陸させる場合
    drone.takeOff();

    // 着陸させる場合
    drone.land();

    // 上昇 ※stepsの値は好きに変えてください。数字が多いと沢山移動します
    drone.up( {steps: 10});

    // 下降
    drone.down( {steps: 10} );

    // 右旋回
    drone.clockwise( {steps: 10} );

    // 左旋回
    drone.counterClockwise( {steps: 10} );

    // 右移動
    drone.right( {steps: 10} );

    // 左移動
    drone.left( {steps: 10} );

    // 宙返り
    drone.backFlip();

/*
    // バッテリーと電波強度を表示したい場合このコメントを削除してください
    drone.on('battery', function () {
    	console.log('Battery: ' + drone.status.battery + '%');
    	drone.signalStrength(function (err, val) {
            console.log('Signal: ' + val + 'dBm');
        });
    });
*/
  });
});
Firebaseの設定
次にHoloLensからの命令を受信するためにFirebaseにプロジェクトを新規作成します。
適当なプロジェクトを作成してください。
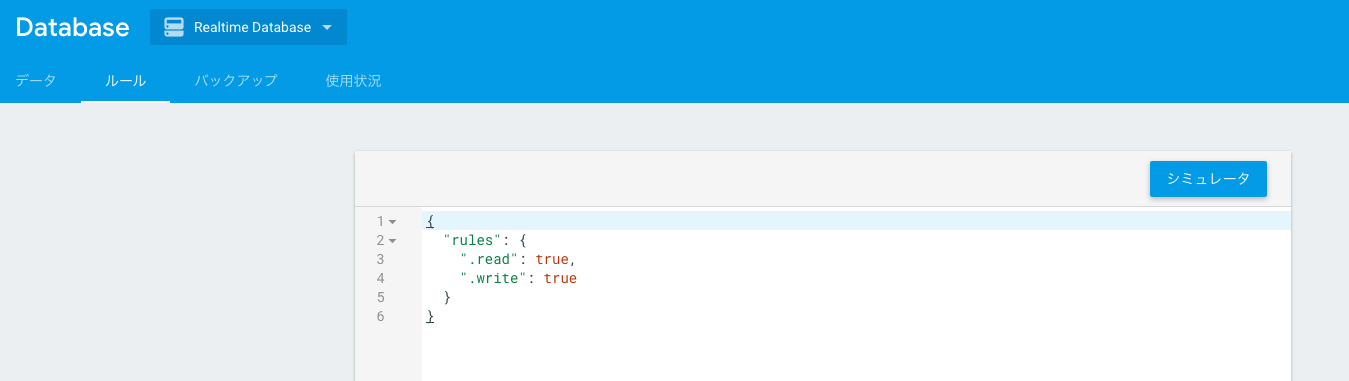
Realtime Databaseに書き込みルールを記述
このままでは誰も書き込めないので、ルールを記述します。
既に書いてあるルールは削除して、下記のように記述します。
{
  "rules": {
    ".read": true,
    ".write": true
  }
}
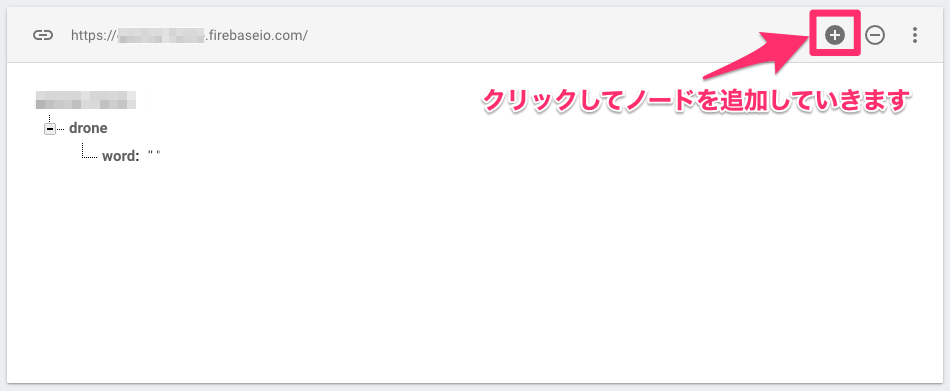
データ格納場所を記述する
今回はdroneノードを追加してその下にwordを記述しました。
これでFirebaseの環境は整いました。
Node.jsにFirebase環境構築
先程Node.jsにFirebaseをインストールしてもらいました。
次は、Node.jsがFirebaseの情報を受信出来るようにプログラムを修正していきます。
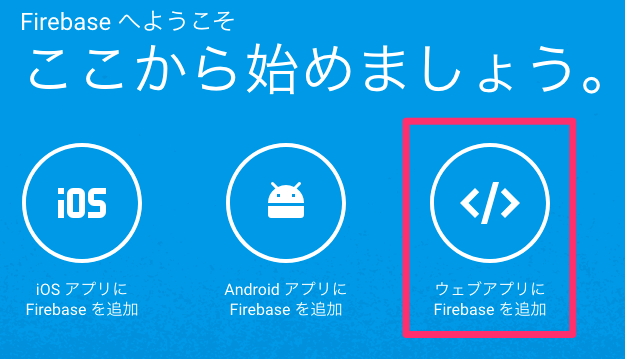
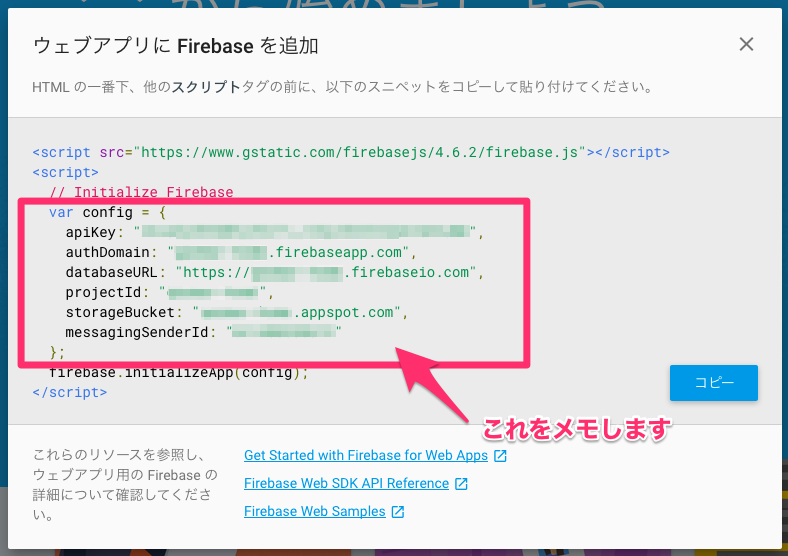
Firebaseのアクセスキーを取得する
Firebaseにアクセスするためのアクセスキーを管理画面から取得します。
ウェブアプリにFirebaseを追加をクリックして、表示されるアクセスキーをメモしておきます。
app.jsを修正する
先程のドローンを操縦するプログラムを修正して、Firebaseからデータを受信したら対応したアクションを行うようにします。
// モジュール読み込み
const Drone = require("rolling-spider");
const drone = new Drone();
var request = require('superagent');
var firebase = require("firebase");

// 各種変数
drone.isActive = false;                           // ドローンがアクティブか否か

// ドローンの初期設定
drone.connect( () => {                            // BLE でドローンに接続し、接続できたらコールバック
  drone.setup( () => {                            // ドローンを初期設定してサービスや特徴を取得、その後コールバック
    drone.flatTrim();                             // トリムをリセット
    drone.startPing();                            // 継続的に接続させる
    drone.flatTrim();                             // トリムをリセット
    drone.isActive = true;                        // ドローンをアクティブ状態にする
    console.log(drone.name + " is ready.");       // 準備OKなことをコンソール出力

/*
    // バッテリーと電波強度を表示したい場合
    drone.on('battery', function () {
    	console.log('Battery: ' + drone.status.battery + '%');
    	drone.signalStrength(function (err, val) {
            console.log('Signal: ' + val + 'dBm');
        });
    });
*/
  });
});

//firebase config
var config = {
  apiKey: "xxxxxxxxxxxxxxxxxxxxxxxxxxxxxxx",
  authDomain: "xxxxxxxxx.firebaseapp.com",
  databaseURL: "https://xxxxxxxx.firebaseio.com",
  projectId: "xxxxxxxx",
  storageBucket: "xxxxxxxx.appspot.com",
  messagingSenderId: "xxxxxxxxxx"
};
firebase.initializeApp(config);

//database更新時
var db = firebase.database();
db.ref("/drone").on("value", function(changedSnapshot) {
  //値取得
  var value = changedSnapshot.child("word").val();
  if (value) {

    if (value.split(" ")[0] == '離着陸') {
	if (!drone.status.flying) {
      	    drone.takeOff();
	} else {
	    drone.land();
	}

    } else if (value.split(" ")[0] == '離陸') {
      drone.takeOff();

    } else if (value.split(" ")[0] == '着陸') {
      drone.land();

    } else if (value.split(" ")[0] == '右旋回') {
      drone.clockwise( {steps: 10} );

    } else if (value.split(" ")[0] == '左旋回') {
      drone.counterClockwise( {steps: 10} );

    } else if (value.split(" ")[0] == '左移動') {
      drone.left( {steps: 10} );

    } else if (value.split(" ")[0] == '右移動') {
      drone.right( {steps: 10} );

    } else if (value.split(" ")[0] == '上昇') {
      drone.up( {steps: 10});

    } else if (value.split(" ")[0] == '下降') {
      drone.down( {steps: 10} );

    } else if (value.split(" ")[0] == '宙返り') {
      drone.backFlip();
    }

    //firebase clear
    db.ref("/drone").set({"word": ""});

  }
});
app.jsを実行する
app.jsを実行してみましょう。
$ sudo node app.js
ドローンとの接続が完了した後、
Firebaseからまずは離着陸命令を投げてみます。
するとすぐさまに受信されてコマンドが実行されます。

HoloLensからFirebaseに命令文字列を書き込む
最後の仕上げです。HoloLensのジェスチャーから対応したコマンドをFirebaseに書き込みます。
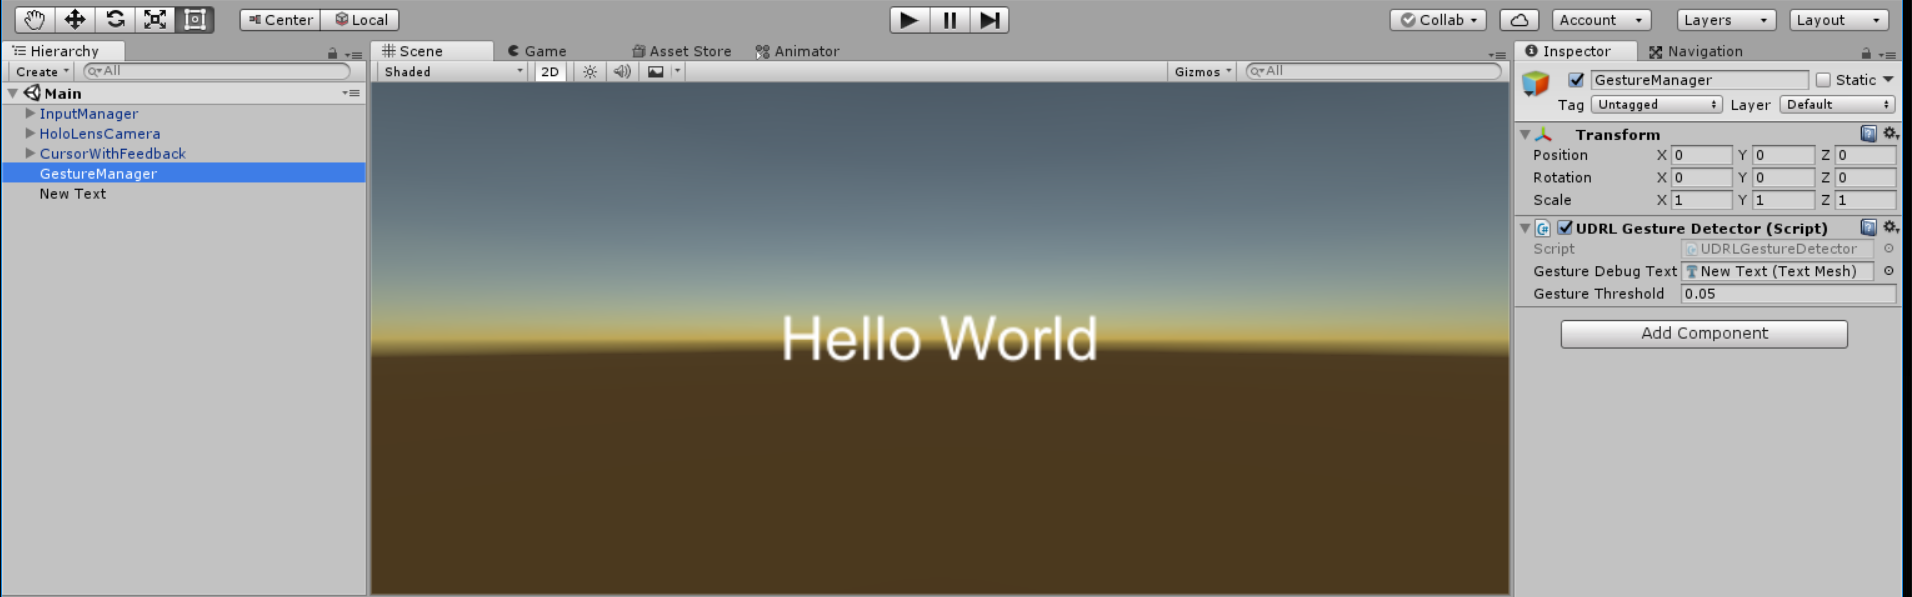
HoloLensの環境構築は割愛します。
HoloLensの画面はこんな感じに設定しました。
ジェスチャープログラムを実装する
ジェスチャーを受け取ったらFirebaseに書き込むまでの処理のサンプルです。
ジャスチャーはコチラを参考にさせて頂きました。
Firebaseに書き込む処理はコチラも参考にしてください。
サンプルプログラムは以下の通りです。
using HoloToolkit.Unity.InputModule;
using System;
using System.Collections;
using System.Collections.Generic;
using System.Text;
using UnityEngine;
using UnityEngine.Networking;
using UnityEngine.VR.WSA.Input;

public class UDRLGestureDetector : MonoBehaviour, IInputHandler
{
    string fb_url = "https://xxxxxxxx.firebaseio.com/xxxxxxx/word.json";

    public TextMesh GestureDebugText;
    public enum Direction
    {
        Neutral, Up, Down, Right, Left
    }

    public enum GestureEventType
    {
        DETECTING, DETECTED
    }

    private static readonly Dictionary<Direction, char> DirectionCodeDic = new Dictionary<Direction, char>()
        {
            {Direction.Up,    'U' },
            {Direction.Down,  'D' },
            {Direction.Right, 'R' },
            {Direction.Left,  'L' },
        };

    public class GestureEventArgs : EventArgs
    {
        public GestureEventType Type { get; set; }
        public Direction Direction { get; set; }
        public string Pattern { get; set; }
    }

    public static EventHandler<GestureEventArgs> GestureDetected;

    public float GestureThreshold = 0.05f;

    private bool notifyGesture;

    private Vector3 lastPos;
    private Direction currentDirection;

    private StringBuilder gesturePattern = new StringBuilder();
    private float accumulatedDx;
    private float accumulatedDy;

    private float presstime;
    private float taptime;  // ダブルタップタイム格納用
    private float PressIntervalTime = 0.5f;// ダブルタップタイム判定時間間隔

    private void Start()
    {
    }

    private void OnDestroy()
    {
    }

    void OnEnable()
    {
        InteractionManager.SourcePressed += OnSourcePressed;
        InteractionManager.SourceReleased += OnSourceReleased;
        InteractionManager.SourceUpdated += OnSourceUpdated;
        InteractionManager.SourceLost += OnSourceLost;
        InteractionManager.SourceDetected += OnSourceDetected;
    }


    void OnDisable()
    {
        InteractionManager.SourcePressed -= OnSourcePressed;
        InteractionManager.SourceReleased -= OnSourceReleased;
        InteractionManager.SourceUpdated -= OnSourceUpdated;
        InteractionManager.SourceLost -= OnSourceLost;
        InteractionManager.SourceDetected -= OnSourceDetected;
    }

    private void OnSourceDetected(InteractionSourceState state)
    {
        Vector3 pos;
        if (state.properties.location.TryGetPosition(out pos))
        {
            this.lastPos = pos;
        }

        this.notifyGesture = false;
        this.currentDirection = Direction.Neutral;
        this.accumulatedDx = 0;
        this.accumulatedDy = 0;
    }

    private void OnSourcePressed(InteractionSourceState state)
    {
        // タップ開始時にジェスチャー通知を有効化

        presstime = Time.time;

        // ※タップ開始前から、ジェスチャーの追跡は行っている。
        if (!this.notifyGesture)
        {
            this.notifyGesture = true;
            gesturePattern.Remove(0, gesturePattern.Length);

            // タップし始めたタイミングで、事前の移動量を多少引き継ぐ
            this.accumulatedDx = Mathf.Min(this.accumulatedDx, GestureThreshold);
            this.accumulatedDy = Mathf.Min(this.accumulatedDy, GestureThreshold);
            this.accumulatedDx = Mathf.Max(this.accumulatedDx, -GestureThreshold);
            this.accumulatedDy = Mathf.Max(this.accumulatedDy, -GestureThreshold);
            this.accumulatedDx /= 2;
            this.accumulatedDy /= 2;
        }
    }

    private void OnSourceUpdated(InteractionSourceState state)
    {
        // ジェスチャーを更新
        TraceGesture(state);
    }

    private void OnSourceReleased(InteractionSourceState state)
    {
        // ダブルタップ判定
        if (Time.time - presstime < PressIntervalTime)
        {
            if (Time.time - taptime < PressIntervalTime)
            {
                GestureDebugText.text += "\r\n Double Tap!";
                StartCoroutine(Put(fb_url, "\"離着陸\""));
            }
        }
        taptime = Time.time;

        // タップ終了時にジェスチャーを確定
        NotifyGestureDetected();
    }

    private void OnSourceLost(InteractionSourceState state)
    {
        GestureDebugText.text = "";

        // トラッキングロスト時にジェスチャーを確定
        NotifyGestureDetected();
    }

    private void TraceGesture(InteractionSourceState state)
    {
        // カメラの上方向をy軸、右方向をx軸とする
        var axisY = Camera.main.transform.up;
        var axisX = Camera.main.transform.right;

        // 手の位置を取得
        Vector3 pos;
        if (state.properties.location.TryGetPosition(out pos))
        {
            // 手の移動量
            var diff = pos - this.lastPos;
            this.lastPos = pos;

            // x,y軸方向の移動量を取得する
            float dx = Vector3.Dot(axisX, diff);
            float dy = Vector3.Dot(axisY, diff);

            // 誤差の蓄積で暴発しないように、dx, dyの大きい要素のみ加算する
            // TODO: これむしろダメかも
            if (Mathf.Abs(dx) > Mathf.Abs(dy))
            {
                // 検知中の方向への加算は0に抑制する
                if (this.currentDirection == Direction.Right && dx > 0)
                {
                    this.accumulatedDx += 0;
                }
                else if (this.currentDirection == Direction.Left && dx < 0)
                {
                    this.accumulatedDx += 0;
                }
                else
                {
                    this.accumulatedDx += dx;
                }
            }
            else
            {
                // 検知中の方向への加算は0に抑制する
                if (this.currentDirection == Direction.Up && dy > 0)
                {
                    this.accumulatedDy += 0;
                }
                else if (this.currentDirection == Direction.Down && dy < 0)
                {
                    this.accumulatedDy += 0;
                }
                else
                {
                    this.accumulatedDy += dy;
                }
            }

            // 蓄積した移動量が閾値以上になれば、ジェスチャーと判定
            // Right
            Direction dir = Direction.Neutral;
            if (this.accumulatedDx > GestureThreshold)
            {
                dir = Direction.Right;
            }
            // Left
            else if (this.accumulatedDx < -GestureThreshold)
            {
                dir = Direction.Left;
            }
            // Up
            else if (this.accumulatedDy > GestureThreshold)
            {
                dir = Direction.Up;
            }
            // Down
            else if (this.accumulatedDy < -GestureThreshold)
            {
                dir = Direction.Down;
            }

            if (dir != Direction.Neutral && this.currentDirection != dir && this.notifyGesture)
            {
                Debug.LogFormat("Gesture Detect {0}", dir);
                if (this.GestureDebugText != null)
                {
                    this.GestureDebugText.text += string.Format("\r\n Detect Gesture: {0}", dir);

                    // 対応したジェスチャーのコマンドをFirebaseに書き込む
                    if (dir == Direction.Up)
                    {
                        StartCoroutine(Put(fb_url, "\"上昇\""));
                    } else if (dir == Direction.Down)
                    {
                        StartCoroutine(Put(fb_url, "\"下降\""));
                    } else if (dir == Direction.Left)
                    {
                        StartCoroutine(Put(fb_url, "\"左移動\""));
                    } else if (dir == Direction.Right)
                    {
                        StartCoroutine(Put(fb_url, "\"右移動\""));
                    }
                }
                this.currentDirection = dir;
                this.accumulatedDx = 0;
                this.accumulatedDy = 0;

                this.gesturePattern.Append(DirectionCodeDic[dir]);

            }
        }
        else
        {
            Debug.Log("InteractionSourceLocation::TryGetPosition failed.");
            if (this.GestureDebugText != null) this.GestureDebugText.text += "\r\n InteractionSourceLocation::TryGetPosition failed";
        }
    }

    private void NotifyGestureDetected()
    {
        if (this.notifyGesture)
        {
            // Clear
            this.notifyGesture = false;
            this.currentDirection = Direction.Neutral;
            this.accumulatedDx = 0;
            this.accumulatedDy = 0;
        }
    }

    public void OnInputDown(InputEventData eventData)
    {
        this.notifyGesture = true;
        this.currentDirection = Direction.Neutral;
        this.accumulatedDx = 0;
        this.accumulatedDy = 0;
    }

    public void OnInputUp(InputEventData eventData)
    {
        this.notifyGesture = false;
    }

    // Firebaseに書き込む
    public IEnumerator Put(string url, string jsonStr)
    {

        var request = new UnityWebRequest();
        request.url = url;
        byte[] body = Encoding.UTF8.GetBytes(jsonStr);
        request.uploadHandler = new UploadHandlerRaw(body);
        request.downloadHandler = new DownloadHandlerBuffer();
        request.SetRequestHeader("Content-Type", "application/json; charset=UTF-8");
        request.method = UnityWebRequest.kHttpVerbPUT;
        yield return request.Send();

        if (request.isNetworkError)
        {
            Debug.Log(request.error);
        }
        else
        {
            if (request.responseCode == 200)
            {
                Debug.Log("success");
                Debug.Log(request.downloadHandler.text);

            }
            else
            {
                Debug.Log("failed");
            }
        }
    }
}
まとめ
簡単にドローンとHoloLensを連携させることが出来ました。
やってる事は全て単純なものですが、
SF映画に出てきた世界にかなり近づいてきた感じを受けました。