Echo Showが発売されスマートディスプレイが盛り上がってまいりました。
先日発表されたAPL(Alexa Presentation Language)を使えば音声と視覚の両方を抑えたスキルの開発ができます。
APLでのタッチ処理について解説します。
2019/01/17 APL有効化に関する記述を追記(@zono_0 さんご指摘ありがとうございました!)
完成動画
APL(Alexa Presentation Language)のタッチ処理を実装してみた#alexa #apl pic.twitter.com/M3rewzxi2w
— がおまる@スマートスピーカーアプリ開発入門発売中! (@gaomar) 2018年12月17日
環境
- ask-sdk-core v2.3.0
- ask-sdk-model v1.9.0
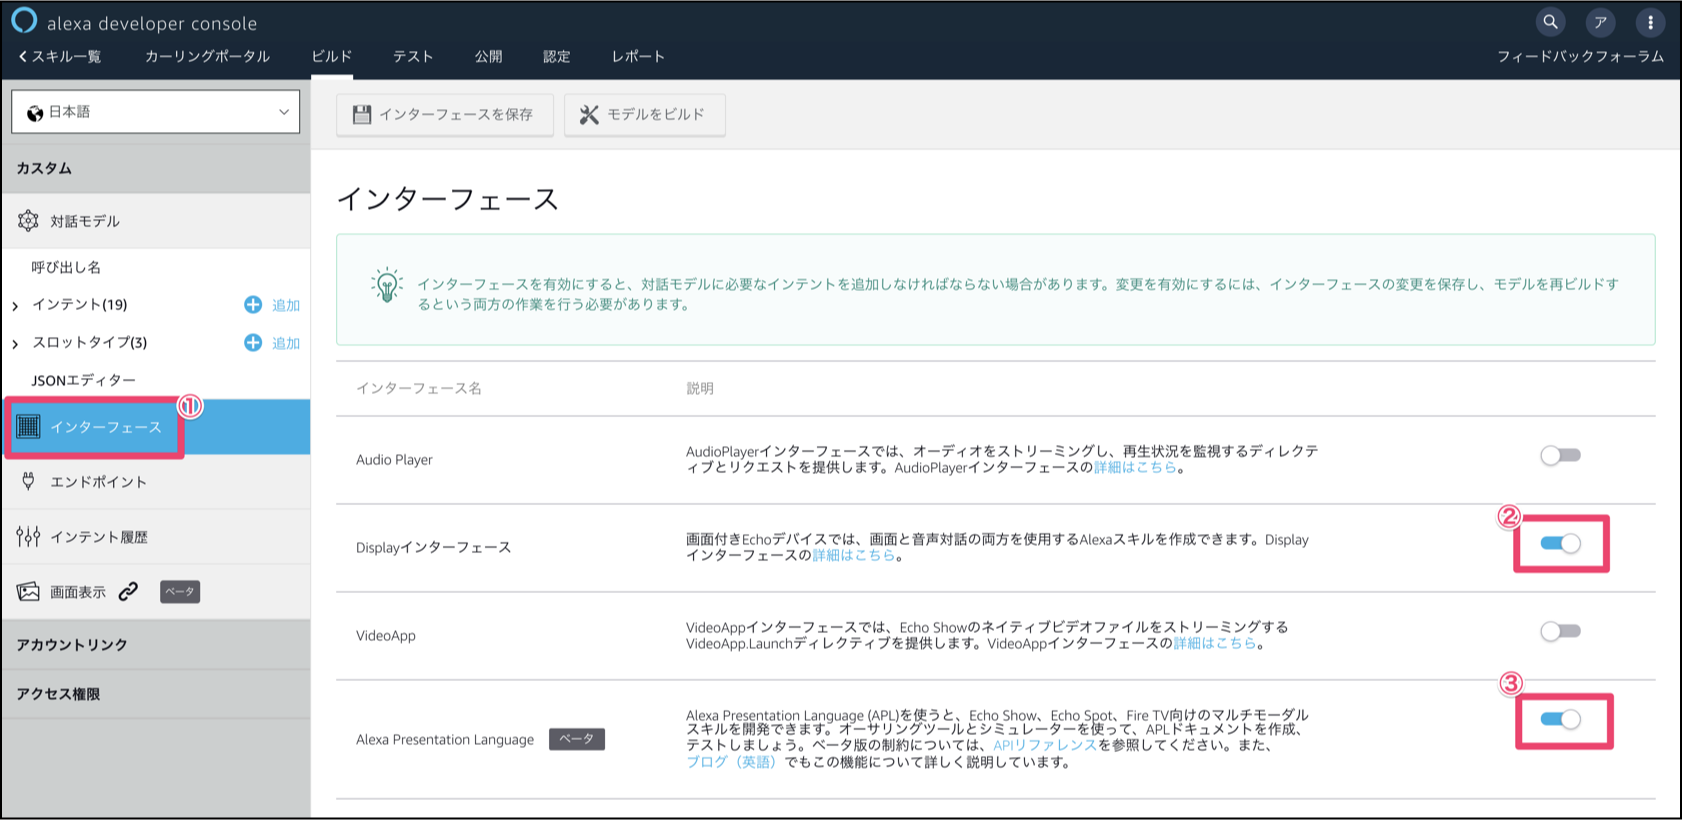
1. APLを有効化する
alexa developer consoleにあるインターフェースのDisplayインターフェースとAlexa Presentation Languageをそれぞれ有効にしておきます。そうしないとうまく反応が返ってきませんので注意しましょう。
2. タッチ処理実装
Echo ShowやEcho Spotで画面タッチ処理をAPLで行う場合はTouchWrapperというものを使って実装します。
TouchWrapperに関する詳しいドキュメントはコチラをご確認ください。
2-1. documentの記述
以下はAPLのdocumentの記述例です。これはデザインの側の実装です。
Sequenceでリストの表示をしています。TouchWarapperの子アイテムでタッチする対象のものを記述する形です。
argumentsでどのボタンが押されたか分かるようになっています。
{
    "type": "APL",
    "version": "1.0",
    "theme": "dark",
    "import": [
        {
            "name": "alexa-layouts",
            "version": "1.0.0"
        }
    ],
    "resources": [
        {
            "strings": {
                "skillName": "アイエンター受付システム",
                "menuText": "該当するメニューをタップしてください。"
            }
        }
    ],
    "styles": {},
    "layouts": {},
    "mainTemplate": {
        "parameters": [
            "payload"
        ],
        "items": [
            {
                "type": "Container",
                "direction": "column",
                "items": [
                    {
                        "type": "Frame",
                        "width": "100vw",
                        "height": "100vh",
                        "backgroundColor": "#999999"
                    },
                    {
                        "type": "Frame",
                        "width": "100vw",
                        "height": "15vh",
                        "backgroundColor": "#b52e29",
                        "position": "absolute"
                    },
                    {
                        "type": "Container",
                        "position": "absolute",
                        "items": [
                            {
                                "type": "Text",
                                "text": "@skillName",
                                "height": "15vh",
                                "paddingLeft": "4vw",
                                "textAlignVertical": "center"
                            },
                            {
                                "type": "Container",
                                "alignItems": "center",
                                "justifyContent": "center",
                                "height": "70vh",
                                "items": [
                                    {
                                        "type": "Sequence",
                                        "scrollDirection": "horizontal",
                                        "data": "${payload.skilldata.image}",
                                        "width": "100vw",
                                        "item": {
                                            "type": "TouchWrapper",
                                            "onPress": {
                                                "type": "SendEvent",
                                                "arguments": [
                                                    "${data.name}"
                                                ]
                                            },
                                            "item": {
                                                "type": "Image",
                                                "source": "${data.icon}",
                                                "width": "34vw",
                                                "height": "34vh"
                                            }
                                        }
                                    }
                                ]
                            },
                            {
                                "type": "Text",
                                "id": "SpeechComponent_0",
                                "speech": "${payload.skilldata.properties.Speech_0}",
                                "text": "@menuText",
                                "textAlign": "center"
                            }
                        ]
                    }
                ]
            }
        ]
    }
}
2-2. dataの記述
dataの記述でdocumentにデータを渡す。
{
    "skilldata": {
        "type": "object",
        "image": [
            {
                "icon": "https://お好きな画像のURL.png",
                "name": "ボタン1"
            },
            {
                "icon": "https://お好きな画像のURL.png",
                "name": "ボタン2"
            },
            {
                "icon": "https://お好きな画像のURL.png",
                "name": "ボタン3"
            }
        ],
        "properties": {
          "Ssml_0": "<speak>タップしてください。</speak>"
        },
        "transformers": [
            {
                "inputPath": "Ssml_0",
                "outputName": "Speech_0",
                "transformer": "ssmlToSpeech"
            }
        ]
    }
}
3. 呼び出すプログラムを実装する
AWS Lambdaで記述するプログラム例です。.addDirectiveでdocumentとdataをそれぞれ指定します。
'use strict';

const Alexa = require('ask-sdk-core');

// 起動時に呼ばれる
const LaunchRequestHandler = {
    canHandle(handlerInput) {
      return handlerInput.requestEnvelope.request.type === 'LaunchRequest';
    },
    handle(handlerInput) {
        const speechText = '該当するメニューをタップしてください。';

        // documentとdataをそれぞれ指定する
        return handlerInput.responseBuilder
            .speak(speechText)
            .addDirective({
                type : 'Alexa.Presentation.APL.RenderDocument',
                version: '1.0',
                token: "token",
                document: require('./document/apl_doc_top.json'),
                datasources: require('./data/apl_data_top.json')
            })
            .getResponse();

	}
};

// 画面タッチ処理
// シミュレーターではonPressが反応し、実機ではPressが反応するため2つ書いておく
const TouchEventHandler = {
    canHandle(handlerInput) {
    return ((handlerInput.requestEnvelope.request.type === 'Alexa.Presentation.APL.UserEvent' &&
        (handlerInput.requestEnvelope.request.source.handler === 'Press' ||
        handlerInput.requestEnvelope.request.source.handler === 'onPress')));
    },
    handle(handlerInput) {
        // TcouhWrapperのargumentsで指定したパラメータを取得する
        const choice = handlerInput.requestEnvelope.request.arguments[0];

        const speechText = `メニュー${choice}をタップしました。`

        return handlerInput.responseBuilder
            .speak(speechText)
            .getResponse();
    }
};

// 終了時に呼ばれる
const SessionEndedRequestHandler = {
    canHandle(handlerInput) {
      return handlerInput.requestEnvelope.request.type === 'SessionEndedRequest';
    },
    handle(handlerInput) {
      return handlerInput.responseBuilder
            .withShouldEndSession(true)
            .getResponse();
    }
};

// EndIntent
const EndHandler = {
    canHandle(handlerInput) {
        return handlerInput.requestEnvelope.request.type === 'IntentRequest'
            && (handlerInput.requestEnvelope.request.intent.name === 'AMAZON.StopIntent' ||
                handlerInput.requestEnvelope.request.intent.name === 'AMAZON.CancelIntent' ||
                handlerInput.requestEnvelope.request.intent.name === 'AMAZON.NoIntent');
    },
    handle(handlerInput) {
        const speechText = 'バイバイ!またね!';

        return handlerInput.responseBuilder
            .speak(speechText)
            .withShouldEndSession(true)
            .getResponse();
    }
};

const ErrorHandler = {
    canHandle(handlerInput, error) {
        return true;
    },
    handle(handlerInput, error) {
        const speechText = 'すみません、よく分かりませんでした。';

        return handlerInput.responseBuilder
            .speak(speechText)
            .reprompt(speechText)
            .getResponse();
    }
};

let skill;
exports.handler = async (event, context) =>{
  if(!skill){
    skill = Alexa.SkillBuilders.custom()
        .addRequestHandlers(
            LaunchRequestHandler,
            TouchEventHandler,
            EndHandler,
            SessionEndedRequestHandler)
        .addErrorHandlers(ErrorHandler)
        .create();
  }
  return skill.invoke(event);
}
これを実行するとこのようなAPLになります。
2018年12月12日ぐらいからシミュレーターでもタッチ反応できるようになったので、
テストがかなり楽になりました!!

繰り返し発話する処理
APLにはコマンド実行することができ、特殊な動きはこのコマンドを使って実装していきます。
詳細はこちらに明記されています。
今回の例では、タッチされずにある一定時間放置されると「タップしてください」と促すようにしたいと思います。
完成動画のように文字がハイライト表示されて水色の文字に一瞬変えることができます。
index.jsの一部を変更します。
.addDirectiveにAlexa.Presentation.APL.ExecuteCommandsを追加します。
5秒待ってから、「タップしてください」と言わせています。repeatCountで2度繰り返すようにしています。
公式ドキュメントにハイライトの説明でkaraoke状態という記載があったので、そこは面白いですね!
// 起動時に呼ばれる
const LaunchRequestHandler = {
    canHandle(handlerInput) {
      return handlerInput.requestEnvelope.request.type === 'LaunchRequest';
    },
    handle(handlerInput) {
        const speechText = '該当するメニューをタップしてください。';

        return handlerInput.responseBuilder
            .speak(speechText)
            .addDirective({
                type : 'Alexa.Presentation.APL.RenderDocument',
                version: '1.0',
                token: "token",
                document: require('./document/apl_doc_top.json'),
                datasources: require('./data/apl_data_top.json')
            })
            .addDirective({
                type : 'Alexa.Presentation.APL.ExecuteCommands',
                token: "token",
                commands: [
                    {
                        type: "Sequential",
                        commands: [
                            {
                                type: "Idle",
                                delay: 5000
                            },
                            {
                                type: "SpeakItem",
                                componentId: "SpeechComponent_0",
                                highlightMode: "line",
                            }
                        ],
                        repeatCount: 2
                    }
                ]
            })
            .getResponse();

	}
};
今回使用したAPL
今回使用したAPLです。APL画面のコードアップロードからこのjsonファイルを指定すると確認することができます。
https://developer.amazon.com/alexa/console/ask/displays
イメージ画像はお好きな画像URLを指定してください。
{
    "document": {
        "type": "APL",
        "version": "1.0",
        "theme": "dark",
        "import": [
            {
                "name": "alexa-layouts",
                "version": "1.0.0"
            }
        ],
        "resources": [
            {
                "strings": {
                    "skillName": "アイエンター受付システム",
                    "menuText": "該当するメニューをタップしてください。"
                }
            }
        ],
        "styles": {},
        "layouts": {},
        "mainTemplate": {
            "parameters": [
                "payload"
            ],
            "items": [
                {
                    "type": "Container",
                    "direction": "column",
                    "items": [
                        {
                            "type": "Text",
                            "id": "SpeechComponent_0",
                            "speech": "タップしてください。",
                            "position": "absolute",
                            "width": 0,
                            "height": 0
                        },
                        {
                            "type": "Frame",
                            "width": "100vw",
                            "height": "100vh",
                            "backgroundColor": "#999999"
                        },
                        {
                            "type": "Frame",
                            "width": "100vw",
                            "height": "15vh",
                            "backgroundColor": "#b52e29",
                            "position": "absolute"
                        },
                        {
                            "type": "Container",
                            "position": "absolute",
                            "items": [
                                {
                                    "type": "Text",
                                    "text": "@skillName",
                                    "height": "15vh",
                                    "paddingLeft": "4vw",
                                    "textAlignVertical": "center"
                                },
                                {
                                    "type": "Container",
                                    "alignItems": "center",
                                    "justifyContent": "center",
                                    "height": "70vh",
                                    "items": [
                                        {
                                            "type": "Sequence",
                                            "scrollDirection": "horizontal",
                                            "data": "${payload.skilldata.image}",
                                            "width": "100vw",
                                            "item": {
                                                "type": "TouchWrapper",
                                                "onPress": {
                                                    "type": "SendEvent",
                                                    "arguments": [
                                                        "${data.name}"
                                                    ]
                                                },
                                                "item": {
                                                    "type": "Image",
                                                    "source": "${data.icon}",
                                                    "width": "34vw",
                                                    "height": "34vh"
                                                }
                                            }
                                        }
                                    ]
                                },
                                {
                                    "type": "Text",
                                    "text": "@menuText",
                                    "textAlign": "center"
                                }
                            ]
                        }
                    ]
                }
            ]
        }
    },
    "dataSources": {
        "skilldata": {
            "image": [
                {
                    "icon": "https://おすきな画像.png",
                    "name": "btn1"
                },
                {
                    "icon": "https://お好きな画像.png",
                    "name": "btn2"
                },
                {
                    "icon": "https://お好きな画像.png",
                    "name": "btn3"
                }
            ],
            "properties": {
                "Ssml_0": "<speak>タップしてください。</speak>"
              },
              "transformers": [
                  {
                      "inputPath": "Ssml_0",
                      "outputName": "Speech_0",
                      "transformer": "ssmlToSpeech"
                  }
              ]
        }
    }
}
repromptは記述しない方がいい?
Echo DotやEchoなどのスマートスピーカーはrepromptの記載がないとスキルが終了してしまいますが、
Echo Show、Spotではスキルは終了されません。
タッチを要求するシーンでは無いほうが良いかと思います。repromptの記述があるとユーザーの音声を待つ状態になり、
画面も暗くなってしまうからです。
ただこの場合に再び音声反応させる場合は「アレクサ」とウェイクワードを言わないと駄目ですが。。。
Echo ShowやSpotでは明示的にスキルを終了させる場合はwithShouldEndSessionをtrueにすることでスキルを終了させることができます。
// EndIntent
const EndHandler = {
    canHandle(handlerInput) {
        return handlerInput.requestEnvelope.request.type === 'IntentRequest'
            && (handlerInput.requestEnvelope.request.intent.name === 'EndIntent' ||
                handlerInput.requestEnvelope.request.intent.name === 'AMAZON.StopIntent' ||
                handlerInput.requestEnvelope.request.intent.name === 'AMAZON.CancelIntent' ||
                handlerInput.requestEnvelope.request.intent.name === 'AMAZON.NoIntent');
    },
    handle(handlerInput) {
        const speechText = 'バイバイ!またね!';

        return handlerInput.responseBuilder
            .speak(speechText)
            .withShouldEndSession(true) /* 明示的にスキルを終了させる*/
            .getResponse();
    }
};
まとめ
画面付きになり、リッチな表現をすることができるようになりました。
あくまでもメインはVUI(音声操作)なので、声で操作する方をメインにおきつつ、せっかくの画面付きなのでうまく使い分けましょう。
システム化のご検討やご相談は弊社までお問い合わせください。
https://i-enter.co.jp/contact/