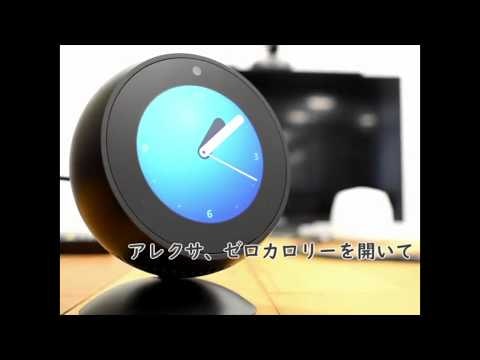
2019年7月6日〜2019年7月7日にかけて開催されたAlexaスキルアワード2019ハッカソン大阪で作った「ゼロカロリー」というスキルで使った技術を惜しみなく晒していきます。
イベントレポートはこちら
https://note.mu/gaomar/n/nc27f57c89201
はじめに
2日間のハッカソンなので、とりあえず動くプロトタイプを作っています。セキュリティ対策などほとんどしていないので、参考程度にお楽しみください。
作ったものはサンドウィッチマンの伊達さんが考案したゼロカロリー理論を誰でも登録できるシステムです。登録したものをAlexaが答えてくれます。
完成動画
アーキテクチャ
使った技術は以下の通り。Alexaのハッカソンなのに関係ない技術ばかりw
- Alexa Skills Kit
- Dialogflow
- MessagingAPI
- LINE Bot
- DynamoDB
- API Gateway
- AWS Lambda
- Azure Functions

1. 登録・取得用のAPIを作成
まずは食べ物の名前とゼロカロリーの理由を登録する処理を行います。
API Gateway → AWS Lambda → DynamoDBという流れです。S3もありますが、今回のハンズオンでは直接画像をアップロードしています。
↓ アーキテクチャのこの部分 ↓

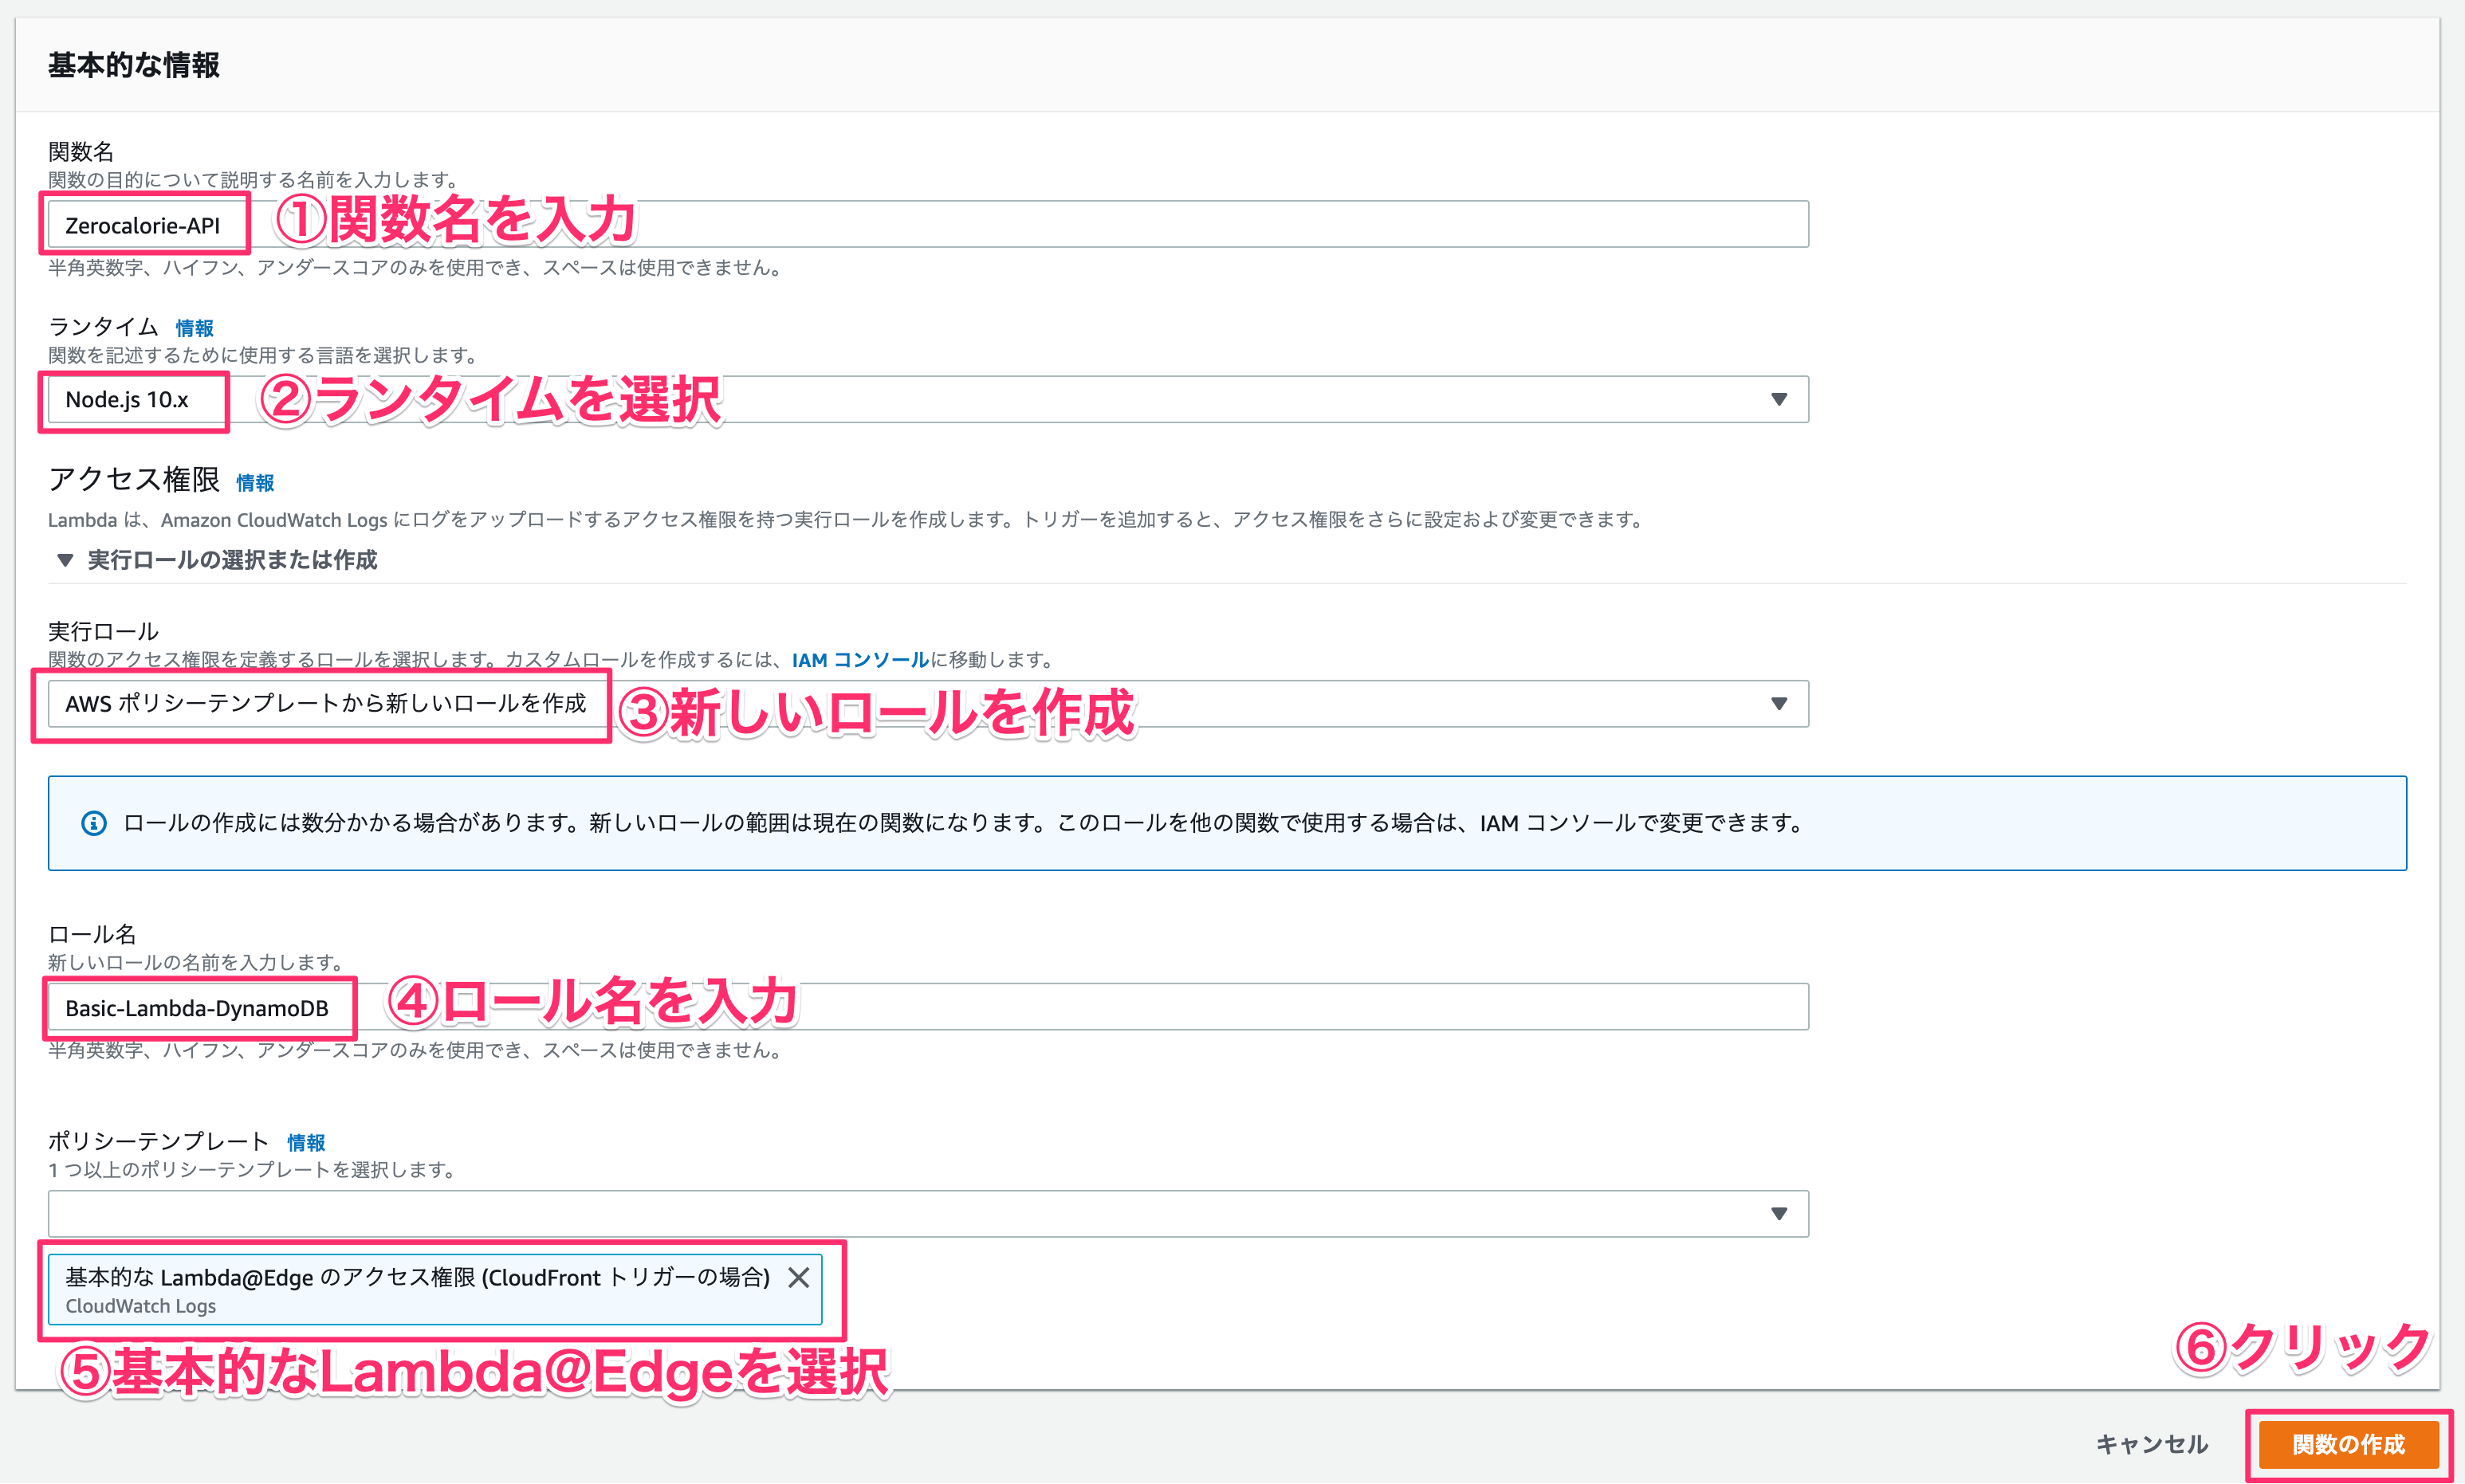
1-1. AWS Lambda関数を作成する
サクッと関数を作成します。
| 項目 | 値 |
|---|---|
| ①関数名 | Zerocalorie-API |
| ②ランタイム | Node.js 10.x |
| ③実行ロール | AWS ポリシーテンプレートから新しいロールを作成 |
| ④ロール名 | Basic-Lambda-DynamoDB |
| ⑤ポリシーテンプレート | 基本的なLambda@Edgeのアクセス権限 |
1-2. プログラムを記述する
では実際にプログラムを書いていきます。
'use strict';
const Util = require('./util.js');

exports.handler = async (event) => {
    var ret = {
        "fulfillmentText": ""
    };

    if (event.httpMethod === 'POST') {
        // 投稿
        const body = JSON.parse(event.body);
        const food = body.queryResult.parameters.food;
        const reason = body.queryResult.parameters.reason;

        // DynamoDBに保存する
        await Util.putCalorie(food, reason);

        ret.fulfillmentText = `${food}を登録しました。`;

    } else if (event.httpMethod === 'GET') {
        // 取得
        const food = event.queryStringParameters.food;
        ret = await Util.searchCalorie(food);

    }

    const response = {
        statusCode: 200,
        body: JSON.stringify(ret)
    };

    return response;
};
'use strict';
const AWS = require('aws-sdk');
const DynamoDB = new AWS.DynamoDB.DocumentClient({
  region: "ap-northeast-1"
});
const documentClient = new AWS.DynamoDB.DocumentClient();
const uuid = require("uuid/v4")

// ゼロカロリー理論登録
module.exports.putCalorie = async function putCalorie(food, reason) {
    // テーブル名設定
    const tableName = process.env.DYNAMO_TABLE_NAME;

    // DynamoDBに書き込む
    await documentClient.put( {
        "TableName": tableName,
        "Item": {
          "ID": uuid(),
          "food": food,
          "reason": reason
        }
    }, function( err, data ) {
        console.log(err);

    }).promise();
};

// ゼロカロリー理論検索
module.exports.searchCalorie = async function searchCalorie(food) {
  try {
    // queryの実行
    const queryItems = await DynamoDB.query({
      TableName: process.env.DYNAMO_TABLE_NAME,
      IndexName: 'food-index',
      KeyConditionExpression: "#FOOD = :FOOD",
      ExpressionAttributeNames: {"#FOOD": "food"},
      ExpressionAttributeValues: {":FOOD": food}
    }).promise();

    // 結果をreturnする
    return queryItems;

  } catch (err) {
    // エラー発生時はエラー文をreturnする
    console.error(`[Error]: ${JSON.stringify(err)}`);
    return err;
  }
};
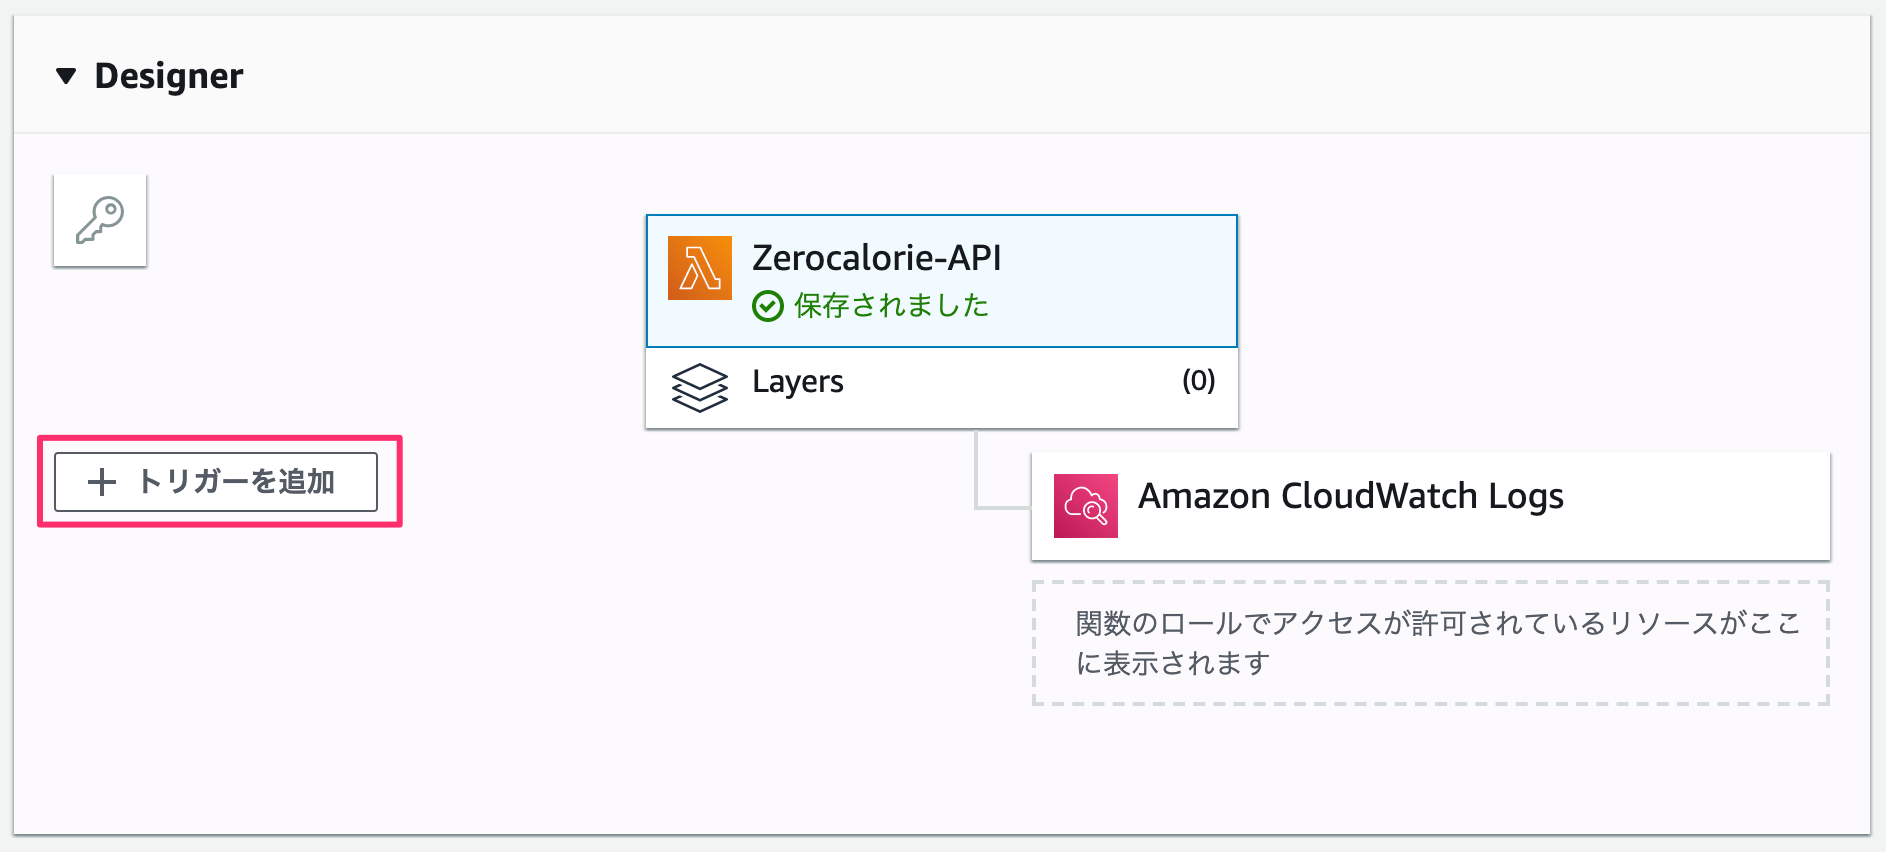
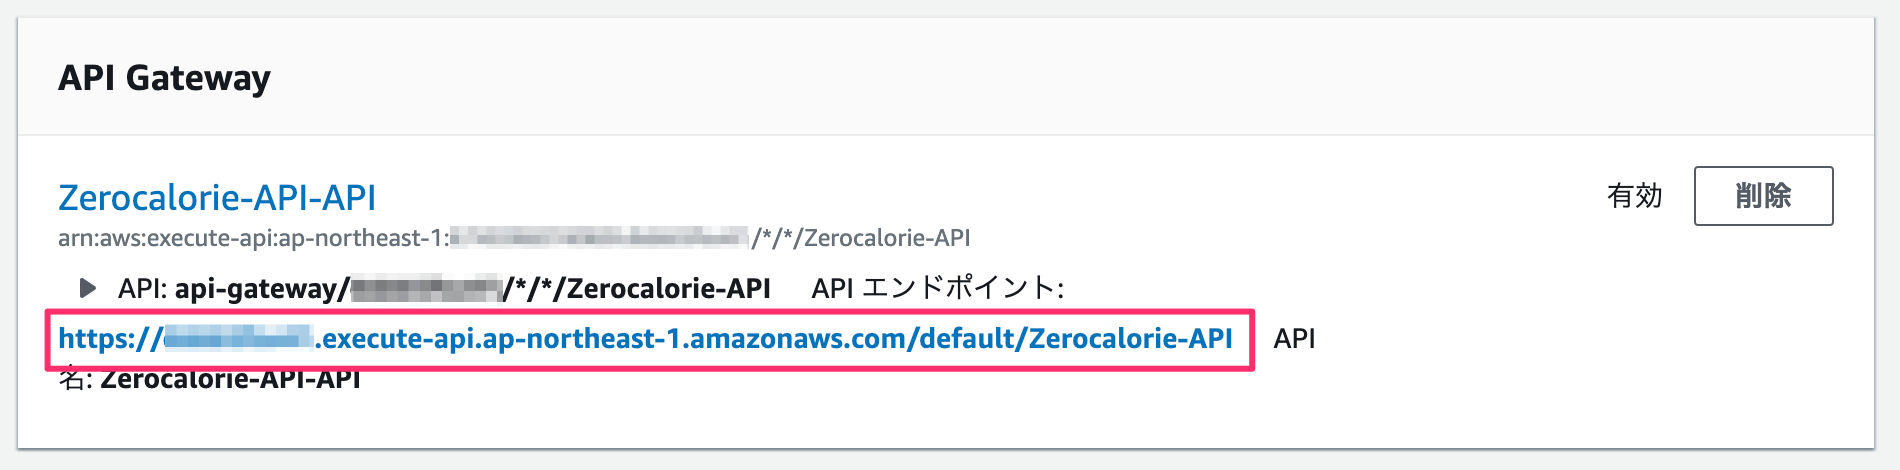
1-3. API Gatewayを設定する
トリガーの追加をクリック
API Gatewayの設定を行う。
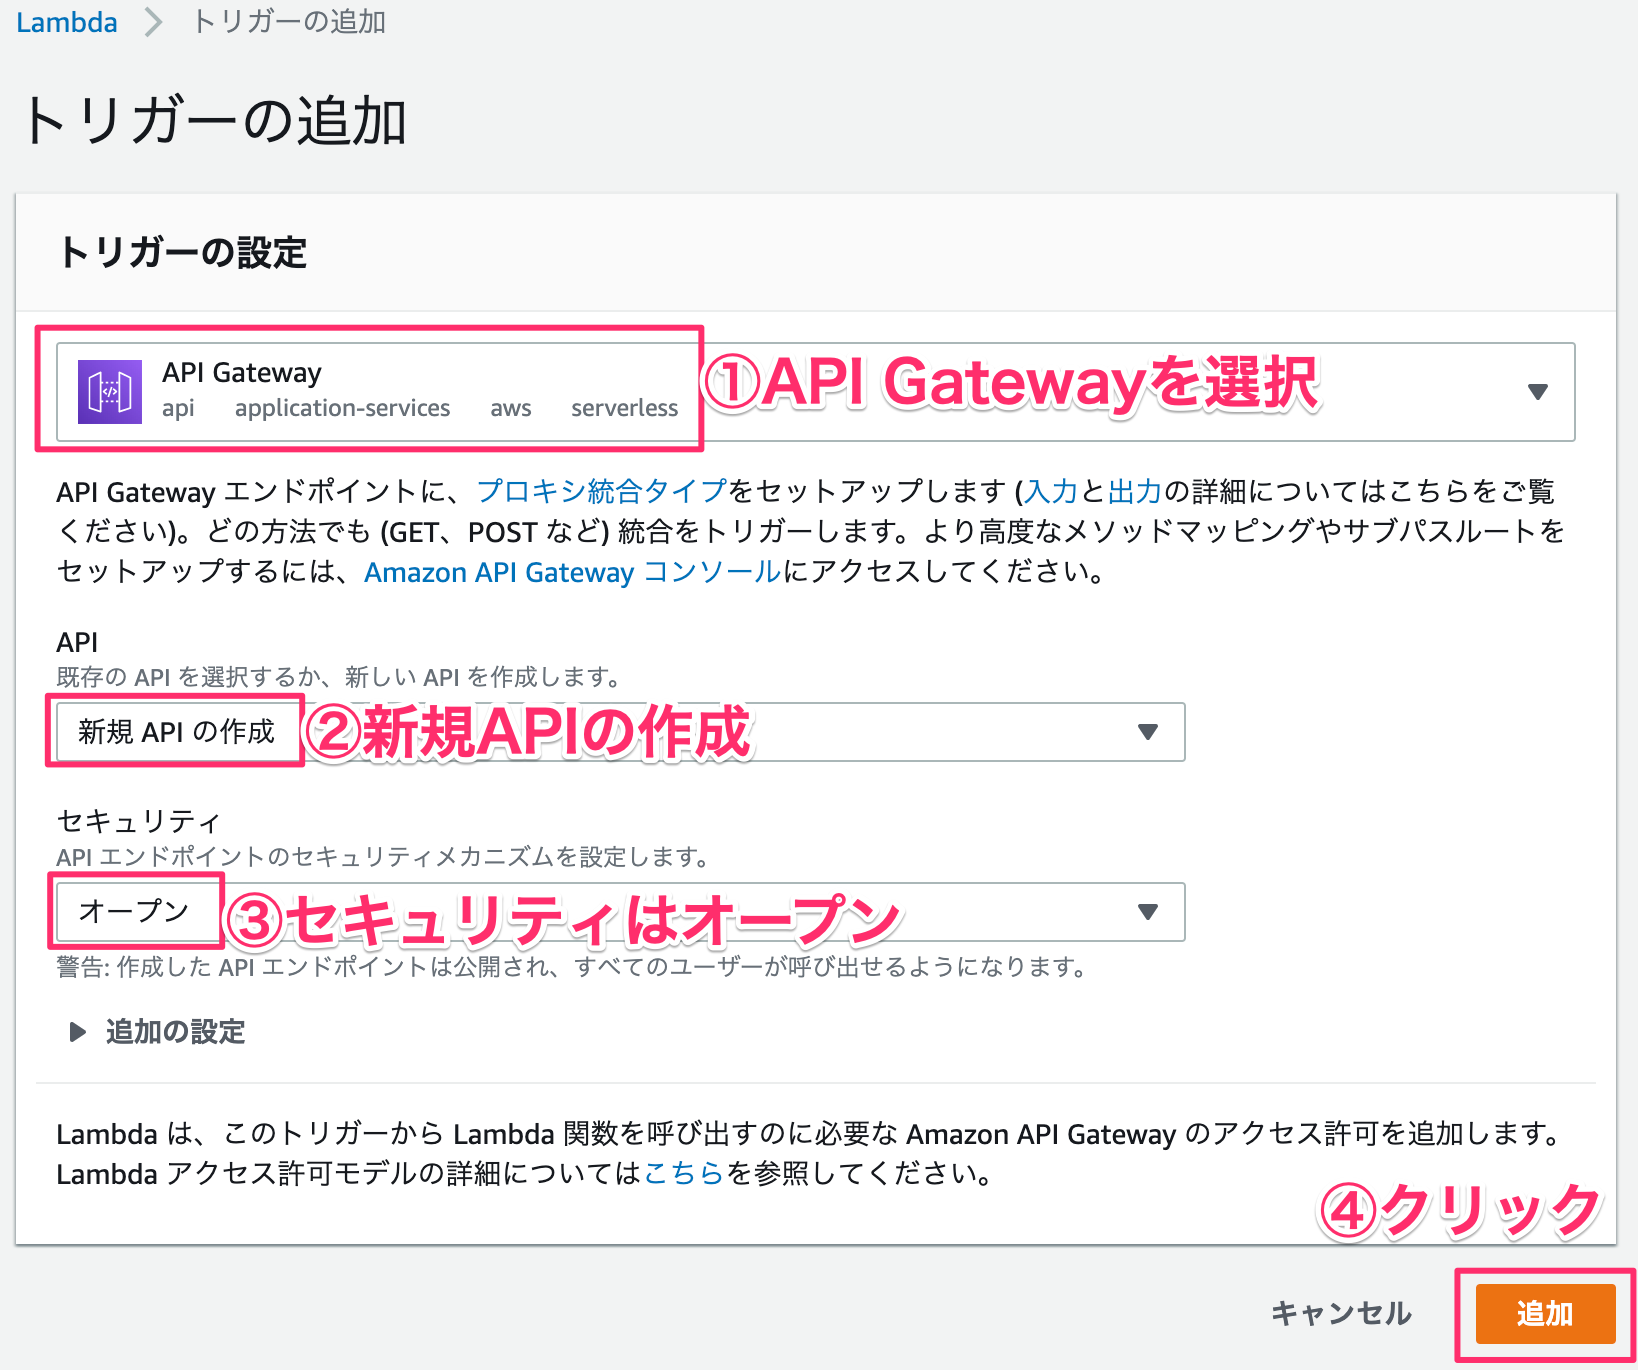
発行されたURLをメモしておく
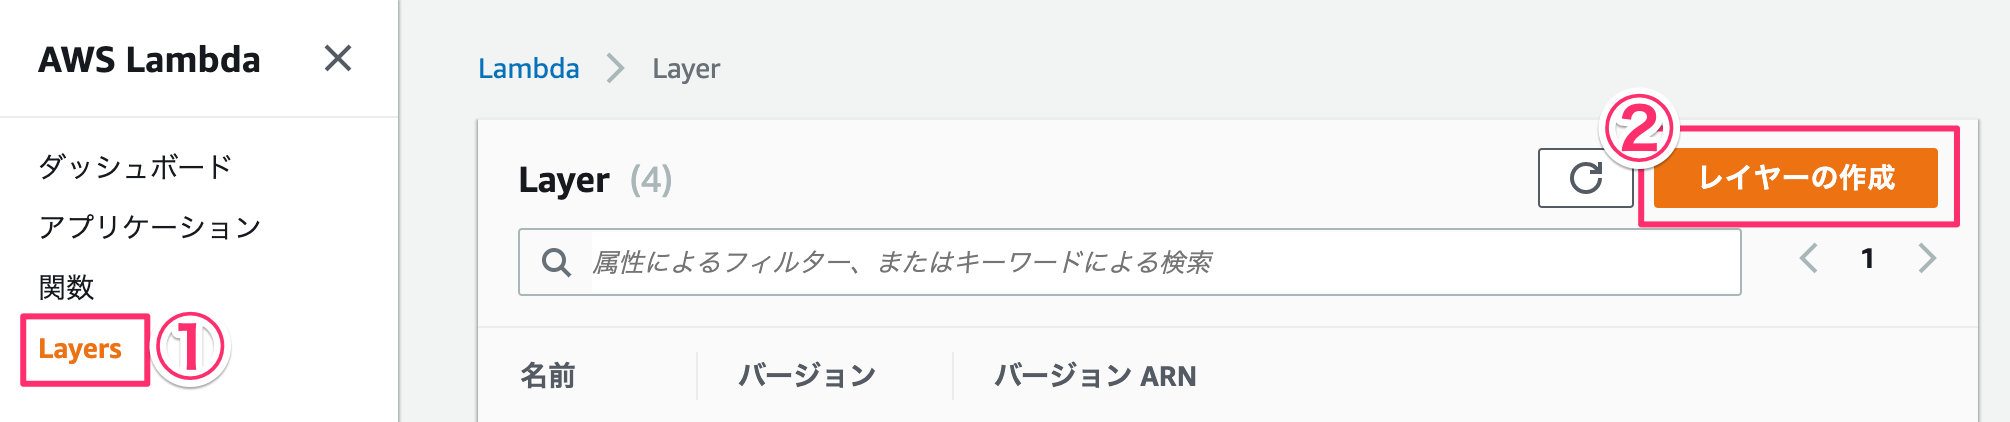
1-4. Lambdaレイヤーを設定する
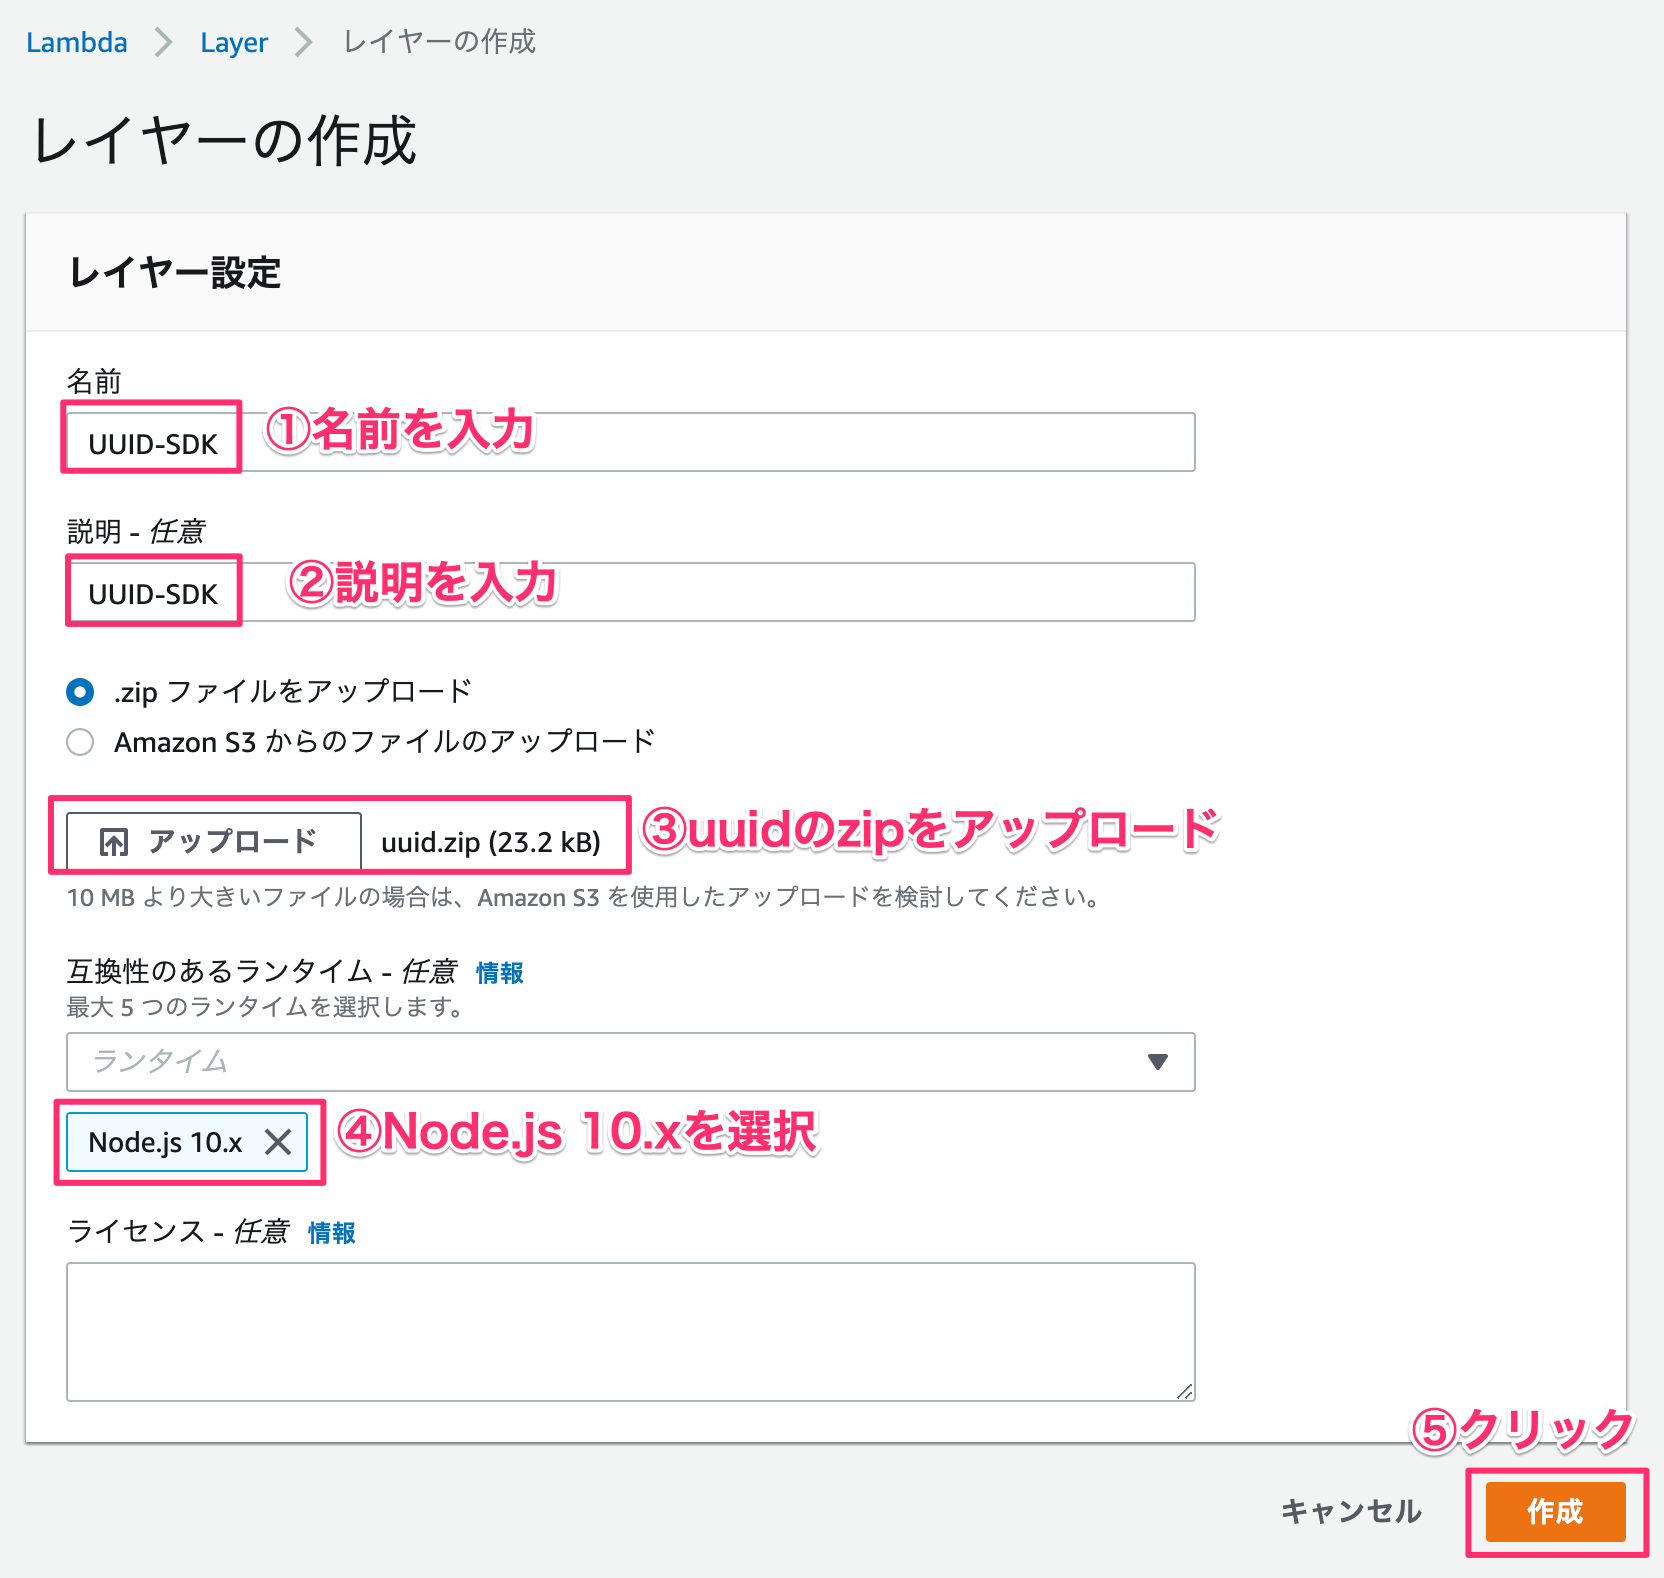
UUIDを発行するためのモジュールをレイヤーに追加しておきます。左側メニューのLayersからレイヤーの作成をクリックします。
| 項目 | 値 |
|---|---|
| ①名前 | UUID-SDK |
| ②説明 | UUID-SDK |
| ③アップロード | 作成したzipを選択する |
| ④ランタイム | Node.js 10.x |
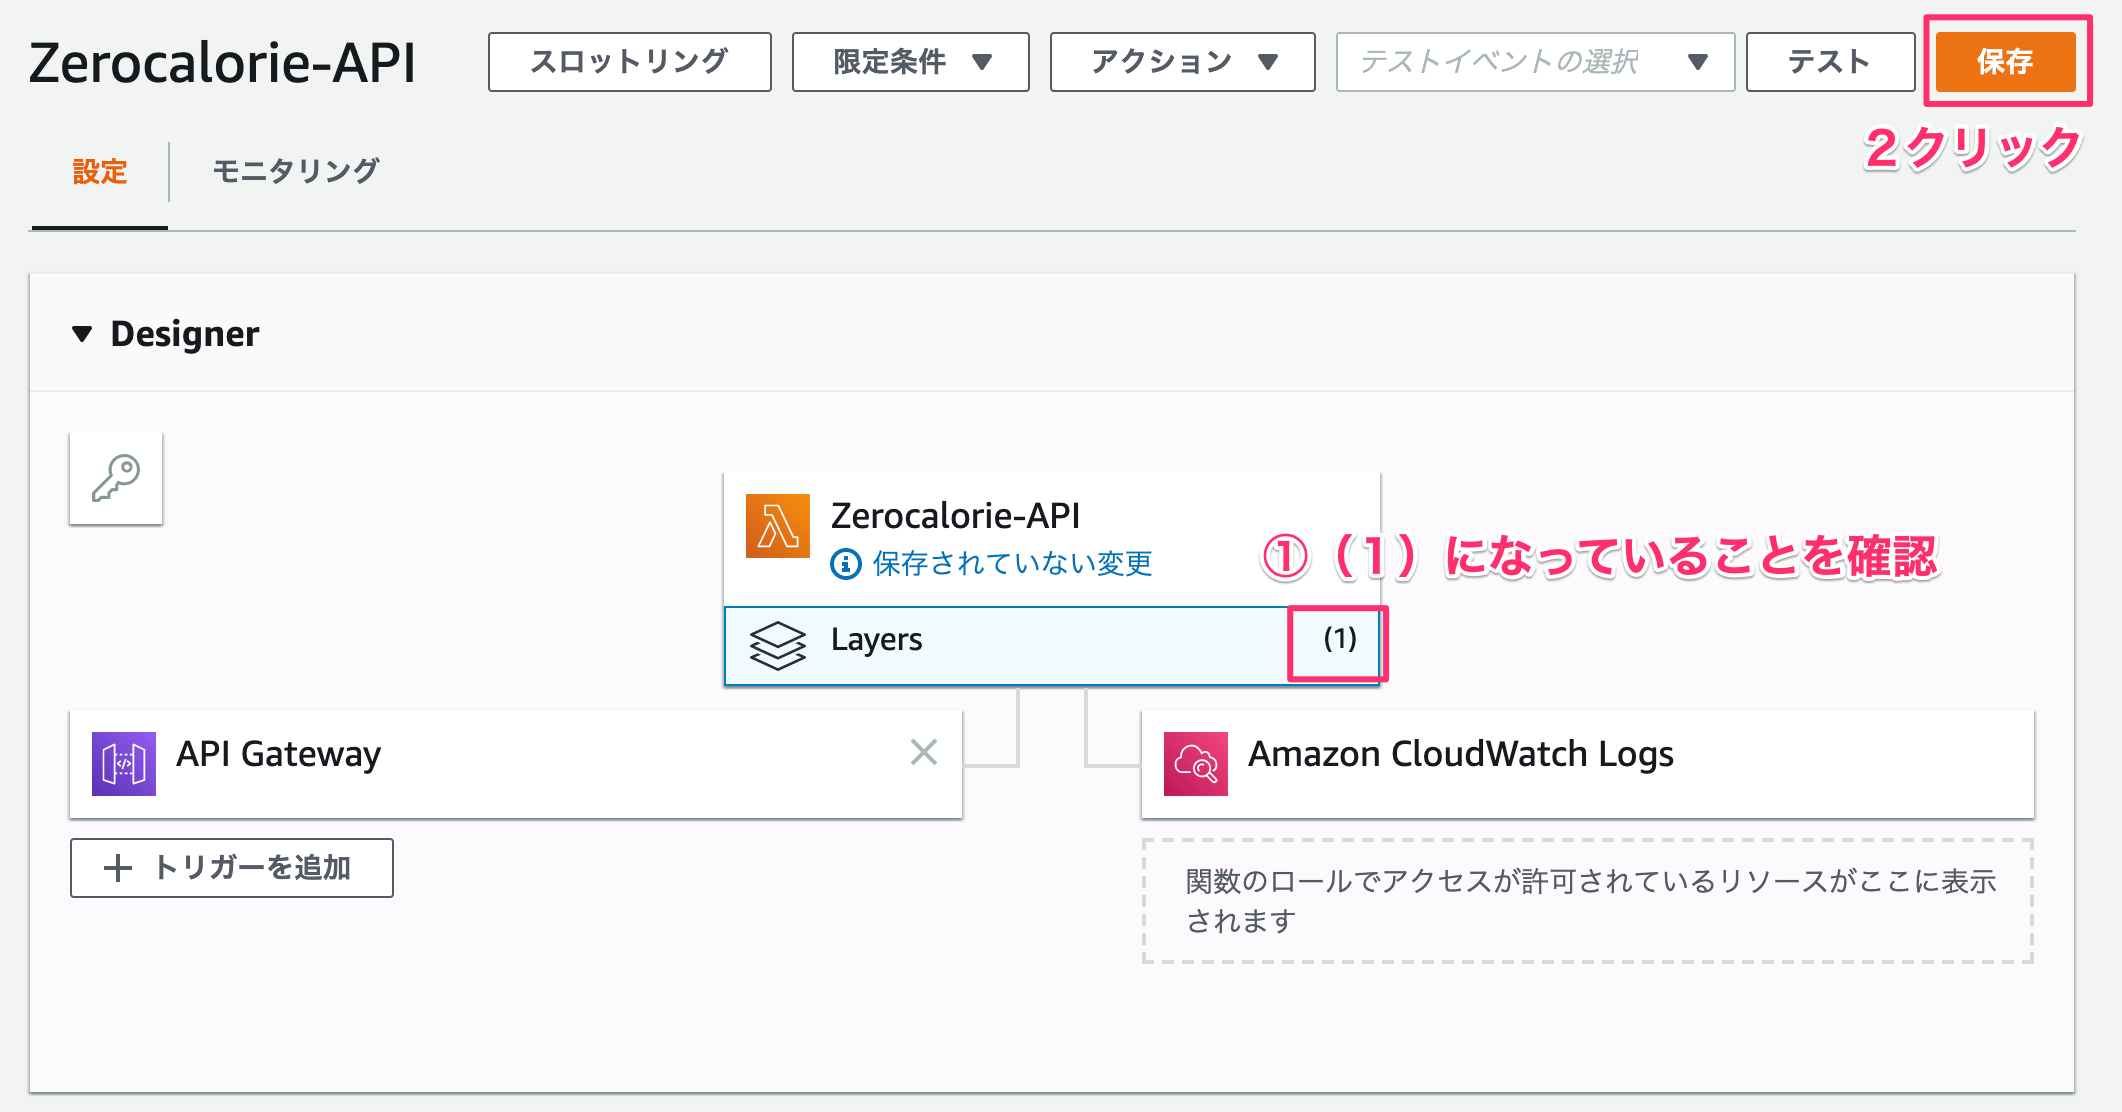
再びLambda関数に戻って、Layersをクリックします。その下にあるレイヤーの追加をクリックします。
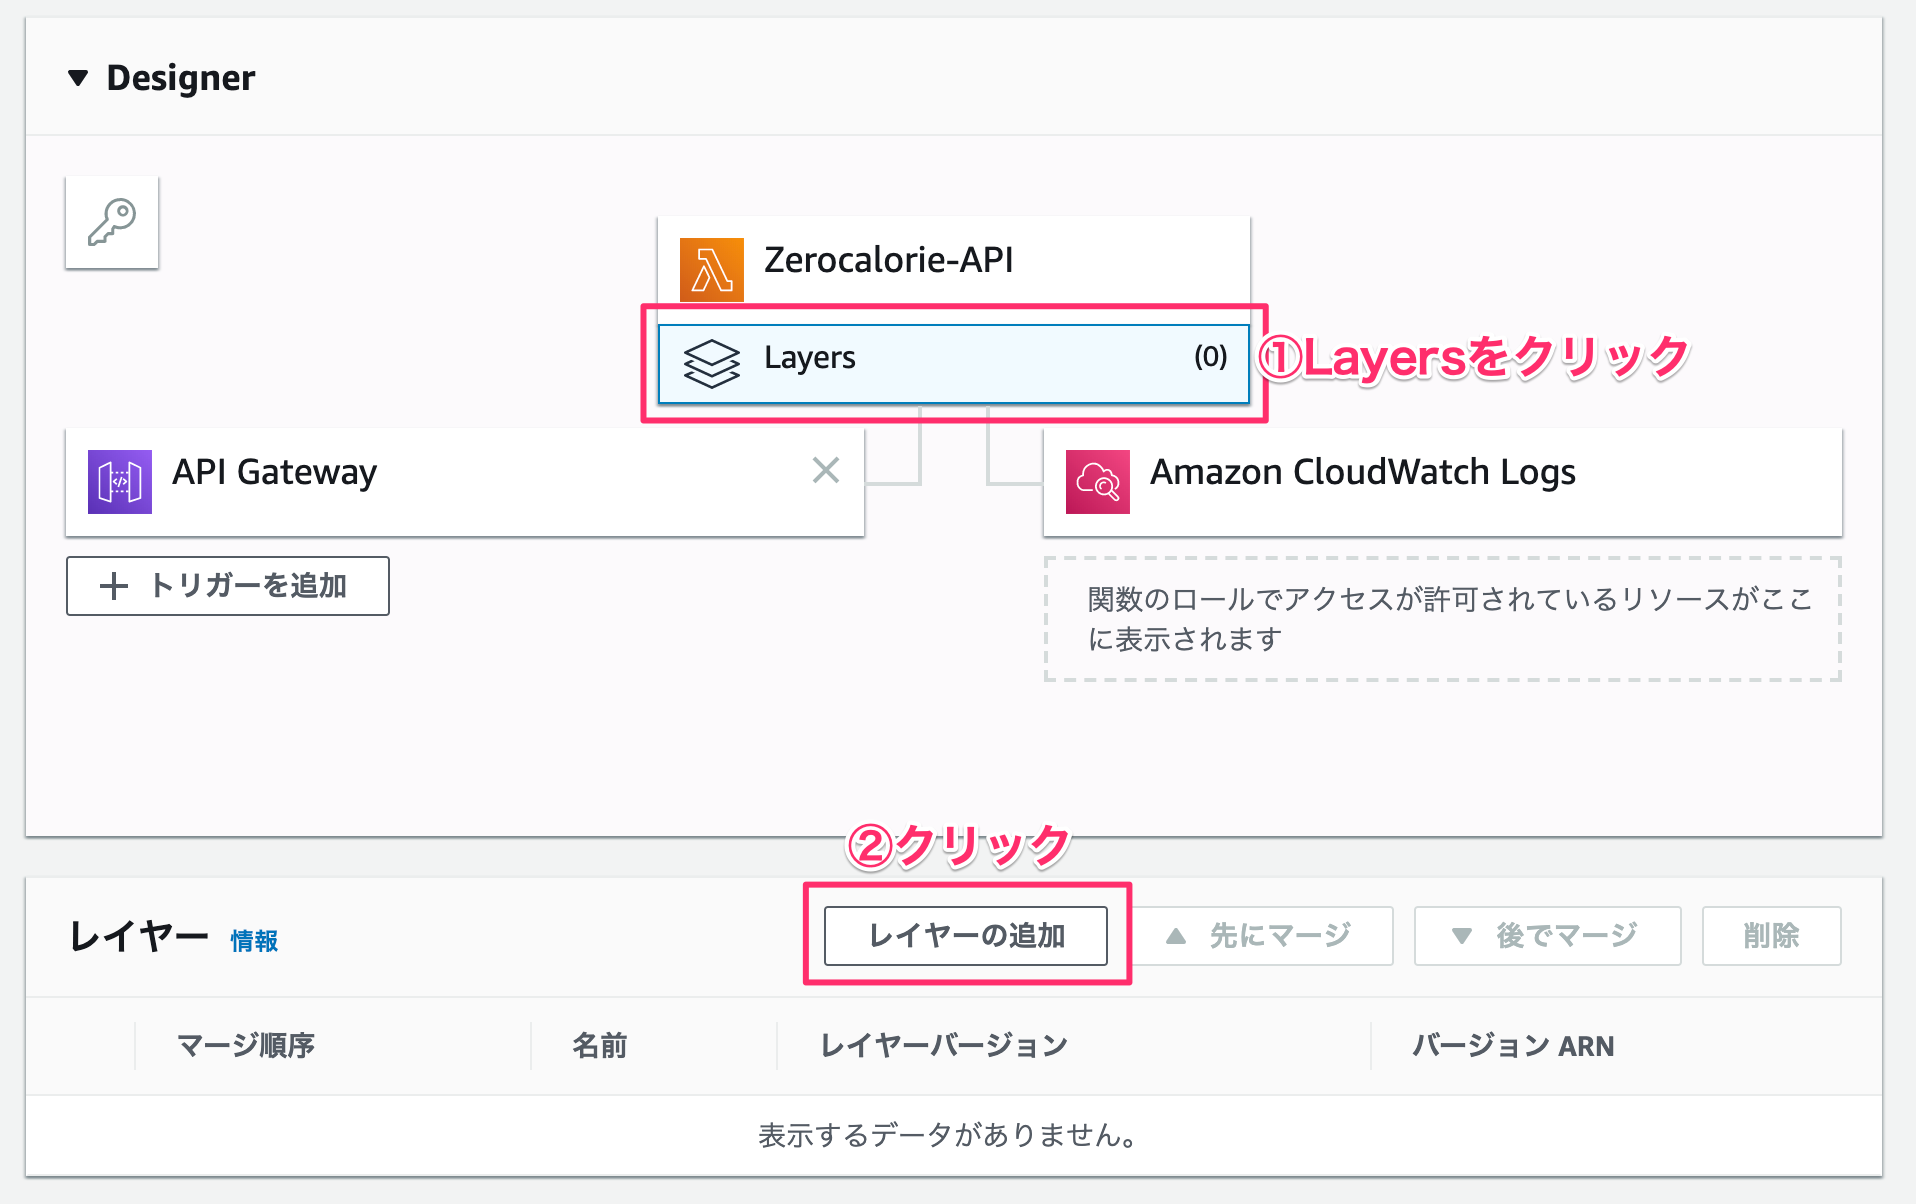
作成したUUID-SDKをプルダウンメニューから選択、バージョンも選択して追加ボタンをクリックします。
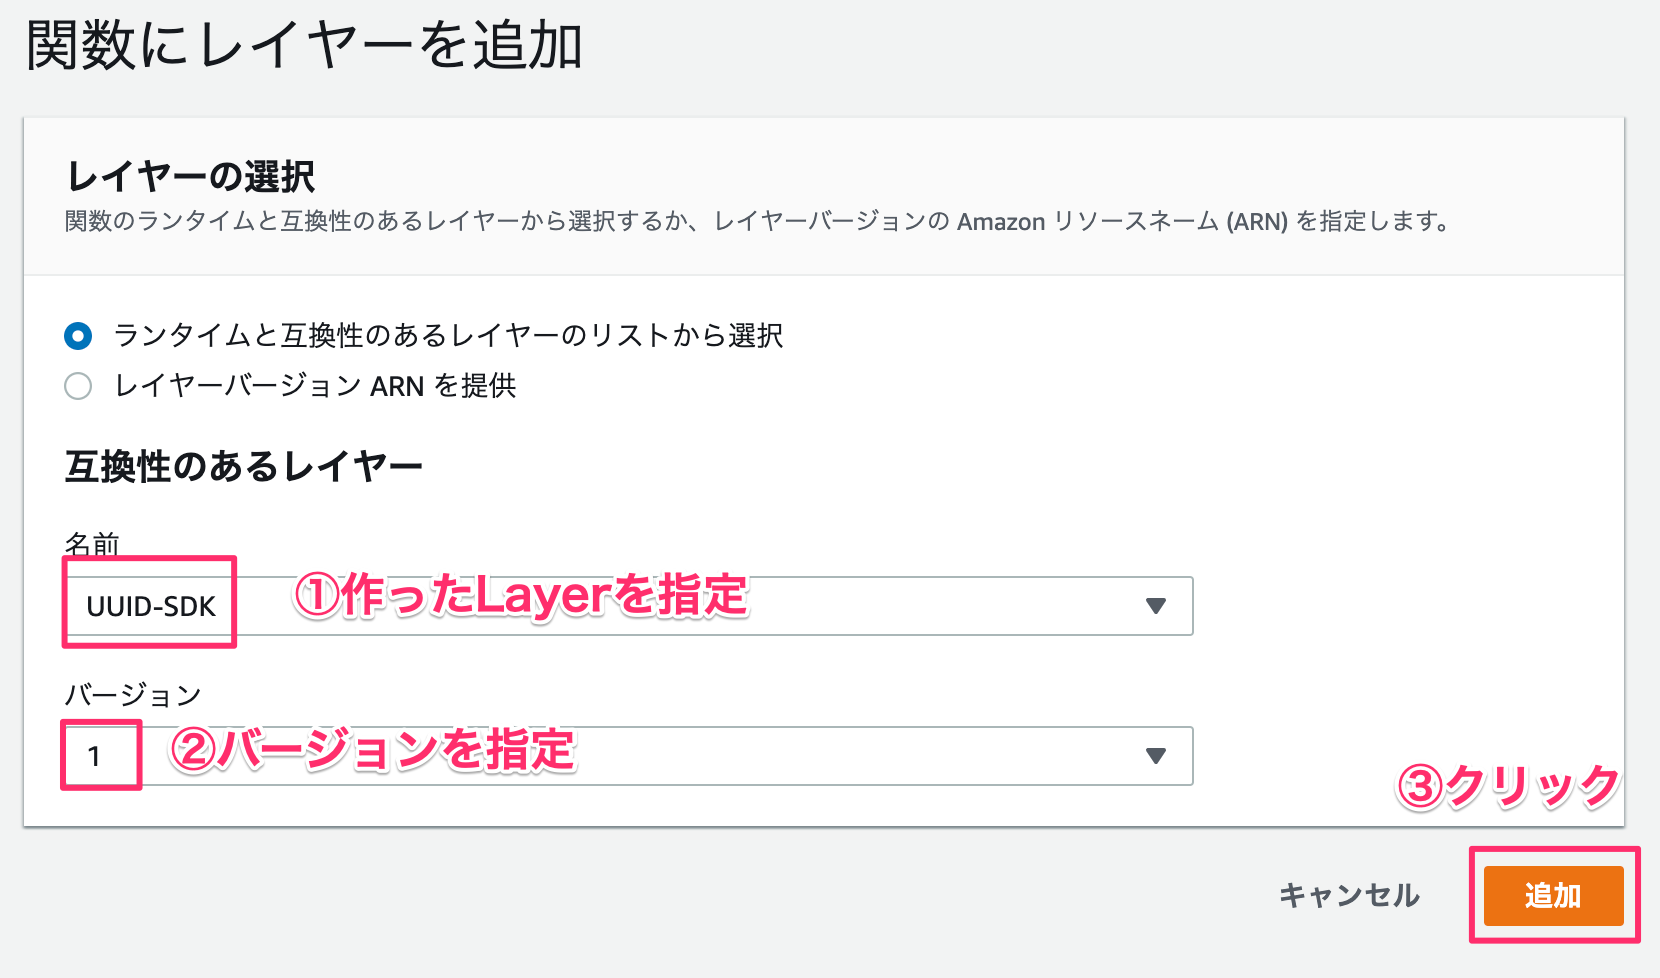
Layers(1)になっていることを確認します。右上の保存ボタンをクリックします。
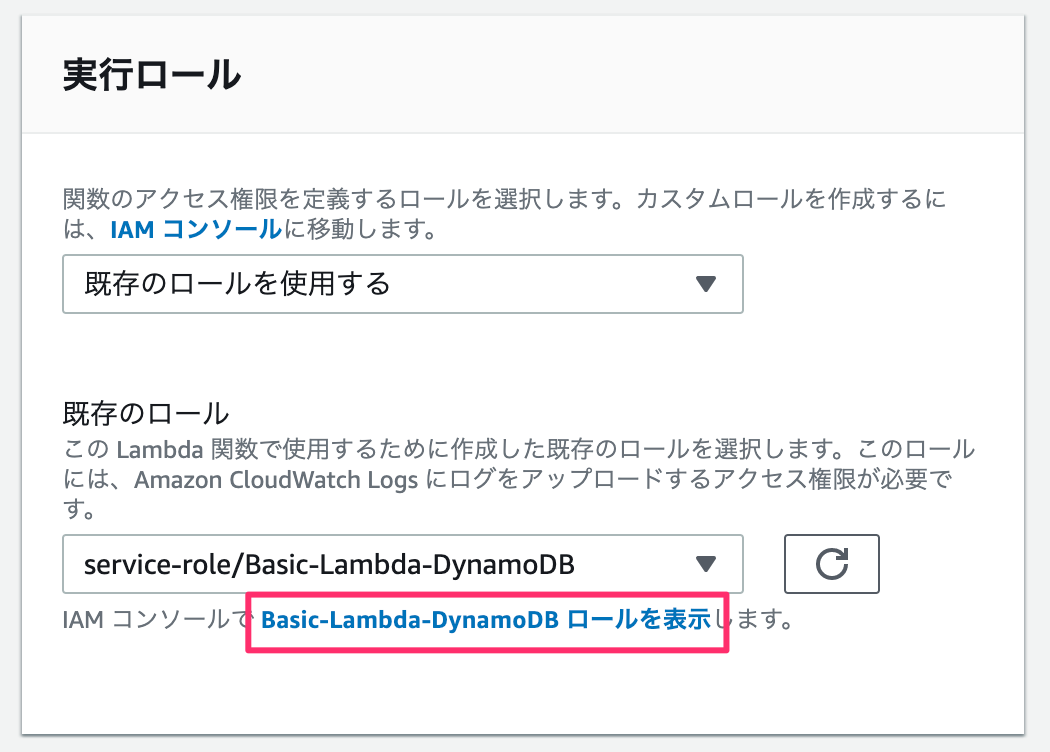
1-5. 実行ロール権限編集する
適用されているロールの権限を編集します。
インラインポリシーを追加します。
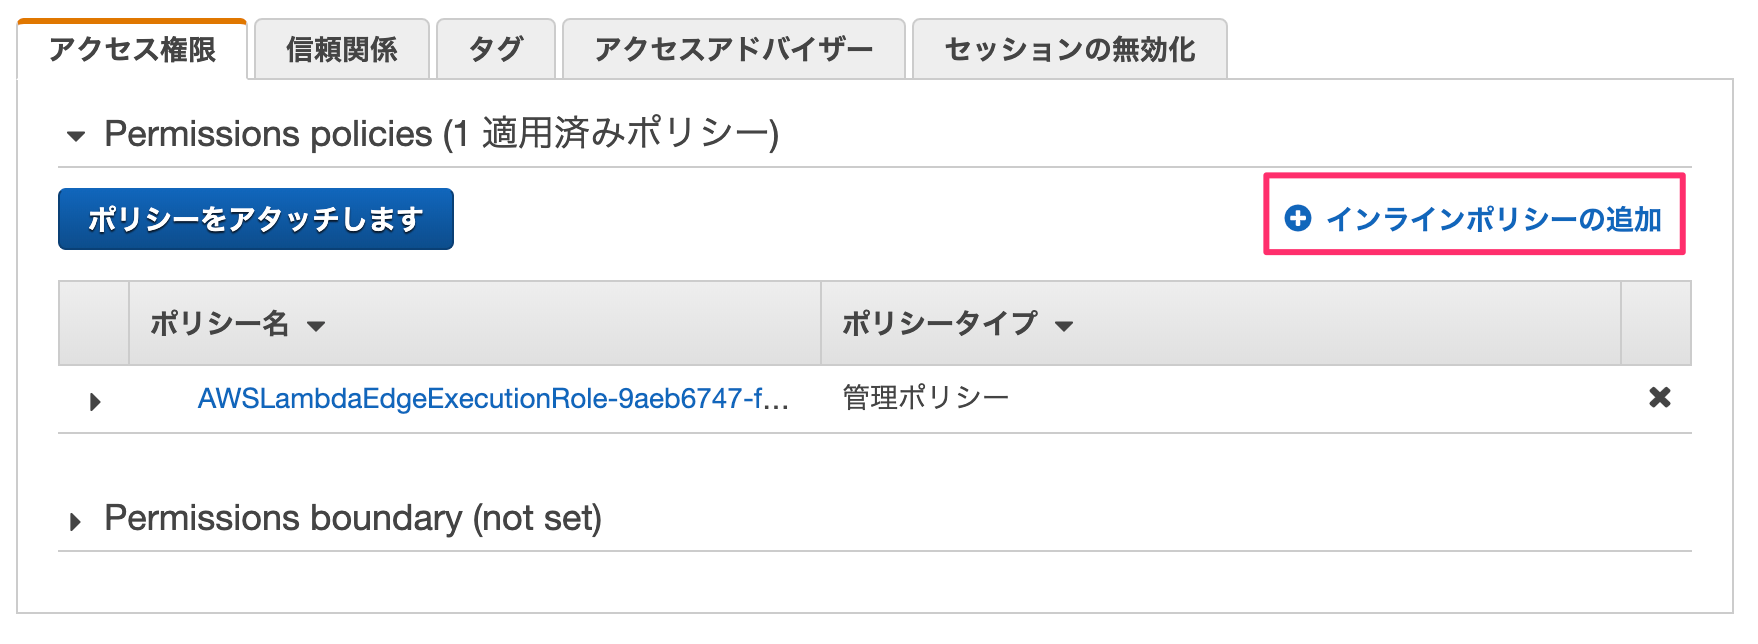
DynamoDBを検索してクリックします。

QueryとPutItemの権限を付与します。

リソースは全てのリソースを選択して、ポリシーの確認をクリックします。
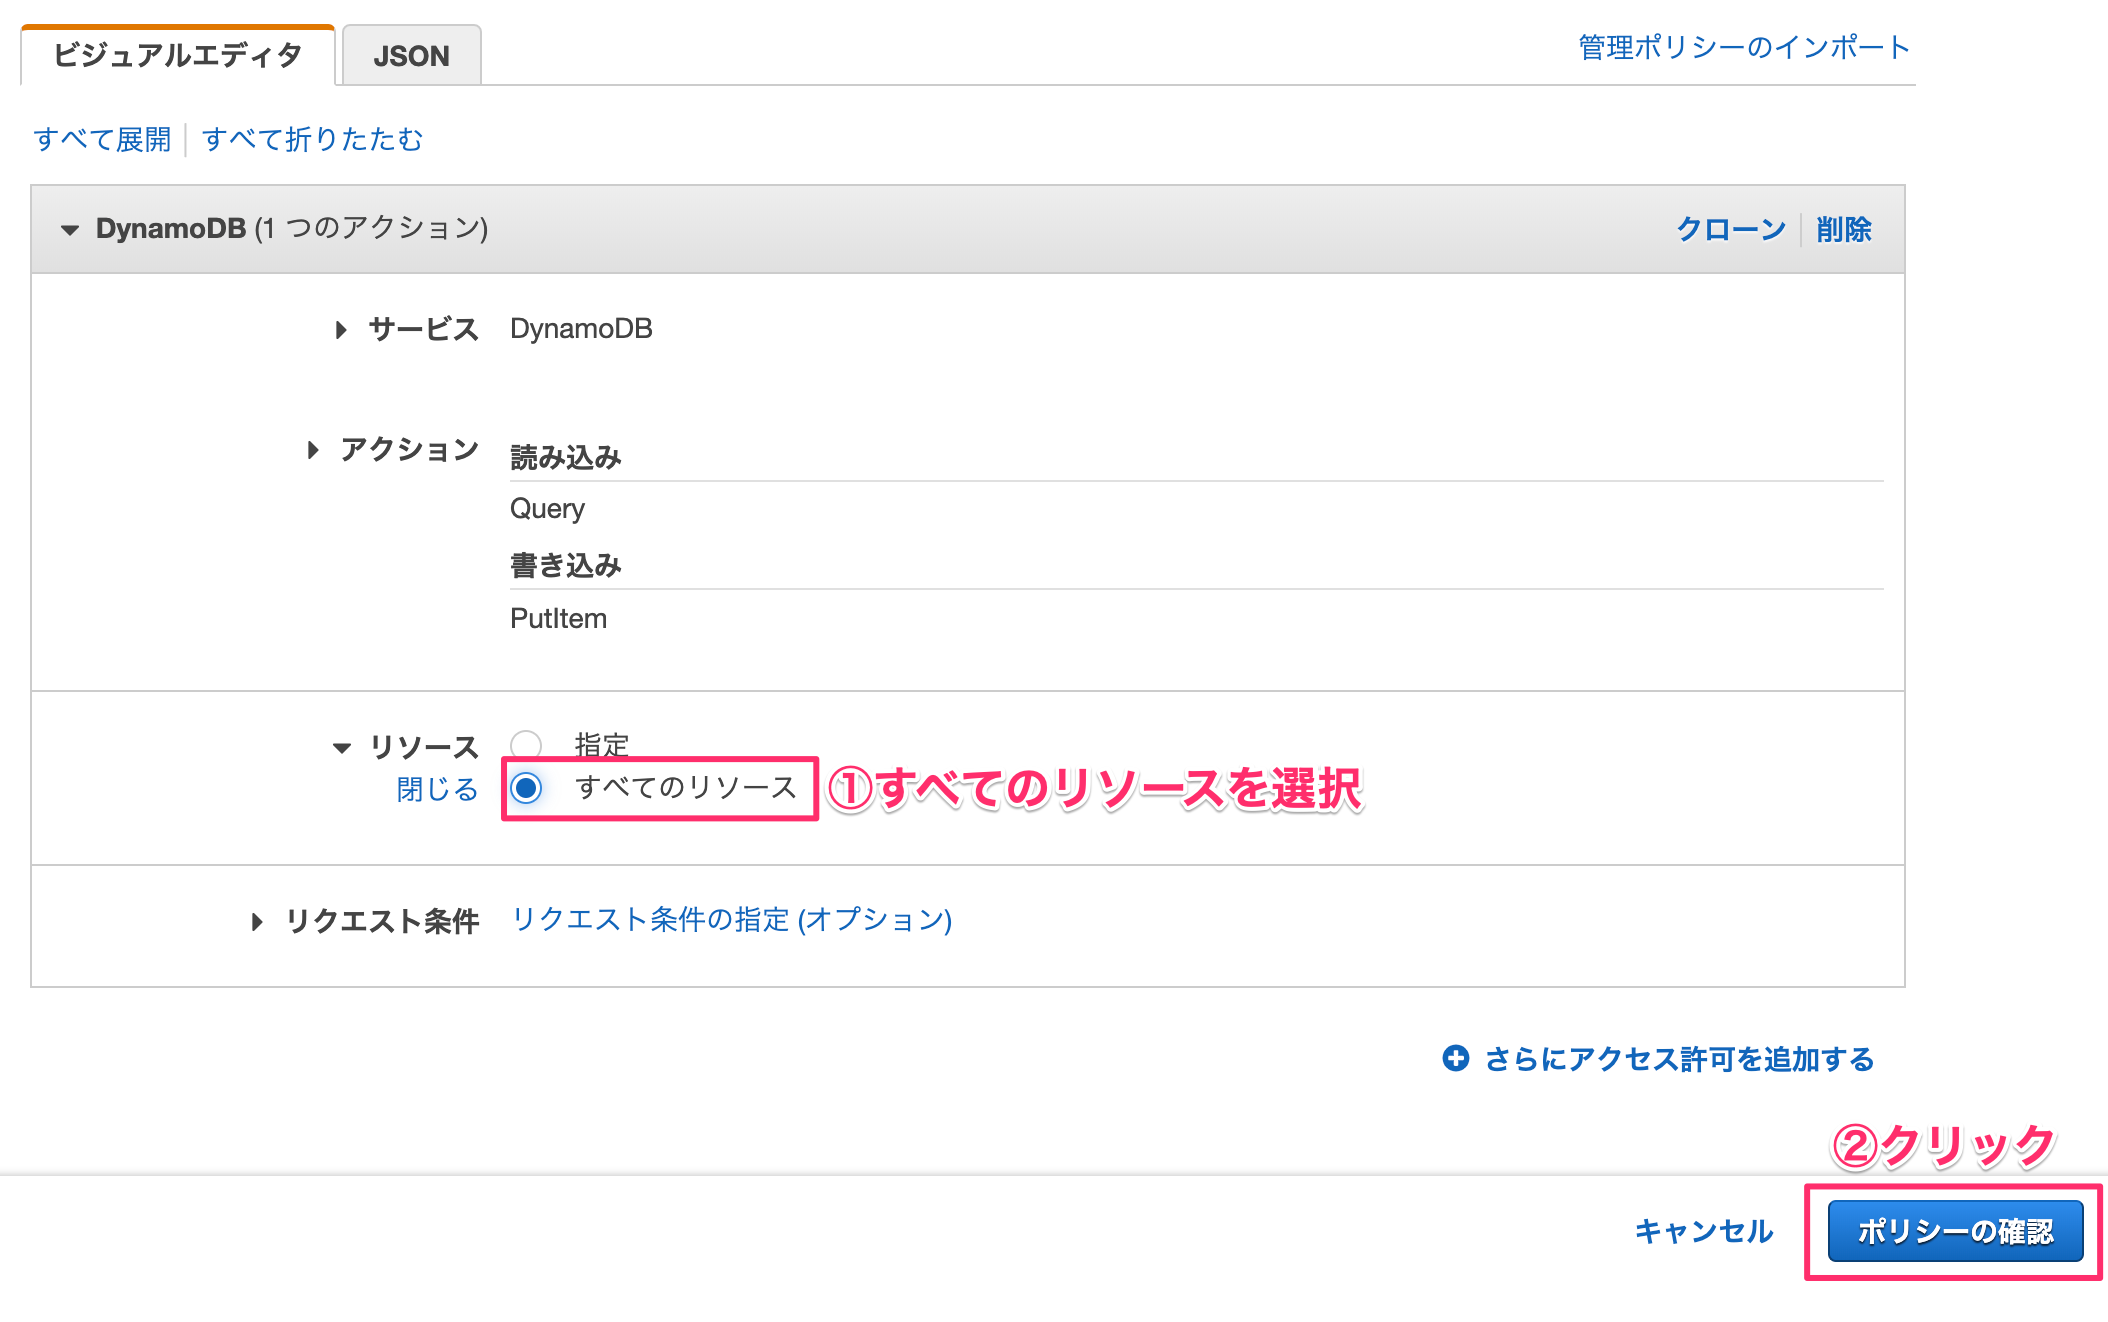
ポリシー名を入力して作成をクリックします。

1-6. DynamoDBテーブルを作成する
ゼロカロリー理論を格納するためのデータベースを作成します。テーブル名とプライマリキーを入力します。
 キーを入力します。
インデックスタブのインデックスの作成ボタンをクリックします。

プライマリキー以外の食べ物で検索をしたいので、foodのインデックスを作成します。
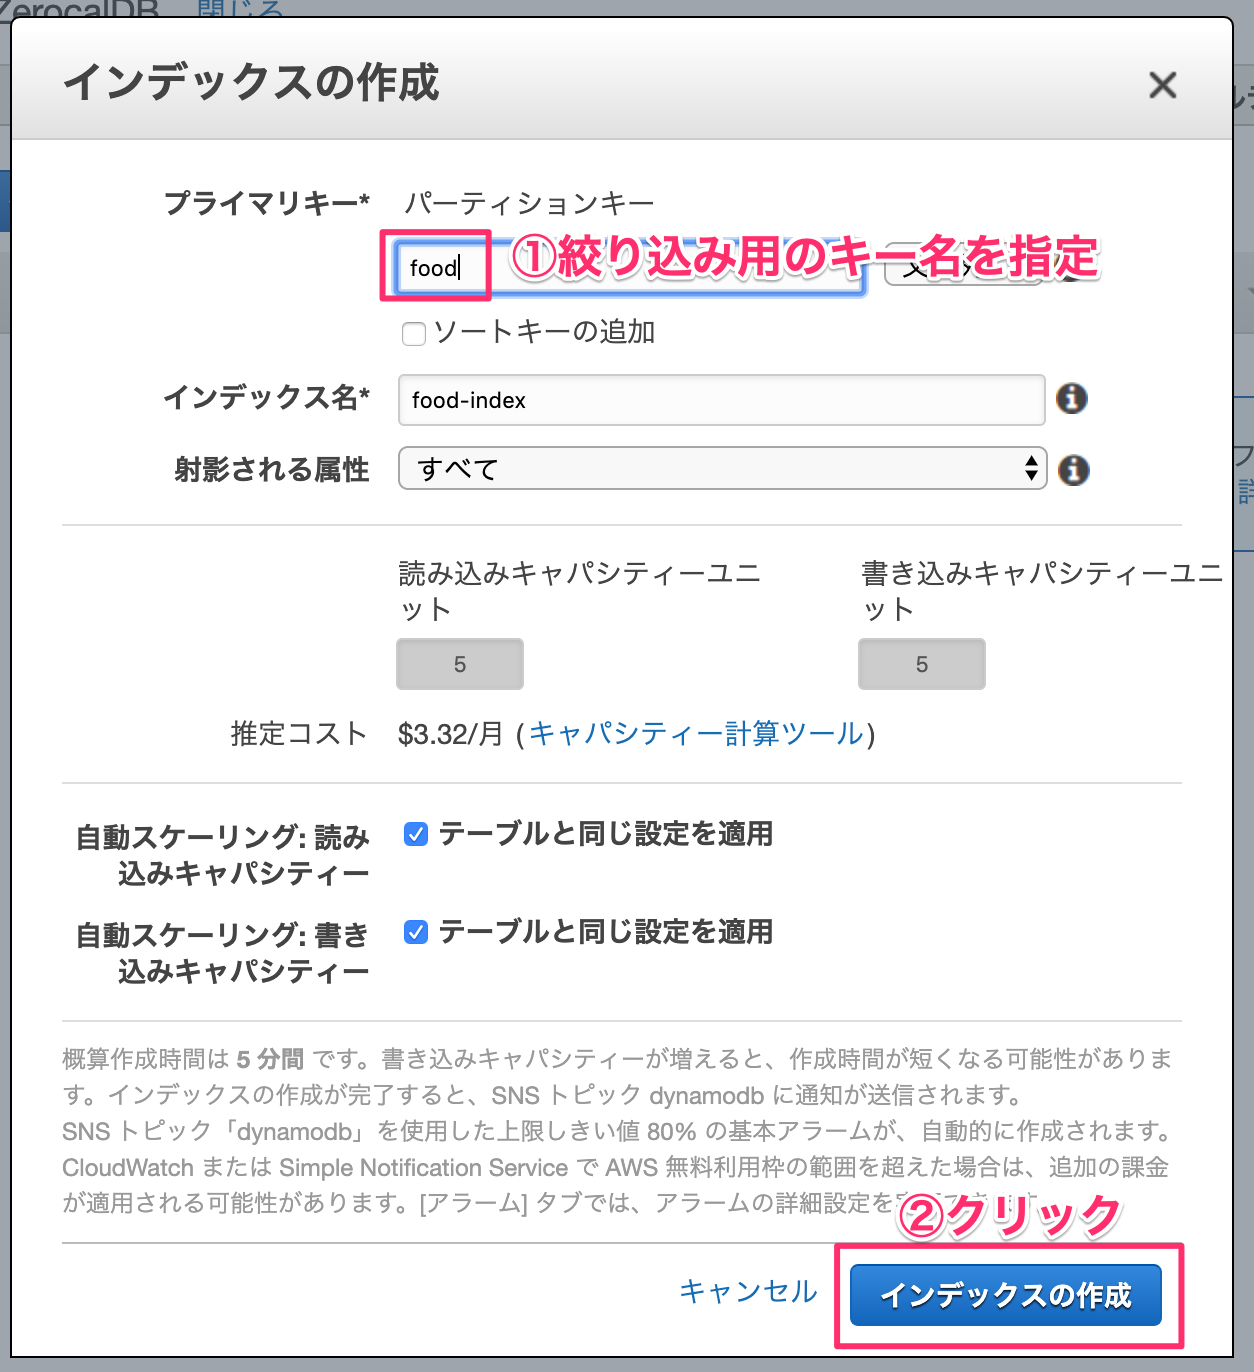
food-indexが生成されました。生成には5分ほどかかります。

1-7. POSTMANで確認してみる(登録編)
出来たプログラムの動作確認をしてみましょう。POSTMANを起動して、登録できるか確認してみます。
POSTを選択して、API GatewayのURLを指定します。Bodyの値は以下の通りです。
foodに食べ物名、reasonにゼロカロリー理論を入力します。Sendボタンを押すと登録されることが確認できます。
{
	"queryResult": {
		"parameters": {
			"food": "ドーナツ",
			"reason": "形がゼロを表しているから"
		}
	}
}

1-8. POSTMANで確認してみる(取得編)
GETにしてAPI GatewayのURLの最後に、?food=ドーナツ というようにパラメーターを付与します。
Snedボタンを押すと、DynamoDBに登録されているものが返ってきます。

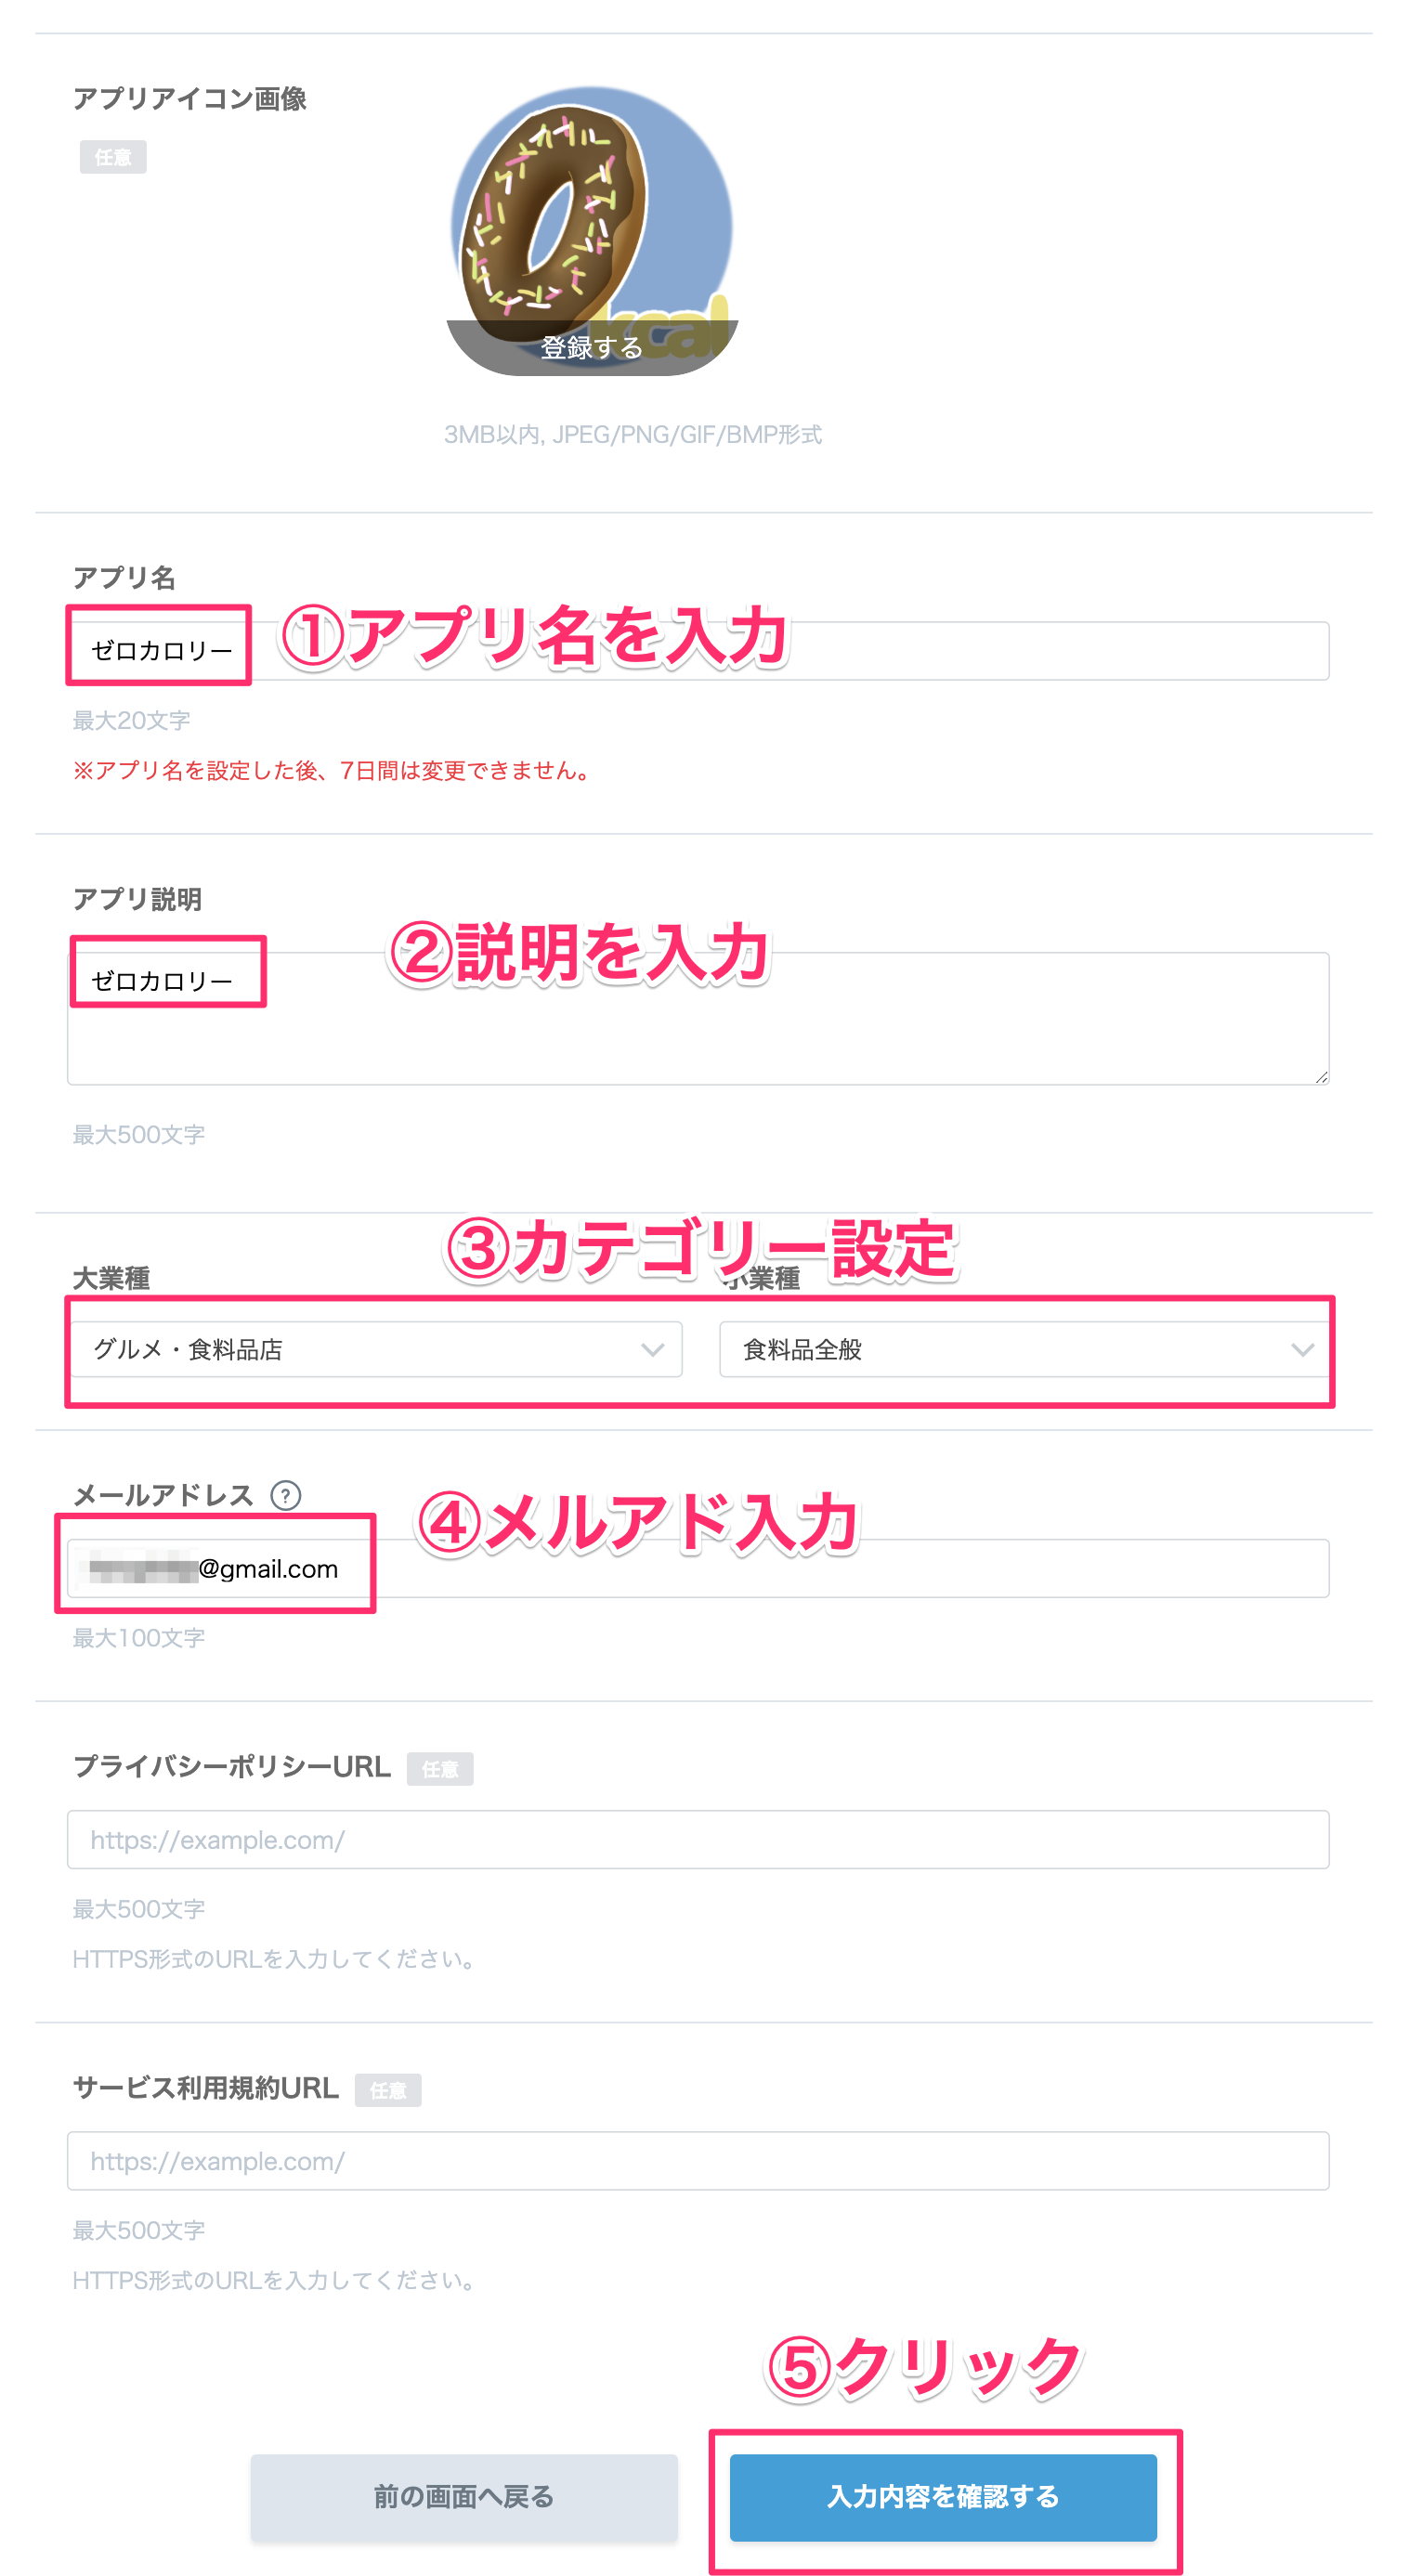
2. LINE Botの作成
ゼロカロリー理論はLINE Botから誰でも登録できるようにしています。
LINE DeveloperページからMessaging APIで新規チャネルを作成します。

アプリ名、説明、カテゴリー、メールアドレスを設定して、確認ボタンをクリックします。
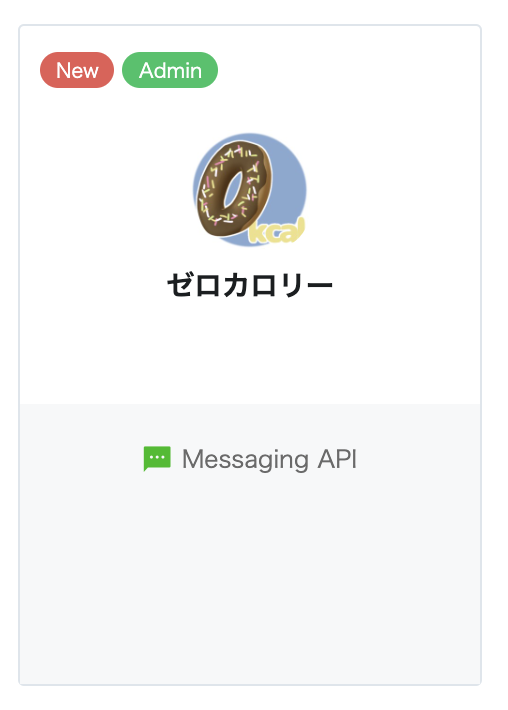
ゼロカロリーのチャネルが出来たので、クリックします。
再発行ボタンを押してください。発行されたアクセストークンは後ほど使うのでメモしておきましょう。

3. Dialogflowの設定
LINE Botの自然言語処理はDialogflowを使って行います。
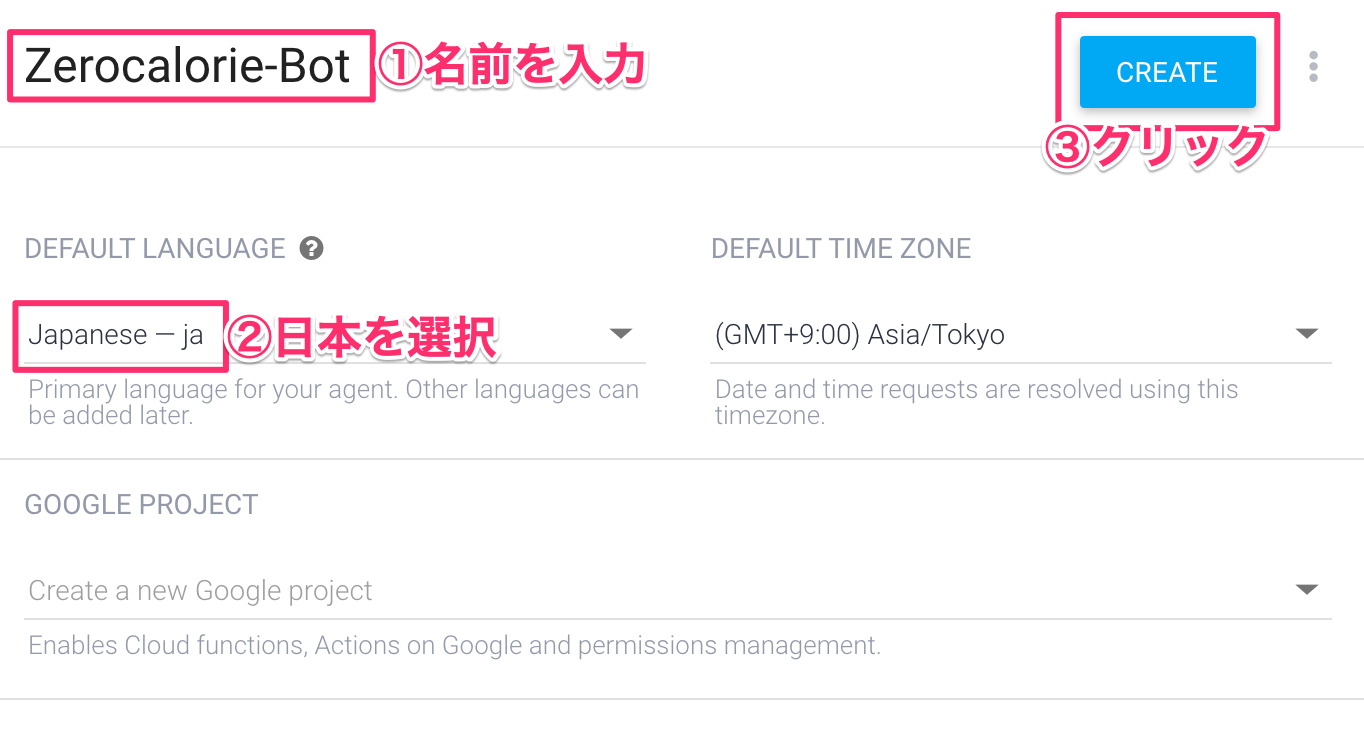
3-1.新規エージェントを作成する
新規エージェントを作成します。エージェント名とデフォルト言語を日本語にします。
3-2. StartIntentの設定
スタートという言葉に反応して、食べ物名とゼロカロリーの理由の入力を促すようにします。
Intentsの右側にある「+」をクリックします。
| 項目 | 値 |
|---|---|
| ②インテント名 | StartIntent |
| ④Training phrases | スタート |
| ④のfoodの設定 | 値 |
|---|---|
| REQUIRED | チェック入れる |
| PARAMETER NAME | food |
| ENTITY | @sys.any |
| PROMPTS | 登録する食べ物を教えてください |
| ④のreasonの設定 | 値 |
|---|---|
| REQUIRED | チェック入れる |
| PARAMETER NAME | reason |
| ENTITY | @sys.any |
| PROMPTS | ゼロカロリーの理由を教えてください |
| 項目 | 値 |
|---|---|
| ⑤Enable webhook call for this intent | ONにする |

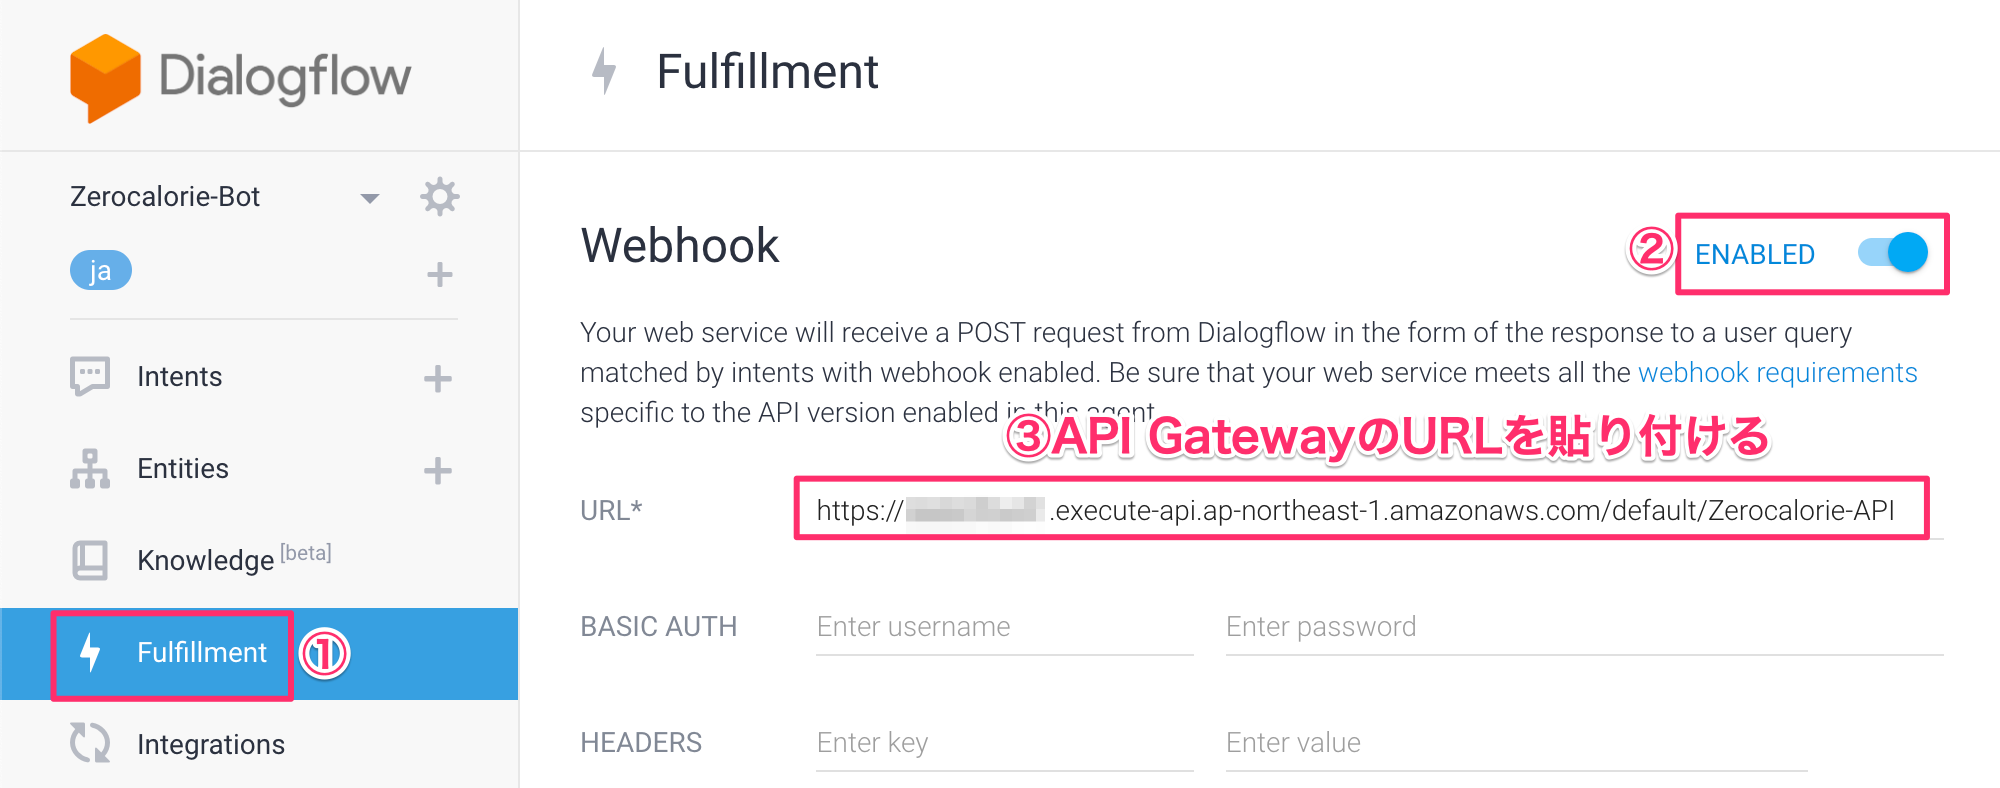
3-3. Fulfillmentの設定
WebhookのURLを設定します。1-3で取得したAPI GatewayのURLを設定します。入力したら、下にあるSaveボタンを教えてください。
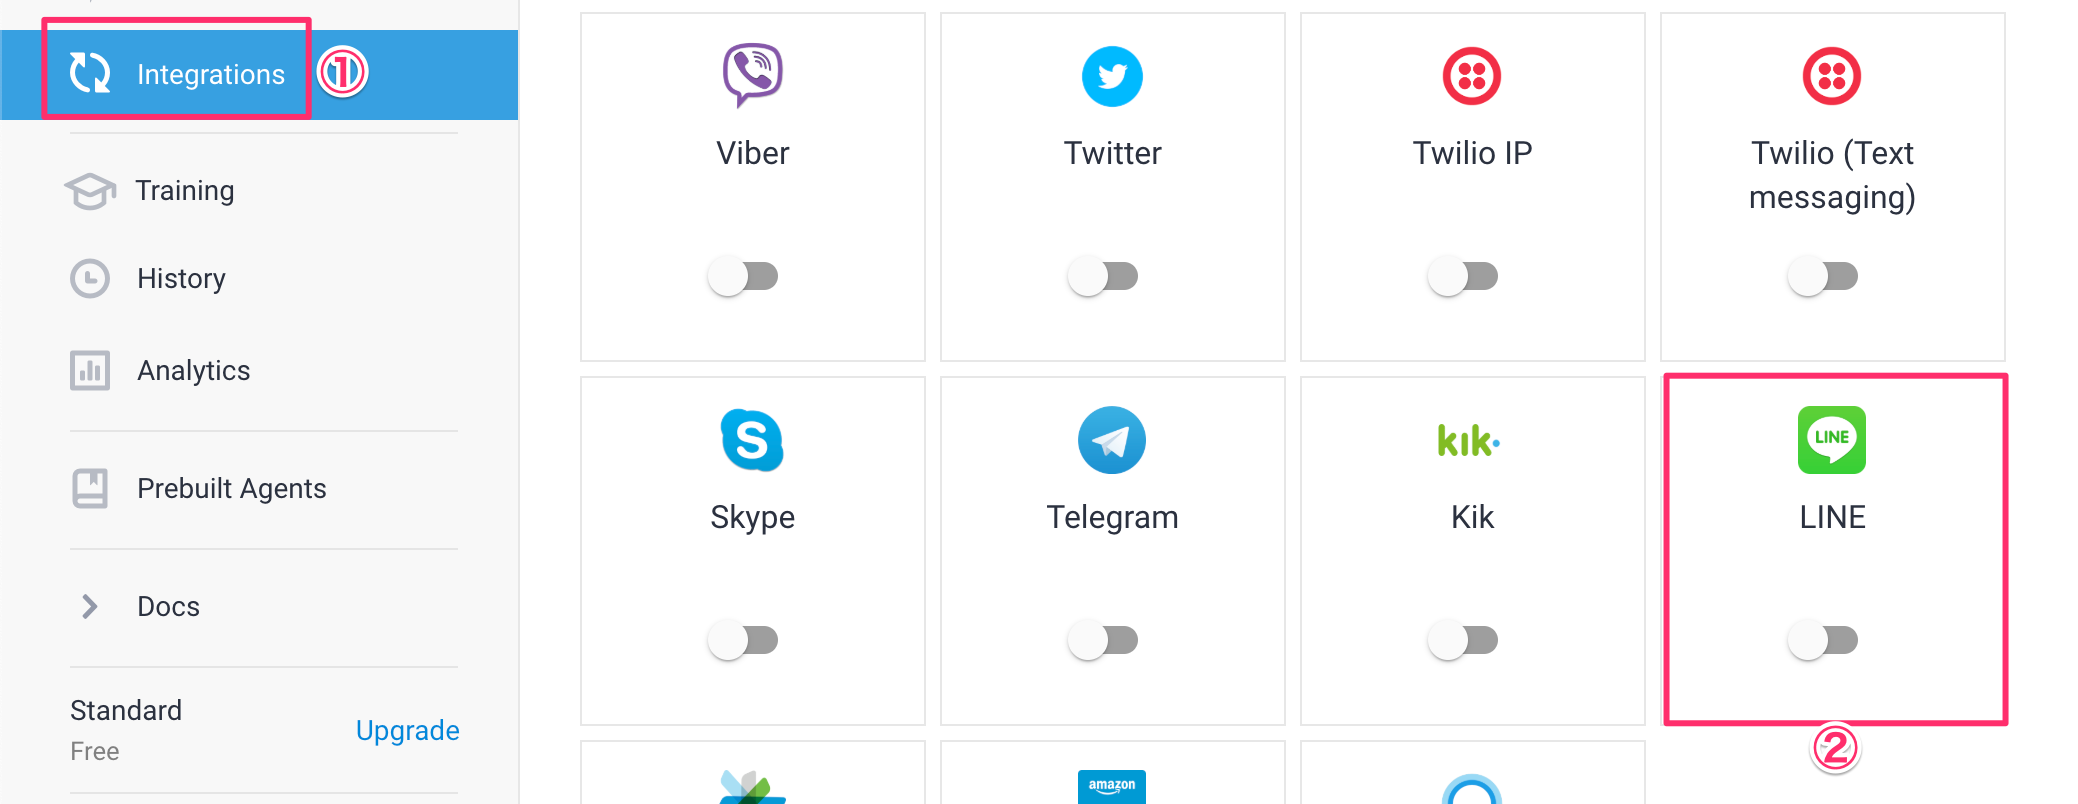
3-4. IntegrationsでLINEと連携する
左側メニューのIntegrationsをクリックして、LINEをクリックします。
表示されるポップアップにLINEの情報を入力して、スタートボタンを押して、連携をスタートします。

3-5. LINE Botと友だちになる
LINE DeveloperページにQRコードが表示されているので、それを読み取ってBotと友だちになっておきます。
「スタート」と入力すると食べ物と理由が聞かれるので答えます。

4. Azure Functionsの設定をする
Alexaのプログラムを今回はAzure Functionsでやってみます。AWS Lambdaだけでもできますが、クラウド技術を駆使したかったので、今回は特別です。
前半のセットアップに関しては、こちらも参考にしてください。
4-1. Azure FunctionsのCLIツールをインストール
サクッとCLIツールを入れる
$ npm install -g azure-functions-core-tools
4-2. プロジェクトの作成
CLIコマンドを実行していきます。適当なフォルダを作ってそこに作成していきます。
必要なモジュールをインストールしていきます。
$ mkdir zerocalorie-alexa
$ cd zerocalorie-alexa
$ func init                      # 選択肢が出てくるのでnodeとjavascriptを選ぶ
$ func new                       # Http triggerを選択し、zerocalorie-alexaという名前で作成する
$ npm init -y
$ npm i -s ask-sdk-core          # Alexa用SDK
$ npm i -s ask-sdk-model
$ npm i -s aws-sdk
$ npm i -s request
4-3. functions.jsonを編集する
HTTPで受け入れるリクエストが定義されているのですが、デフォルトだと GET, POST なので今回は GET が不要なので削除しましょう。誰でもアクセスできるようにanonymousにもしておきます。
{
  "bindings": [
    {
      "authLevel": "anonymous",        // anonymousにしておく
      "type": "httpTrigger",
      "direction": "in",
      "name": "req",
      "methods": [
        "post"      // getは使わないので消しておく
      ]
    },
    {
      "type": "http",
      "direction": "out",
      "name": "$return"     // $returnにしておく
    }
  ]
}
4-4. プログラムを記述する
実際に動作するプログラムを入力していきます。これでAzure Functionsにデプロイすれば動かすことができます。
'use strict';

const AWS = require('aws-sdk');
const Alexa = require('ask-sdk-core');
const Util = require('./util.js');

// s3初期化
AWS.config.update({
  "accessKeyId": process.env.ACCESSKEY,       // アクセスキーID
  "secretAccessKey": process.env.SECRETKEY,   // シークレットアクセスキー
  "region": "ap-northeast-1"                  // Tokyoリージョン
});
const s3 = new AWS.S3();

const LaunchRequestHandler = {
  canHandle(handlerInput) {
    return handlerInput.requestEnvelope.request.type === 'LaunchRequest';
  },
  async handle(handlerInput) {
    const speechText = '食べ物のカロリーをお答えします。好きな食べ物を言ってください。';

    return handlerInput.responseBuilder
      .speak(speechText)
      .reprompt(speechText)
      .getResponse();
  }
};

// 画像存在チェック
const getS3Object = async (foodVal) => {
  var params = {
    Bucket: 'zerocalfoods',
    Key: `${foodVal}.jpg`
  };
  try {
    const metadata = await s3.headObject(params).promise();
    console.log(metadata);
    return `${process.env.IMAGEURL}/${foodVal}.jpg`;
  } catch (err) {
    if (err.code === 'NotFound') {
      return `${process.env.IMAGEURL}/errorCat.jpg`;
    }
    throw err;
  }
};

// 食べ物取得
function getFood(intent) {
  if (intent.slots.Food && intent.slots.Food.resolutions && intent.slots.Food.resolutions.resolutionsPerAuthority) {
    if (intent.slots.Food.resolutions.resolutionsPerAuthority[0].status.code == 'ER_SUCCESS_MATCH') {
      if(intent.slots.Food.resolutions.resolutionsPerAuthority[0].values.length == 1) {
        return intent.slots.Food.resolutions.resolutionsPerAuthority[0].values[0].value.name;
      }
    }
  }
  return intent.slots.Food.value;
}

const FoodIntentHandler = {
    canHandle(handlerInput) {
        return handlerInput.requestEnvelope.request.type === 'IntentRequest'
            && handlerInput.requestEnvelope.request.intent.name === 'FoodIntent';
    },
    async handle(handlerInput) {
      const intent = handlerInput.requestEnvelope.request.intent;
      const foodVal = getFood(intent);

      // 理由取得
      const ret = await Util.getReason(foodVal);
      const myRet = JSON.parse(ret);
      var speechText = '';
      var myURL = `${process.env.IMAGEURL}/errorCat.jpg`;

      if (myRet.Count === 0) {
          speechText = `${foodVal}は、まだ登録されていません。他に知りたい食べ物はありますか?`;

      } else {
          const reasonIndex = Math.floor(Math.random() * myRet.Items.length);
          speechText = `${foodVal}は、${myRet.Items[reasonIndex].reason}、カロリーゼロ。他に知りたい食べ物はありますか?`;
          myURL = await getS3Object(foodVal);
      }

      if (supportsDisplay(handlerInput)) {
        // 画面付きデバイス
        return handlerInput.responseBuilder
        .speak(speechText)
        .addDirective({
            type : 'Alexa.Presentation.APL.RenderDocument',
            version: '1.0',
            token: "token",
              document: require('./apl_document.json'),
              datasources:
              {
                "skilldata": {
                  "url": myURL
                }
              }
            })
        .withShouldEndSession(false)
        .getResponse();

      } else {
        return handlerInput.responseBuilder
          .speak(speechText)
          .reprompt(speechText)
          .getResponse();

      }
    }
};

const SessionEndedRequestHandler = {
  canHandle(handlerInput) {
    return handlerInput.requestEnvelope.request.type === 'SessionEndedRequest';
  },
  handle(handlerInput) {
    return handlerInput.responseBuilder
      .withShouldEndSession(true)
      .getResponse();
  }
};

const HelpIntentHandler = {
  canHandle(handlerInput) {
    return handlerInput.requestEnvelope.request.type === 'IntentRequest'
        && handlerInput.requestEnvelope.request.intent.name === 'AMAZON.HelpIntent';
  },
  handle(handlerInput) {
    const speechText = 'ヘルプ';

    return handlerInput.responseBuilder
        .speak(speechText)
        .reprompt(speechText)
        .getResponse();
  }
};

const CancelAndStopIntentHandler = {
  canHandle(handlerInput) {
    return handlerInput.requestEnvelope.request.type === 'IntentRequest'
      && (handlerInput.requestEnvelope.request.intent.name === 'AMAZON.CancelIntent'
        || handlerInput.requestEnvelope.request.intent.name === 'AMAZON.StopIntent'
        || handlerInput.requestEnvelope.request.intent.name === 'AMAZON.NoIntent');
  },
  handle(handlerInput) {
    const speechText = 'さようなら!';
    return handlerInput.responseBuilder
      .speak(speechText)
      .withShouldEndSession(true)
      .getResponse();
  }
};

const ErrorHandler = {
  canHandle() {
    return true;
  },
  handle(handlerInput, error) {
    console.log(`~~~~ Error handled: ${error.message}`);
    const speechText = `エラーが発生しました。`;

    return handlerInput.responseBuilder
      .speak(speechText)
      .getResponse();
  }
};

// 画面付きかどうかチェック
function supportsDisplay(handlerInput) {
  const hasDisplay =
    handlerInput.requestEnvelope.context &&
    handlerInput.requestEnvelope.context.System &&
    handlerInput.requestEnvelope.context.System.device &&
    handlerInput.requestEnvelope.context.System.device.supportedInterfaces &&
    handlerInput.requestEnvelope.context.System.device.supportedInterfaces.Display;
  return hasDisplay;
}

let event = function (req) {
  let EventEmitter = require('events');
  let ee = new EventEmitter();
  for (let prop in req.body) {
    if(prop){
      ee[prop] = req.body[prop];
    }
  }
  return ee;
};

let skill;
module.exports = async function (context, req) {
  if(!skill){
    // ハンドラ設定
    skill = Alexa.SkillBuilders.custom()
      .addRequestHandlers(
        LaunchRequestHandler,
        FoodIntentHandler,
        HelpIntentHandler,
        CancelAndStopIntentHandler,
        SessionEndedRequestHandler,
      )
      .addErrorHandlers(ErrorHandler)
      .create();
  }

  // 処理実行&Alexa応答
  return skill.invoke(event(req));
};
'use strict';
const request = require('request');

// ゼロカロリー理論を取得する
module.exports.getReason = async function getReason(food) {
    // オプションを定義
    const headers = {
        'User-Agent': 'Request-Promise'
    };

    const options = {
      url: process.env.URL,
      method: 'GET',
      headers: headers,
      qs: {
          'food': food
      }
    };

    return new Promise(function (resolve, reject) {
      request(options, function (error, response, body) {
        if (!error) {
          const myBody =  JSON.parse(body);
          const count = myBody.Count;
          console.log("body_count="+count);

          resolve(body);

        } else {
          console.log('error: ' + response + body);
          resolve(true);
        }
      });
    });
};
{
        "type": "APL",
        "version": "1.1",
        "settings": {
            "idleTimeout": 120000
        },
        "theme": "dark",
        "import": [
            {
                "name": "alexa-layouts",
                "version": "1.0.0"
            }
        ],
        "resources": [
            {
                "description": "Stock color for the light theme",
                "colors": {
                    "colorTextPrimary": "#151920"
                }
            },
            {
                "description": "Stock color for the dark theme",
                "when": "${viewport.theme == 'dark'}",
                "colors": {
                    "colorTextPrimary": "#f0f1ef"
                }
            },
            {
                "description": "Standard font sizes",
                "dimensions": {
                    "textSizeBody": 48,
                    "textSizePrimary": 27,
                    "textSizeSecondary": 23,
                    "textSizeSecondaryHint": 25
                }
            },
            {
                "description": "Common spacing values",
                "dimensions": {
                    "spacingThin": 6,
                    "spacingSmall": 12,
                    "spacingMedium": 24,
                    "spacingLarge": 48,
                    "spacingExtraLarge": 72
                }
            },
            {
                "description": "Common margins and padding",
                "dimensions": {
                    "marginTop": 40,
                    "marginLeft": 60,
                    "marginRight": 60,
                    "marginBottom": 40
                }
            }
        ],
        "styles": {
            "textStyleBase": {
                "description": "Base font description; set color",
                "values": [
                    {
                        "color": "@colorTextPrimary"
                    }
                ]
            },
            "textStyleBase0": {
                "description": "Thin version of basic font",
                "extend": "textStyleBase",
                "values": {
                    "fontWeight": "100"
                }
            },
            "textStyleBase1": {
                "description": "Light version of basic font",
                "extend": "textStyleBase",
                "values": {
                    "fontWeight": "300"
                }
            },
            "mixinBody": {
                "values": {
                    "fontSize": "@textSizeBody"
                }
            },
            "mixinPrimary": {
                "values": {
                    "fontSize": "@textSizePrimary"
                }
            },
            "mixinSecondary": {
                "values": {
                    "fontSize": "@textSizeSecondary"
                }
            },
            "textStylePrimary": {
                "extend": [
                    "textStyleBase1",
                    "mixinPrimary"
                ]
            },
            "textStyleSecondary": {
                "extend": [
                    "textStyleBase0",
                    "mixinSecondary"
                ]
            },
            "textStyleBody": {
                "extend": [
                    "textStyleBase1",
                    "mixinBody"
                ]
            },
            "textStyleSecondaryHint": {
                "values": {
                    "fontFamily": "Bookerly",
                    "fontStyle": "italic",
                    "fontSize": "@textSizeSecondaryHint",
                    "color": "@colorTextPrimary"
                }
            }
        },
        "onMount": [
            {
                "type": "Sequential",
                "commands": [
                    {
                        "type": "Parallel",
                        "commands": "<COMPONENT_ON_MOUNT_COMMANDS>"
                    }
                ],
                "finally": "<DOCUMENT_ON_MOUNT_COMMAND>"
            }
        ],
        "graphics": {
            "parameterizedCircle": {
                "type": "AVG",
                "version": "1.0",
                "height": 100,
                "width": 100,
                "items": {
                    "type": "path",
                    "fill": "red",
                    "stroke": "blue",
                    "strokeWidth": 4,
                    "pathData": "M 50 0 L 100 50 L 50 100 L 0 50 z"
                }
            }
        },
        "commands": {
            "slideInFromRight": {
                "parameters": [
                    "distance"
                ],
                "command": {
                    "type": "AnimateItem",
                    "easing": "ease-in-out",
                    "duration": 300,
                    "values": [
                        {
                            "property": "opacity",
                            "from": 0,
                            "to": 1
                        },
                        {
                            "property": "transformX",
                            "from": "${distance}",
                            "to": 0
                        }
                    ]
                }
            }
        },
        "layouts": {},
        "mainTemplate": {
            "parameters": [
                "payload"
            ],
            "items": [
                {
                    "when": "${viewport.shape == 'round'}",
                    "type": "Container",
                    "direction": "column",
                    "items": [
                        {
                            "type": "Container",
                            "grow": 1,
                            "alignItems": "center",
                            "justifyContent": "center",
                            "items": [
                                {
                                    "type": "Image",
                                    "width": "100vw",
                                    "height": "100vh",
                                    "source": "${payload.skilldata.url}",
                                    "scale": "best-fill",
                                    "align": "center"
                                }
                            ]
                        }
                    ]
                },
                {
                    "type": "Container",
                    "height": "100vh",
                    "width": "100vw",
                    "items": [
                        {
                            "type": "Image",
                            "width": "100vw",
                            "height": "100vh",
                            "source": "${payload.skilldata.url}",
                            "scale": "best-fill",
                            "position": "absolute"
                        }
                    ]
                }
            ]
        }
    }
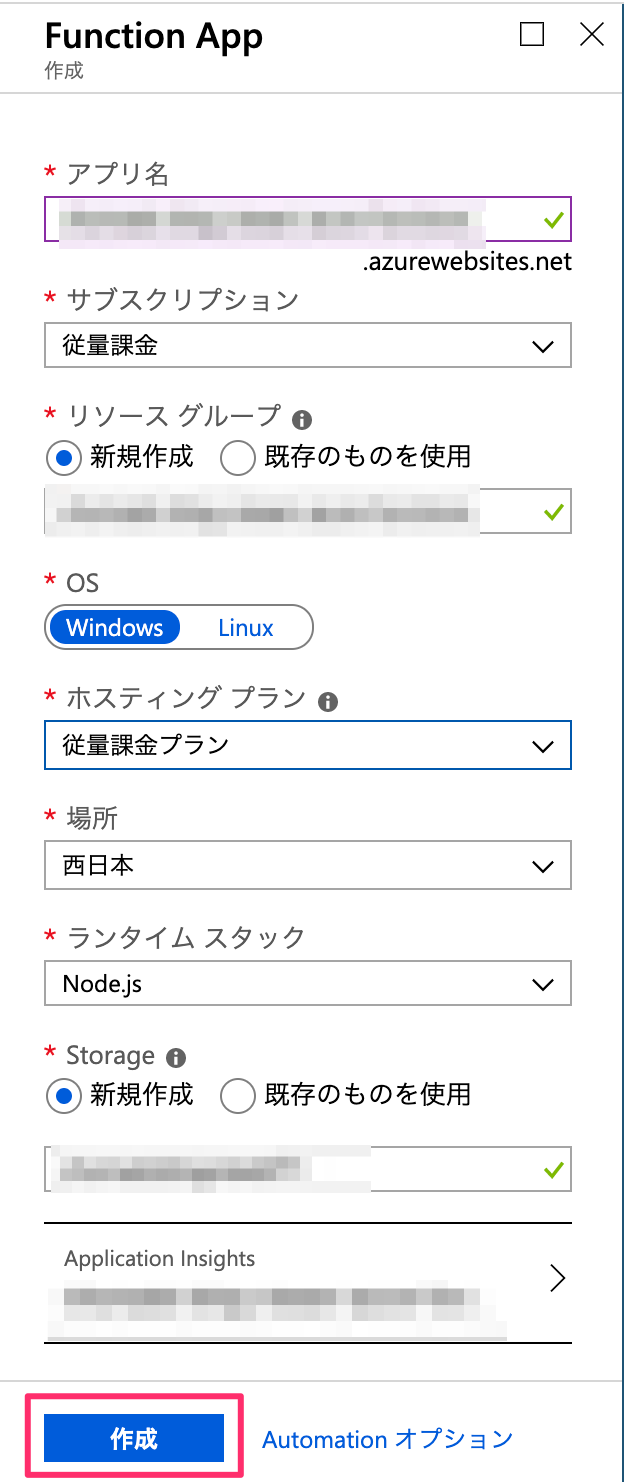
4-5. Azure Functionsへデプロイする
リソースを作成します。
VSCodeでデプロイします。
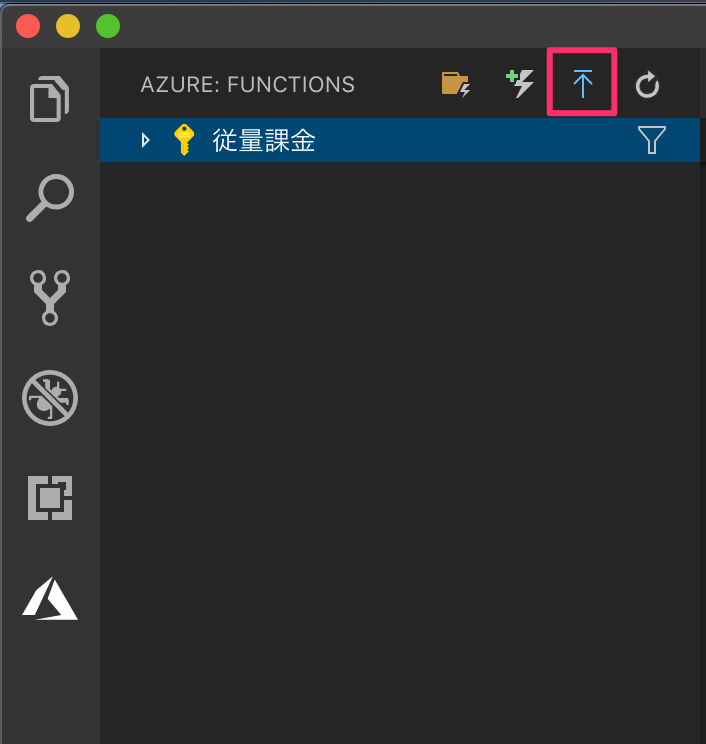
関数をクリックして、アクセスするためのURLをメモしておきましょう。
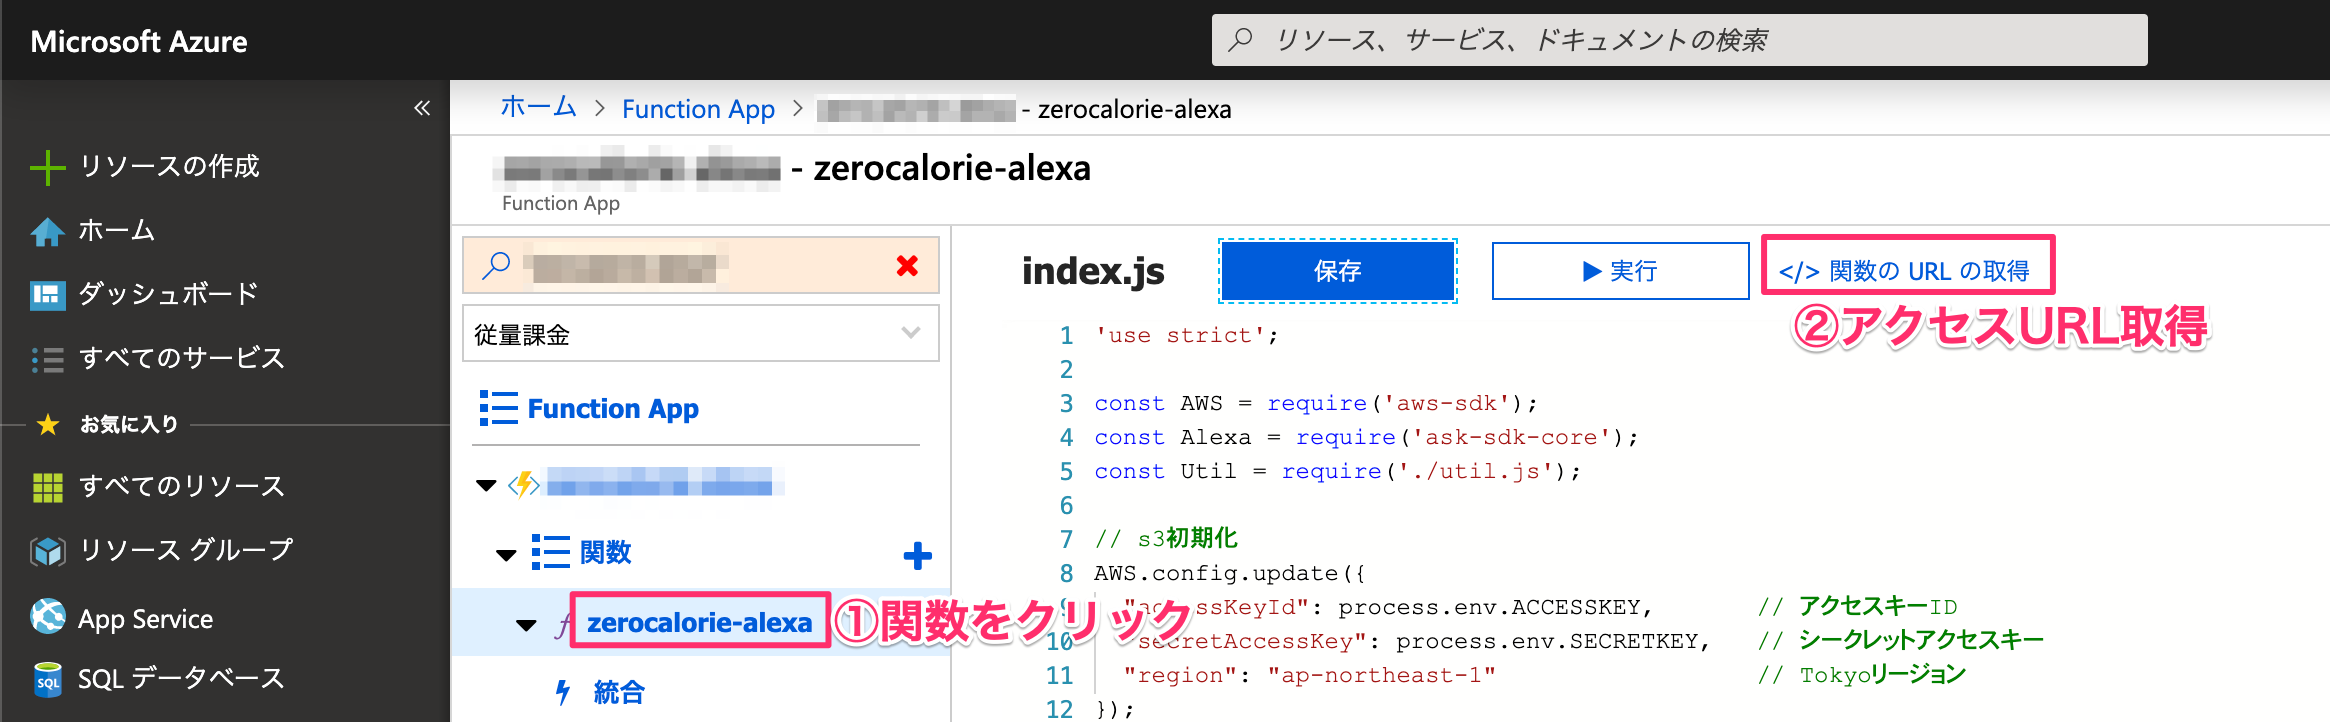
4-6. 環境変数を設定する
プログラムで設定している環境変数を記述します。
構成をクリックします。

新規でキーを追加して、アクセスURLを指定します。

5.Alexaの設定を行う
Amazon DeveloperにアクセスしてAlexaスキルを新規作成します。
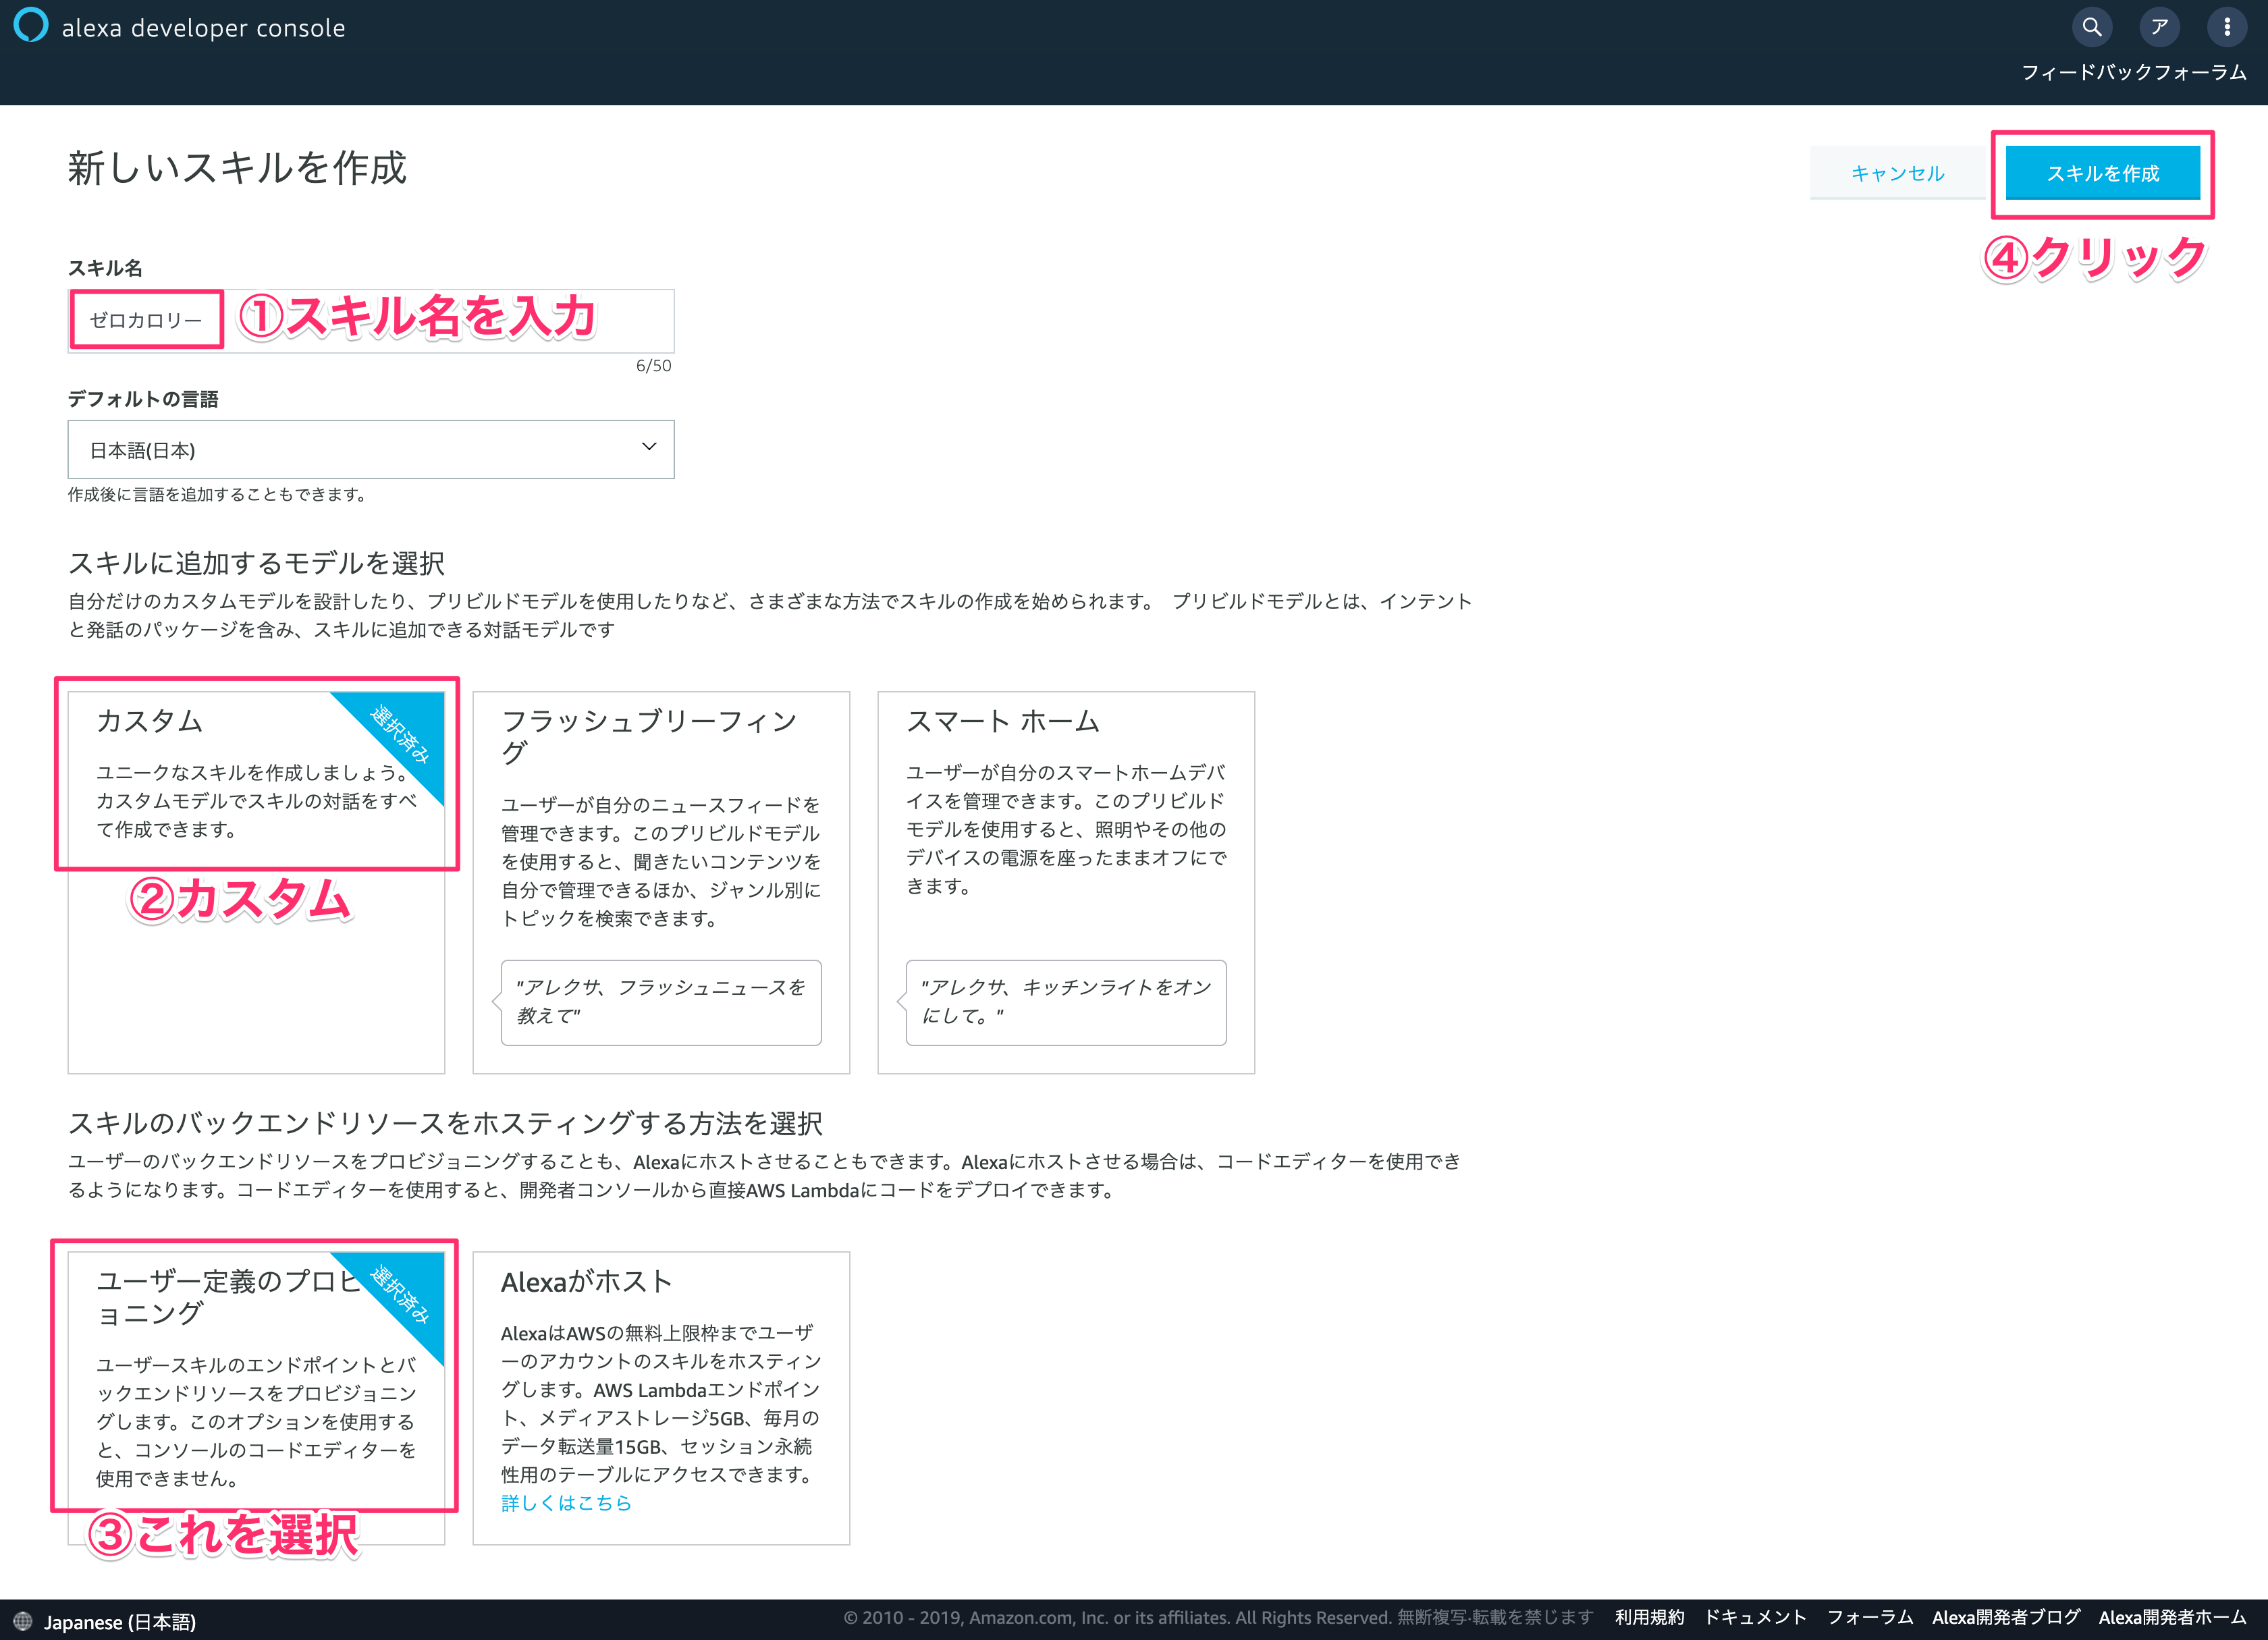
5-1. 新規スキル作成
スキル名はゼロカロリー、モデルはカスタム、ユーザー定義のプロビジョニングを選択。
右上のスキルを作成ボタンをクリックします。
5-2. 呼び出し名を設定する
呼び出し名をゼロカロリーにする

5-3. スロットタイプを追加する
スロットタイプを追加します。foodで絞り込んで、AMAZON.Foodのスロットタイプを追加します。

5-4. インテントを追加する
追加ボタンをクリックして、FoodIntentと入力します。カスタムインテントを作成ボタンをクリックしてインテントを追加します。
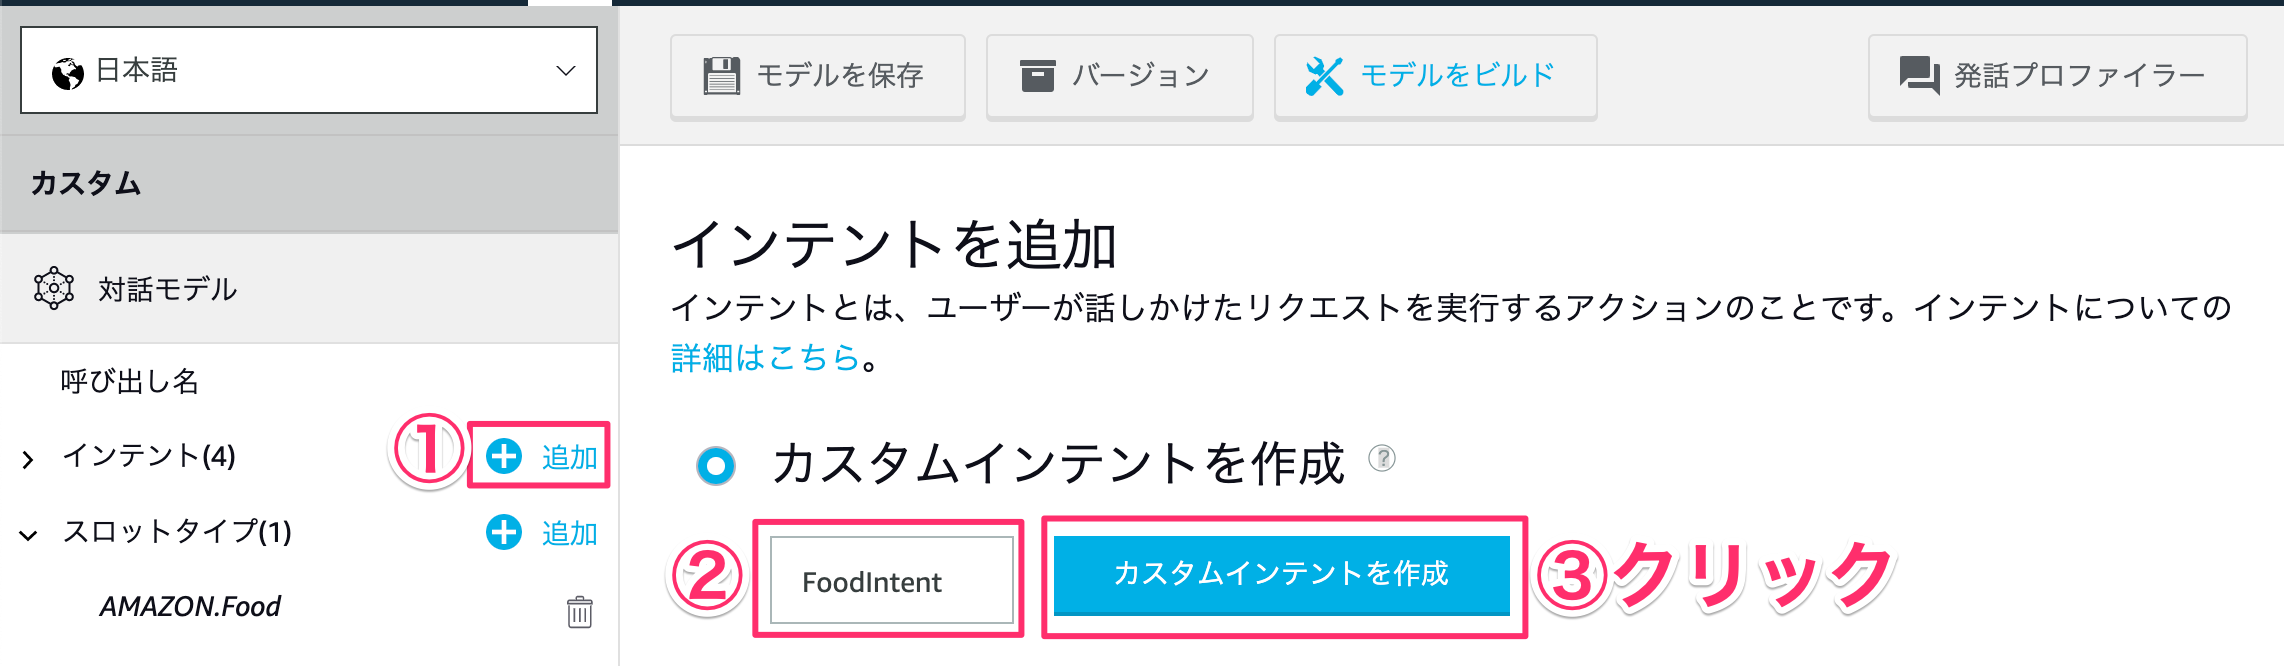
インテントスロットにFoodと入力して、「+」を押します。右側のプルダウンメニューからAMAZON.Foodを選択します。
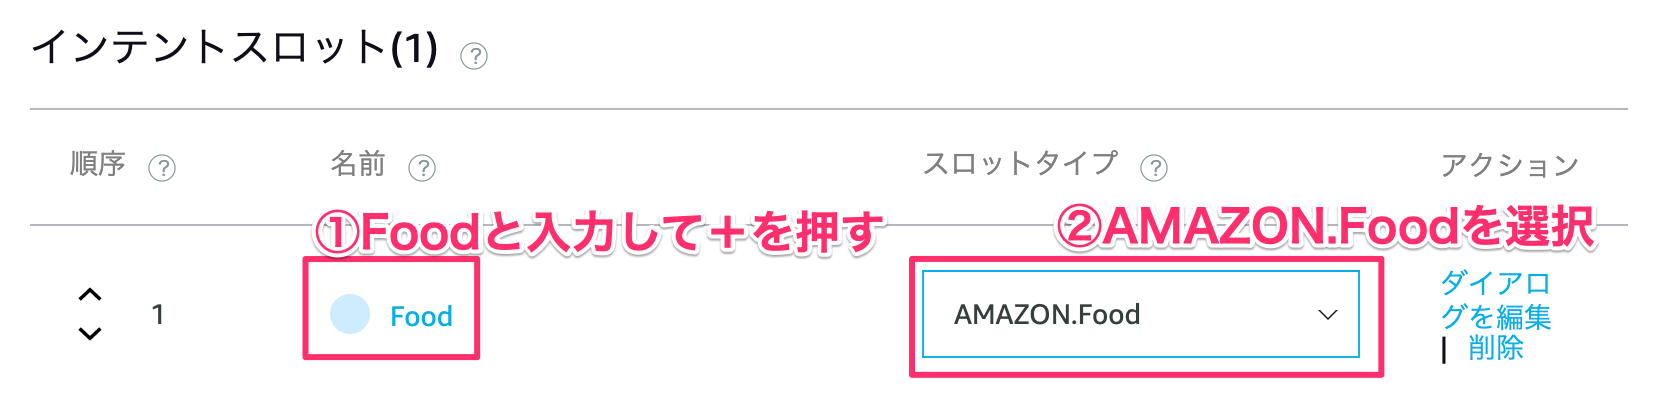
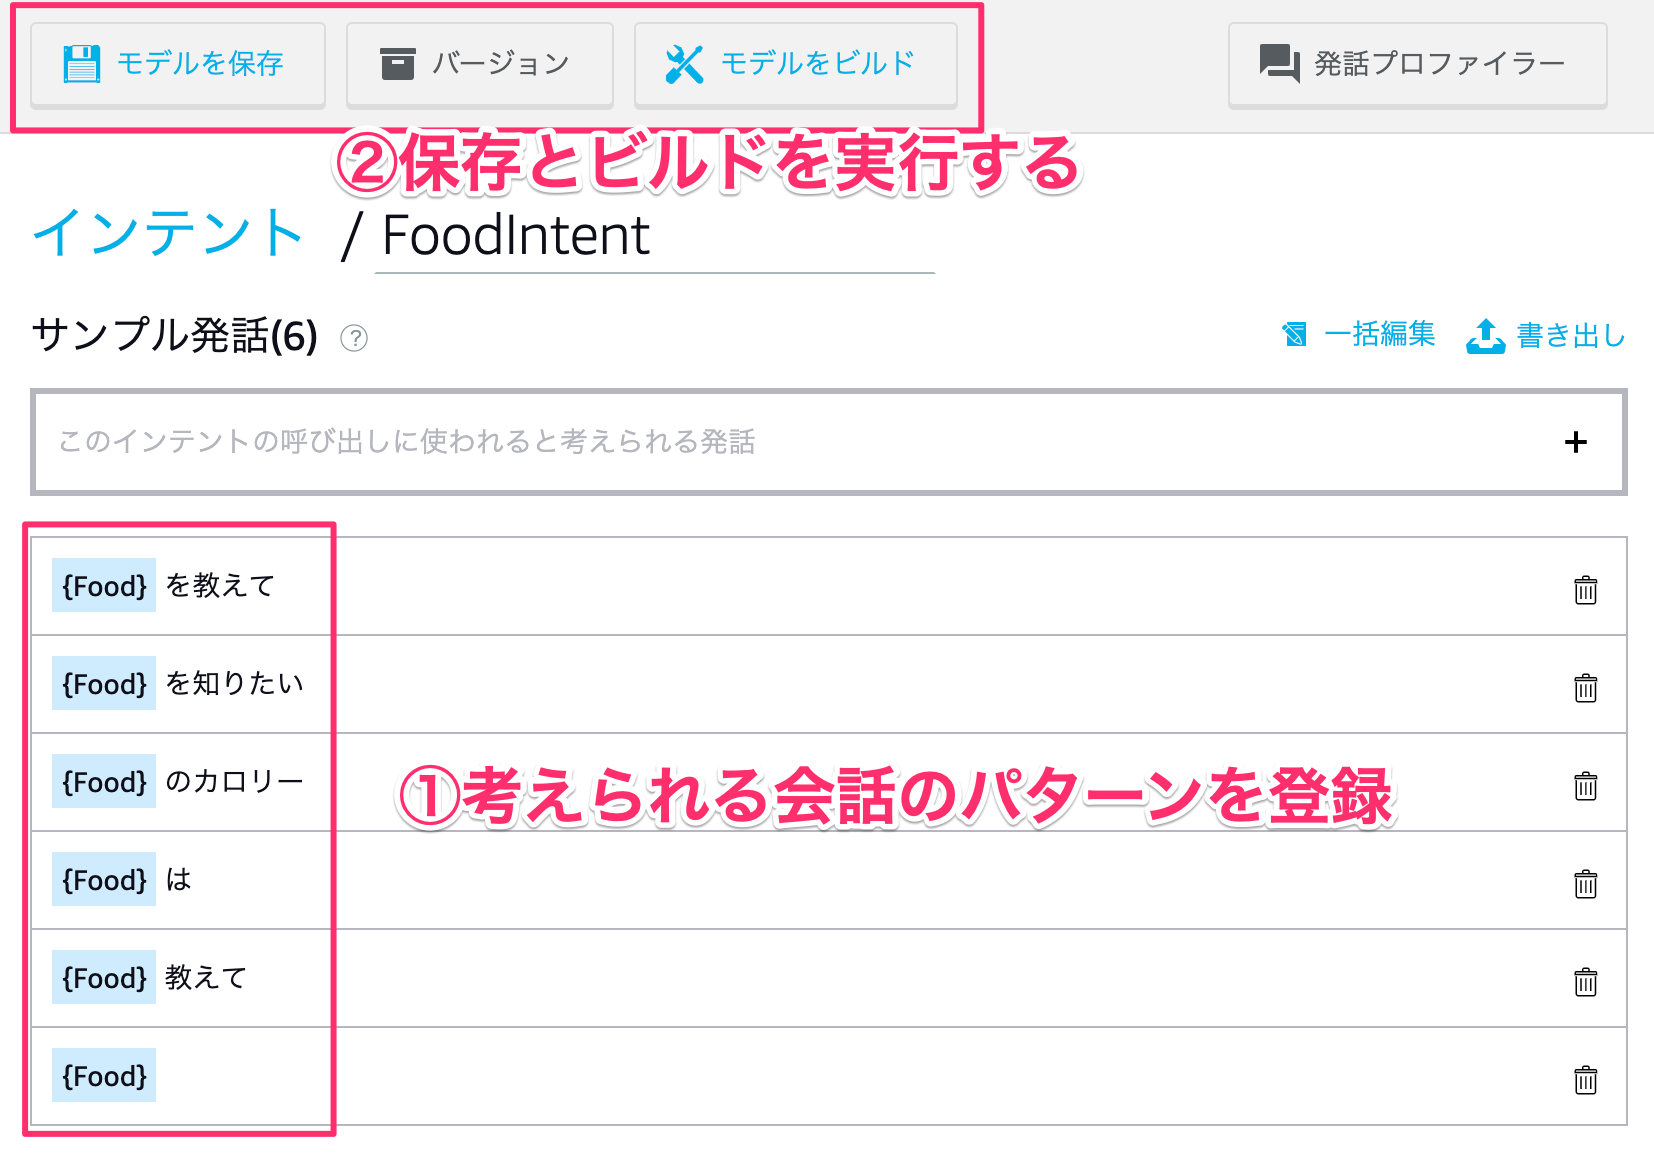
考えられる会話のパターンを登録していきます。登録が終われば保存とビルドを行います。
5-5. インターフェースを設定する
DisplayインターフェースとAlexa Presentation Languageの設定をそれぞれ有効にします。

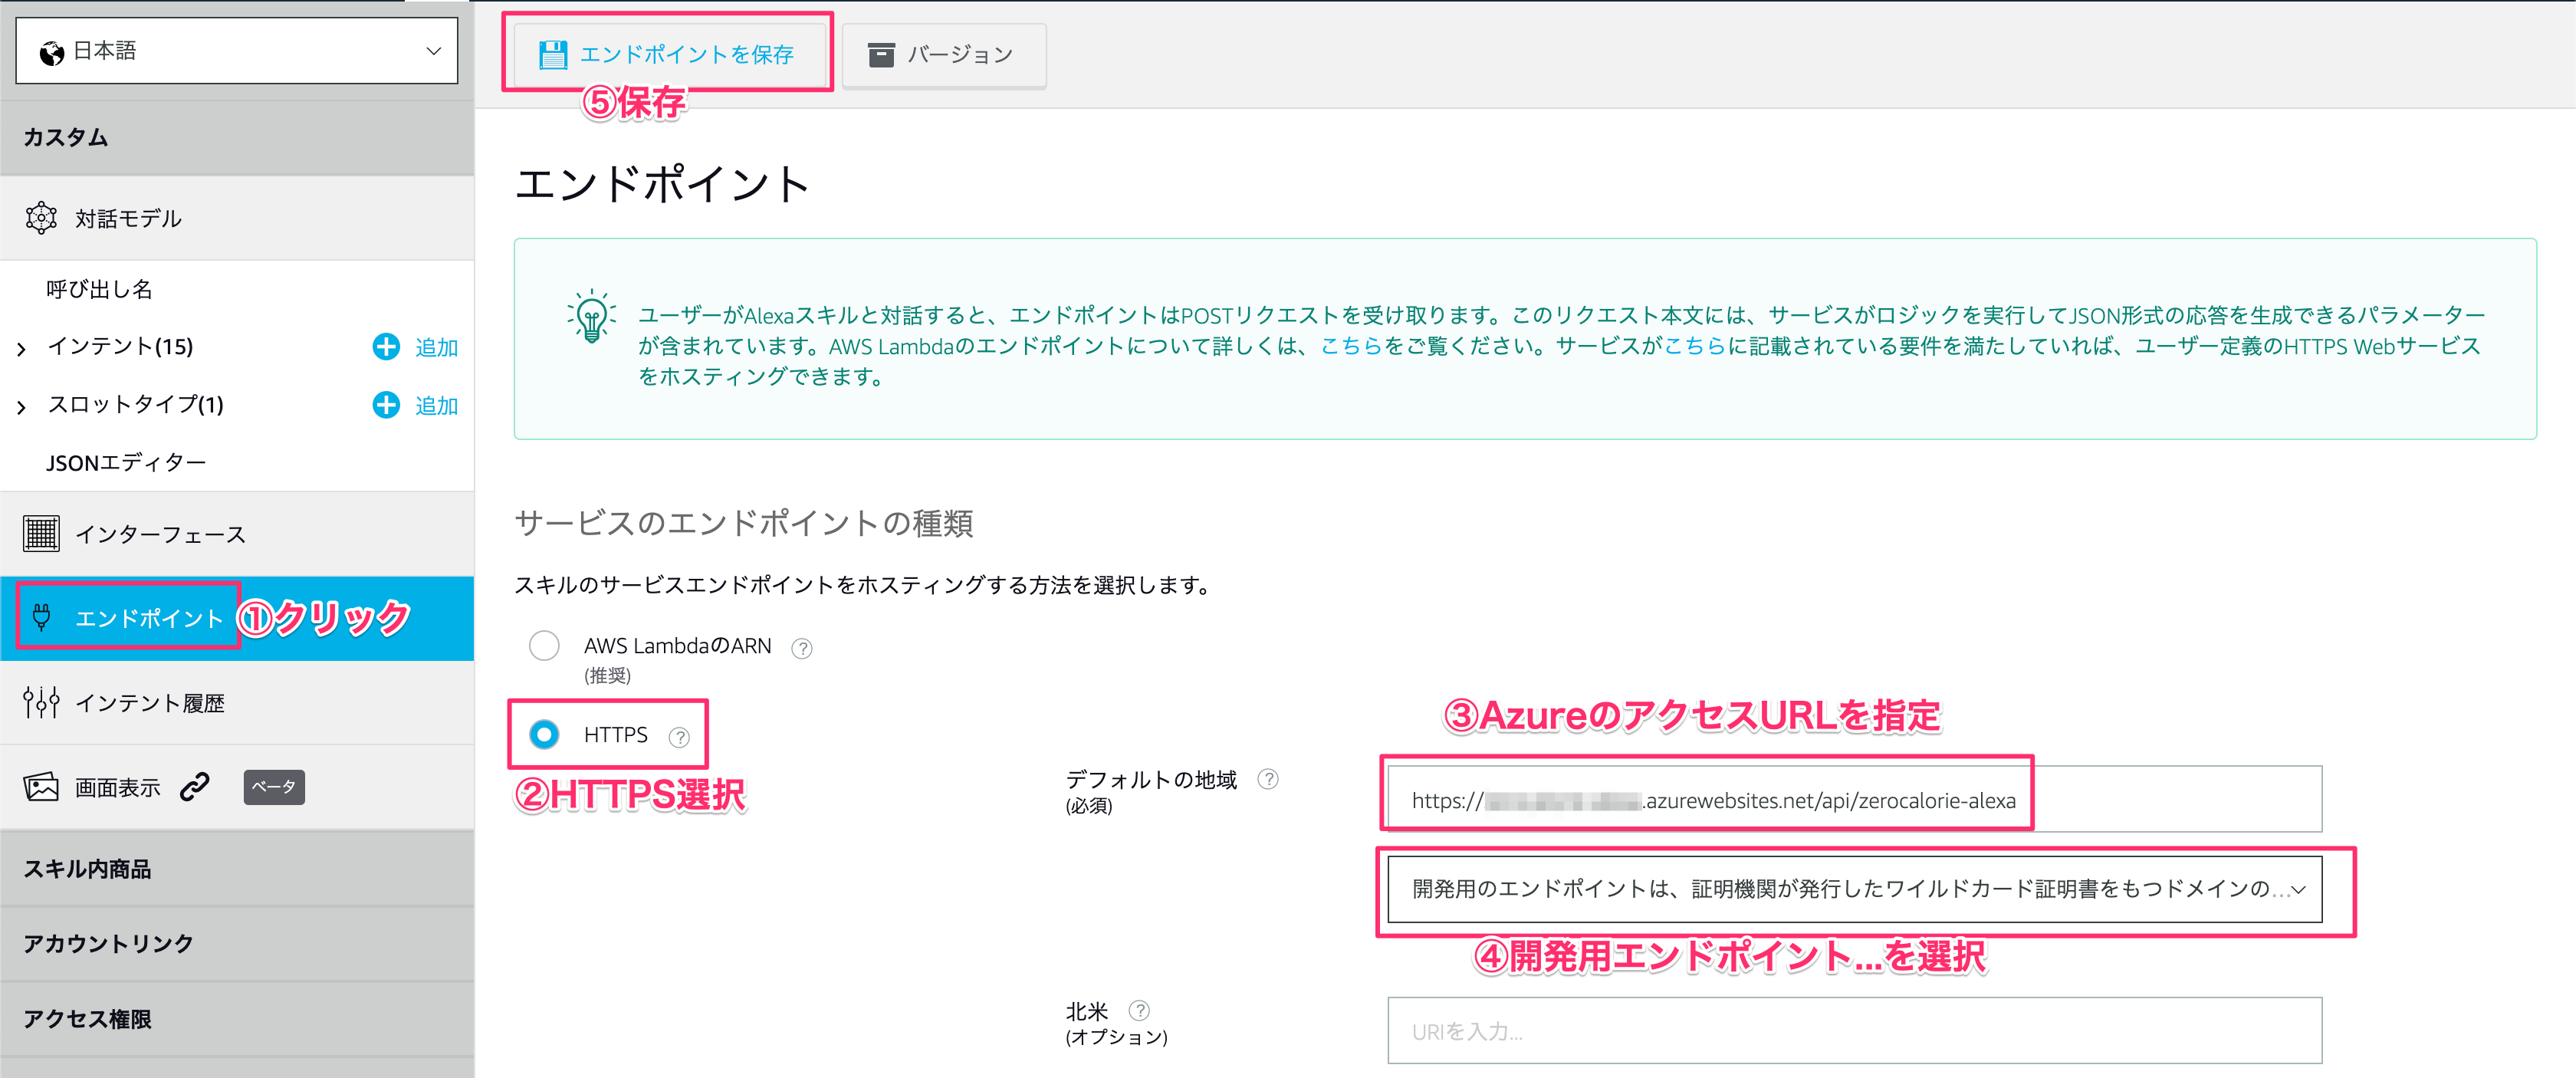
5-6. エンドポイントを設定する
左側メニューのエンドポイントからHTTPSを選択します。デフォルトの地域に4-5で取得したAzureのアクセルURLを設定します。
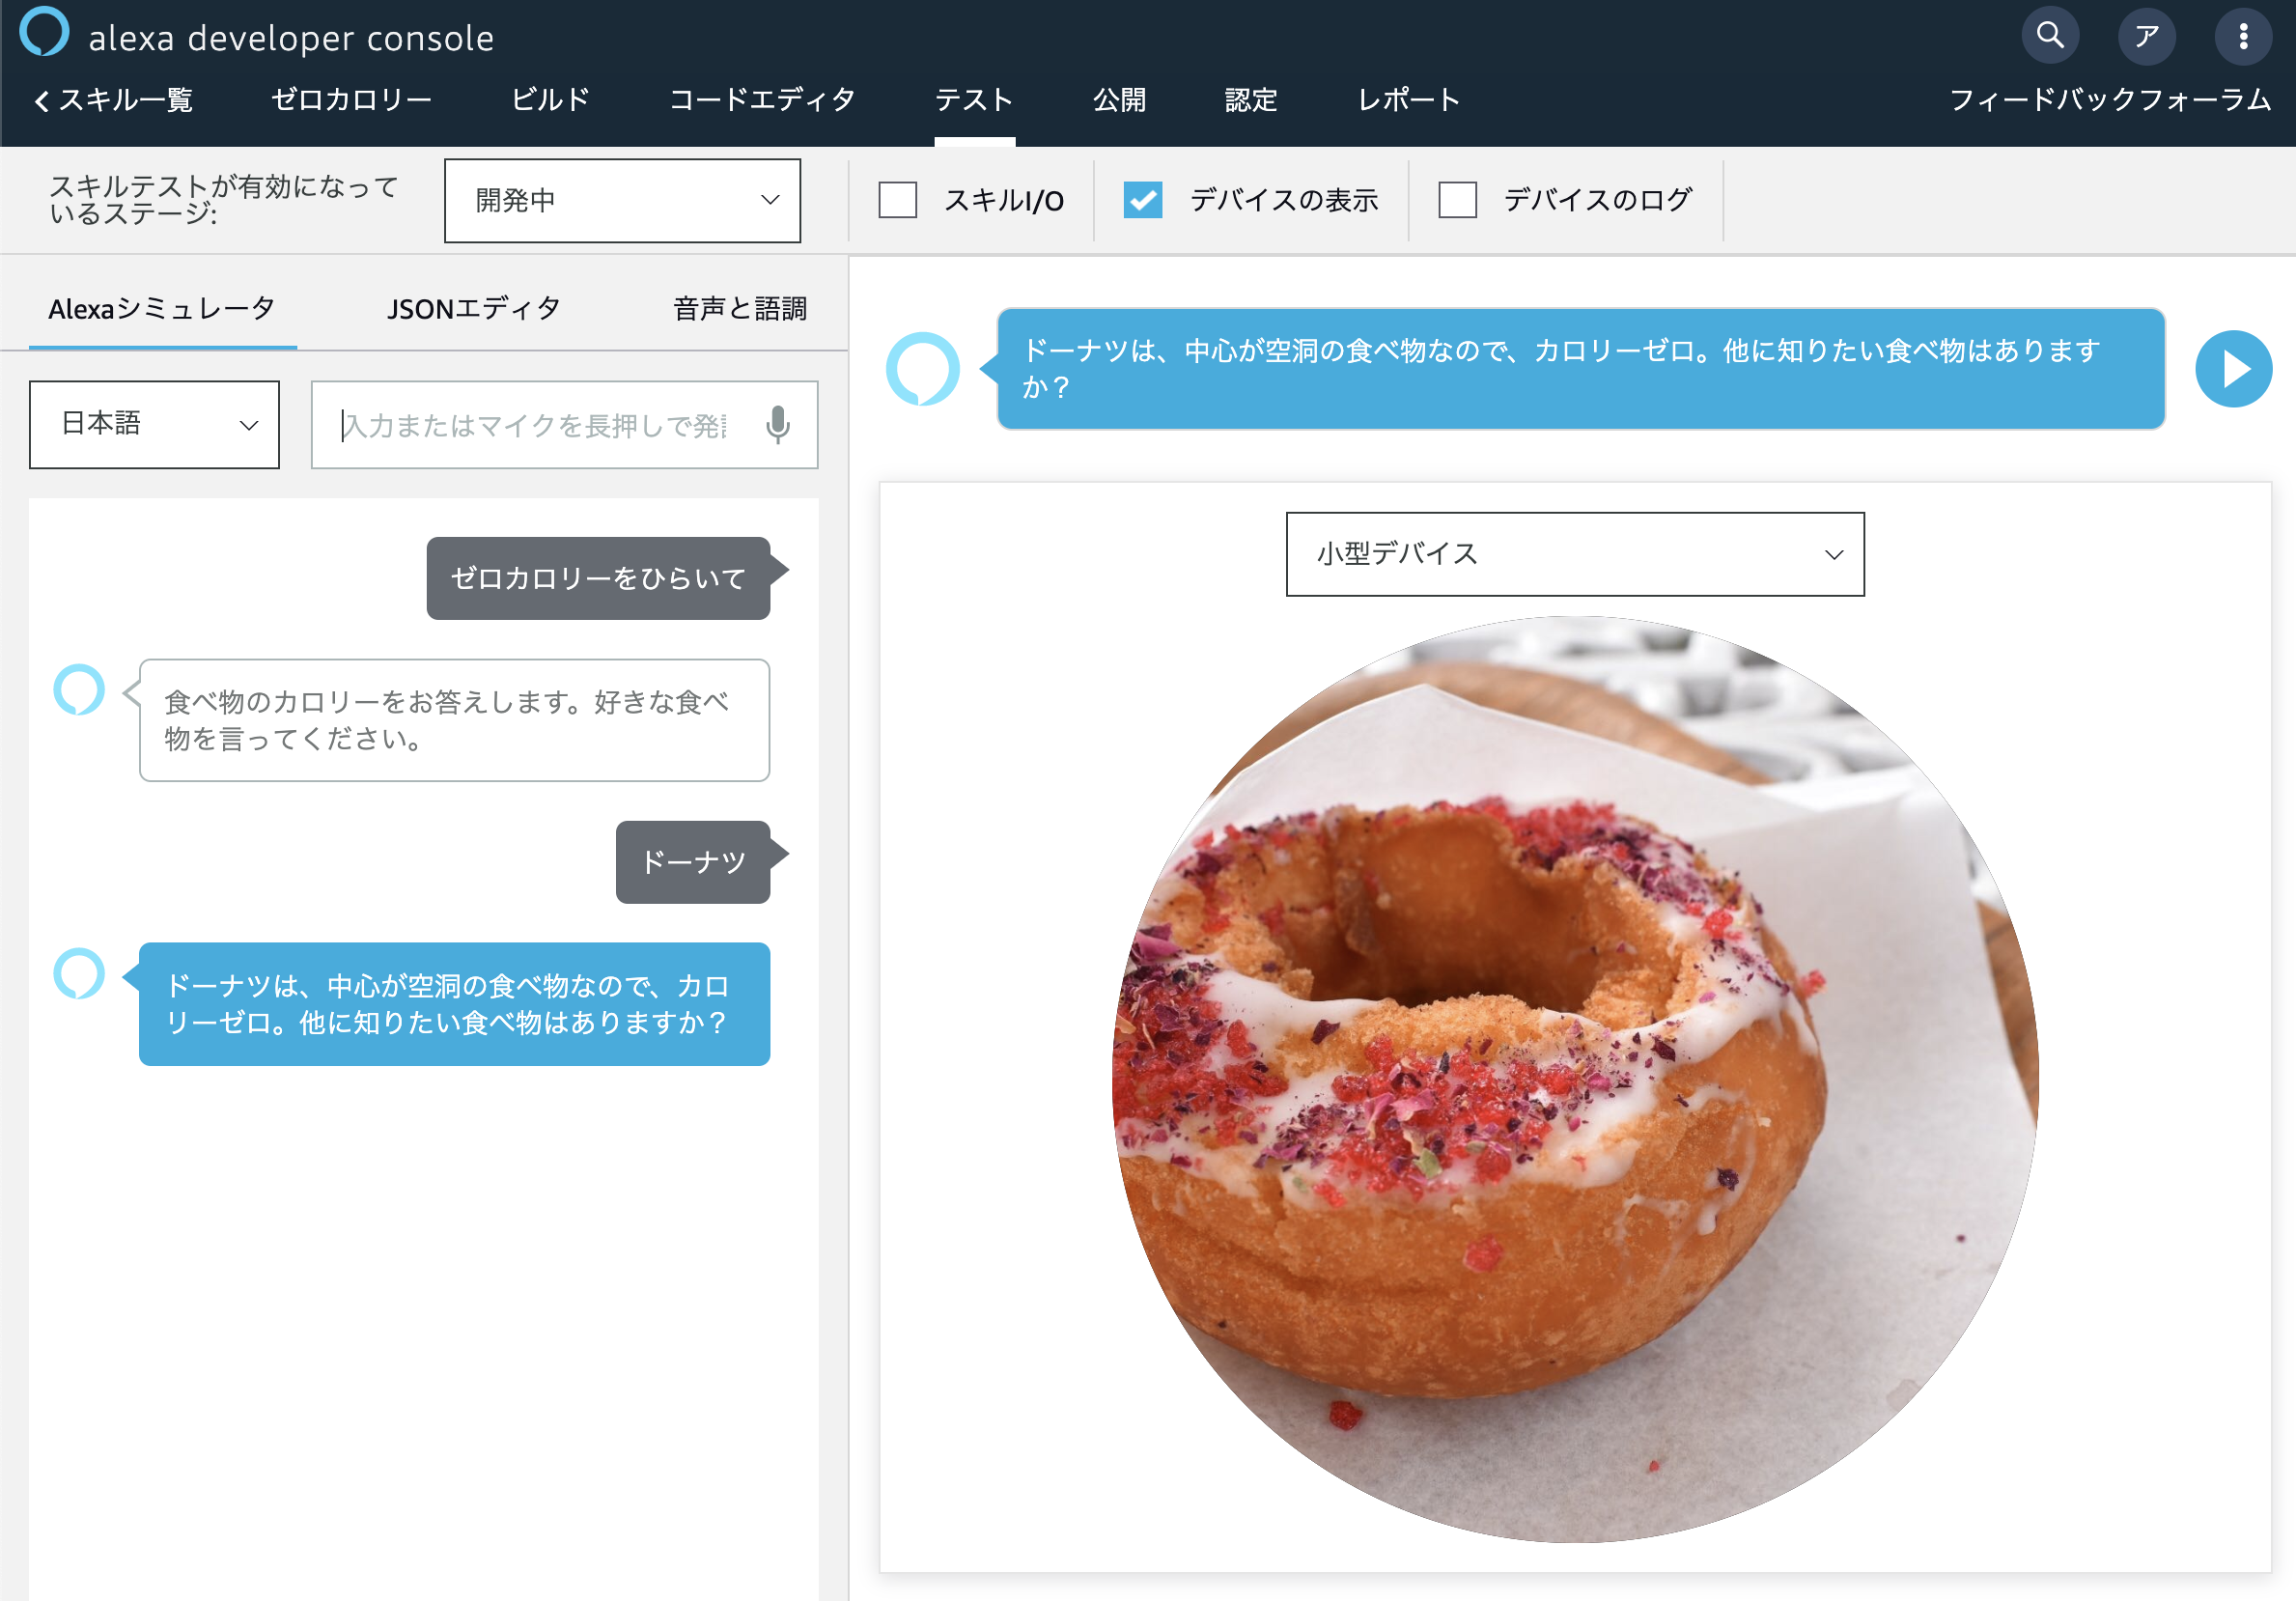
5-7. シミュレーターで確認する
テストタブをクリックして、ゼロカロリーをひらいてと入力して、登録した食べ物を入力します。
※ここで画像が出てこない方はご自身のS3に画像が入っていないからです。
まとめ
ちょっと無理やりですが、様々なクラウド技術を使ってゼロカロリースキルを作ってみました。
アイデア次第でいろんな連携ができるので参考にしてみてください!
システム化のご検討やご相談は弊社までお問い合わせください。
https://i-enter.co.jp/contact/