つくるもの
今回は、階層型のデータから、PowerAppsでTreeView Controlを作成する方法を紹介します。
データソースとしてはSharePoint Onlineのカスタムリストを利用しています。

- 参考にしたビデオはこちらです。
最終的には下のように動くアプリを作成しました。
4階層でもやり方は同じですね。 pic.twitter.com/9oTzxz8vfM
— ながちん(Hiro) #PowerAddict (@mofumofu_dance) 2019年1月7日
準備
SharePointカスタムリスト
(データソースがSharePointカスタムリストである必要は必ずしもありません。利用しやすいデータソースを使ってください。)
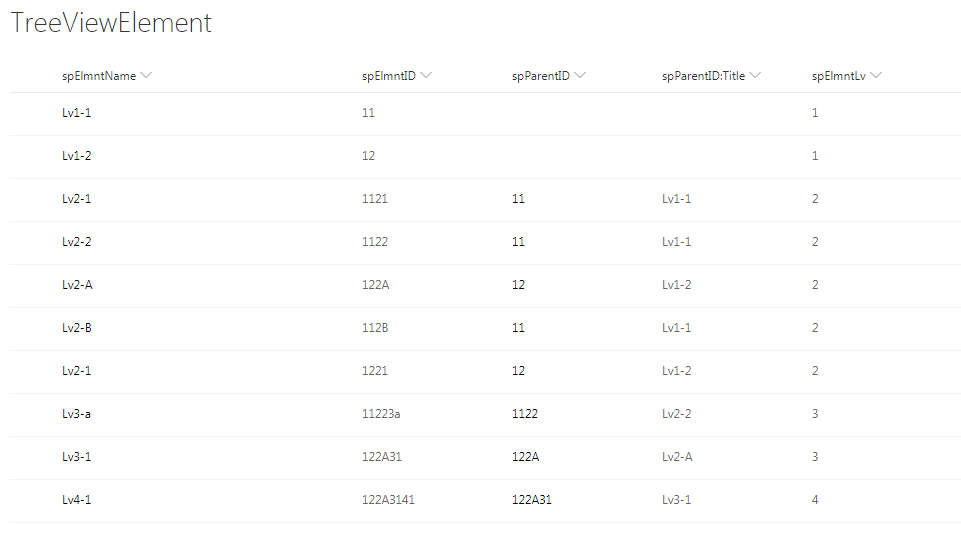
データソースのSharePointリストは下図のような構成で作っています。

List Name:
TreeViewElement
Columns:
- spElmntName : Title列。 各要素の名前を格納
- spElmntID : Single line text(必須&一意) 各要素の名前の重複を許可するために作成
- spParentID : Lookup このリストのspElmntIDを参照する列
- spPreantID:Title : Lookup列の結果のspElmntName
- spElmntLv : Choice 1~4までのレベル(階層)を指定する列
PowerApps側のCollection
データソースからTreeView Controlを作成するために、PowerApps側で中間の加工データ (Collection)を作成します。

元のデータに加えて、TreeViewの開閉のために"Show"という列を追加します。
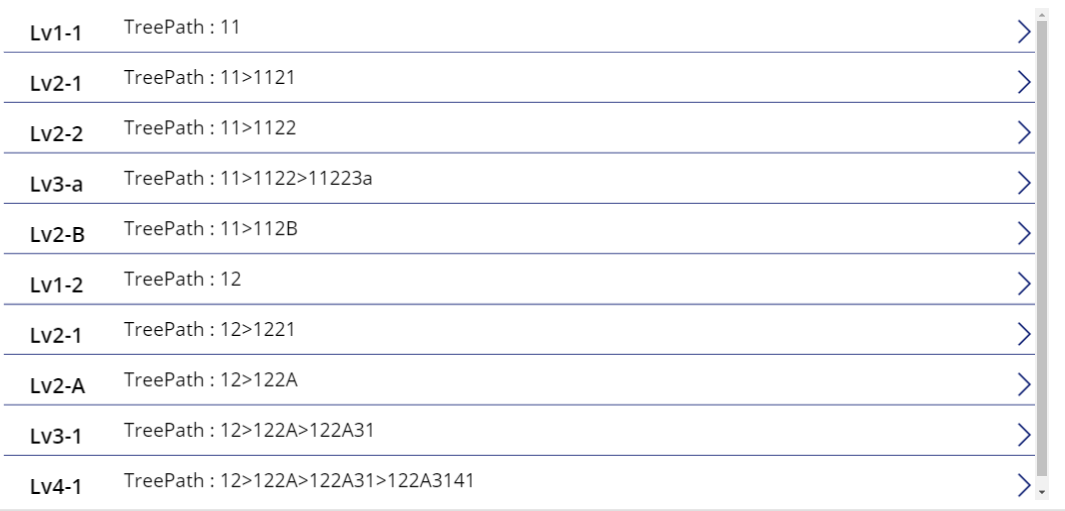
また、正しくソートするために、"TreePath"という列を追加します。
今回のTreeViewはPowerAppsのGalleryコントロールを利用しますが、そのItemsにはSortByColumns(XXXX,"TreePath",Ascending)を指定します。
具体的にはCollectionを作成するためのアクション(ボタンのOnSelectやスクリーンのOnVisible)に以下のコードを設定します。
ForAll(
    TreeViewElement,
    Collect(
        colTreeElmnt,
        {
            ElmntName: Title,
            ElmntId: spElmntID,
            Lv: Value(spElmntLv.Value),
            ParentId: spParentID.Value,
          //Expand/collapseを制御するための列'Show'を追加
            Show: If(
                Value(spElmntLv.Value) = 1,
                true,//初期状態ではspElmntLv=1の要素のみ表示
                false
            ),
            TreePath: ""//TreePathは次に定義

        }
    )
);
//TreePathを定義する
UpdateIf(
    colTreeElmnt,
    Lv = 1,
    {TreePath: ElmntId},
    Lv = 2,
    {TreePath: Concatenate(ParentId,">",ElmntId)},
    Lv = 3,
    {TreePath:
    //Lv3のTreePathは、自分のParendIdと元のデータソースのspElmntIDが一致するレコード(自分の親レコード)のspParentIDを利用する
      Concatenate(LookUp(TreeViewElement,spElmntID = ParentId,spParentID.Value),">",ParentId,">",ElmntId)
    },
    Lv = 4,
    {TreePath:
    //Lv4のTreePathは、Lv3の手順で得られたspParentIDと、元のデータソースのspElmntIDが一致するレコード(自分の親の親のレコード)のspParentIDを利用する
      Concatenate(
          LookUp(TreeViewElement,
            spElmntID = LookUp(TreeViewElement,spElmntID = ParentId,spParentID.Value),
            spParentID.Value),
          ">",LookUp(TreeViewElement,spElmntID = ParentId,spParentID.Value),">",ParentId,">",ElmntId
      )
    }
)
TreePathの構成は少し複雑ですが、
自分のLevelが1なら、自分自身のID。Levelが2なら、自分と親要素のIDをConcatenateで結合。
Levelが3なら、自分の親要素(spParentID)を使ってリストのspElmntIDを検索し、一致したレコードのspParentIDを結合
というように、自分の要素のLevelに応じてTreeのたどり方を指定しています。
このようにして生成されたCollectionをGalleryに表示すると以下のようになります。

ここで、GalleryのItemsプロパティは以下のように設定しました。
SortByColumns(colTreeElmnt,"TreePath",Ascending)
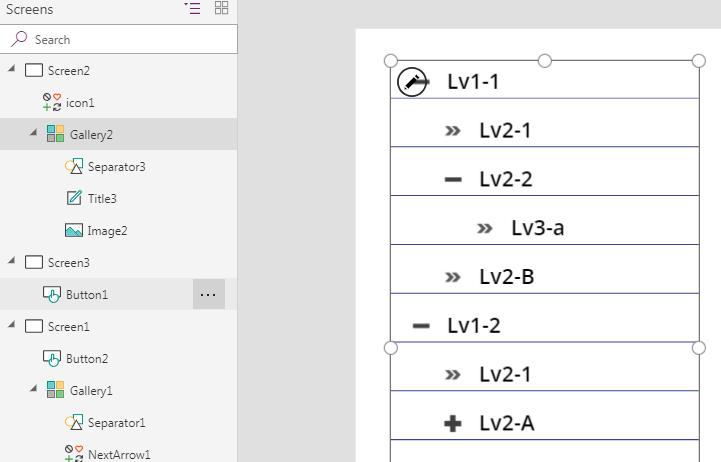
ここまででほとんど完成です。あとは要素の開閉やインデントの調整をしていきます。
Gallery Control
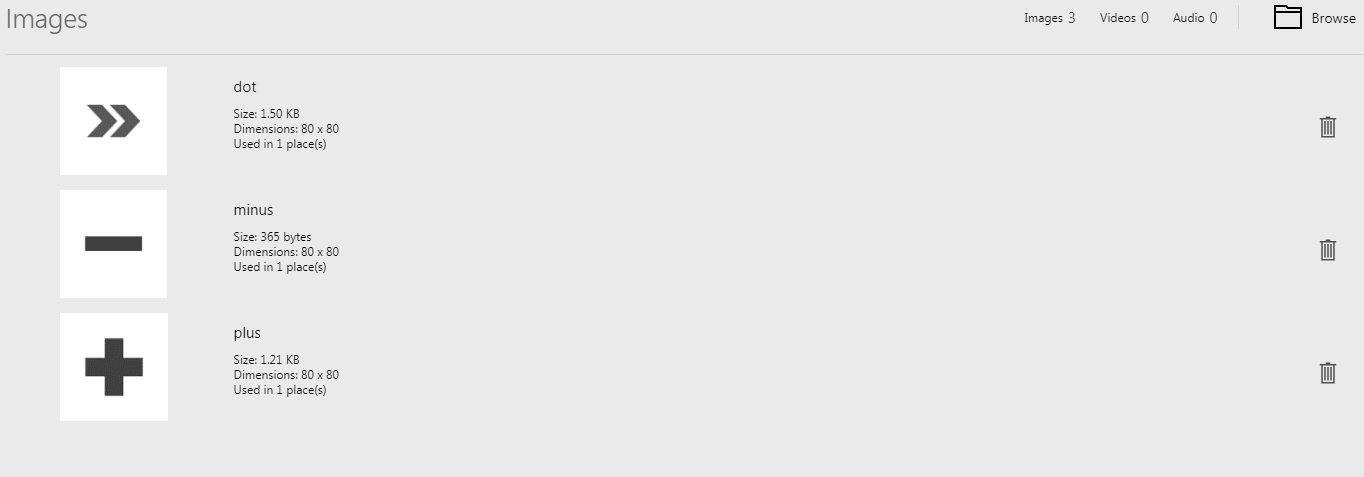
事前に名前の前に付ける画像を用意しておきます。

子要素がある場合にはplus/minusを、子要素がない場合にはdotを表示させます。

あとは設定をしていくだけなので、各プロパティを順に記載します。
//Show=trueだけを表示する
SortByColumns(Filter(colTreeElmnt,Show=true),"TreePath",Ascending)
If(
    CountRows(
        Filter(
            colTreeElmnt,
            ParentId = ThisItem.ElmntId
        )
    ) = 0,
    dot,//自分のIDがを親要素IDにセットされているレコードがなければdot
    LookUp(
        colTreeElmnt,
        ParentId = ThisItem.ElmntId
    ).Show = true,
    minus,//子要素が表示されていればminus
    plus//子要素が表示されていなければplus
)
If(
    //自分のIDを親IDとしてもつレコードが0でなく、それらが表示されているか判定
    CountRows(Filter(colTreeElmnt,ParentId=ThisItem.ElmntId))<>0&&LookUp(colTreeElmnt,ParentId=ThisItem.ElmntId).Show= true,
    //表示されていれば、自分のIDをTreePathに持っている列をすべて非表示にして、自分を再表示
    UpdateIf(colTreeElmnt,CountRows(Filter(Split(TreePath,">"),Result=ThisItem.ElmntId))<>0,{Show: false });UpdateIf(colTreeElmnt,ElmntId=ThisItem.ElmntId,{Show: true}),
    //表示されていなければ、自分を親とする要素(直下の要素)を表示
    UpdateIf(colTreeElmnt,ParentId=ThisItem.ElmntId,{Show:!Show})
)
ポイントは、Lv1やLv2の場合、自分の下にある要素全てを閉じるために、
UpdateIf(colTreeElmnt,CountRows(Filter(Split(TreePath,">"),Result=ThisItem.ElmntId))<>0,{Show: false })
このコードを入れていることです。
あとはインデントの調整だけですが、
ThisItem.Lv*40-30
30+ThisItem.Lv*40
このようにレベルに応じてずらしています。
最後に
何かわからないことがあればmofumofu_danceまでご連絡ください。