この記事は Fediverse (3) Advent Calendar 2020 8日目の記事です。
導入
MatrixはSlackやMS Teamsのようなチャンネル参加型のOSSチャットサービスです。
タイトルでわかりやすいようにSlackとしましたが、厳密にはMS Teamsに近いかもしれません。
オンプレミスに構築できるチャットサービスとしてRocket.chatやMattermostなどがありますが、これらとの違いは他のサーバと連合(フェデレーション)することで、他のサーバのチャンネルにアカウントを新たに作成することなく参加できるようになっています。
ココらへんはDiscordをイメージしてもらうとわかりやすいと思います。一つのアカウントで複数サーバのチャンネルに参加する→このサーバが物理的に別れているイメージです。
このように、単一の企業や組織が管理者として特定されておらず、無数のサーバ(もしくはユーザ)と相互に通信できるようにすることで、ユーザの発言の自由やプライバシーを尊重することを目的としたSNSを**「Fediverse(または分散SNS)」**といいます。
日本におけるFediverse界隈で代表的とも言えるのが、Mastodonを始めとするActivityPubプロトコルを実装した各種サービスです。MatrixはActivityPubに対応していないのでマストドンなどと連合を組むことはできませんが、同じFediverseの仲間です。気になる方は今回私も参加している Fediverse Advent Calendar も御覧ください。 ( 第一会場 、 第二会場 、 第三会場 、 第四会場 )
また、Matrixの紹介概要編として こちらで記事としてまとめています ので、こちらも確認していただければと思います。
また、この記事は構築編としてQiitaにあげています。
この記事ではタイトルにある通り、Matrixのサービスを動かすための構築手順を紹介します。
海外の有志による構築手順のまとめがあるため、あえてこの場で書くことは必ずしも必要ではありませんが、日本語のナレッジとしてかんたんに紹介させていただきます。
本来であれば、nginxの構築手順やSMTPの設定手順なども乗せる必要があるのかもですが、時間が足りず、構築/設定済みの環境を使って紹介させてもらいます。今回紹介できなかった箇所については、後ほど別途記事にして上げることにします。
導入環境
- LXD on Ubuntu
- UbuntuServer 20.04LTS
- バックエンド:Synapse
- フロントエンド:Element Web
※Matrixはサーバ間通信やAPIを提供するバックエンド側のシステムとフロントエンド側がそれぞれ別に開発されています。
今回は最もポピュラーで利用者も多いSynapse/Element Webの組み合わせで構築を行います。
※MatrixはWebクライアントを構築しなくても、 element.io が公開しているクライアント app.element.io を使うことでWebクライアントを使わなくても動きますが、CSPなどの関係から、できるなら専用ドメインで動かしたほうが良いと 公式でもアナウンスがなされているので 、そのとおりに構築をします。
また、構築/設定済みとして以下の環境を用います。
- CDN & ネームサーバ: CloudFlare
- SMTP: Mailgun
全体のシステム構成は以下のとおりです。
なお、今回は UbuntuServer20.04 で構築しますが、その他のディストリビューションの構築についても以下のページでまとめられています。
1. aptリポジトリの登録とSynapseインストール
Matrix.orgの公式リポジトリを登録してaptコマンドでインストールします。
公開鍵とリポジトリを登録します。
wget -qO - https://matrix.org/packages/debian/repo-key.asc | sudo apt-key add -
sudo add-apt-repository https://matrix.org/packages/debian/
# apt-keyやadd-apt-repositoryの実行時にエラーが出たら、gnupg2パッケージを入れてから再度実施してみてください。
必要なパッケージの導入
aptパッケージを最新にした上で、matrix-synapse-py3 パッケージをインストールします。
sudo apt update && sudo apt upgrade -y
sudo apt install -y matrix-synapse-py3
aptのsynapseのパッケージには、matrix-synapse-py3の他にmatrix-synapseというものもありますが、こちらはやや古めのバージョンの安定版パッケージらしく、使用できない機能や設定も多くあります。基本的にはpy3版を入れるので問題ないでしょう。
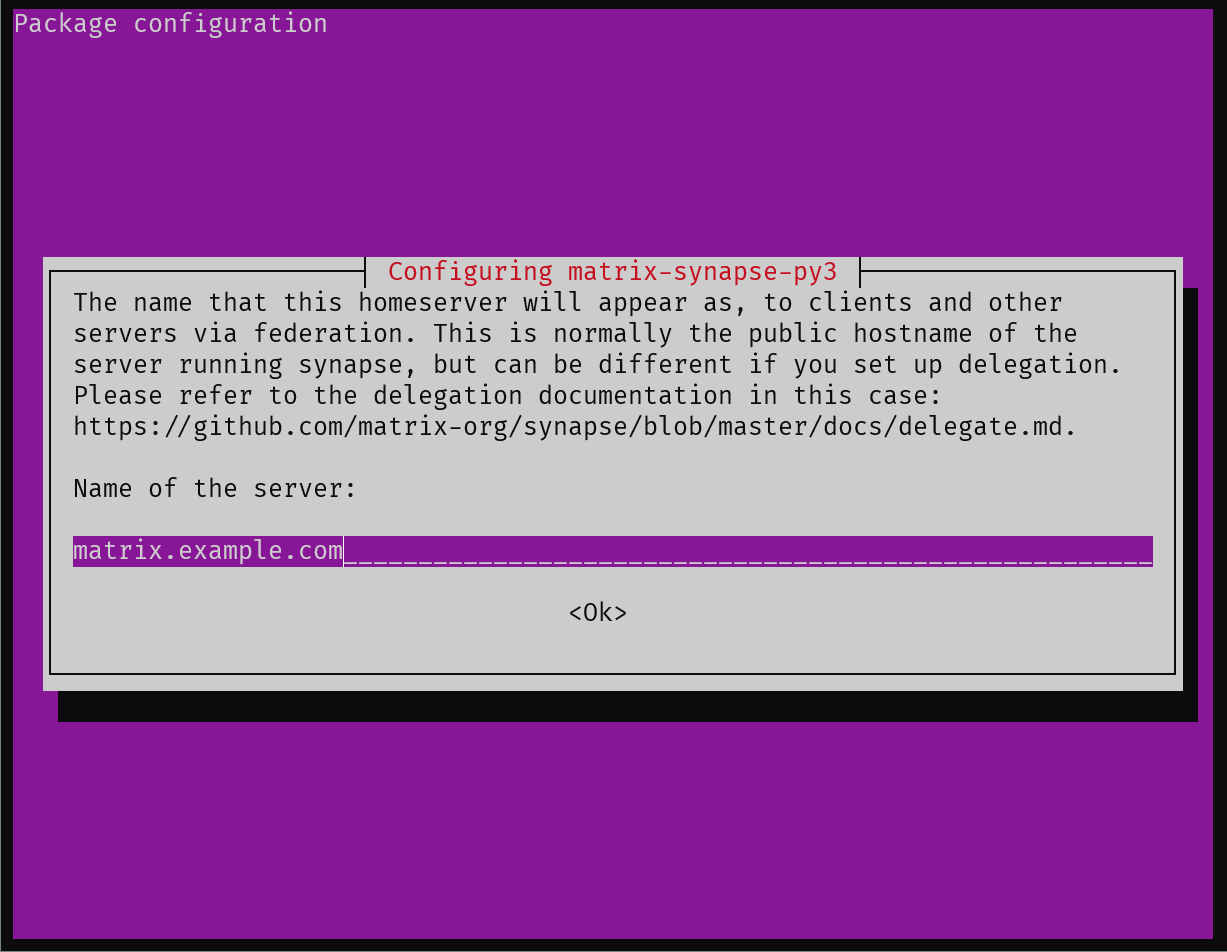
インストール時に設定を促すTUI画面が表示されます。
サーバ名を入力します
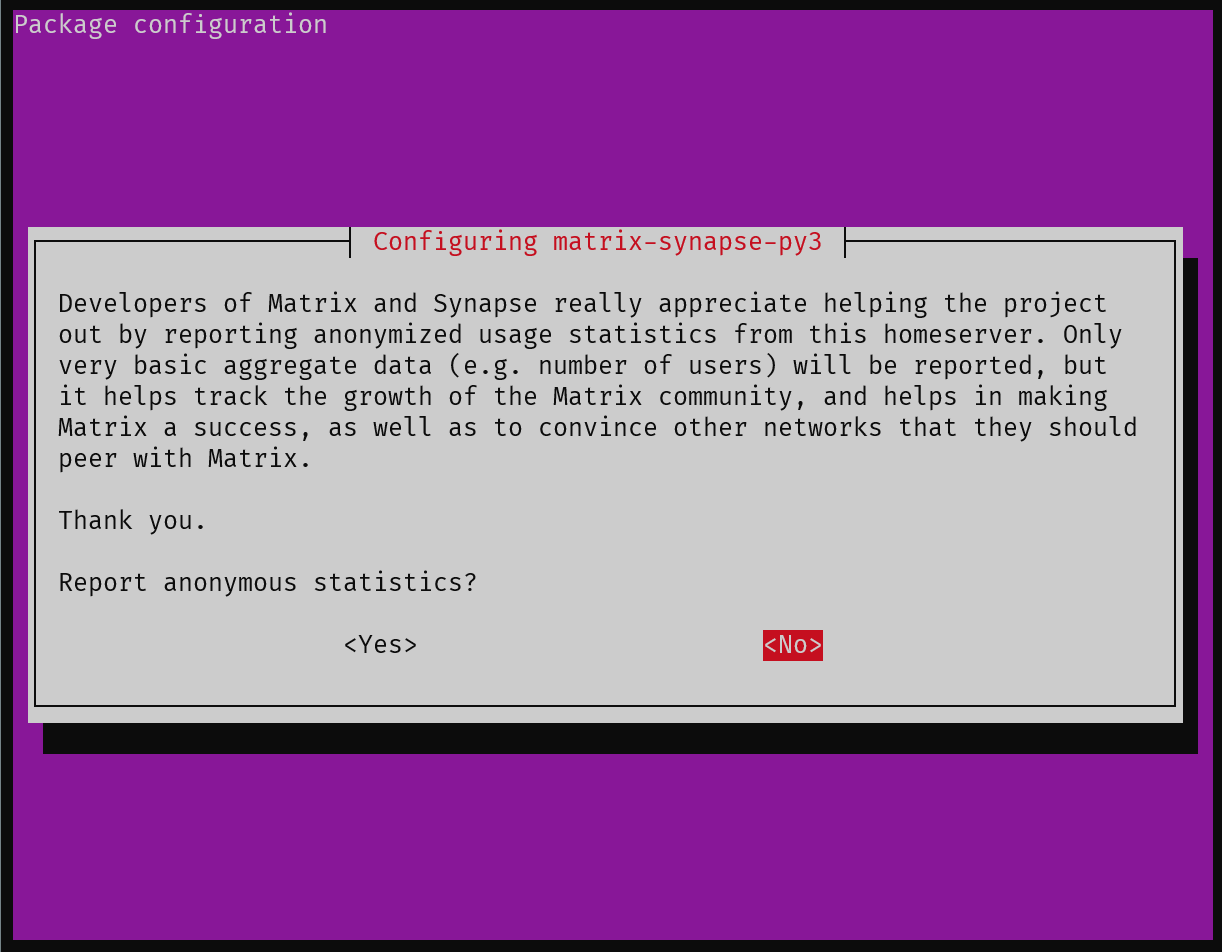
ユーザレポートを送信するかの確認をされますが、必要ないのでNOで大丈夫です。
(オプション) データベースをPostgreSQLにする
SynapseのデフォルトはSQLiteが設定されています。
単一のサーバで運用するならこのままでも問題ありませんが、DBサーバを分けたりレプリケーションしたりといった高度なDB操作をしたい場合にはPostgreSQLに設定してしまいましょう。
今回はmatrix-synapseパッケージの導入と同様に公式のリポジトリを登録する方法で行います。
※デフォルトのaptリポジトリにも登録はされていますが、PostgreSQLはアップデートが早いため公式リポジトリを参照したほうがいいです。
公開鍵とリポジトリの登録
sudo sh -c 'echo "deb http://apt.postgresql.org/pub/repos/apt $(lsb_release -cs)-pgdg main" > /etc/apt/sources.list.d/pgdg.list'
wget --quiet -O - https://www.postgresql.org/media/keys/ACCC4CF8.asc | sudo apt-key add -
aptパッケージのアップデートとPostgreSQL13(2020/12時点での最新) のインストール
sudo apt update && sudo apt upgrade -y
sudo apt install -y postgresql-13 libpq5
DB用アカウントの作成
sudo -u postgres -- createuser --pwprompt synapse_user
※rootで操作している場合は could not change directory to "/root": Permission denied などのメッセージは出ますが問題ありません。
パスワード入力を求められるので、適当なパスワードを入力します。
DBの作成。公式ドキュメントではアカウント作成はcreateuser使ってたのに、DB作成は直接SQL打ってたのが気持ち悪かったので、こちらもcreatedbコマンドでまとめました。
sudo -u postgres -- createdb -E UTF8 -l C -T template0 -O synapse_user synapse
PostgreSQLはデフォルトではループバックアドレス(127.0.0.1)からのリクエストしか許可していないため、DBサーバを分ける場合は /etc/postgresql/13/main ディレクトリにある postgresql.conf と pg_hba.conf を修正しましょう(今回は解説を省略)
また、PostgreSQLはデフォルトの設定で自サーバにおける最高のパフォーマンスを発揮するとは限りません。
PGTune などを使って、最低限の設定を確認するようにしましょう。
(オプション) Redisを設定する
メッセージの投稿など、クライアントからHTTPリクエストがあった際にDBに直接書き込むのではなく、一旦Redisにキャッシュを作成してデータの保全などを行うことができます。
ユーザ数が増えてくると、Redisの設定があったほうがサーバのレスポンスが良くなったりするので、サーバの規模に合わせて導入すればいいでしょう。
sudo apt install -y redis-server
設定(homeserver.yaml)の変更
設定ファイルは /etc/matrix-synapse/homeserver.yaml にあります。
ここでの設定は環境によって設定内容が変わってきます。なので設定の必要がある項目のdiff結果のみを箇条書きに紹介します。各自の環境で適宜パラメータを調整してください。
なお、設定項目の中に、シークレットキーを入力する箇所が度々出てきます。文字列のランダム性と文字列長が長いほうがセキュリティが強固になるため、以下のコマンドを打ちキーを生成しましょう。
cat /dev/urandom | base64 -w 0 | fold -w 100 | head -n 1
@@ -42,7 +42,7 @@
 # under the 'listeners' configuration, however this is a security risk:
 # https://github.com/matrix-org/synapse#security-note
 #
-#web_client_location: https://riot.example.com/
+web_client_location: /usr/local/matrix/element/live

 # The public-facing base URL that clients use to access this HS
 # (not including _matrix/...). This is the same URL a user would
Webクライアント(今回の場合はElement web) のパスを設定します。
デフォルトではURLが書かれていますが、ディレクトリパスを指定することでローカルディレクトリを参照します。
@@ -50,7 +50,7 @@
 # use synapse with a reverse proxy, this should be the URL to reach
 # synapse via the proxy.
 #
-#public_baseurl: https://example.com/
+public_baseurl: https://matrix.example.com/

 # Set the soft limit on the number of file descriptors synapse can use
 # Zero is used to indicate synapse should set the soft limit to the
MatrixのベースとなるURLを設定します。リバースプロキシを利用している環境で必要とありますが、今回はnginxでリバースプロキシをかけているので、設定をしておきます。
@@ -86,7 +86,7 @@
 # If set to 'true', allows any other homeserver to fetch the server's public
 # rooms directory via federation. Defaults to 'false'.
 #
-#allow_public_rooms_over_federation: true
+allow_public_rooms_over_federation: true

 # The default room version for newly created rooms.
 #
他サーバから公開されている部屋に参加するようにするためにはコメントをはずしてtrueを設定します(デフォルトはfalseです)
@@ -204,10 +204,10 @@
 listeners:
   - port: 8008
     tls: false
     type: http
     x_forwarded: true
     bind_addresses: ['::1', '127.0.0.1']

     resources:
-      - names: [client, federation]
+      - names: [client, federation, webclient]
         compress: false

     # example additional_resources:
待ち受けるListerポートの設定です。
ここに他のアプリケーションと異なる部分として、resourcesを設定する項目があります。
namesの項目には、待ち受けるポートで動かすサービスを指定します。
clientがAPIリクエストに対して返すサービス、federationが他サーバからのリクエストに対して返すサービス、webclientが、Webブラウザからのクライアント要求があった際に返すサービスです。
その他にもいくつかのresouceがあるので、詳しくは当該行近くにあるコメントを確認してください。
@@ -241,7 +241,7 @@

 # How to reach the server admin, used in ResourceLimitError
 #
-#admin_contact: 'mailto:admin@server.com'
+admin_contact: 'mailto:admin@matrix.example.com'

 # Global blocking
 #
管理者問い合わせ用のメールアドレスです。
ドメインとか特に関係なく、問い合わせできるアドレスを設定してください。
@@ -736,10 +736,16 @@
 # For more information on using Synapse with Postgres, see `docs/postgres.md`.
 #
 database:
-  name: sqlite3
+  name: psycopg2
   args:
-    database: /var/lib/matrix-synapse/homeserver.db
-
+    user: synapse_user
+    password: "PostgreSQLのユーザ作成時に設定したパスワード"
+    dbname: synapse
+    host: 127.0.0.1
+    port: 5432
+    cp_min: 5
+    cp_max: 10

 ## Logging ##
DBにSQLiteではなくPostgreSQLを利用する際はこの設定を入れてください。
argsに設定できる内容については libpqのドキュメント にあるパラメータが使えるみたいです。
GitHubの synapse/postgres.md にも設定例がありますが、ちょっと古いみたいで使えない設定もあるので注意しましょう。
@@ -1069,7 +1075,7 @@

 # Enable registration for new users.
 #
-#enable_registration: false
+enable_registration: true

 # Optional account validity configuration. This allows for accounts to be denied
 # any request after a given period.
一般ユーザの登録を開放する場合はコメントを外して true に設定します。
ユーザ登録を開放していない場合は、CLIにて register_new_matrix_user コマンドを打つことで新しいユーザを作成することができます。
@@ -1174,7 +1180,7 @@
 # If set, allows registration of standard or admin accounts by anyone who
 # has the shared secret, even if registration is otherwise disabled.
 #
-#registration_shared_secret: <PRIVATE STRING>
+registration_shared_secret: <ランダム文字列で生成したキー>

 # Set the number of bcrypt rounds used to generate password hash.
 # Larger numbers increase the work factor needed to generate the hash.
登録が無効になっててもアカウント作成をしたい場合はこの設定を埋めてください。みたいに書かれてる気がするんだけど設定しないとエラーが出たので一応入れときました。
@@ -1254,8 +1260,9 @@
 # as a publicly joinable room when the first user registers for the
 # homeserver. This behaviour can be customised with the settings below.
 #
-#auto_join_rooms:
-#  - "#example:example.com"
+auto_join_rooms:
+  - "#welcome:matrix.example.com"
+  - "#information:example.com"

 # Where auto_join_rooms are specified, setting this flag ensures that the
 # the rooms exist by creating them when the first user on the
ユーザ登録時に自動で参加するチャンネルのリストをここに入力します。
@@ -1322,7 +1329,7 @@
 #
 # Defaults to true.
 #
-#auto_join_rooms_for_guests: false
+auto_join_rooms_for_guests: false


 ## Metrics ###
@@ -1389,13 +1396,13 @@
 # the registration_shared_secret is used, if one is given; otherwise,
 # a secret key is derived from the signing key.
 #
-#macaroon_secret_key: <PRIVATE STRING>
+macaroon_secret_key: <ランダム文字列で生成したキー>

 # a secret which is used to calculate HMACs for form values, to stop
 # falsification of values. Must be specified for the User Consent
 # forms to work.
 #
-#form_secret: <PRIVATE STRING>
+form_secret: <ランダム文字列で生成したキー>

 ## Signing Keys ##
registration_shared_secretが設定されてたらmacaroon_secret_keyも入れる?これ入れてたからregistration_shared_secret入れなくてエラー出た?
ともあれこれ入れないとサーバ動かなかったので入れた。
form_secretはフォーム送信時に暗号化するなどしてるっぽいです。
@@ -1466,11 +1473,12 @@
 #
 trusted_key_servers:
   - server_name: "matrix.org"
+  - server_name: "matrix.remote.server.example.com"

 # Uncomment the following to disable the warning that is emitted when the
 # trusted_key_servers include 'matrix.org'. See above.
 #
-#suppress_key_server_warning: true
+suppress_key_server_warning: true

 # The signing keys to use when acting as a trusted key server. If not specified
 # defaults to the server signing key.
通信を信頼するリモートサーバのリストをここに入力します。ここらへんがホワイトリストとなります。
デフォルトのmatrix.orgが入っていると警告が出るようになっているみたいです(そのまま動きますが)。matrix.orgを使うのが問題ない場合は、 suppress_key_server_warning のコメントを外してください。
@@ -2013,24 +2021,24 @@
 email:
   # The hostname of the outgoing SMTP server to use. Defaults to 'localhost'.
   #
-  #smtp_host: mail.server
+  smtp_host: smtp.mailgun.org

   # The port on the mail server for outgoing SMTP. Defaults to 25.
   #
-  #smtp_port: 587
+  smtp_port: 587

   # Username/password for authentication to the SMTP server. By default, no
   # authentication is attempted.
   #
-  #smtp_user: "exampleusername"
-  #smtp_pass: "examplepassword"
+  smtp_user: "postmaster@matrix.example.com"
+  smtp_pass: "MailgunのSMTPパスワード"

   # Uncomment the following to require TLS transport security for SMTP.
   # By default, Synapse will connect over plain text, and will then switch to
   # TLS via STARTTLS *if the SMTP server supports it*. If this option is set,
   # Synapse will refuse to connect unless the server supports STARTTLS.
   #
-  #require_transport_security: true
+  require_transport_security: true

   # notif_from defines the "From" address to use when sending emails.
   # It must be set if email sending is enabled.
@@ -2042,12 +2050,12 @@
   # Note that the placeholder must be written '%(app)s', including the
   # trailing 's'.
   #
-  #notif_from: "Your Friendly %(app)s homeserver <noreply@example.com>"
+  notif_from: "Matrix Notification<noreply@matrix.sabakan.industries>"

   # app_name defines the default value for '%(app)s' in notif_from and email
   # subjects. It defaults to 'Matrix'.
   #
-  #app_name: my_branded_matrix_server
+  app_name: Matrix

   # Uncomment the following to enable sending emails for messages that the user
   # has missed. Disabled by default.
@@ -2065,12 +2073,12 @@
   # (This setting used to be called riot_base_url; the old name is still
   # supported for backwards-compatibility but is now deprecated.)
   #
-  #client_base_url: "http://localhost/riot"
+  client_base_url: "https://matrix.example.com/_matrix/client"

   # Configure the time that a validation email will expire after sending.
   # Defaults to 1h.
   #
-  #validation_token_lifetime: 15m
+  validation_token_lifetime: 15m

   # Directory in which Synapse will try to find the template files below.
   # If not set, default templates from within the Synapse package will be used.
@@ -2124,7 +2132,7 @@
   # If a subject isn't overridden in this configuration file, the value used as
   # its example will be used.
   #
-  #subjects:
+  subjects:

     # Subjects for notification emails.
     #
SMTPサーバの設定です。
今回はMailgunで通信できるように設定してあります。(といってもTLS有効にするぐらい)
その後にもメール設定関連の項目が続きます。
app_nameの項目に日本語を設定したらなんか動かなくなったので適当に設定しました。
@@ -2225,8 +2233,8 @@
 # because it is loaded by the app. iPhone, however will send a
 # notification saying only that a message arrived and who it came from.
 #
-#push:
-#  include_content: true
+push:
+  include_content: true


 # Spam checkers are third-party modules that can block specific actions
Push通知にコンテンツを含めたい場合は設定するなどあるみたいです。
@@ -2541,14 +2549,14 @@
 redis:
   # Uncomment the below to enable Redis support.
   #
-  #enabled: true
+  enabled: true

   # Optional host and port to use to connect to redis. Defaults to
   # localhost and 6379
   #
-  #host: localhost
-  #port: 6379
+  host: localhost
+  port: 6379

   # Optional password if configured on the Redis instance
   #
-  #password: <secret_password>
+  password: "Redisのパスワード(設定した場合)"
Redisを有効にしたい場合はここも設定します。
Webクライアント(Element Web)設定
Webクライアントとして、Element Webの導入を行います。
といっても、中身はビルド済みのReact製SPAです。静的コンテンツとしてユーザに渡されるので、サーバ負荷は殆どありません。
ElementはGitHubのリポジトリから落としてきます。
Releases · vector-im/element-web
ここのAssets内にある element-vx.x.xx.tar.gz とあるところのリンクを右クリックし、URLをコピーします。
これはビルド済みのものなのでそのまま使えます。リポジトリをcloneしてもいいですが、ビルドしなければ使うことができません。バージョンによらず最新の機能を追随したい or elementを改造したい場合はcloneする運用でも構わないと思います。
ただしこちらの方法は少々手間のため、今回はそのままアーカイブをダウンロードする方法を取ります。
前項の homeserver.yaml の設定でElementの格納パスを /usr/local/matrix/element/live としたので、そこに展開する方法を紹介します。
sudo mkdir -p /usr/local/matrix/element/versions && cd $_
sudo wget https://github.com/vector-im/element-web/releases/download/v1.7.15/element-v1.7.15.tar.gz
sudo tar xvf element-v1.7.15.tar.gz
cd ..
sudo ln -s versions/element-v1.7.15 live
本来であればアーカイブを展開するだけでいいんですが、僕のいつものやり方であるシンボリックリンクを張る方法で今回は紹介してみました。
これをしておくことでバージョン切り替えが素早くできるようになるので、ご参考までに。
配置が終わったら、Elementの設定ファイルを修正します。設定のサンプルは config.sample.json として同ディレクトリ内に設置されているので、 config.json にリネームして修正してください。
cd live
sudo mv config.sample.json config.json
sudo vim config.json
設定の変更箇所は homeserver.yaml と同様に差分箇所だけ紹介します。
@@ -1,15 +1,15 @@
 {
     "default_server_config": {
         "m.homeserver": {
-            "base_url": "https://matrix-client.matrix.org",
-            "server_name": "matrix.org"
+            "base_url": "https://matrix.example.com",
+            "server_name": "MATRIX.EXAMPLE.COM"
         },
         "m.identity_server": {
             "base_url": "https://vector.im"
         }
     },
Elementを設置するベースURLとサーバ名を設定します。
サーバ名は任意の文字で大丈夫ですが、使いどころはほとんどなく、ログインページで見れるかな?程度のものです。
-    "disable_custom_urls": false,
+    "disable_custom_urls": true,
disable_custom_urlsの項目では、自ドメインのMatrix以外のサーバにここのElementを使えるかどうかを設定する項目です。他のサーバのログインに使う必要はないと思われるので、ここは true にしてしまって構わないでしょう。
-    "disable_guests": false,
+    "disable_guests": true,
disable_guests設定は、その名の通りゲストログインを有効にするかどうかです。
-    "defaultCountryCode": "GB",
+    "defaultCountryCode": "JP",
国別コードがデフォルトでドイツになってるので、日本に変更します。
     "features": {
-        "feature_new_spinner": false
+        "feature_new_spinner": true
     },
スピナー画像(ローディングとかのぐるぐるするやつかな) をsvgファイルに変更する追加機能です。
この他にも追加機能は結構あるらしいので、 こちら も御覧ください。
     "roomDirectory": {
         "servers": [
-            "matrix.org"
+            "matrix.example.com"
         ]
     },
部屋(チャンネル)を検索することができるサーバの一覧を入力します。
     "piwik": {
         "url": "https://piwik.riot.im/",
-        "whitelistedHSUrls": ["https://matrix.org"],
-        "whitelistedISUrls": ["https://vector.im", "https://matrix.org"],
+        "whitelistedHSUrls": ["https://matrix.drdr.work"],
+        "whitelistedISUrls": ["https://vector.im", "https://matrix.drdr.work"],
         "siteId": 1
     },
     "enable_presence_by_hs_url": {
nginxの設定
本来であれば、このへんでCloudFlareの登録手順とか、使わない場合はLet'sEncryptの設定とかも入れたほうがいいと思いますが、今回は省略します。
/etc/nginx/sites-available にファイルを作成して、 /etc/nginx/sites-enabled にシンボリックリンクを作成します。
まずはsites-availableに実体ファイルを作成します。
cd /etc/nginx/sites-available
sudo vim synapse.conf
nginxの設定は、今回実際に設定したものを載せておきます。
server {
    server_name matrix.example.com;

    listen 443 ssl http2;
    listen [::]:443 ssl http2;

    ssl_certificate CloudFlareのサーバ証明書を格納したパス;
    ssl_certificate_key CloudFlareの秘密鍵を格納したパス;

    location / {
        proxy_set_header Host $host;
        proxy_set_header X-Real-IP $remote_addr;
        proxy_set_header X-Forwarded-For $proxy_add_x_forwarded_for;
        proxy_set_header X-Forwarded-Proto $scheme;
        proxy_set_header X-Forwarded-Host $host;
        proxy_set_header X-Forwarded-Server $host;

        proxy_pass http://127.0.0.1:8008;
        proxy_buffering on;
        proxy_http_version 1.1;
        proxy_set_header Upgrade $http_upgrade;

        add_header X-Cached $upstream_cache_status;
        add_header Strict-Transport-Security "max-age=31536000";

        tcp_nodelay on;
    }

    # CloudFlareを通す場合はこれも
    location /.well-known/matrix/server {
        add_header 'Content-Type' 'application/json';
        return 200 '{ "m.server": "matrix.example.com:443" }';
    }
}
ここで一点特徴的なのが、location /.well-known/matrix/server のディレクティブです。
synapseでは他のサーバと通信を行うポートとして、 homeserver.yaml に記載した8008を使うのではなく、8443を使うようになっているようです。
CloudFlareで8443ポートを使うためには有償プランにする必要があるため、これを443ポートに変更しています。
最後に sites-enabled にシンボリックリンクを張ります。
こちらのディレクトリにある設定ファイルが、実際のサーバとして動作します。
cd /etc/nginx/sites-enabled
sudo ln -s ../sites-available/synapse.conf
起動とトラブルシュート
ここまで設定できたら、あとはサービスの起動です。
sudo systemctl start matrix-synapse.service
sudo systemctl enable matrix-synapse.service
sudo systemctl status matrix-synapse.service
これで正常に起動できていれば、Webブラウザからアクセスできるようになっているはずです。
できない場合はログを見て原因を特定しましょう。ログは /var/log/matrix-synapse/homeserver.log に出力されます。 tail を使ってログを流しながらだとわかりやすいです。
sudo tail -f /var/log/matrix-synapse/homeserver.log
おわり
長くなりましたが、matrixサーバ構築の参考になってもらえれば幸いです。
というか参考にするやつどれだけいるんだ?とも思うけど。。。


