概要
- Nagiosサーバー(Linux) から Windows Serverを監視する設定のメモ
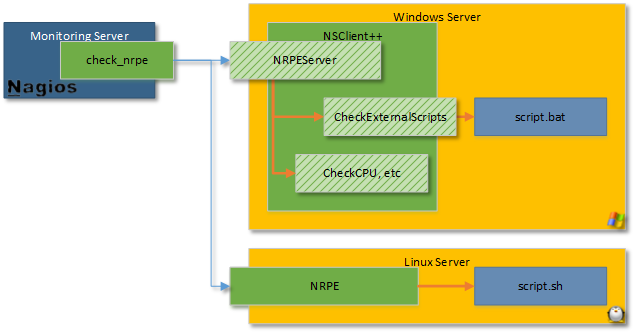
- 構成の把握は↓の画像で。 当記事は Nagios -> Windows Server間の設定のみ
手順
Naigosサーバーの設定は省略。
check_nrpeプラグインが使用できればよい。
1. WindowsServerにログインする
リモートデスクトップ接続は、↓を参考にさせていただきました。
https://qiita.com/nekonoprotocol/items/ea7eb537a6785c3846d0
2. InternetExplorerを開く
ファイルをダウンロード出来るように設定変更。
 [インターネットオプション] -> [セキュリティ]タブ -> [レベルのカスタマイズ] を開き
 [ダウンロード] の [ファイルのダウンロード] を [有効にする]。
3. NSClient++ のインストール
ダウンロードは↓から、バージョンはLastestを選ぶ。
URL:https://www.nsclient.org/download/
インストール時の設定は必要最低限。
 [Generic] -> [Typical] ->

 IP   : 監視サーバーIP
 PASS :
 Enable Common Check plugins    : enable
 Enable NRPE Server(check_nrpe) : enable
 Secure : safe mode

 ->[install]
4. NSClient++ 設定ファイルの修正
ディレクトリ : C:\Program Files\NSClient++
ファイル : nsclient.ini
設定前にファイルの操作権限を変更する必要があるかもしれません。
[/settings/default]
allowd hosts = NagiosサーバーのIPアドレス

[/settings/NRPE/server]
verify mode = none
insecure = true
allow arguments = true
allow nasty characters= true

[/modules]
※全て enabled に変更

[/settings/external scripts]
allow nasty characters = true
設定ファイルを変更したのでNSClient++を再起動する必要がある。
Windowsメニュー検索から
  [サービス] -> [NSClient++] -> 右クリック[プロパティ] -> [ログオン]タブ
デスクトップとの対話をサービスに許可 を On にする。
  [NSClient++] まで戻り、右クリック[再起動]
5. ポートの解放
デフォルトのNRPEポート番号は5666

[windowsファイアウォール] -> [受信の規則] -> [新しい規則]
からポート番号5666を開ける。
6. 設定確認
Nagiosサーバーから疎通確認する。
 ./check_nrpe -H [WindowsServerのIPアドレス]
I (0.5.2.35 2018-11-01) seem to be doing fine...