fastlaneと言えば、iOSをやっている人なら、一度は使ったこと, 聞いたことあるツールだと思います。
fastlaneは、iOSだけしか使えないのではなく、Androidでも使えます!
でも、すべての機能を使えるわけではないです。
Androidで使えるのは、こちらの2つです。
- supply: Google Playへのアップロード
- screengrab: スクリーンショット作成
fastlaneの導入
※ Rubyの環境が必要です。
sudo gem install fastlane --verbose
fastlaneのセットアップ
fastlaneを使うには、プロジェクト内にfastlaneの設定ファイル等を作る必要があります。
①init
initコマンドをすると、質問に答えるだけで、必要なファイルを作れます。
fastlane init
②Git
Git などで、バージョン管理している??って聞いてくれるのでyを押します。(してない人はnね。)
Do you have everything commited in version control? If not please do so now!
(y/n)
③パッケージ名
パッケージ名入れてっと聞いてくるので、パッケージ名をいれます。
To not re-enter your packagename and issuer every time you run one of the fastlane tools or fastlane, these will be stored in a so-called Appfile.
Package Name (com.krausefx.app):
④認証ファイルのパス
Google playの認証ファイルのパスを入れてっと聞いてくるので、認証ファイルのパスを入力します。(入力したくない人は、そのままエンターを押してください)
認証ファイルを設定すると、supplyが使えるようになり、Google playへのapkのアップロードができます。
認証ファイルの作成方法については、こちらを参照してください。(この辺りは、また今度書きます。)
Follow the Setup Guide on how to get the Json file: https://github.com/fastlane/fastlane/tree/master/supply#setup
Path to the json secret file:
⑤metadata
Google Playに掲載するアプリの説明や画像ファイルなどを管理する??っと聞いてくるので、管理したい人はy、したくない人はn。
Do you plan on uploading metadata, screenshots and builds to Google Play using
fastlane? (y/n)
⑥成功
Successfully finished setting up fastlane
と表示されたたら、成功です。
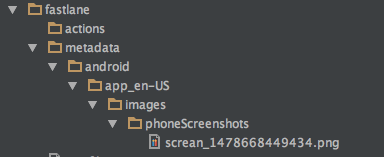
プロジェクトにはfastlaneというフォルダができているはずです( ´∀`)b

fastlaneのファイルの簡単な説明
Fastfile
デプロイやテストなどの処理を書くファイルです。
fastlane_version "1.107.0"

default_platform :android

platform :android do
  before_all do
     ENV["SLACK_URL"] = "slackのweb hookのurl"
  end

  desc "Runs all the tests"
  lane :test do
    gradle(task: "test")
  end

  desc "Submit a new Beta Build to Crashlytics Beta"
  lane :beta do
    gradle(task: "assembleDebug")
    crashlytics(
        api_token: "トークン",
        build_secret: "トークン",
        groups: "betaのグループ名",
        emails: "メアド",
        debug: "true"
     )
  end

  desc "Deploy a new version to the Google Play"
  lane :deploy do
    gradle(task: "assembleRelease")
    supply
  end

  after_all do |lane|
    slack(
        message: ":tada: Successfully deployed new App Update.\(^o^)/"
      )
  end

  error do |lane, exception|
    slack(
       message: exception.message,
       success: false
    )
  end
end
Fastfileにあるコマンドの説明
lane
テストやapkのアップロードなど処理を定義したものです。
desc
laneの説明です。
crashlytics
FabricのBetaです。
これでBetaにapkのアップロードができます。
FabricのBetaの使い方は、こちらを参照してください。
supply
Developer Consoleへのapkのアップロードです。
※認証ファイルの設定が必要です。
slack
slackへの通知です。
こちらにslackのweb hookのurlを書いてください。
before_all do
  ENV["SLACK_URL"] = "slackのweb hookのurl"
end
gradle
Gradleのコマンド実行です。
Appfile
認証情報とアプリのパッケージ名が書かれています。
json_key_file "認証ファイルのパス"
package_name "com.gupuru.hogehoge"
metadata
Developer Consoleにアップロードするアプリのスクリーンショットや説明文などが含まれています。
fastlaneを使う
fastlaneとコマンドをうつだけです。
fastlane
すると、こんな感じのやつが表示されます。実行したい番号を入力します。
+--------+----------------+---------------------------------------------+
|                        Available lanes to run                         |
+--------+----------------+---------------------------------------------+
| Number | Lane Name      | Description                                 |
+--------+----------------+---------------------------------------------+
| 1      | android test   | Runs all the tests                          |
| 2      | android beta   | Submit a new Beta Build to Crashlytics Beta |
| 3      | android deploy | Deploy a new version to the Google Play     |
| 0      | cancel         | No selection, exit fastlane!                |
+--------+----------------+---------------------------------------------+
例えば、android betaを使いたい場合は、2を押します。
そして...
fastlane.tools finished successfully
と表示されたら成功です( *• ̀ω•́ )b
ちなみに...
fastlane android beta
としても同じことができます。
アプリのスクリーンショットを撮ってみる
fastlaneのscreengrabを使って、アプリのスクリーンショットを撮ってみます。
セットアップ
gradleに、この2つを追加してください。
dependencies {
    androidTestCompile 'com.android.support:support-annotations:25.0.0'
    androidTestCompile 'tools.fastlane:screengrab:0.5.5'
    //...
}
debug/AndroidManifestに、これを追加してください。
<?xml version="1.0" encoding="utf-8"?>
<manifest xmlns:android="http://schemas.android.com/apk/res/android"
    package="com.gupuru.hogehoge">

    <uses-permission android:name="android.permission.DISABLE_KEYGUARD" />
    <uses-permission android:name="android.permission.WAKE_LOCK" />
    <uses-permission android:name="android.permission.WRITE_EXTERNAL_STORAGE" />
    <uses-permission android:name="android.permission.READ_EXTERNAL_STORAGE" />
    <uses-permission android:name="android.permission.CHANGE_CONFIGURATION" />

</manifest>
で、スクリーンショットを撮りたい所に Screengrab.screenshot("screan");を追加します。
@RunWith(JUnit4.class)
public class JUnit4StyleTests {

    @ClassRule
    public static final LocaleTestRule localeTestRule = new LocaleTestRule();

    @Rule
    public ActivityTestRule<MainActivity> activityRule = new ActivityTestRule<>(MainActivity.class);

    @Test
    public void testTakeScreenshot() {
        Screengrab.screenshot("screan");
    }

}
実行
はじめに、assembleAndroidTestを実行します。
./gradlew assembleDebug assembleAndroidTest
次に、こちら。
fastlane screengrab
で、このように表示されるので、androidTestほうを選びます。
Select your debug tests APK
1. app/build/outputs/apk/app-debug-androidTest.apk
2. app/build/outputs/apk/app-debug.apk
成功すると、こんな感じにスクリーンショットが撮れています。
ちなみに、Fastfileにこんな感じに書いても同じことができます(•̀ᴗ•́)و
 lane :test do
    gradle(task: "assembleDebug assembleAndroidTest")
    screengrab
  end
screengrabの公式のサンプル
まとめ
fastlane便利(・ω・)b
...と思うけど、fastlaneでできることは、gradleのプラグインとかで出来てしまうから、iOSみたいに必須ツールとは言えないかも???
