three.jsは、HTMLの3D技術WebGLを使って3次元の表現ができる無償のJavaScriptライブラリです。GPUによる本格的な3D表現をプラグインなしでつくれます。本稿は、three.jsをはじめて使う方が対象です。50行足らずのJavaScriptコードで3次元空間に立方体をつくり、テクスチャを貼ってみます。さらには、オービット/ズーム/パンといったマウス操作によるカメラワークまで仕込んでしまおうというのです。
でき上がったサンプルはjsdo.itに掲げましたので、コードを開いてお試しいただけます。マウスによるカメラ操作はつぎのとおりです。なお、オービットというのは被写体を中心にして周回軌道を描くように映すことです。
| カメラワーク | マウス操作 |
|---|---|
| オービット | ドラッグ |
| ズーム | ホイール |
| パン | 右ボタンドラッグ |
theree.jsライブラリを使う
ライブラリはthree.jsサイトのリンク[download]で、ZIPファイルがローカルに保存できます。buildフォルダの中に、開発用のthree.jsと公開用のthree.min.jsが納められていますので、用途に応じていずれかをお使いください。

CDNも公開されています。今回はこちらを使いましょう。
<script src="https://cdnjs.cloudflare.com/ajax/libs/three.js/99/three.js"></script>
シーンとカメラを定める
3次元空間であるシーンは、コンストラクタScene()でつくります。引数は要りません。シーンの中には、3次元のオブジェクトや光源、それらを映しだすためのカメラが加えられます。カメラを定めるのはコンストラクタPerspectiveCamera()です。引数はつぎの4つを渡します。
new THREE.PerspectiveCamera(視野角, 縦横比, 撮影開始距離, 撮影終了距離)
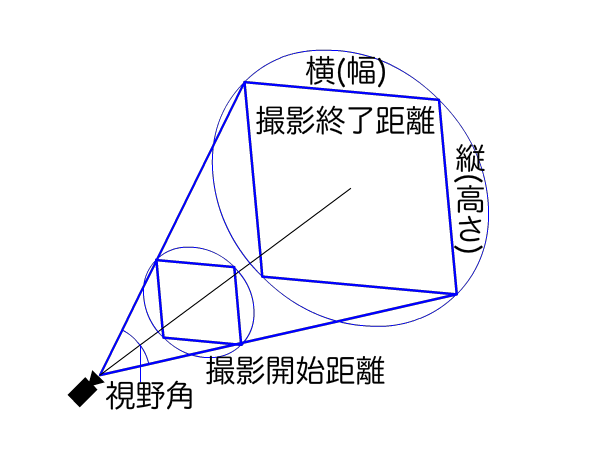
視野角は画角とも呼ばれ、撮影する範囲の広さのほか遠近法の強さにも影響します(「レンズと画角のちがいを知り、表現に活かす CG制作者のための画角講座」参照)。画面の縦横比は幅/高さです。そして、奥行きに対して撮影する範囲の始まりと終わりを与えます。
シーンとカメラはつぎのように定め、カメラのz軸方向の位置はObject3D.positionプロパティで少し下げました(デフォルト値0)。なお、JavaScriptコードから<body>要素を参照することになるので、DOMContentLoadedイベントのリスナーで、これら初期化の処理(init())を行います。
let camera;
let scene;

function init() {
	const windowWidth = window.innerWidth;
	const windowHeight = window.innerHeight;

	camera = new THREE.PerspectiveCamera(70, windowWidth / windowHeight, 1, 1000);
	camera.position.z = 400;
	scene = new THREE.Scene();
}
document.addEventListener('DOMContentLoaded', init);
レンダラーで<canvas>要素をつくってページに加える
カメラの映したシーンを描くのがレンダラーです。コンストラクタWebGLRenderer()で<canvas>要素をつくります。引数は省きましょう。メソッドsetPixelRatio()がデバイスピクセル比、WebGLRenderer.setSize()が幅と高さを決めます(デフォルト値300×150ピクセル)。<canvas>要素はページに加えなければなりません。WebGLRenderer.domElementプロパティで参照できるので、<body>要素に差し込みました。これらの処理は関数(createRenderer())として定め、戻り値のレンダラーは変数に納めます(renderer)。
let renderer;

function init() {

	renderer = createRenderer(windowWidth, windowHeight);
}
function createRenderer(width, height) {
	const renderer = new THREE.WebGLRenderer({antialias: true});
	renderer.setPixelRatio(window.devicePixelRatio);
	renderer.setSize(width, height);
	document.body.appendChild(renderer.domElement);
	return renderer;
}
立方体をつくってシーンに加える
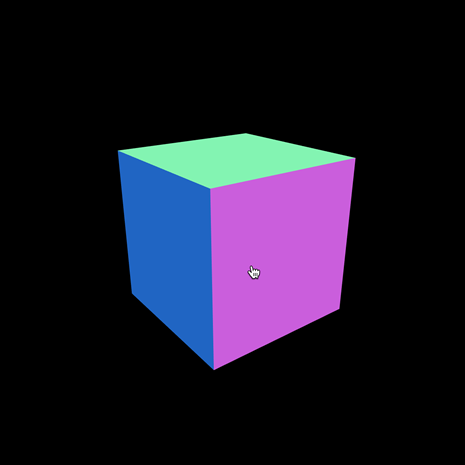
立体はMeshクラスのオブジェクトとしてつくります。メッシュには、かたちの幾何学情報となるジオメトリーと素材のマテリアルを与えなければなりません。直方体のジオメトリーをつくるのは、BoxBufferGeometry()メソッドです。幅と高さと奥行きを引数に渡します。MeshNormalMaterial()でつくる素材は少し変わっていて、面の向きによって色が決まるのです。でき上がったジオメトリー(geometry)とマテリアル(material)のオブジェクトは、コンストラクタMesh()の引数にします。こうして関数(createCube())から返された立体(mesh)は、Object3D.add()メソッドでシーンに加えてください。
function init() {

	const side = Math.min(windowWidth, windowHeight) / 4;

	const mesh = createCube(side, side, side);
	scene.add(mesh);

	renderer.render(scene, camera);
}

function createCube(width, height, depth) {
	const geometry = new THREE.BoxBufferGeometry(width, height, depth);
	const material = new THREE.MeshNormalMaterial();
	const cube = new THREE.Mesh(geometry, material);
	return cube;
}
カメラ(camera)で映したシーン(scene)の画像は、レンダラー(renderer)で<canvas>要素に描きます。そのために呼び出すのが、WebGLRenderer.render()メソッドです。引数にはシーンとカメラを渡します。これで、3次元空間に立方体が描かれます。もっとも、真正面向きですので、立方体か正方形かわかりません。ひとまず、ここまでのJavaScriptコードを以下にまとめました。
let camera;
let scene;
let renderer;

function init() {
	const windowWidth = window.innerWidth;
	const windowHeight = window.innerHeight;
	const side = Math.min(windowWidth, windowHeight) / 4;

	camera = new THREE.PerspectiveCamera(70, windowWidth / windowHeight, 1, 1000);
	camera.position.z = 400;
	scene = new THREE.Scene();

	renderer = createRenderer(windowWidth, windowHeight);

	const mesh = createCube(side, side, side);
	scene.add(mesh);

	renderer.render(scene, camera);
}
function createRenderer(width, height) {
	const renderer = new THREE.WebGLRenderer({antialias: true});
	renderer.setPixelRatio(window.devicePixelRatio);
	renderer.setSize(width, height);
	document.body.appendChild(renderer.domElement);
	return renderer;
}
function createCube(width, height, depth) {
	const geometry = new THREE.BoxBufferGeometry(width, height, depth);
	const material = new THREE.MeshNormalMaterial();
	const cube = new THREE.Mesh(geometry, material);
	return cube;
}
document.addEventListener('DOMContentLoaded', init);
OrbitControlsでカメラをマウス操作する
ここまでで30行ほど書きました。あと20行でカメラワークとテクスチャ貼りまで済ませなければなりません。そこで、カメラのコントロールについては少々卑怯な手を使います。OrbitControlsというライブラリです。three.js標準ライブラリには含まれていません。実は、ダウンロードしたライブラリファイル群のexamples/js/controls/にひっそりと収められているのです。このライブラリOrbitControls.jsを別途<script>要素に読み込んでおきます(以下はライブラリファイルをフォルダlibに納めた場合です)。
<script src="lib/OrbitControls.js"></script>
OrbitControlsの使い方はとても簡単で、コンストラクタにつぎのようにCameraオブジェクトを渡すだけです。 OrbitControls.autoRotateプロパティにtrueを与えると、カメラは立体を中心にゆっくりと周回します。アニメーションは再描画を繰り返さなければなりません。そこで再描画の関数(update())を定め、その中からカメラ操作更新のOrbitControls.update()メソッドを呼び出します。そして、window.requestAnimationFrame()メソッドで描画を繰り返せばよいでしょう。
let controls;

function init() {

	controls = new THREE.OrbitControls(camera);
	controls.autoRotate = true;
	// renderer.render(scene, camera);
	update();
}

function update() {
	controls.update();
	requestAnimationFrame(update);
	renderer.render(scene, camera);
}
冒頭でご紹介したとおり、カメラはつぎのようにマウスで操作できます。
- オービット: ドラッグ
- ズーム: ホイール
- パン: 右ボタンドラッグ
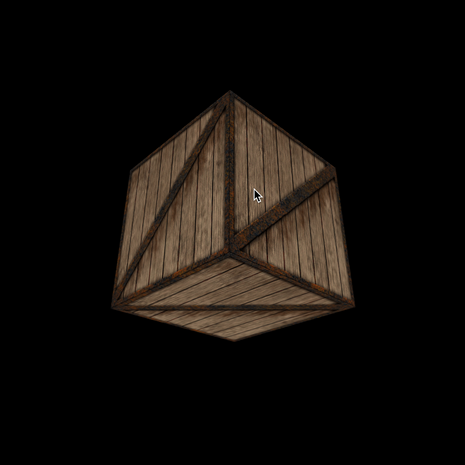
立方体にテクスチャを加える
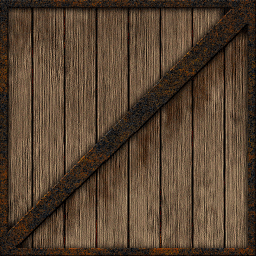
残るはテクスチャです。three.jsライブラリのexamples/textures/crate.gifを使わせてもらいます。
テクスチャを読み込むために用いるのは、TextureLoaderクラスです。TextureLoader.load()メソッドに、テクスチャのURLを渡してロードします。テクスチャを加えるには、マテリアルのクラスは切り替えなければなりません。MeshBasicMaterial()コンストラクタでつくり、引数のオブジェクトにはmapプロパティでテクスチャを与えます(MeshBasicMaterial.mapに定められます)。テクスチャの読み込み待ちはしなくても大丈夫です。
function init() {

	const texture = new THREE.TextureLoader().load('textures/crate.gif');
	// const mesh = createCube(side, side, side);
	const mesh = createCube(side, side, side, texture);

}

function createCube(width, height, depth, texture) {

	// const material = new THREE.MeshNormalMaterial();
	const material = new THREE.MeshBasicMaterial({map: texture});

}
これで、立方体にテクスチャが貼られ、マウス操作でカメラワークもできるようになりました。以下にJavaScriptコードをまとめます。また、jsdo.itのサンプルもお試しください。

let camera;
let scene;
let renderer;
let controls;

function init() {
	const windowWidth = window.innerWidth;
	const windowHeight = window.innerHeight;
	const side = Math.min(windowWidth, windowHeight) / 4;

	camera = new THREE.PerspectiveCamera(70, windowWidth / windowHeight, 1, 1000);
	camera.position.z = 400;
	scene = new THREE.Scene();

	renderer = createRenderer(windowWidth, windowHeight);

	const texture = new THREE.TextureLoader().load('textures/crate.gif');
	const mesh = createCube(side, side, side, texture);
	scene.add(mesh);

	controls = new THREE.OrbitControls(camera);
	controls.autoRotate = true;
	update();
}
function createRenderer(width, height) {
	const renderer = new THREE.WebGLRenderer({antialias: true});
	renderer.setPixelRatio(window.devicePixelRatio);
	renderer.setSize(width, height);
	document.body.appendChild(renderer.domElement);
	return renderer;
}
function createCube(width, height, depth, texture) {
	const geometry = new THREE.BoxBufferGeometry(width, height, depth);
	const material = new THREE.MeshBasicMaterial({map: texture});
	const cube = new THREE.Mesh(geometry, material);
	return cube;
}
function update() {
	controls.update();
	requestAnimationFrame(update);
	renderer.render(scene, camera);
}
document.addEventListener('DOMContentLoaded', init);