はじめに
本記事はNSSOL Advent Calendar 2024の15日目の記事になります。
IaC(Infrastructure as Code)に初めて触れる経験として、AWS CloudFormaitonを使ってRDSの管理者ユーザーの認証情報をSecrets Managerで管理するテンプレートをいくつかの段階に分けて作成してみました。今回はその作成過程の共有です。
IaC(Infrastructure as Code)とは
IaCは、サーバやデータベースなどのインフラ基盤をコードで定義・管理するアプローチです。手動で設定するのではなく、コードで記述するため、簡単に環境を複製したり、設定エラーを減らしたりすることができます。(パラメータシートを見ながら設定ミスがないかチェックする手間を減らせるのは、かなり魅力的だと思いませんか?)
AWS CloudFormationについて
AWS CloudFormationとは、AWSが提供している宣言型のIaCツールです。IaCには宣言型と命令型(手続き型)の二通りのアプローチがあるのですが、宣言型の方が記述としては簡単です。
| 型 | 説明 |
|---|---|
| 宣言型 | 目的のシステムの最終状態を記述する。CloudFormation, Terraformなど。 |
| 命令型 | システムを構築するための手順を記述する。Ansible,Puppet, Chefなど。 |
CloudForamtionのテンプレートはJSONもしくはYAML形式で記述します。今回のコードは全てJSONで記述しています。JSON形式の場合、コメントがサポートされていないことには注意が必要です。また、テンプレートの構造はいくつかのセクションに分かれていますが、必須なのはResourcesセクションだけです。コードを書く際はAWS CloudFormationのユーザーガイドを参照すると便利です。
ちなみに作成したテンプレートはAWS CLIを使って以下のコマンドで構文の検証が可能です。
aws cloudformation validate-template --template-body file://sampletemplate.json
AWS CLIはここからインストール方法を確認できます。インストールしたら、windowsの場合、コマンドプロンプトもしくはPowerShellを開いてテンプレートのあるディレクトリにcdコマンドで移動します。あとは上記コマンドのファイル名を変えて叩けばOKです。
テンプレートの作成方針
最終的なゴールは、Secrets ManagerでRDSの認証情報の自動ローテーションを実現することです。これはAWSの公式ドキュメントにRDSのセキュリティのベストプラクティスの一つとして挙げられています。(認証情報の更新って結構工数かかりますよね!?)
しかし、IaC初心者が一発で書くのはハードルが高いと考え、いくつかのステップに分けて作成を進めることにしました。
1.RDSインスタンスを作成してみる。
いけそう
2.管理者ユーザーの認証情報をSecret Managerに保存してみる。
難しそう
3.認証情報のシークレットをローテーションしてみる。
難しそう×2
なんにせよ、始めてみることが大事ですよね。
Step1.RDSインスタンスの作成
とりあえず書いてみました。
{
  "AWSTemplateFormatVersion": "2010-09-09",
  "Parameters": {
    "SubnetIds": {
      "Type": "List<AWS::EC2::Subnet::Id>",
      "Description": "A list of subnet IDs where the RDS instance will be deployed."
    },
    "SecurityGroupId": {
      "Type": "AWS::EC2::SecurityGroup::Id",
      "Description": "The ID of the security group to associate with the RDS instance."
    },
    "Password": {
      "Type": "String",
      "NoEcho": true,
      "Description": "The password for the master user. It will not be displayed in the console due to NoEcho."
    },
    "DBName": {
      "Type": "String",
      "Description": "The name of the database to be created when the RDS instance is generated. The meaning of this parameter varies by DBMS."
    }
  },
  "Resources": {
    "RDSSubnetGroup": {
      "Type": "AWS::RDS::DBSubnetGroup",
      "Properties": {
        "SubnetIds": {
          "Ref": "SubnetIds"
        },
        "DBSubnetGroupDescription":"A subnet group spanning across two Availability Zones"
      }
    },
    "RDSInstance": {
      "Type": "AWS::RDS::DBInstance",
      "Properties": {
        "DBInstanceClass": "db.t3.micro",
        "Engine": "mysql",
        "MasterUsername": "admin",
        "MasterUserPassword": {
          "Ref": "Password"
        },
        "DBName": {
          "Ref": "DBName"
        },
        "DBInstanceIdentifier": "test-database",
        "VPCSecurityGroups": [
          {
            "Ref": "SecurityGroupId"
          }
        ],
        "DBSubnetGroupName": {
          "Ref": "RDSSubnetGroup"
        },
        "MultiAZ": true,
        "StorageType": "gp2",
        "AllocatedStorage": 20
      }
    }
  },
  "Outputs": {
    "RDSInstanceEndpoint": {
      "Description": "The endpoint address of the RDS instance",
      "Value": {
        "Fn::GetAtt": [
          "RDSInstance",
          "Endpoint.Address"
        ]
      }
    },
    "RDSInstanceId": {
      "Description": "The ID of the RDS instance",
      "Value": {
        "Ref": "RDSInstance"
      }
    }
  }
}
RDSインスタンスをマルチAZ構成で配置した構成です。セクションとしてはAWSTemplateFormatVersion, Parameters, Resources, Outputsの4つに分かれています。ただ、AWSTemplateFormatVersionは、テンプレートが準拠する形式のバージョンですが、現状では"2010-09-09"しかありません。そのため、ここはこう書くしかありません。
Parametersセクションについて
Parametersセクションは、CloudFormationテンプレート実行時にユーザーから入力を受け取るための設定項目です。スタック作成時に下記のような画面が出てきます。パラメータの説明は、Descriptionに追加することができます。(ただし日本語で書くと文字化けするので注意が必要。)
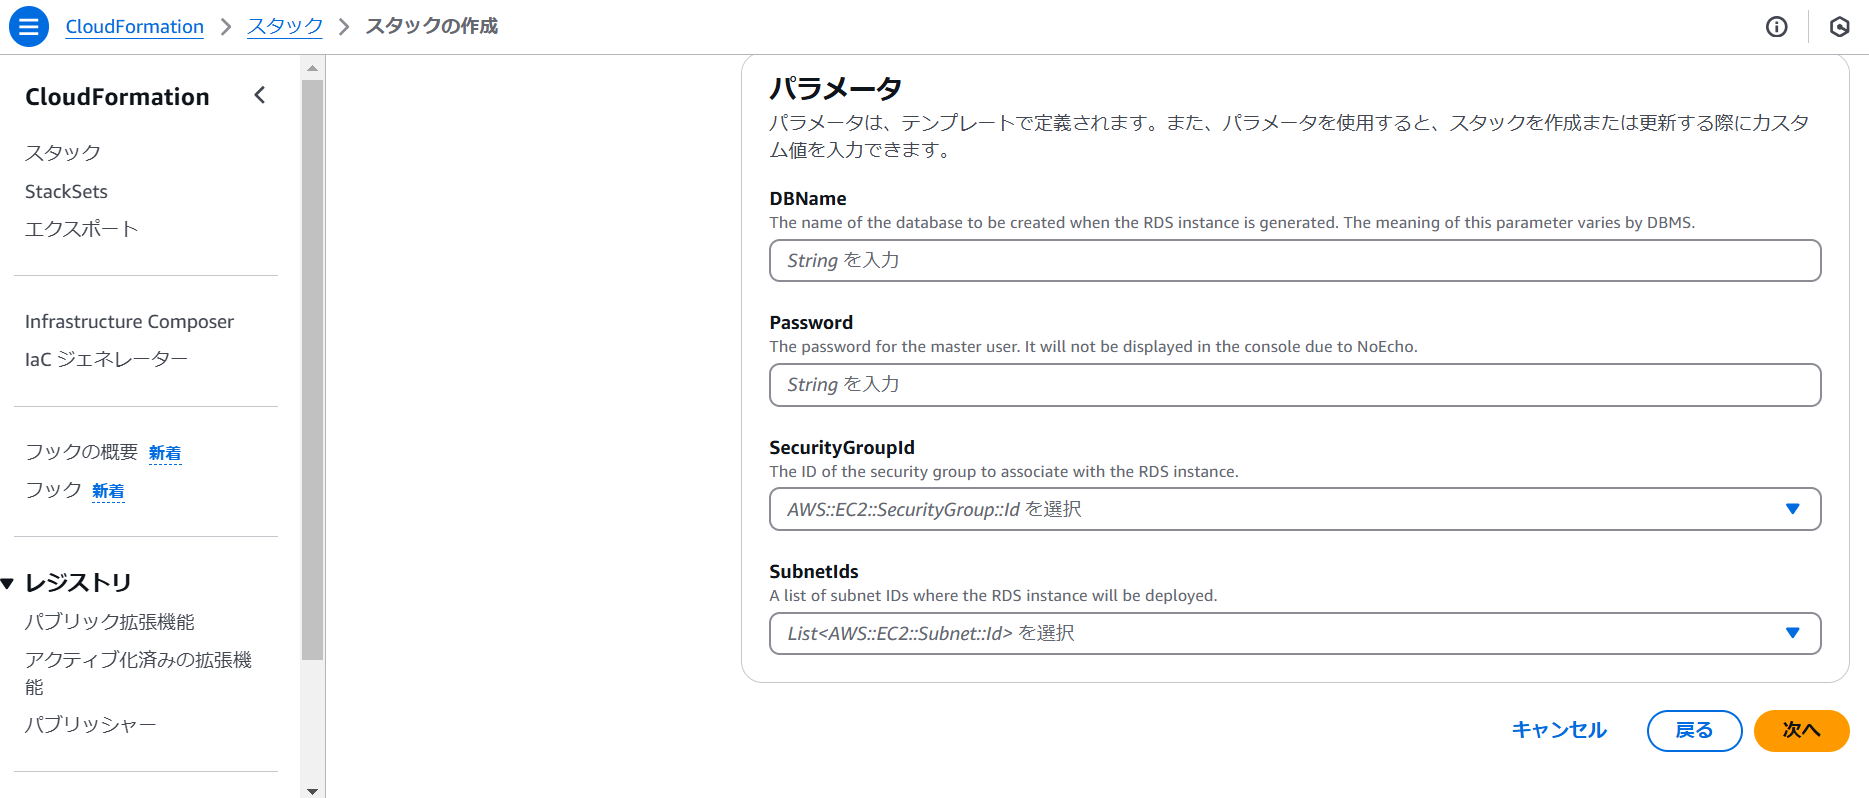
入力した値は、RefやFn::Subを使ってテンプレートに埋め込んでいます。
| パラメータ名 | プロパティ名 | 説明 |
|---|---|---|
SubnetIds |
Type |
マルチAZ構成にするためList<>で複数のサブネットを選択できるようにしています。最初はVPCを選択するパラメータも記述していたのですが、subnet自体にVPCが紐づけられているため、subnetを指定するパラメータのみ残しました。 |
Password |
NoEcho |
このプロパティを入れることでパスワードの文字列がコンソールに表示されなくなります。 |
Resourcesセクションについて
Resourcesセクションでは、テンプレート内で作成するリソースを定義します。各リソースは、リソース名(任意の名前)、Type(配置するAWSリソースの種類)を持ちます。各リソースの設定項目はPropertiesに記述します。上のコードでは、リソース名でRDSSubnetGroupとRDSInstanceの2つを定義しています。
・RDSSubnetGroup:
"Type": "AWS::RDS::DBSubnetGroup"
Properties |
設定値 | 説明 |
|---|---|---|
SubnetIds |
"Ref": "SubnetIds" | パラメータSubnetIdsで選択したサブネットIDを埋め込んでいます。 |
DBSubnetGroupDescription |
コード内参照 | 意外なことにこのプロパティは必須です。要注意。 |
・RDSInstance:
"Type": "AWS::RDS::DBInstance"
Properties |
設定値 | 説明 |
|---|---|---|
DBInstanceClass |
db.t3.micro |
無料利用枠で使えるインスタンスクラスのため選択。 |
Engine |
mysql |
オープンソースで無料なので選択。 |
MasterUsername |
admin | 管理者ユーザーの名前です。 |
MasterUserPassword |
"Ref": "Password" | パラメータPasswordで入力したものを埋め込んでいます。 |
DBName |
"Ref": "DBName" | 選択したDBMSによって意味が異なりますが、MySQLの場合はRDSインスタンス作成時に作成するデータベースの名前です。名前が指定されないとデータベースが作成されません。 |
DBInstanceIdentifier |
test-database | こっちはDBインスタンスの名前。名前を指定しない場合は、AWS CloudFormation によって一意の物理IDが生成されます。コードを使いまわしてスタックを作成するときは、ここがタブってないか要注意。私はここでドツボにはまりました。 |
VPCSecurityGroups |
"Ref": "SecurityGroupId" | RDSインスタンスにアタッチするSG。ちなみにDBSecurityGroups は現在はほとんど使われません。 |
DBSubnetGroupName |
"Ref": "RDSSubnetGroup" | テンプレート内のリソース名"RDSSubnetGroup"で定義した"AWS::RDS::DBSubnetGroupを指定しています。 |
MultiAZ |
true |
trueにするとマルチAZ構成になります。DBSubnetGroupNameとセットで指定しなければならず、指定するDBSubnetGroupNameには、少なくとも 2つ以上の異なるアベイラビリティゾーンに跨るサブネットが含まれている必要があります。 |
StorageType |
gp2 |
汎用SSDを選択。選べるのはgp2,gp3, io1, io2, standardの5つで、一番安いのはHDDのstandard。あとは右につれてIOPSが高くなり、指定しない場合はデフォルトでio1が指定されます。 |
AllocatedStorage |
20 | 汎用SSDの場合は20GiB以上を指定する必要があります。 |
Outputsセクションについて
Outputs セクションは、スタックの作成後に出力される情報を定義する部分です。このセクションを使用することで、スタックの作成後に「出力」タブで必要な情報を簡単に確認できるようになります。
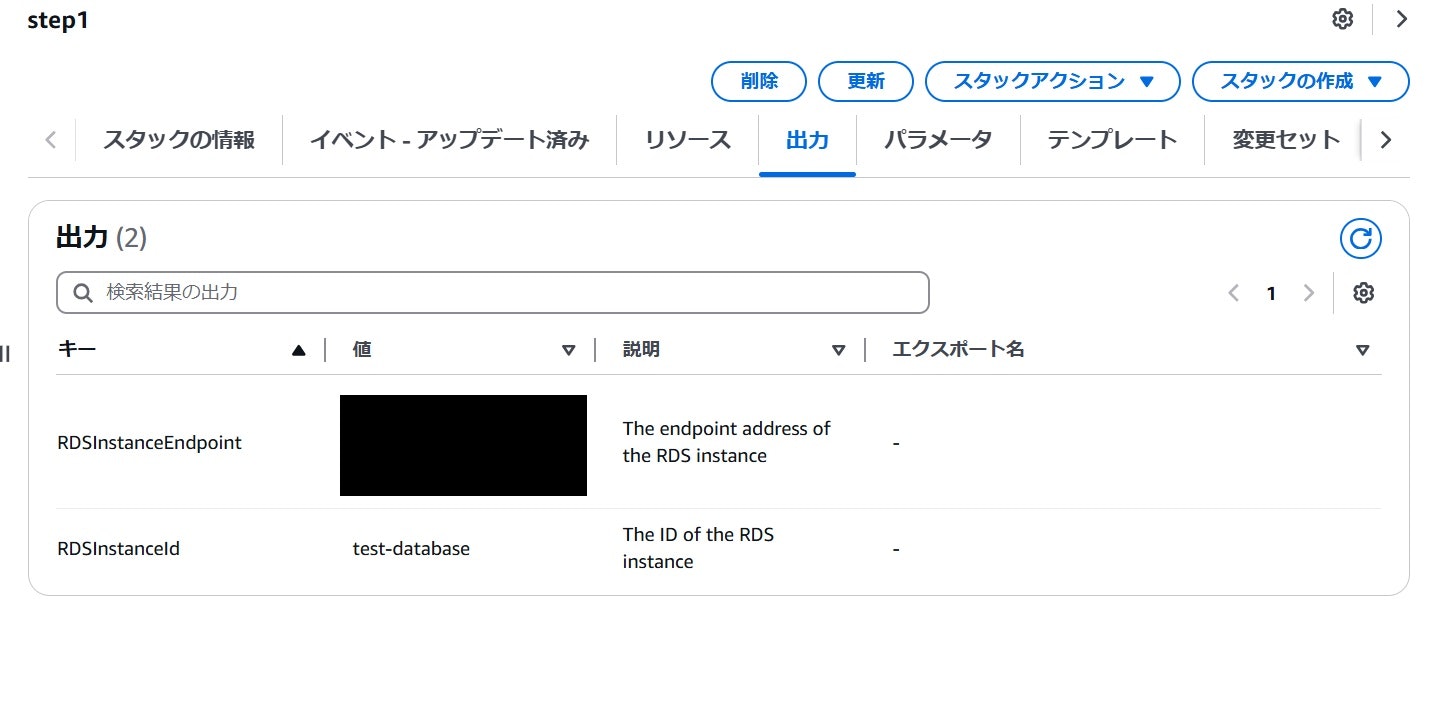
RDSインスタンスのエンドポイントとインスタンスIDを出力しています。エンドポイントアドレスは、EC2インスタンスやアプリケーションがRDSインスタンスに接続する際に必要な情報です。なお、テンプレート内のFn::GetAttはリソースの属性値を取得するために使用する関数です。構文は下記の通りです。
"Fn::GetAtt" : [ "リソース名", "属性名" ]
まとめ
step1はひとまずこれで完了です!ここまではスムーズに作成できました。
Step2.管理者ユーザーの認証情報をSecret Managerに保存
{
  "AWSTemplateFormatVersion": "2010-09-09",
  "Parameters": {
    "SubnetIds": {
      "Type": "List<AWS::EC2::Subnet::Id>",
      "Description": "A list of subnet IDs where the RDS instance will be deployed."
    },
    "SecurityGroupId": {
      "Type": "AWS::EC2::SecurityGroup::Id",
      "Description": "The ID of the security group to associate with the RDS instance."
    },
    "Password": {
      "Type": "String",
      "NoEcho": true,
      "Description": "The password for the master user. It will not be displayed in the console due to NoEcho."
    },
    "DBName": {
      "Type": "String",
      "Description": "The name of the database to be created when the RDS instance is generated. The meaning of this parameter varies by DBMS."
    },
    "SecretName":{
      "Type": "String",
      "Description": "The name of the secret in Secrets Manager that stores the master user password for the RDS instance."
    }
  },
  "Resources": {
    "RDSSubnetGroup": {
      "Type": "AWS::RDS::DBSubnetGroup",
      "Properties": {
        "SubnetIds": {
          "Ref": "SubnetIds"
        },
        "DBSubnetGroupDescription": "A subnet group spanning across two Availability Zones"
      }
    },

    "DBMasterSecret": {
      "Type": "AWS::SecretsManager::Secret",
      "Properties": {
        "Name": {"Ref": "SecretName"},
        "SecretString": {
          "Fn::Sub": "{\"username\": \"admin\", \"password\": \"${Password}\"}"
        }
      }
    },
    "RDSInstance": {
      "Type": "AWS::RDS::DBInstance",
      "Properties": {
        "DBInstanceClass": "db.t3.micro",
        "Engine": "mysql",
        "MasterUsername": "admin",
        "MasterUserPassword": {
          "Fn::Sub": "{{resolve:secretsmanager:${SecretName}:SecretString:password}}"
        },
        "DBName": {
          "Ref": "DBName"
        },
        "DBInstanceIdentifier": "test-database",
        "VPCSecurityGroups": [
          {
            "Ref": "SecurityGroupId"
          }
        ],
        "DBSubnetGroupName": {
          "Ref": "RDSSubnetGroup"
        },
        "MultiAZ": true,
        "StorageType": "gp2",
        "AllocatedStorage": 20
      }
    }
  },
  "Outputs": {
    "RDSInstanceEndpoint": {
      "Description": "The endpoint address of the RDS instance",
      "Value": {
        "Fn::GetAtt": [
          "RDSInstance",
          "Endpoint.Address"
        ]
      }
    },
    "RDSInstanceId": {
      "Description": "The ID of the RDS instance",
      "Value": {
        "Ref": "RDSInstance"
      }
    }
  }
}
step1とは異なる個所を説明したいと思います。
Parametersセクションについて
・SecretName:
ここで指定したシークレット名(SecretName)は、AWS Secrets Managerに保存するシークレットの名前を指定するためのパラメータです。
Resourcesセクションについて
・DBMasterSecret:
Type": "AWS::SecretsManager::Secret
このリソースは、Secrets Managerに認証情報(シークレット)を保存します。このシークレットにはRDSの管理者ユーザーのパスワード(Passwordパラメータで入力された値)を含む、ユーザー名とパスワードの情報が保存されます。
Properties |
設定値 | 説明 |
|---|---|---|
Name |
"Ref": "SecretName" | パラメータSecretNameとして入力したものを埋め込んでいます。 |
SecretString |
"Fn::Sub": "{"username": "admin", "password": "${Password}"}" | シークレットとして保存する内容。Fn::Subにより、Passwordパラメータで入力した値を動的に埋め込み、ユーザー名(admin)とパスワードを含むJSON構造を作成します。 |
Fn::Subは文字列の変数を指定した値に置き換える関数です。変数を${Password}として書き込んでいます。
・RDSInstance:
Type": "AWS::RDS::DBInstance
Properties |
設定値 | 説明 |
|---|---|---|
MasterUserPassword |
"Fn::Sub": "{{resolve:secretsmanager:${SecretName}:SecretString:password}}" |
Fn::Subを使ってテンプレート内で作成したシークレットDBMasterSecretを指定し、{{resolve:secretsmanager:...}}を使ってSecrets Managerからシークレット情報を取得しています。 |
Secrets Managerからシークレット情報を取得するには、次の構文を使用します。この構文により、Secrets ManagerへのAPI呼び出しが行われ、シークレット情報を安全に取得できます。
"{{resolve:secretsmanager:secret-id:secret-string:json-key}}"
secret-stringに入れられるのは現状SecretStringだけなのでここは固定です。シークレットの全体の情報を取り出す場合などはドキュメントを参照するとわかりやすいです。
ランダムなパスワードを生成するには
Secrets Managerを使ってRDSの認証情報に使うランダムなパスワードを生成することもできます。上記のコードからの変更箇所は、まずは自分で値を入力しないのでパラメータPasswordの箇所を削除します。次にSecretStringをGenerateSecretStringに変えて、以下のように記述します。
"GenerateSecretString": {
  "SecretStringTemplate": "{\"username\": \"admin\"}",
  "GenerateStringKey": "password",
  "PasswordLength": 8,
  "ExcludeCharacters": "\"@/\\"
}
GenerateSecretStringの使い方はここを参照するとよいです。
まとめ
スタック作成後にSecrets Managerをみるとシークレットが作成されていることが確認できます。
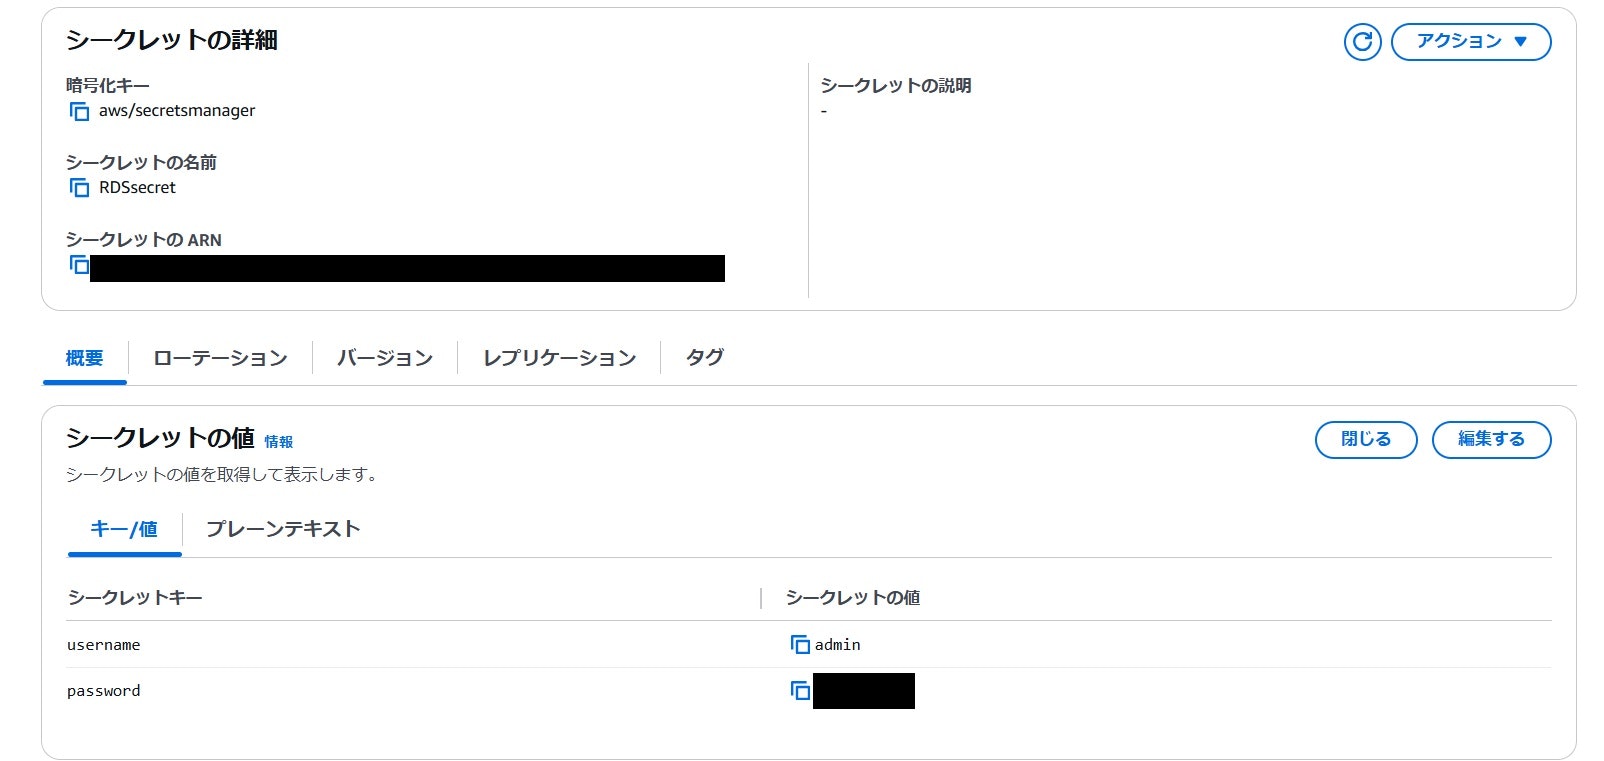
しかし、この状態ではRDSの認証情報とSecrets Managerのシークレットは自動的に同期されていません。つまり、RDSのMasterUserPasswordを変更した場合、その変更はSecrets Managerには反映されないため、手動でSecrets Manager内のシークレット情報を更新する必要があります。Secretes Managerをパスワードを記載したノートとして使っているのと同じですね。
自動同期を実装するには、Lambda関数などを作成する必要があります。Secrets Managerがローテーションを管理し、変更されたパスワードを自動で更新するLambda関数のテンプレートは公式で用意されていますが、自動同期だけのものはなさそうです。
Step3.認証情報のシークレットをローテーションしてみる。
シークレットをローテーションする方法としては、カスタムローテーションとマネージドローテーション の2つがあります。
| 特徴 | カスタムローテーション | マネージドローテーション |
|---|---|---|
| 設定の簡易さ | 手動で設定が必要(Lambda関数を作成する必要あり) | 自動で設定される(AWSが提供するローテーション機能を使用) |
| ローテーションの実行方法 | ユーザーが定義したLambda関数で実行される | AWSが管理するローテーションプロセスが自動で実行される |
| サービス | 任意のAWSサービス | 一部のAWSサービス(RDS、Redshiftなど) |
RDSの認証情報のマネージドローテーションの実装方法は簡単です。GUIの場合、RDSインスタンス作成時に下記赤枠のところを選択するだけです。
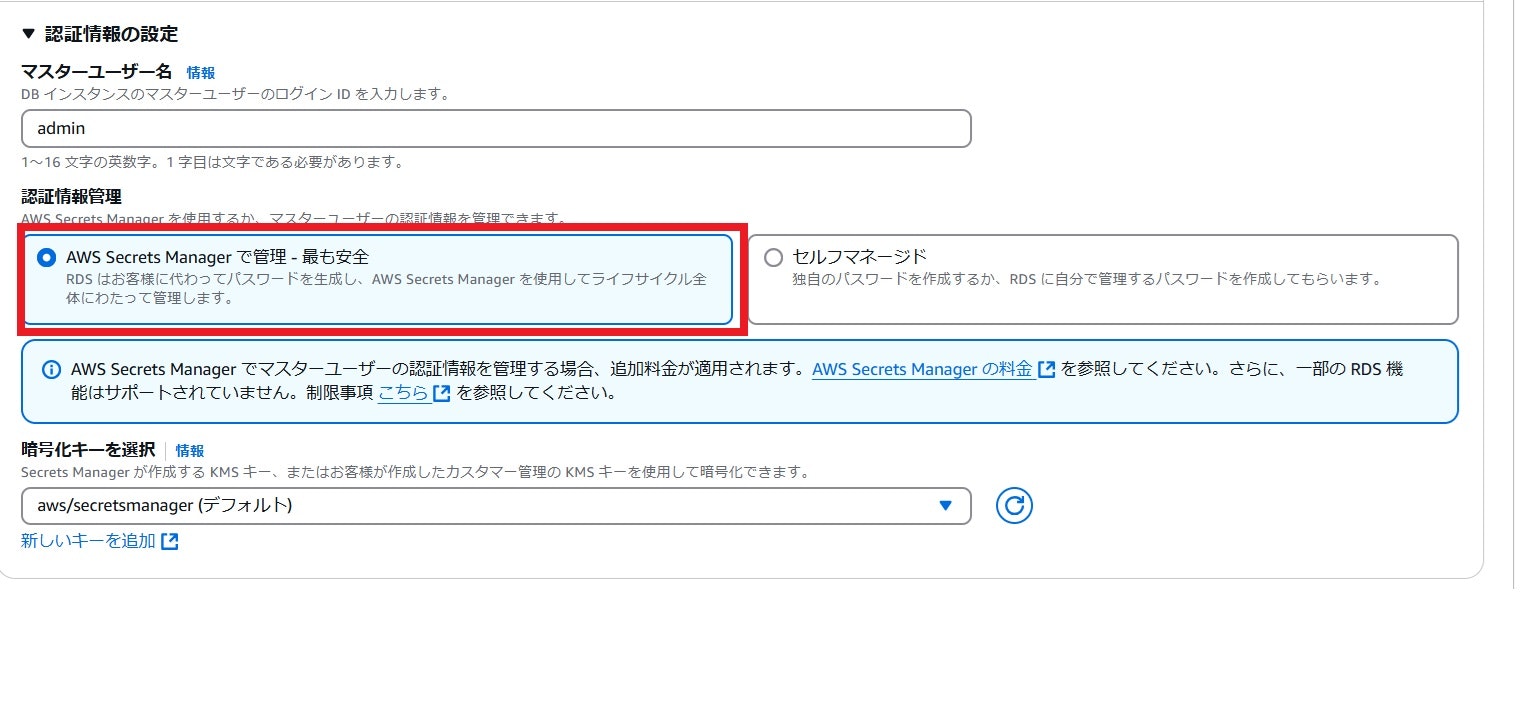
マネージドローテーションの実装
CloudFormationのテンプレートで記述する場合も、MasterUserPasswordの代わりに
ManageMasterUserPassword: trueとするだけで実装できます。コード全体としては次の通りになります。
{
  "AWSTemplateFormatVersion": "2010-09-09",
  "Parameters": {
    "SubnetIds": {
      "Type": "List<AWS::EC2::Subnet::Id>",
      "Description": "A list of subnet IDs where the RDS instance will be deployed."
    },
    "SecurityGroupId": {
      "Type": "AWS::EC2::SecurityGroup::Id",
      "Description": "The ID of the security group to associate with the RDS instance."
    },
    "DBName": {
      "Type": "String",
      "Description": "The name of the database to be created when the RDS instance is generated. The meaning of this parameter varies by DBMS."
    }
  },
  "Resources": {
    "RDSSubnetGroup": {
      "Type": "AWS::RDS::DBSubnetGroup",
      "Properties": {
        "SubnetIds": {
          "Ref": "SubnetIds"
        },
        "DBSubnetGroupDescription": "A subnet group spanning across two Availability Zones"
      }
    },

    "RDSInstance": {
      "Type": "AWS::RDS::DBInstance",
      "Properties": {
        "DBInstanceClass": "db.t3.micro",
        "Engine": "mysql",
        "MasterUsername": "admin",
        "ManageMasterUserPassword": true,
        "DBName": {
          "Ref": "DBName"
        },
        "DBInstanceIdentifier": "test-database",
        "VPCSecurityGroups": [
          {
            "Ref": "SecurityGroupId"
          }
        ],
        "DBSubnetGroupName": {
          "Ref": "RDSSubnetGroup"
        },
        "MultiAZ": true,
        "StorageType": "gp2",
        "AllocatedStorage": 20

      }
    }
  },
  "Outputs": {
    "RDSInstanceEndpoint": {
      "Description": "The endpoint address of the RDS instance",
      "Value": {
        "Fn::GetAtt": [
          "RDSInstance",
          "Endpoint.Address"
        ]
      }
    },
    "RDSInstanceId": {
      "Description": "The ID of the RDS instance",
      "Value": {
        "Ref": "RDSInstance"
      }
    }
  }
}
Step2のコードと比べると、DBMasterSecretリソースや、Password、SecretNameのパラメータが省略されている分、よりシンプルになっています。コンソールのSecrets Managerを確認すると、「RDSによって作成されたシークレット」であり、自動ローテーションが有効になっていることがわかります。
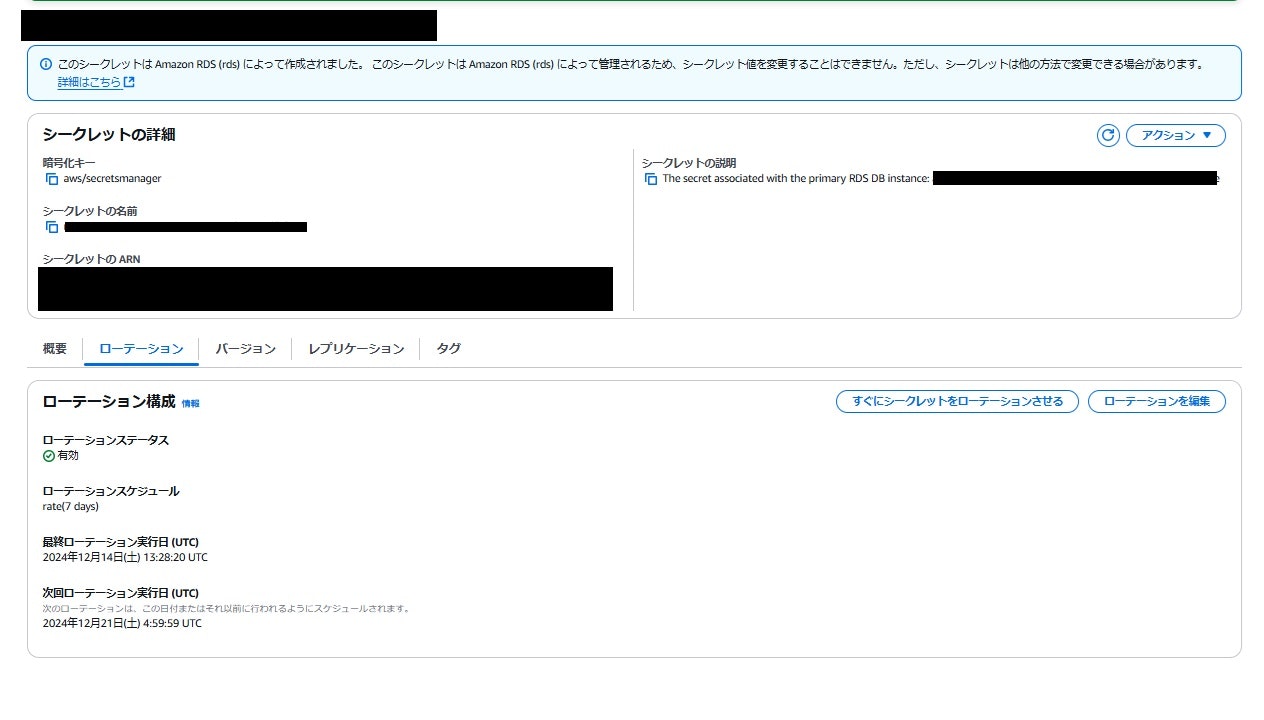
なお暗号化する際にカスタマー管理型のキーを使用したい場合は、プロパティMasterUserSecretを追加して、次のように書きます。
"MasterUserSecret": {
          "KmsKeyId": "自前のKMSキーのID"
        }
カスタムローテーションの実装
大きな変更点としてはAWS::SecretsManager::SecretTargetAttachmentとAWS::SecretsManager::RotationScheduleを追加します。コード全体は次の通りになります。
{
  "AWSTemplateFormatVersion": "2010-09-09",
  "Transform": "AWS::SecretsManager-2024-09-16",
  "Parameters": {
    "SubnetIds": {
      "Type": "List<AWS::EC2::Subnet::Id>",
      "Description": "A list of subnet IDs where the RDS instance will be deployed."
    },
    "SecurityGroupId": {
      "Type": "AWS::EC2::SecurityGroup::Id",
      "Description": "The ID of the security group to associate with the RDS instance."
    },
    "DBName": {
      "Type": "String",
      "Description": "The name of the database to be created when the RDS instance is generated. The meaning of this parameter varies by DBMS."
    },
    "SecretName": {
      "Type": "String",
      "Description": "The name of the secret in Secrets Manager that stores the master user password for the RDS instance."
    }
  },
  "Resources": {
    "RDSSubnetGroup": {
      "Type": "AWS::RDS::DBSubnetGroup",
      "Properties": {
        "SubnetIds": {"Ref": "SubnetIds"},
        "DBSubnetGroupDescription": "A subnet group spanning across two Availability Zones"
      }
    },
    "DBMasterSecret": {
      "Type": "AWS::SecretsManager::Secret",
      "Properties": {
        "Name": {"Ref": "SecretName"},
        "GenerateSecretString": {
          "SecretStringTemplate": "{\"username\": \"admin\"}",
          "GenerateStringKey": "password",
          "PasswordLength": 8,
          "ExcludeCharacters": "\"@/\\"
        }
      }
    },
    "RDSInstance": {
      "Type": "AWS::RDS::DBInstance",
      "Properties": {
        "DBInstanceClass": "db.t3.micro",
        "Engine": "mysql",
        "MasterUsername": "admin",
        "MasterUserPassword": {
          "Fn::Sub": "{{resolve:secretsmanager:${SecretName}:SecretString:password}}"
        },
        "DBName": {"Ref": "DBName"},
        "DBInstanceIdentifier": "test-database",
        "VPCSecurityGroups": [ {"Ref": "SecurityGroupId"} ],
        "DBSubnetGroupName": {"Ref": "RDSSubnetGroup"},
        "MultiAZ": true,
        "StorageType": "gp2",
        "AllocatedStorage": 20
      }
    },
    "SecretAttachment": {
      "Type": "AWS::SecretsManager::SecretTargetAttachment",
      "Properties": {
        "SecretId": {"Ref": "DBMasterSecret"},
        "TargetId": {"Ref": "RDSInstance"},
        "TargetType": "AWS::RDS::DBInstance"
      }
    },
    "SecretRotationSchedule": {
      "Type": "AWS::SecretsManager::RotationSchedule",
      "Properties": {
        "SecretId": {"Ref": "DBMasterSecret"},
        "HostedRotationLambda": {
          "RotationType"     : "MySQLSingleUser",
          "ExcludeCharacters": "\"@/\\"
        },
        "RotationRules": {"AutomaticallyAfterDays": 10}
      },
      "DependsOn": ["SecretAttachment"]
    }
  },
  "Outputs": {
    "RDSInstanceEndpoint": {
      "Description": "The endpoint address of the RDS instance",
      "Value": { "Fn::GetAtt": ["RDSInstance", "Endpoint.Address"] }
    },
    "RDSInstanceId": {
      "Description": "The ID of the RDS instance",
      "Value": {"Ref": "RDSInstance"}
    }
  }
}
・AWS::SecretsManager::SecretTargetAttachment:
Secrets Managerに格納されたシークレットをRDSインスタンスに関連付けるためのリソースです。このリソースにより、RDSインスタンスがSecrets Managerに格納されたデータベースの認証情報を利用できるようになります。
・AWS::SecretsManager::RotationSchedule
Secrets Manager内のシークレット(ここでは DBMasterSecret)に対して自動的にパスワードのローテーションを行うスケジュールを設定します。指定されたローテーション関数(HostedRotationLambda)に基づいて、ローテーションが定期的に実行されます。そして、HostedRotationLambdaを記述するには、Transform: AWS::SecretsManager-2024-09-16をテンプレートの先頭で指定する必要があります。
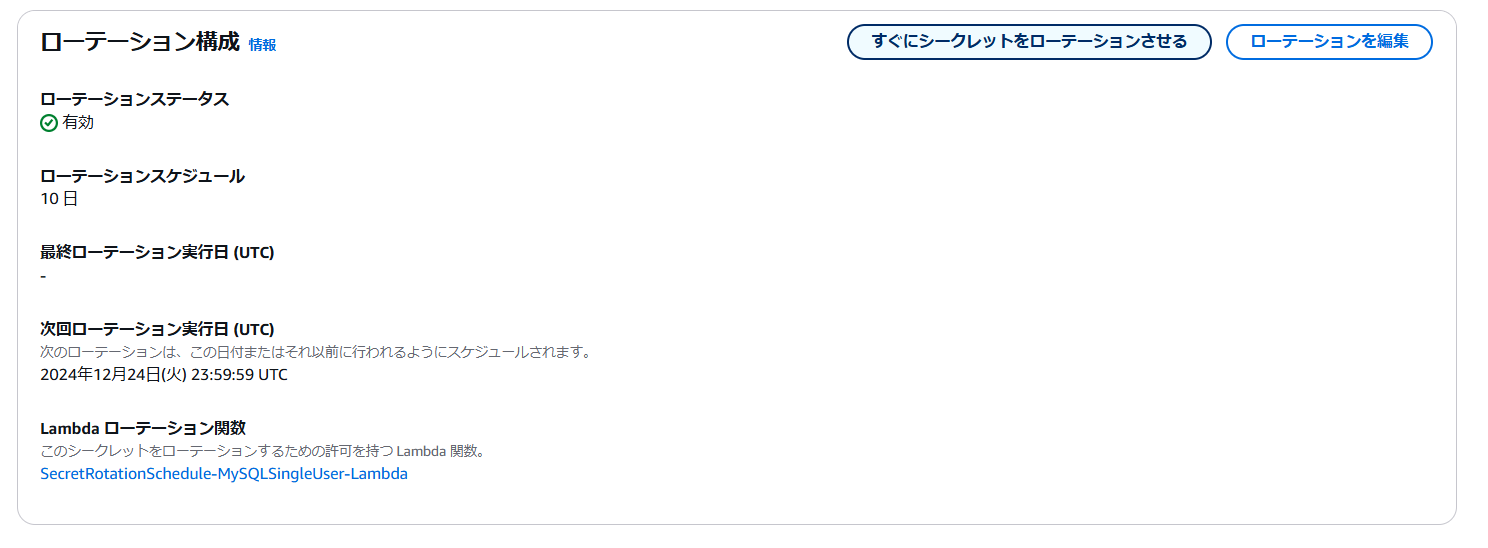
スタック作成後にSecret Managerに作成されたシークレットの画面を見ると、ローテーションスケジュールがしっかり10日になっていました。ローテーション関数も指定したものになっています。
まとめ
カスタムローテーションと比較して、マネージドローテーションの記述量が圧倒的に少ないことを実感しました。ただし、テンプレート内でローテーションスケジュールを調整できないのが難点ではあります。(デフォルトは7日間)
最後に
文系出身で今年の4月からSEとして働き始め、「ITのインフラってなんだろう…?」という状態でしたが、会社の研修や周りの同期たちのポジティブな影響のおかげで技術に触れることが楽しいと思えるようになってきました。本当に感謝しています。来年もAdvent Calendarに記事を投稿できたら嬉しいなと思っています。引き続きがんばります!