DynamoDB と OpenSearch Service のゼロ ETL 統合
先日、Amazon DynamoDB と Amazon OpenSearch Service のゼロ ETL 統合 が GA となりました。この機能のリリースにより、データパイプラインを自分で実装せずに、DynamoDB にあるデータを自動的に OpenSearch Service に同期することが可能になりました。ゼロ ETL 統合では Amazon OpenSearch Ingestion と呼ばれるマネージドなデータ収集サービスを使用することによって、DynamoDB Streams によって流れてくるデータを収集し、必要に応じて変換を行って OpenSearch Service へと同期します。
AWS re:Invent 2023 のセッション AWS re:Invent 2023 - Amazon DynamoDB zero-ETL integration with Amazon OpenSearch Service (DAT339) では、このゼロ ETL 統合を利用して、テキストデータをベクトルに変換して OpenSearch に保存することができると解説されています。本記事では、Amazon Bedrock の Titan Embeddings というモデルを使って、DynamoDB から OpenSearch Service へと同期する過程でテキストデータをベクトル化する方法を紹介します。
OpenSearch の Neural Search Plugin
DynamoDB と OpenSearch Service のゼロ ETL 統合の中でテキストをベクトル化する処理を行いたい場合、OpenSearch の Neural Search Plugin という機能を利用します。
Neural Search Plugin は、ベクトル検索用のプラグインです。OpenSearch には従来よりベクトル検索(k-NN 検索)機能がありますが、これまでベクトル化は OpenSearch の外部で実行する必要がありました。そのため、検索時には検索クエリをベクトルに変換する処理を、データ投入時にはドキュメントをベクトルに変換する処理を自分で行う必要がありました。しかし、Neural Search Plugin では、OpenSearch の内部で、ベクトル化の処理を実行することが可能です。これにより、検索時やデータ投入時にあらかじめベクトル化せずに、ベクトル検索を実行できるため、開発者の負担を軽減することができます。
OpenSearch Service でも、2023 年 11 月より OpenSearch 2.9 以降のバージョンで利用可能になった新しい機能です。ベクトル化に使用するためのモデルには、OpenSearch が持つ Pretrained モデルを利用したり、外部サービスと連携する方法などがあります。今回は、外部サービスとして Amazon Bedrock と接続する方法を扱います。
本記事で作成する構成のアーキテクチャ
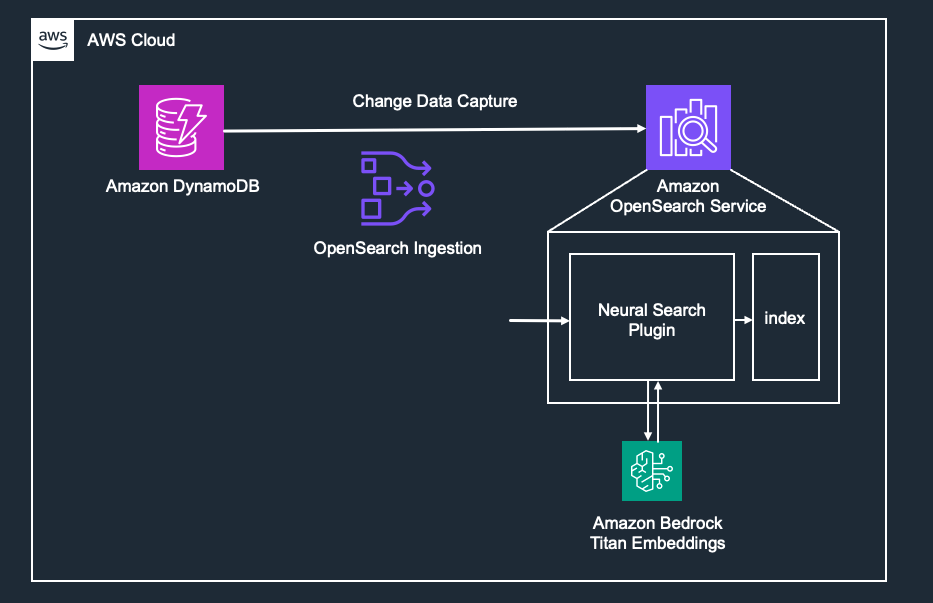
本記事では、以下の図のような流れで DynamoDB と OpenSearch Service の同期を行います。OpenSearch Ingestion を使用して、DynamoDB Streams から受け取ったストリームデータを OpenSearch へと書き込みます。その際、OpenSearch ではあらかじめ Neural Search Plugin に関する設定を行います(Amazon Bedrock との接続設定もここで行う)。これにより、OpenSearch Ingestion から Neural Search Plugin 経由でインデックスに書き込みを行うことが可能となります。
DynamoDB から OpenSearch へ同期する手順
1. OpenSearch ドメインを作成する
OpenSearch Service のコンソールから OpenSearch ドメインを立ち上げます。Neural Search の機能を利用するためにも、OpenSearch 2.9 以降を選択する必要があります。本記事では、OpenSearch 2.11 をパブリックアクセス設定で作成し、クラスター名は test-cluster としています。
2. 最初のデータをロードするための S3 バケットを作成する
あらかじめ DynamoDB に入っていたデータを OpenSearch に同期するために、DynamoDB から S3 へのエクスポート機能が内部で利用されます。そのため、S3 バケットをあらかじめ作成する必要があります。
3. DynamoDB テーブルを作成する
DynamoDB テーブルを作成します。この時、ポイントインタイムリカバリ(PITR)と DynamoDB Streams 機能を有効にする必要があります。DynamoDB Streams の表示タイプでは「新旧イメージ」を設定します。本記事では、パーティションキーとして product_id、Attribute として product_description を持つテーブルを想定し、テーブル名は products としています。
4. OpenSearch Ingestion 用の IAM ロールを作成する
OpenSearch Ingestion のパイプラインが接続する各サービスへのアクセスを許可する IAM ロール(パイプラインロール)を作成します。ドキュメント にどのような設定をする必要があるかの記述があります。
今回は以下のようなポリシーを作成します。関連する OpenSearch Service、DynamoDB、S3 に対して必要な処理を許可しています。
{
    "Version": "2012-10-17",
    "Statement": [
        {
            "Effect": "Allow",
            "Action": "es:DescribeDomain",
            "Resource": "arn:aws:es:ap-northeast-1:{アカウントID}:domain/*"
        },
        {
            "Effect": "Allow",
            "Action": "es:ESHttp*",
            "Resource": "arn:aws:es:ap-northeast-1:{アカウントID}:domain/test-cluster/*"
        },
        {
            "Sid": "allowRunExportJob",
            "Effect": "Allow",
            "Action": [
                "dynamodb:DescribeTable",
                "dynamodb:DescribeContinuousBackups",
                "dynamodb:ExportTableToPointInTime"
            ],
            "Resource": [
                "arn:aws:dynamodb:ap-northeast-1:{アカウントID}:table/products"
            ]
        },
        {
            "Sid": "allowCheckExportjob",
            "Effect": "Allow",
            "Action": [
                "dynamodb:DescribeExport"
            ],
            "Resource": [
                "arn:aws:dynamodb:ap-northeast-1:{アカウントID}:table/products/export/*"
            ]
        },
        {
            "Sid": "allowReadFromStream",
            "Effect": "Allow",
            "Action": [
                "dynamodb:DescribeStream",
                "dynamodb:GetRecords",
                "dynamodb:GetShardIterator"
            ],
            "Resource": [
                "arn:aws:dynamodb:ap-northeast-1:{アカウントID}:table/products/stream/*"
            ]
        },
        {
            "Sid": "allowReadAndWriteToS3ForExport",
            "Effect": "Allow",
            "Action": [
                "s3:GetObject",
                "s3:AbortMultipartUpload",
                "s3:PutObject",
                "s3:PutObjectAcl"
            ],
            "Resource": [
                "arn:aws:s3:::{バケット名}/export/*"
            ]
        }
    ]
}
次に、このポリシーを持つロールを作成します。信頼ポリシーの Principal は以下のように osis-pipelines.amazonaws.com を設定します。
{
	"Version": "2012-10-17",
	"Statement": [
		{
			"Effect": "Allow",
			"Principal": {
				"Service": "osis-pipelines.amazonaws.com"
			},
			"Action": "sts:AssumeRole"
		}
	]
}
5. Bedrock の Titan Embeddings に関する設定を行う
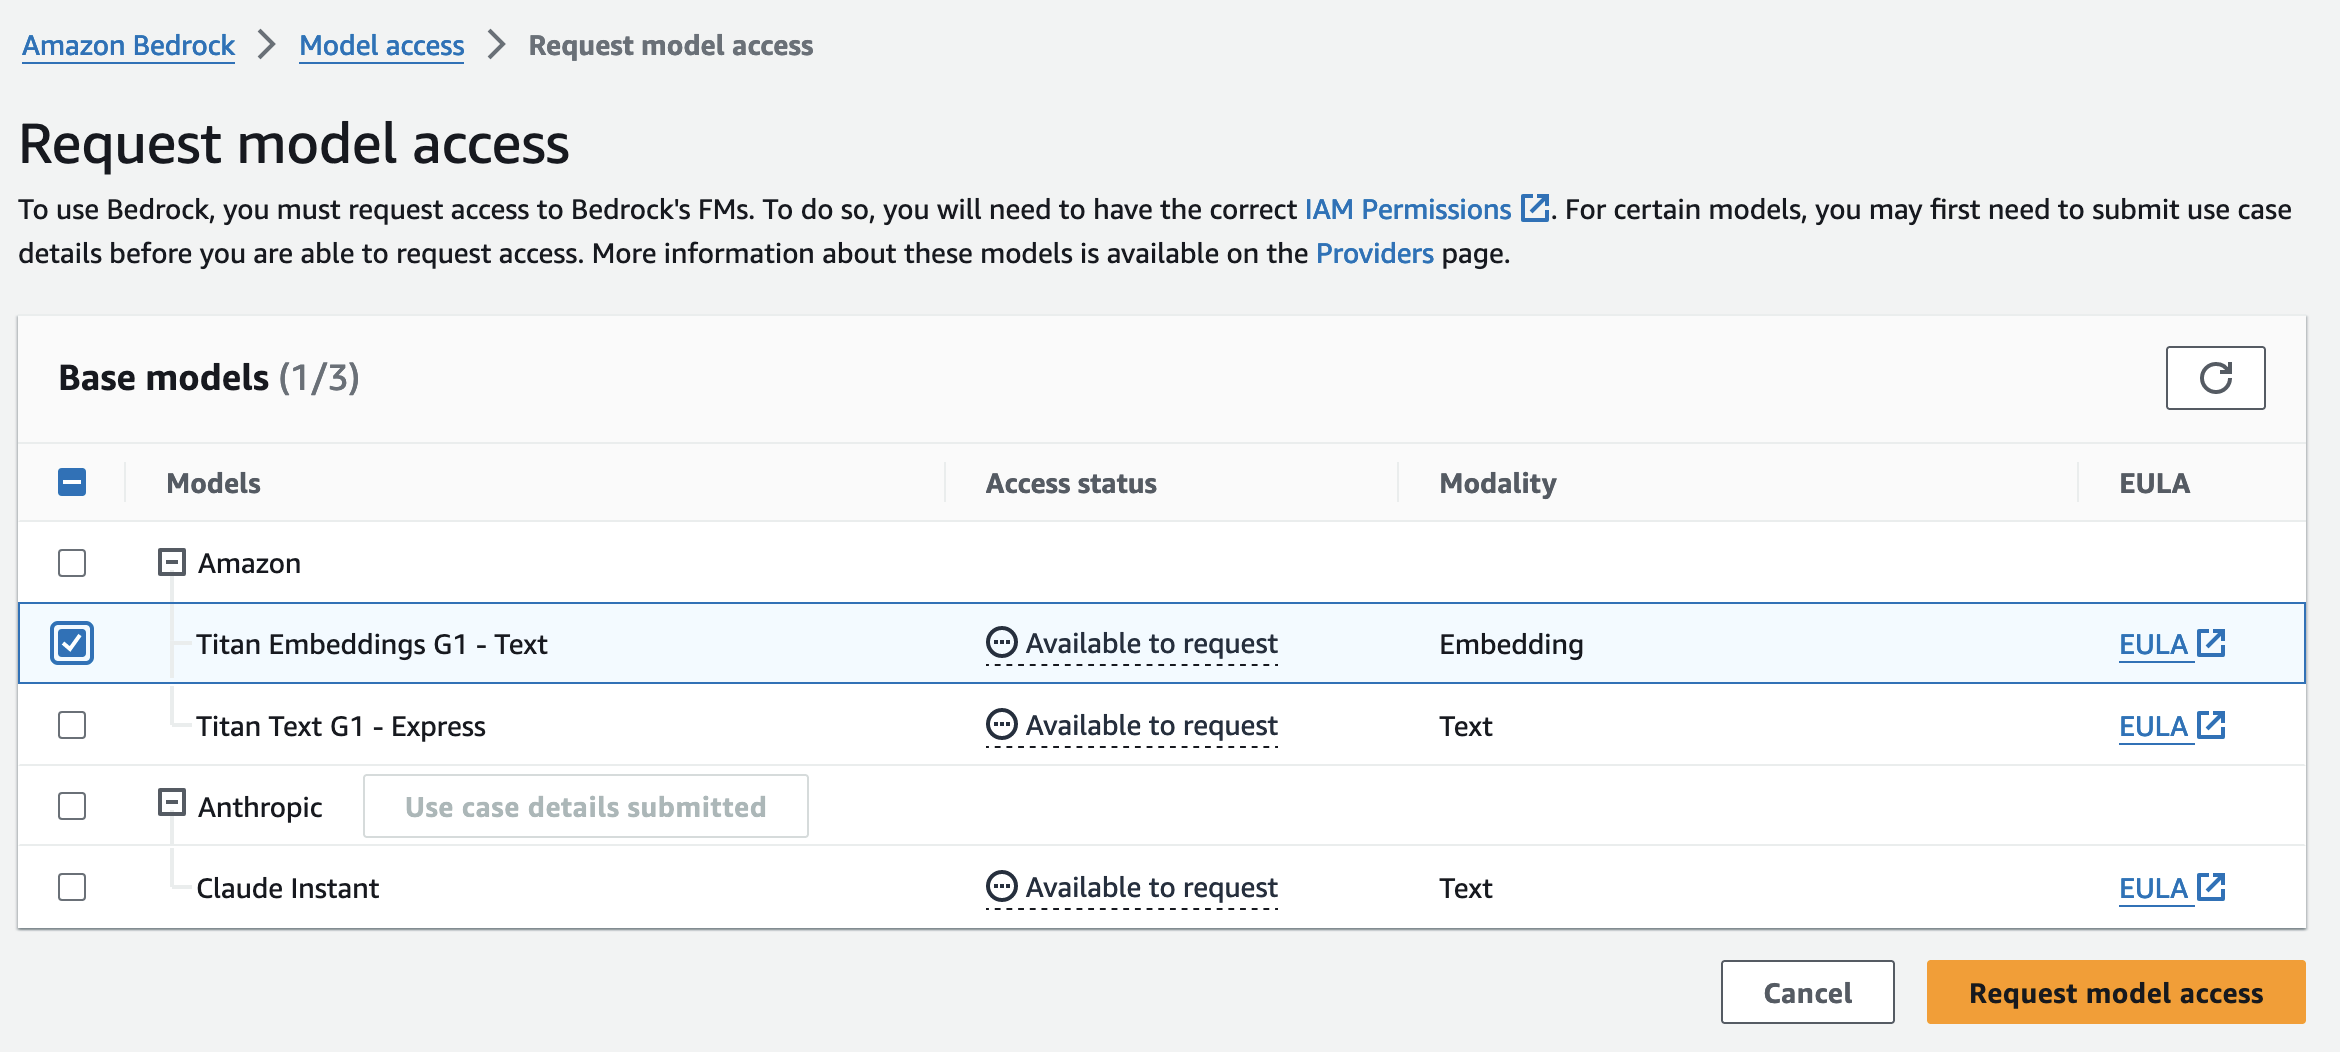
まず、Bedrock で Titan Embeddings を利用するには、モデルアクセスを有効化する必要があります。
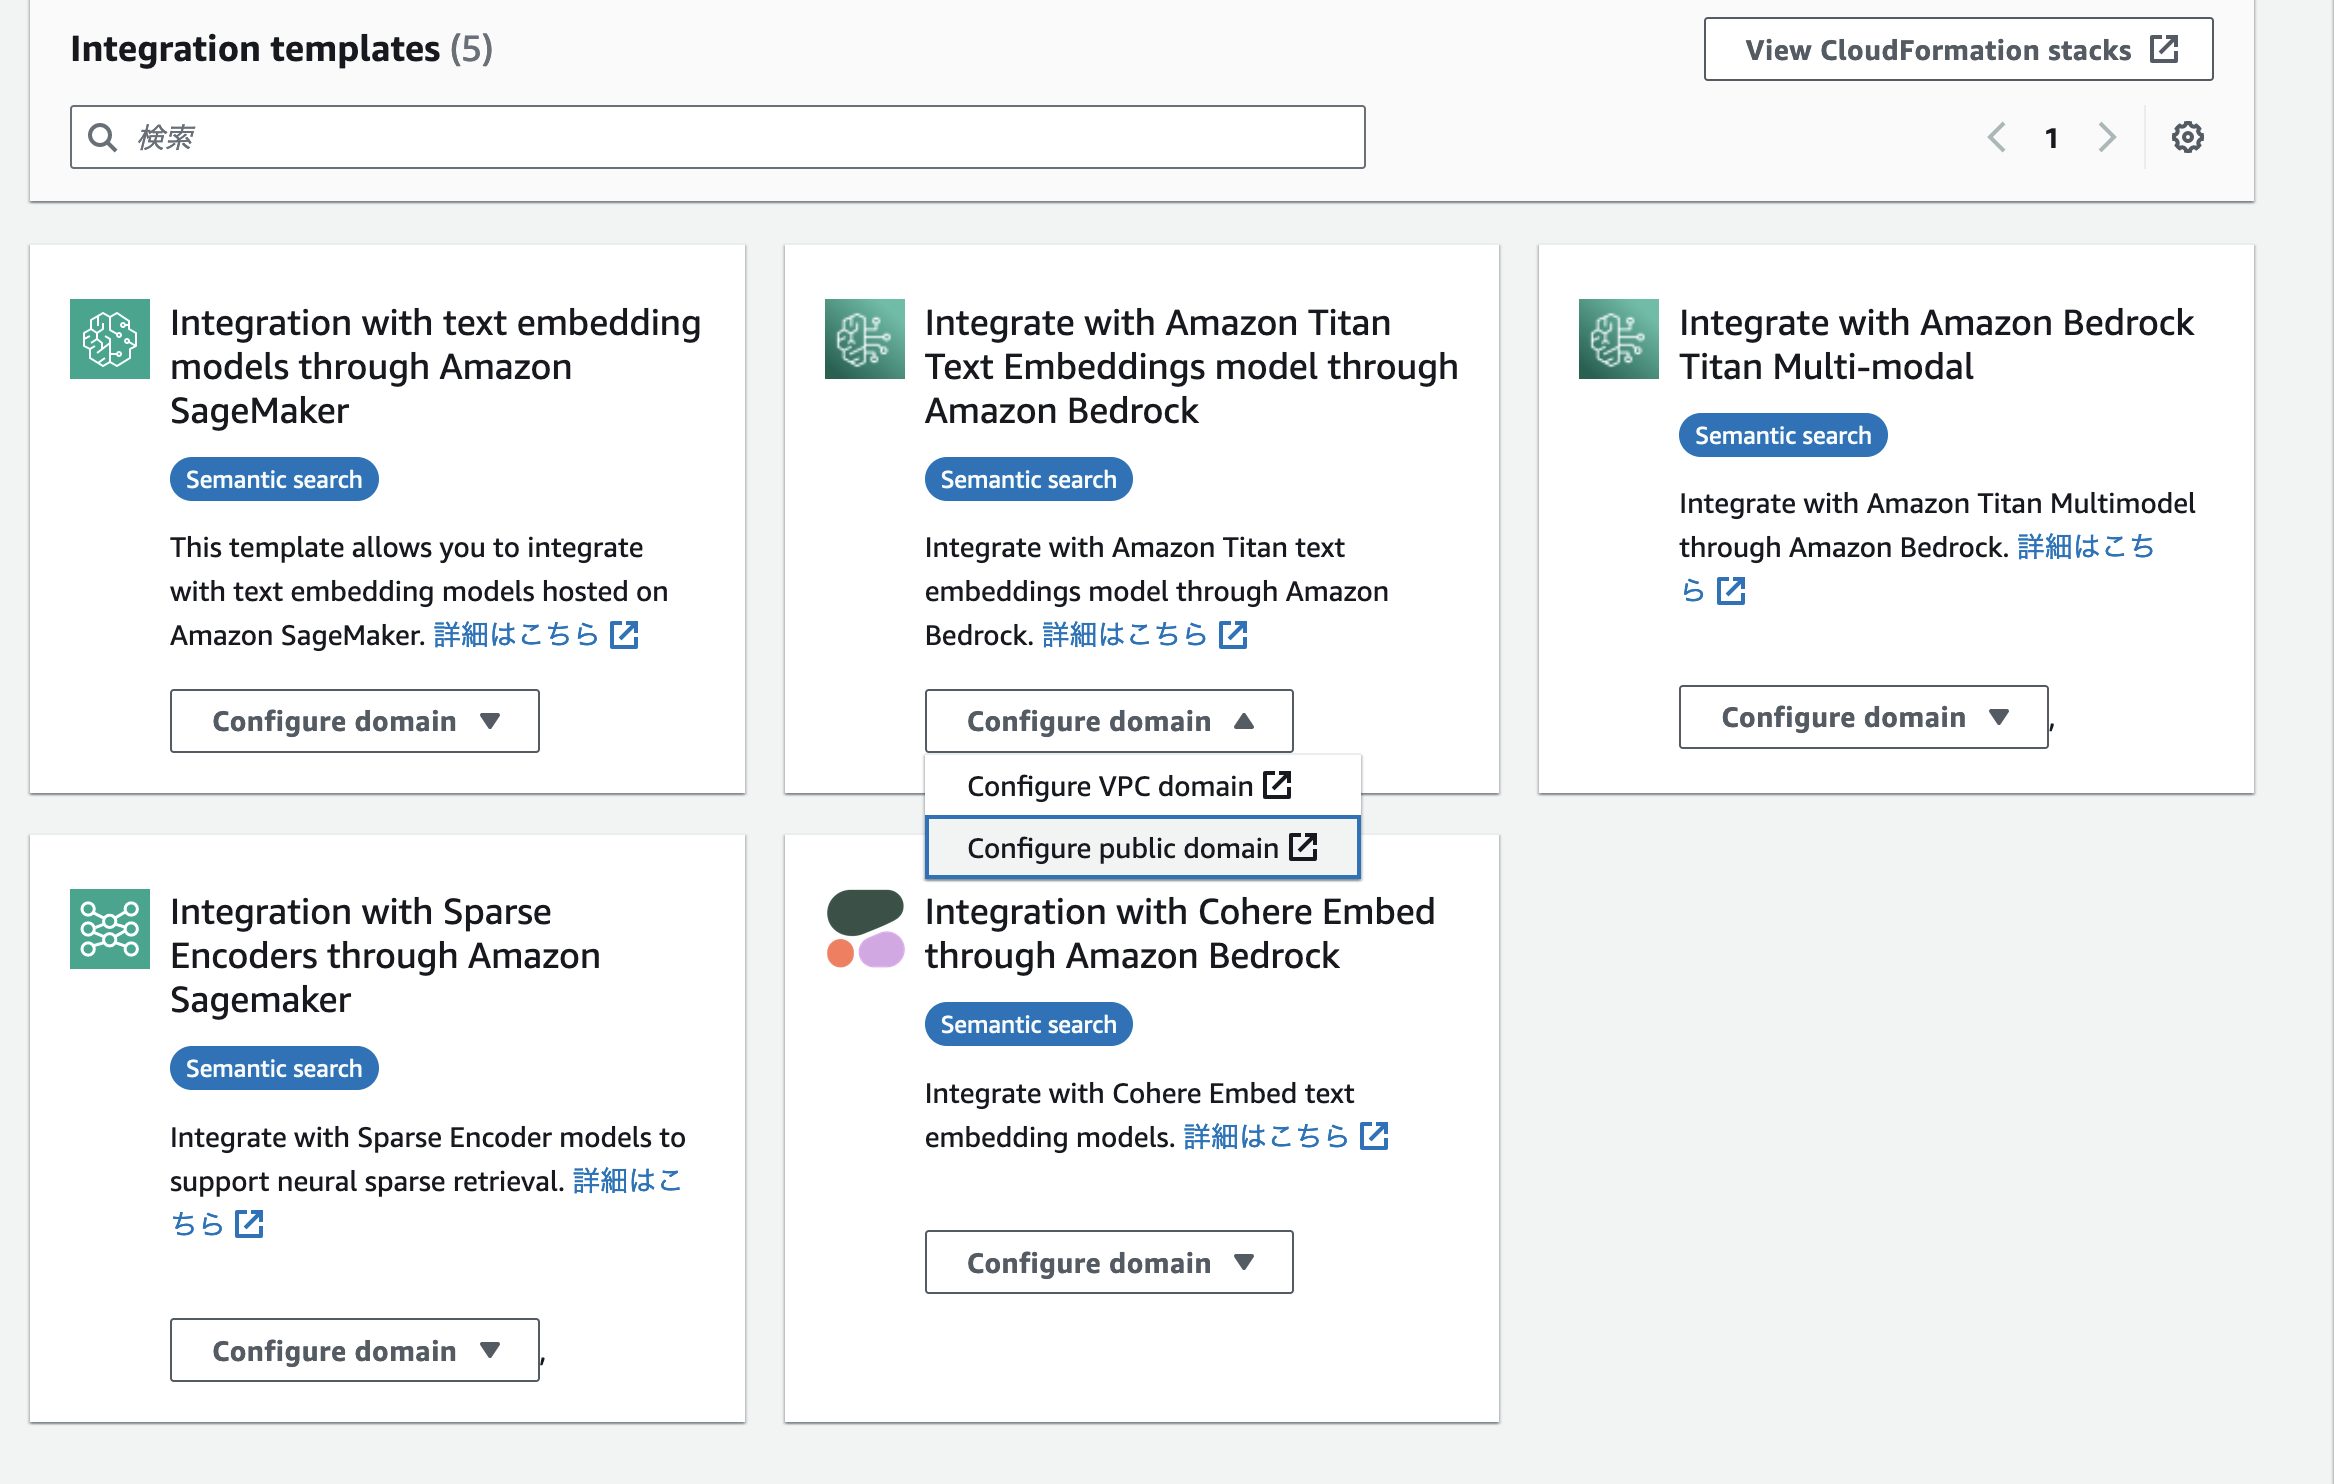
次に、OpenSearch から Titan Embeddings を利用するための設定を行います。OpenSearch Service のコンソールの左ペインに「Integrations」という項目があります。ここから、Integration templates を選択することができます。これは、OpenSearch Service から Bedrock や SageMaker を手軽に利用できる CloudFormation テンプレートです。今回は、「Integrate with Amazon Titan Text Embeddings model through Amazon Bedrock」を選択します。このテンプレートの起動が完了すると、Titan Embeddings での埋め込みがすぐに利用できるようになっています。
OpenSearch Dashboards の Dev Tools から、モデルが利用可能になっているか確認します。
- クエリ
GET /_plugins/_ml/models/_search?filter_path=hits
{
  "query": {
    "match_all": {}
  }
}
- レスポンス
{
  "hits": {
    "total": {
      "value": 1,
      "relation": "eq"
    },
    "max_score": 1,
    "hits": [
      {
        "_index": ".plugins-ml-model",
        "_id": "o9w3iIwBvfYEbB9AplRY",
        "_version": 3,
        "_seq_no": 2,
        "_primary_term": 1,
        "_score": 1,
        "_source": {
          "last_deployed_time": 1703092398381,
          "model_version": "1",
          "created_time": 1703092397409,
          "deploy_to_all_nodes": true,
          "description": "Bedrock Model for connector oNw3iIwBvfYEbB9AnlQR",
          "model_state": "DEPLOYED",
          "planning_worker_node_count": 3,
          "last_updated_time": 1703092398382,
          "name": "OpenSearch-bedrock-122123021132",
          "connector_id": "oNw3iIwBvfYEbB9AnlQR",
          "current_worker_node_count": 3,
          "model_group_id": "odw3iIwBvfYEbB9An1TS",
          "planning_worker_nodes": [
            "0jVxPszqTFGB_exlDbn97g",
            "aP6xaLzFSAyhR_u6O-9gMg",
            "htWcRUbJSAKSd7au_MrMWg"
          ],
          "algorithm": "REMOTE"
        }
      }
    ]
  }
}
モデルが登録されていることが確認できたら、Neural Search で利用するパイプラインの登録をします。ここでも model_id は、上記のレスポンスの _id フィールドの値です。また、"product_description": "product_description_embedding" の部分は、product_description という名前のフィールドのテキストデータをベクトル化して、product_description_embedding という knn_vector 型のフィールドに出力する、ということを意味します。
PUT /_ingest/pipeline/titan-embeddings-pipeline
{
  "description": "An NLP ingest pipeline with Titan Embeddings G1 – Text v1.2",
  "processors": [
    {
      "text_embedding": {
        "model_id": "o9w3iIwBvfYEbB9AplRY",
        "field_map": {
          "product_description": "product_description_embedding"
        }
      }
    }
  ]
}
6. DynamoDB の Integration を設定する
ここまでの設定が完了したら、あとは DynamoDB Integration に関する設定を行うのみです。
DynamoDB のコンソールの左ペインに、「インテグレーション」という項目があります。ここをクリックして作成画面に移ると、OpenSearch Ingestion のパイプライン設定画面にリダイレクトします。OpenSearch Ingestion の設定は YAML ファイルで行います。DynamoDB のページからリダイレクトすると、あらかじめテーブル名などが入力された形で雛形が提供されています。設定ファイルは大きく、source と sink に分かれています。source ではデータの元となる DynamoDB(や S3)に関する設定、sink ではデータの出力先となる OpenSearch に関する設定を行います。対応しているプラグインやオプションは公式ドキュメントに記述があります。
雛形から変更する部分は、以下になります。
- S3 バケットに関する情報を追記する
- 先ほど作成した IAM ロール(パイプライン)の ARN を追記する
- index 名を変更する(今回は
products) -
template_type: "index-template"を追記する -
template_contentを追記する- ここでは OpenSearch の Index templates を設定します。
template_contentの中では、先ほど作成したパイプラインをdefault_pipelineパイプラインとして設定し、マッピング設定の中で、product_idやproduct_description、そしてproduct_descriptionをベクトル化したフィールドであるproduct_description_embeddingのフィールドを定義しています。
- ここでは OpenSearch の Index templates を設定します。
version: "2"
dynamodb-pipeline:
  source:
    dynamodb:
      acknowledgments: true
      tables:
        # REQUIRED: Supply the DynamoDB table ARN and whether export or stream processing is needed, or both
        - table_arn: "arn:aws:dynamodb:ap-northeast-1:{アカウントID}:table/products"
          # Remove the stream block if only export is needed
          stream:
            start_position: "LATEST"
          # Remove the export block if only stream is needed
          export:
            # REQUIRED for export: Specify the name of an existing S3 bucket for DynamoDB to write export data files to
            s3_bucket: "{バケット名}"
            # Specify the region of the S3 bucket
            s3_region: "ap-northeast-1"
            # Optionally set the name of a prefix that DynamoDB export data files are written to in the bucket.
            s3_prefix: "export/"
      aws:
        # REQUIRED: Provide the role to assume that has the necessary permissions to DynamoDB, OpenSearch, and S3.
        sts_role_arn: "arn:aws:iam::{アカウントID]:role/OpenSearchPipelineRole"
        # Provide the region to use for aws credentials
        region: "ap-northeast-1"
  sink:
    - opensearch:
        # REQUIRED: Provide an AWS OpenSearch endpoint
        hosts:
          [
            "{OpenSearch Domain エンドポイント}"
          ]
        index: "products"
        index_type: custom
        template_type: "index-template"
        template_content: |
          {
            "template": {
              "settings": {
                "index.knn": true,
                "default_pipeline": "titan-embeddings-pipeline"
              },
              "mappings": {
                "properties": {
                  "product_id": {
                    "type": "keyword"
                  },
                  "product_description_embedding": {
                    "type": "knn_vector",
                    "dimension": 1536,
                    "method": {
                      "engine": "nmslib",
                      "space_type": "l2",
                      "name": "hnsw",
                      "parameters": {}
                    }
                  },
                  "product_description": {
                    "type": "text"
                  }
                }
              }
            }
          }
        document_id: "${getMetadata(\"primary_key\")}"
        action: "${getMetadata(\"opensearch_action\")}"
        document_version: "${getMetadata(\"document_version\")}"
        document_version_type: "external"
        aws:
          # REQUIRED: Provide a Role ARN with access to the domain. This role should have a trust relationship with osis-pipelines.amazonaws.com
          sts_role_arn: "arn:aws:iam::{アカウントID}:role/OpenSearchPipelineRole"
          # Provide the region of the domain.
          region: "ap-northeast-1"
          # Enable the 'serverless' flag if the sink is an Amazon OpenSearch Serverless collection
          # serverless: true
          # serverless_options:
          # Specify a name here to create or update network policy for the serverless collection
          # network_policy_name: "network-policy-name"
          # Enable the S3 DLQ to capture any failed requests in an S3 bucket. This is recommended as a best practice for all pipelines.
          # dlq:
          # s3:
          # Provide an S3 bucket
          # bucket: "your-dlq-bucket-name"
          # Provide a key path prefix for the failed requests
          # key_path_prefix: "dynamodb-pipeline/dlq"
          # Provide the region of the bucket.
          # region: "us-east-1"
          # Provide a Role ARN with access to the bucket. This role should have a trust relationship with osis-pipelines.amazonaws.com
          # sts_role_arn: "arn:aws:iam::123456789012:role/Example-Role"
7. データを投入して動作を確認する
以下のデータを DynamoDB に投入して動作を確認します。
product_id,product_description
1,高性能なスポーツシューズ。最新のテクノロジーを使用し、快適な履き心地と優れた耐久性を提供します。
2,美味しいコーヒーを淹れるためのプロフェッショナルなコーヒーメーカー。簡単な操作で本格的な味わいを楽しめます。
3,スタイリッシュなデザインのワイヤレスイヤフォン。最新のノイズキャンセリング機能付きで、クリアな音楽体験を提供します。
4,ヘルシーな生活をサポートするスムージーメーカー。新鮮なフルーツや野菜から栄養たっぷりのスムージーを作れます。
5,高解像度のデジタルカメラ。プロの写真家も認めるクオリティで、すぐれた写真撮影が可能です。
それでは、検索クエリを実行します。試しに「健康グッズ」というクエリで検索します。size を 1 とすることで、合計の返却結果が 1 件返却されるようにしています。また、埋め込みのベクトルデータは数値の羅列でしかないため、レスポンスからは除外するようにしています(model_id は titan-embeddings-pipeline を作成する際に使用したものと同一です)
- クエリ
GET products/_search
{
  "_source": {
    "excludes": [
      "product_description_embedding"
    ]
  },
  "size": 1,
  "query": {
    "neural": {
      "product_description_embedding": {
        "query_text": "健康グッズ",
        "model_id": "o9w3iIwBvfYEbB9AplRY",
        "k": 1
      }
    }
  }
}
- レスポンス
{
  "took": 966,
  "timed_out": false,
  "_shards": {
    "total": 5,
    "successful": 5,
    "skipped": 0,
    "failed": 0
  },
  "hits": {
    "total": {
      "value": 4,
      "relation": "eq"
    },
    "max_score": 0.0021516578,
    "hits": [
      {
        "_index": "products",
        "_id": "4",
        "_score": 0.0021516578,
        "_source": {
          "product_id": "4",
          "product_description": "ヘルシーな生活をサポートするスムージーメーカー。新鮮なフルーツや野菜から栄養たっぷりのスムージーを作れます。"
        }
      }
    ]
  }
}
検索クエリと似た要素を含む検索結果が返ってくることが確認できました。キーワード検索とは異なり、シノニムなどを設定せずに類似の意味を含むドキュメントを取得することができています。一度 ステップ 1~6 の設定をすれば、検索時(やデータ投入時)にはクエリのテキストを入力するだけでベクトル検索を実現できることが確認できました。
まとめ
本記事では、DynamoDB から OpenSearch Service へ同期する際に、Neural Search Plugin を使用してテキストをベクトル化する方法について紹介しました。この方法を利用することで、自前でパイプラインの実装をする必要なく、DynamoDB に保存されたデータに対してニアリアルタイムにベクトル検索を行うことができます。また今回は、DynamoDB と OpenSearch Service の統合と、Neural Search Plugin を同時に紹介にするような内容でしたが、勿論どちらか片方のみを利用することも可能です。用途に応じてこれらの機能を活用していきましょう。


