はじめに
2020年くらいにE資格を取ったのですが、だいぶ忘れてしまったので、復習しようと思い立ち、数年ぶりに投稿します。まずは定番の手書き数字認識から。
作ったもの
- モデルを訓練し、保存
- scikit-learn
- MNIST
- SVM
- ペイント機能
- Tkinter
- Tkinter
- 予測
# こんな感じの結果が出る
array(['4'], dtype=object)
Import
ライブラリをインポートします。
import joblib
import numpy as np
import tkinter
from PIL import Image, ImageFilter
from sklearn import datasets, svm
from sklearn.model_selection import train_test_split

import warnings
warnings.filterwarnings('ignore')
定数を適当に設定します。
IMG = 'paint/outfile.ps'
WIDTH = 24
TRAINED_MODEL_SVM = 'trained_model/svm.pkl'
モデル訓練
機械学習モデルを訓練します。データはMNIST、モデルはSVMにします。この辺りは後で変更したいです。あと、毎回訓練するもの効率的でないので、訓練済みモデルを保存し、それを呼び出せる形にします。
TRAIN = False

# サンプル画像データのロード
mnist = datasets.fetch_openml('mnist_784', data_home='image/')
X = mnist.data / 255
y = mnist.target

# 訓練用データとテスト用データに分ける
X_train, X_test, y_train, y_test = train_test_split(
    X, y, train_size=1000, test_size=300
)

if TRAIN:
    print("訓練を実施し、モデルを上書きします。")
    # 訓練用データで学習
    clf = svm.SVC()
    clf.fit(X_train, y_train)

    # 訓練済みモデルの保存
    joblib.dump(clf, TRAINED_MODEL_SVM)

    # テスト用データで実際に試す
    score = clf.score(X_test, y_test)
    print(score)

else:
    print("訓練済みのモデルを使用します。")
    clf = joblib.load(TRAINED_MODEL_SVM)

    # テスト用データで実際に試す
    score = clf.score(X_test, y_test)
    print(score)
テストデータの正解率は92.3%で、まあまあでした。
訓練済みのモデルを使用します。
0.9233333333333333
ペイント機能
せっかくなので、ペイント機能も実装したいなと思いました。MNISTに合わせて、黒地&白線にしたかったのですが上手くいかず、後で処理することにしました。
class Paint:
    def __init__(self):
        # 操作中の図形のID
        self.curr_id = -1

        # メインウィンドウ作成
        root = tkinter.Tk()
        root.title("右クリックで保存")
        root.geometry("280x280")

        # 画像表示用キャンバス作成
        self.canvas = tkinter.Canvas(root, bg="white")
        self.canvas.pack(expand=True, fill=tkinter.BOTH)
        # キーバインド
        self.canvas.bind("<ButtonPress-1>", self.on_key_left)
        self.canvas.bind("<B1-Motion>", self.dragging)
        self.canvas.bind("<ButtonPress-3>", self.save_image)

        root.mainloop()

    # マウス左ボタン押下
    def on_key_left(self, event):
        # 直線描画
        self.curr_id = self.canvas.create_line(event.x, event.y, event.x, event.y, fill="black", width=WIDTH)

   # ドラッグ中
    def dragging(self, event):
        points = self.canvas.coords(self.curr_id)
        points.extend([event.x,event.y])
        self.canvas.coords(self.curr_id, points)

    # 右クリックで保存
    def save_image(self, event):
        self.canvas.postscript(file=IMG, colormode='color')
        # PILでPNG形式に変換
        saveimg= Image.open(IMG)
        saveimg.save('paint/temp.png')
        print("saved!")

if __name__ == '__main__':
    if True:
        Paint()
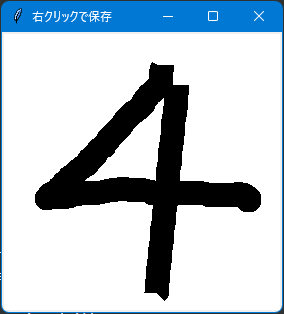
実際の画面はこちら。左ドラッグで線を描画し、右クリックで保存します。
画像読み込み
img = Image.open(IMG)
print(img.format, img.size, img.mode)

# 変換
img = img.resize((28, 28)) # リサイズ
img = img.convert('L') # グレースケール
img_array = np.array(img)/255.0 # numpy配列化し、0-1に正規化
img_array = img_array.reshape(1, -1) # flatten
img_array = 1 - img_array # 反転
予測
最後に予測します。
clf.predict(img_array)
予測結果が表示されます。
array(['9'], dtype=object)
おわりに
あれ?合わない。そもそもテストデータの正解率は9割ですが、ペイントツールを使うと、さらに精度は落ちます。MNISTに過学習しているものと思われますので、やはりモデルを変えたり、正則化したりする必要がありそうです。