はじめに
パーティクルフィルタは、動的な環境におけるオブジェクト追跡や位置推定のための強力なアルゴリズムです。本記事では、PythonとOpenCVを使用してパーティクルフィルタを実装し、動画中のオブジェクト追跡を行う方法を紹介します。
パーティクルフィルタの概要
パーティクルフィルタは、状態推定の問題をランダムサンプリングで解決するベイズフィルタの一種です。多数のパーティクル(仮説点)を用いて、システムの状態(位置や速度など)を推定します。以下の手順で進みます:
- 初期化: パーティクルをランダムに生成。
- 予測: パーティクルをシステムモデルに基づいて予測。
- 尤度計算: 各パーティクルが観測データに一致するかを評価。
- リサンプリング: 尤度に基づいてパーティクルを再配置。
実装の概要
今回のコードでは、以下の要素を実装しています:
-
Point2d: 2次元ポイントを表現するクラス。 -
Particle: パーティクルを表現するクラス。 -
ParticleFilter: パーティクルフィルタのメインクラス。 - 動画処理: 動画を読み込み、フレームごとにパーティクルフィルタを適用。
実装のポイント
1. パーティクルの定義
パーティクルは、位置 (pos)、速度 (vel)、尤度 (like)、重み (weight) などを持つデータクラスとして定義します。
@dataclass
class Particle():
    pos: Point2d
    vel: Point2d
    like: float
    weight: float
    keep: bool
Point2d クラスを使って、位置と速度の計算を簡潔に行います。
2. 初期化と予測
パーティクルフィルタは最初にランダムな位置にパーティクルを生成します。その後、速度に基づいてパーティクルの位置を予測します。
def initialize(self):
    for i in range(self.n_particles):
        pt = Point2d(
            self._rs.randint(0, self._img_cols),
            self._rs.randint(0, self._img_rows)
        )
        self.particle_list.append(
            Particle(pt, Point2d(0, 0), 1.0, 0.0, False)
        )

def predict(self):
    for i_particle in self.particle_list:
        i_particle.pos += i_particle.vel * self.dt
3. 尤度の更新
各パーティクルの位置の色相値(Hue)と彩度(Saturation)を計算し、尤度を更新します。色相値70、彩度200を目標としています。
def _calc_like(self, img, i_particle):
    img_hsv = cv2.cvtColor(img, cv2.COLOR_BGR2HSV)
    vec_hsv = cv2.split(img_hsv)

    h = vec_hsv[0][i_particle.pos.y, i_particle.pos.x]
    s = vec_hsv[1][i_particle.pos.y, i_particle.pos.x]
    len_h = abs(70 - h)
    len_s = abs(200 - s)
    like = (len_h / 180) * 0.8 + (len_s / 255) * 0.2
    return 1 - like
4. リサンプリング
尤度の高いパーティクルを保持し、新しいパーティクルを生成します。
def resample(self):
    self.particle_list.sort()

    particle_list = [i_particle for i_particle in self.particle_list if i_particle.keep]
    like_sum = sum([i_particle.like for i_particle in particle_list])

    for i_particle in particle_list:
        i_particle.weight = i_particle.like / like_sum

    particle_list_new = []
    for i_particle in particle_list:
        n_particles_new = int(i_particle.weight * (self.n_particles - len(particle_list)))
        for _ in range(n_particles_new):
            r = self._rs.normal(loc=0.0, scale=self._img_rows + self._img_cols) * (1 - i_particle.like)
            ang = self._rs.uniform(-np.pi, np.pi)
            pt = Point2d(
                r * np.cos(ang) + i_particle.pos.x,
                r * np.sin(ang) + i_particle.pos.y
            )
            particle_list_new.append(
                Particle(pt, pt - i_particle.pos, i_particle.like, i_particle.weight, False)
            )

    self.particle_list = particle_list + particle_list_new
5. 描画
パーティクルを描画し、重心を計算して中心線を引きます。
def plot_particles(self, img):
    _img = img.copy()
    for i_particle in self.particle_list:
        if 0 < i_particle.pos.x < self._img_cols and 0 < i_particle.pos.y < self._img_rows:
            _img = cv2.circle(
                img=_img,
                center=i_particle.pos.xy,
                radius=2,
                color=(0, 0, 255),
                thickness=-1)
    return _img

def plot_center(self, img):
    _img = img.copy()
    center = sum([i_particle.pos for i_particle in self.particle_list]) / len(self.particle_list)

    cv2.line(_img,
             (center.x, 0),
             (center.x, self._img_rows),
             (0, 255, 255),
             3)
    cv2.line(_img,
             (0, center.y),
             (self._img_cols, center.y),
             (0, 255, 255),
             3)
    return _img
実装まとめ
import time
from dataclasses import dataclass

import cv2
import numpy as np


class Point2d():
    def __init__(self, x, y):
        self.x = int(x)
        self.y = int(y)

    def __add__(self, other):
        return self.__class__(self.x + other.x, self.y + other.y)

    def __sub__(self, other):
        return self.__class__(self.x - other.x, self.y - other.y)

    def __mul__(self, other):
        return self.__class__(round(self.x * other), round(self.y * other))

    def __truediv__(self, other):
        return self.__mul__(1 / other)

    def __radd__(self, other):
        return self.__class__(self.x + other, self.y + other)

    @property
    def xy(self):
        pass

    @xy.getter
    def xy(self):
        return (self.x, self.y)


@dataclass
class Particle():
    pos: Point2d
    vel: Point2d
    like: float
    weight: float
    keep: bool

    def __eq__(self, other):
        if isinstance(other, self.__class__):
            return self.like == other.like
        else:
            kls = other.__class__.__name__
            raise NotImplementedError(
                f'comparison between {self.__class__.__name__} and {kls} is not supported')

    def __ne__(self, other):
        return not self.__eq__(other)

    def __lt__(self, other):
        if isinstance(other, self.__class__):
            return self.like < other.like
        else:
            kls = other.__class__.__name__
            raise NotImplementedError(
                f'comparison between {self.__class__.__name__} and {kls} is not supported')

    def __le__(self, other):
        return self.__lt__(other) or self.__eq__(other)

    def __gt__(self, other):
        return not self.__le__(other)

    def __ge__(self, other):
        return not self.__lt__(other)


class ParticleFilter():
    def __init__(self, shape, n_particles=1000, dt=1, random_state=0, like_thresh=0.9, thresh_keep=100):
        self.n_particles = n_particles
        self.dt = dt
        self.random_state = random_state
        self.like_thresh = like_thresh
        self.thresh_keep = thresh_keep

        self._img_cols, self._img_rows = shape
        self._rs = np.random.RandomState(random_state)
        self.initialize()

    def initialize(self):
        self.particle_list = []
        for i in range(self.n_particles):
            pt = Point2d(
                self._rs.randint(0, self._img_cols),
                self._rs.randint(0, self._img_rows)
            )
            self.particle_list.append(
                Particle(pt, Point2d(0, 0), 1.0, 0.0, False)
            )

    def predict(self):
        for i_particle in self.particle_list:
            i_particle.pos += i_particle.vel * self.dt

    def update_like(self, img):
        # 色相値、彩度値から尤度を計算、更新
        for i_particle in self.particle_list:
            if 0 < i_particle.pos.x < self._img_cols and 0 < i_particle.pos.y < self._img_rows:
                i_particle.like = self._calc_like(img, i_particle)
            else:
                i_particle.like = 0

    def _calc_like(self, img, i_particle):
        """尤度計算メソッド.自分でカスタマイズする.
        """
        img_hsv = cv2.cvtColor(img, cv2.COLOR_BGR2HSV)
        vec_hsv = cv2.split(img_hsv)

        # 尤度を計算
        h = vec_hsv[0][i_particle.pos.y, i_particle.pos.x]
        s = vec_hsv[1][i_particle.pos.y, i_particle.pos.x]
        len_h = abs(70 - h)
        len_s = abs(200 - s)
        like = (len_h / 180) * 0.8 + (len_s / 255) * 0.2
        return 1 - like

    def resample(self):
        # 尤度の昇順にソート
        self.particle_list.sort()

        # 尤度の高いパーティクルを残し、尤度の低いパーティクルを消す
        for i, i_particle in enumerate(self.particle_list):
            if i_particle.like > self.like_thresh or i > len(self.particle_list) - self.thresh_keep:
                i_particle.keep = True
            else:
                i_particle.keep = False
        particle_list = [i_particle for i_particle in self.particle_list if i_particle.keep]

        # 尤度の高いパーティクルの計数、尤度の合計
        like_sum = sum([i_particle.like for i_particle in particle_list])

        # 正規化した重みを計算
        for i_particle in particle_list:
            i_particle.weight = i_particle.like / like_sum

        # リサンプリング
        particle_list_new = []
        for i_particle in particle_list:
            n_particles_new = int(i_particle.weight * (self.n_particles - len(particle_list)))
            for _ in range(n_particles_new):
                r = self._rs.normal(loc=0.0, scale=self._img_rows + self._img_cols) * (1 - i_particle.like)
                ang = self._rs.uniform(-np.pi, np.pi)
                pt = Point2d(
                    r * np.cos(ang) + i_particle.pos.x,
                    r * np.sin(ang) + i_particle.pos.y
                )
                # velocityは位置の差分で計算
                particle_list_new.append(
                    Particle(pt, pt - i_particle.pos, i_particle.like, i_particle.weight, False)
                )

        # パーティクル更新
        self.particle_list = particle_list + particle_list_new

    def plot_particles(self, img):
        _img = img.copy()
        # パーティクル描画
        for i_particle in self.particle_list:
            if 0 < i_particle.pos.x < self._img_cols and 0 < i_particle.pos.y < self._img_rows:
                _img = cv2.circle(
                    img=_img,
                    center=i_particle.pos.xy,
                    radius=2,
                    color=(0, 0, 255),
                    thickness=-1)
        return _img

    def plot_center(self, img):
        _img = img.copy()
        # パーティクルの重心
        center = sum([i_particle.pos for i_particle in self.particle_list]) / len(self.particle_list)

        cv2.line(_img,
                 (center.x, 0),
                 (center.x, self._img_rows),
                 (0, 255, 255),
                 3)
        cv2.line(_img,
                 (0, center.y),
                 (self._img_cols, center.y),
                 (0, 255, 255),
                 3)
        return _img


def main():
    WIN_PF = 'main'
    RESIZE = (640, 360)  # (x, y)

    pf = ParticleFilter(
        shape=RESIZE,
        n_particles=1000,
        dt=1,
        random_state=0,
        like_thresh=0.9,
        thresh_keep=100)

    cap = cv2.VideoCapture('04-06.wmv')
    cv2.namedWindow(WIN_PF, cv2.WINDOW_NORMAL)

    while True:
        # 予測
        pf.predict()

        ret, img_src = cap.read()

        if not ret:
            break

        img_src = cv2.resize(img_src, RESIZE)
        pf.update_like(img_src)
        pf.resample()

        img_src = pf.plot_particles(img_src)
        img_src = pf.plot_center(img_src)

        cv2.imshow(WIN_PF, img_src)

        if cv2.waitKey(1) == ord('q'):
            break

        # 描画のための遅延
        time.sleep(0.2)

    cap.release()
    cv2.destroyAllWindows()


if __name__ == '__main__':
    main()
実行方法
1.必要なライブラリをインストールします。
pip install opencv-python numpy
2.04-06.wmv という動画ファイルを用意し、コードの同じディレクトリに配置します。動画はこちらのサイトのサンプルプログラムに同梱されています。
3.コードを実行します。
python main.py
4.動画の再生中にオブジェクト追跡結果を確認できます。
結果
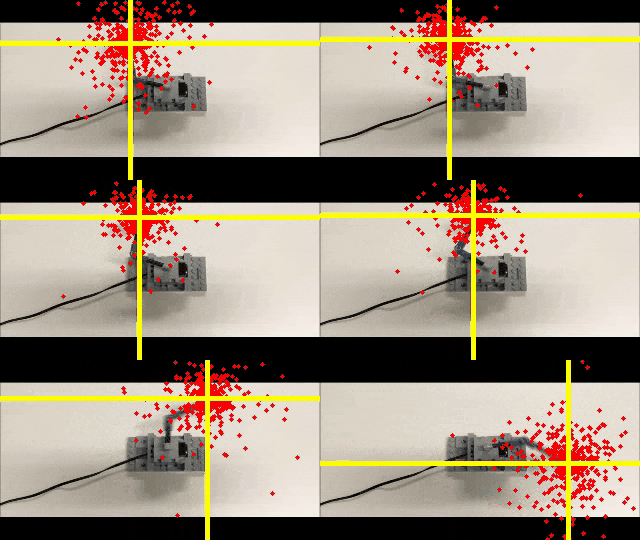
実行すると、パーティクルが画面上でオブジェクトを追跡する様子が表示されます。各パーティクルの位置が赤い点で描画され、重心が黄色い線で示されます。
応用
この実装は、特定の色相値と彩度を追跡する例ですが、カスタマイズすることで以下のような応用が可能です:
- 顔検出や物体検出: Haarカスケードや深層学習モデルと組み合わせる。
- ロボットの位置推定: LiDARやカメラのデータと統合する。
- その他の追跡対象: 特徴量やテンプレートマッチングを使用。
まとめ
本記事では、Pythonでパーティクルフィルタを実装して動画中のオブジェクトを追跡する方法を紹介しました。この実装を基に、さまざまな応用やカスタマイズに挑戦してみてください!
