はじめに
Pythonを使用して、深度画像から3D点群を作成する手順です。主に使用するライブラリはOpen3Dです。
- Open3Dは、3Dデータを扱うソフトウェアの迅速な開発をサポートするオープンソースのライブラリです。ライセンスはThe MIT Licenseです。
- Open3DはC++とPythonから使用可能です。
Open3Dのインストールは以下の通り。
pip install open3d
環境
- macOS Ventura 13.6.3(22G436)
- Python 3.10.9
- conda 22.9.0
- open3d==0.16.1
データセット
データセットはRGB-D SLAM Dataset and Benchmark1を使用します。このデータセットにはMicrosoft社のKinectセンサーのカラー画像、深度画像(Time-of-Flight深度カメラ)、センサーの軌跡および加速度が含まれています。データはフルフレームレート(30Hz)、カラー画像解像度(640x480; PNG; ビット深度8)、深度センサー解像度(640x480; PNG; ビット深度16)で記録されており、センサーの軌跡は、8台の高速トラッキングカメラ(100Hz)を備えた高精度モーションキャプチャシステムから取得されています。加速度はKinectの加速度計で取得されています。
今回はデータ一覧ページから、freiburg1_deskをダウンロードしました。ディレクトリの中身は次のようになっています。
rgbd_dataset_freiburg1_desk
├── accelerometer.txt
├── depth/
├── depth.txt
├── groundtruth.txt
├── rgb/
└── rgb.txt
カラー画像ファイル、深度画像ファイルは名前が撮影時刻になっています。また、センサー位置も時刻ごとに記録されています。
点群作成
まず、カラー画像と深度画像の対応をとる必要があります。associate.pyを実行し、カラー画像と深度画像の対応をとります。
#!/usr/bin/python
# Software License Agreement (BSD License)
#
# Copyright (c) 2013, Juergen Sturm, TUM
# All rights reserved.
#
# Redistribution and use in source and binary forms, with or without
# modification, are permitted provided that the following conditions
# are met:
#
#  * Redistributions of source code must retain the above copyright
#    notice, this list of conditions and the following disclaimer.
#  * Redistributions in binary form must reproduce the above
#    copyright notice, this list of conditions and the following
#    disclaimer in the documentation and/or other materials provided
#    with the distribution.
#  * Neither the name of TUM nor the names of its
#    contributors may be used to endorse or promote products derived
#    from this software without specific prior written permission.
#
# THIS SOFTWARE IS PROVIDED BY THE COPYRIGHT HOLDERS AND CONTRIBUTORS
# "AS IS" AND ANY EXPRESS OR IMPLIED WARRANTIES, INCLUDING, BUT NOT
# LIMITED TO, THE IMPLIED WARRANTIES OF MERCHANTABILITY AND FITNESS
# FOR A PARTICULAR PURPOSE ARE DISCLAIMED. IN NO EVENT SHALL THE
# COPYRIGHT OWNER OR CONTRIBUTORS BE LIABLE FOR ANY DIRECT, INDIRECT,
# INCIDENTAL, SPECIAL, EXEMPLARY, OR CONSEQUENTIAL DAMAGES (INCLUDING,
# BUT NOT LIMITED TO, PROCUREMENT OF SUBSTITUTE GOODS OR SERVICES;
# LOSS OF USE, DATA, OR PROFITS; OR BUSINESS INTERRUPTION) HOWEVER
# CAUSED AND ON ANY THEORY OF LIABILITY, WHETHER IN CONTRACT, STRICT
# LIABILITY, OR TORT (INCLUDING NEGLIGENCE OR OTHERWISE) ARISING IN
# ANY WAY OUT OF THE USE OF THIS SOFTWARE, EVEN IF ADVISED OF THE
# POSSIBILITY OF SUCH DAMAGE.
#
# Requirements:
# sudo apt-get install python-argparse

"""
The Kinect provides the color and depth images in an un-synchronized way. This means that the set of time stamps from the color images do not intersect with those of the depth images. Therefore, we need some way of associating color images to depth images.

For this purpose, you can use the ''associate.py'' script. It reads the time stamps from the rgb.txt file and the depth.txt file, and joins them by finding the best matches.
"""

import argparse
import sys
import os
import numpy


def read_file_list(filename):
    """
    Reads a trajectory from a text file.

    File format:
    The file format is "stamp d1 d2 d3 ...", where stamp denotes the time stamp (to be matched)
    and "d1 d2 d3.." is arbitary data (e.g., a 3D position and 3D orientation) associated to this timestamp.

    Input:
    filename -- File name

    Output:
    dict -- dictionary of (stamp,data) tuples

    """
    file = open(filename)
    data = file.read()
    lines = data.replace(","," ").replace("\t"," ").split("\n")
    list = [[v.strip() for v in line.split(" ") if v.strip()!=""] for line in lines if len(line)>0 and line[0]!="#"]
    list = [(float(l[0]),l[1:]) for l in list if len(l)>1]
    return dict(list)

def associate(first_list, second_list,offset,max_difference):
    """
    Associate two dictionaries of (stamp,data). As the time stamps never match exactly, we aim
    to find the closest match for every input tuple.

    Input:
    first_list -- first dictionary of (stamp,data) tuples
    second_list -- second dictionary of (stamp,data) tuples
    offset -- time offset between both dictionaries (e.g., to model the delay between the sensors)
    max_difference -- search radius for candidate generation

    Output:
    matches -- list of matched tuples ((stamp1,data1),(stamp2,data2))

    """
    first_keys = first_list.keys()
    second_keys = second_list.keys()
    potential_matches = [(abs(a - (b + offset)), a, b)
                         for a in first_keys
                         for b in second_keys
                         if abs(a - (b + offset)) < max_difference]
    potential_matches.sort()
    matches = []
    for diff, a, b in potential_matches:
        if a in first_keys and b in second_keys:
            first_keys.remove(a)
            second_keys.remove(b)
            matches.append((a, b))

    matches.sort()
    return matches

if __name__ == '__main__':

    # parse command line
    parser = argparse.ArgumentParser(description='''
    This script takes two data files with timestamps and associates them
    ''')
    parser.add_argument('first_file', help='first text file (format: timestamp data)')
    parser.add_argument('second_file', help='second text file (format: timestamp data)')
    parser.add_argument('--first_only', help='only output associated lines from first file', action='store_true')
    parser.add_argument('--offset', help='time offset added to the timestamps of the second file (default: 0.0)',default=0.0)
    parser.add_argument('--max_difference', help='maximally allowed time difference for matching entries (default: 0.02)',default=0.02)
    args = parser.parse_args()

    first_list = read_file_list(args.first_file)
    second_list = read_file_list(args.second_file)

    matches = associate(first_list, second_list,float(args.offset),float(args.max_difference))

    if args.first_only:
        for a,b in matches:
            print("%f %s"%(a," ".join(first_list[a])))
    else:
        for a,b in matches:
            print("%f %s %f %s"%(a," ".join(first_list[a]),b-float(args.offset)," ".join(second_list[b])))
実行すると、次のようにファイルの対応が出力されます。
$ python associate.py rgbd_dataset_freiburg1_desk/rgb.txt rgbd_dataset_freiburg1_desk/depth.txt
1305031453.359684 rgb/1305031453.359684.png 1305031453.374112 depth/1305031453.374112.png
1305031453.391690 rgb/1305031453.391690.png 1305031453.404816 depth/1305031453.404816.png
1305031453.423683 rgb/1305031453.423683.png 1305031453.436941 depth/1305031453.436941.png
1305031453.459685 rgb/1305031453.459685.png 1305031453.473352 depth/1305031453.473352.png
...
今回はこれらの対応の中から、二組のデータを使用します。
"rgbd_dataset_freiburg1_desk/rgb/1305031455.891657.png"
"rgbd_dataset_freiburg1_desk/depth/1305031455.908418.png"

"rgbd_dataset_freiburg1_desk/rgb/1305031464.127681.png"
"rgbd_dataset_freiburg1_desk/depth/1305031464.115837.png"
generate_pointcloud.pyを使用して、深度画像から点群を作成します。点群の作成にはカメラの内部パラメータが必要です。今回はコードの最初にハードコーディングされています。焦点距離と主点の単位はピクセル(pixels)です。
#!/usr/bin/python
# Software License Agreement (BSD License)
#
# Copyright (c) 2013, Juergen Sturm, TUM
# All rights reserved.
#
# Redistribution and use in source and binary forms, with or without
# modification, are permitted provided that the following conditions
# are met:
#
#  * Redistributions of source code must retain the above copyright
#    notice, this list of conditions and the following disclaimer.
#  * Redistributions in binary form must reproduce the above
#    copyright notice, this list of conditions and the following
#    disclaimer in the documentation and/or other materials provided
#    with the distribution.
#  * Neither the name of TUM nor the names of its
#    contributors may be used to endorse or promote products derived
#    from this software without specific prior written permission.
#
# THIS SOFTWARE IS PROVIDED BY THE COPYRIGHT HOLDERS AND CONTRIBUTORS
# "AS IS" AND ANY EXPRESS OR IMPLIED WARRANTIES, INCLUDING, BUT NOT
# LIMITED TO, THE IMPLIED WARRANTIES OF MERCHANTABILITY AND FITNESS
# FOR A PARTICULAR PURPOSE ARE DISCLAIMED. IN NO EVENT SHALL THE
# COPYRIGHT OWNER OR CONTRIBUTORS BE LIABLE FOR ANY DIRECT, INDIRECT,
# INCIDENTAL, SPECIAL, EXEMPLARY, OR CONSEQUENTIAL DAMAGES (INCLUDING,
# BUT NOT LIMITED TO, PROCUREMENT OF SUBSTITUTE GOODS OR SERVICES;
# LOSS OF USE, DATA, OR PROFITS; OR BUSINESS INTERRUPTION) HOWEVER
# CAUSED AND ON ANY THEORY OF LIABILITY, WHETHER IN CONTRACT, STRICT
# LIABILITY, OR TORT (INCLUDING NEGLIGENCE OR OTHERWISE) ARISING IN
# ANY WAY OUT OF THE USE OF THIS SOFTWARE, EVEN IF ADVISED OF THE
# POSSIBILITY OF SUCH DAMAGE.
#
# the resulting .ply file can be viewed for example with meshlab
# sudo apt-get install meshlab

"""
This script reads a registered pair of color and depth images and generates a
colored 3D point cloud in the PLY format.
"""

import argparse
import sys
import os
from PIL import Image

focalLength = 525.0
centerX = 319.5
centerY = 239.5
scalingFactor = 5000.0

def generate_pointcloud(rgb_file,depth_file,ply_file):
    """
    Generate a colored point cloud in PLY format from a color and a depth image.

    Input:
    rgb_file -- filename of color image
    depth_file -- filename of depth image
    ply_file -- filename of ply file

    """
    rgb = Image.open(rgb_file)
    depth = Image.open(depth_file)

    if rgb.size != depth.size:
        raise Exception("Color and depth image do not have the same resolution.")
    if rgb.mode != "RGB":
        raise Exception("Color image is not in RGB format")
    if depth.mode != "I":
        raise Exception("Depth image is not in intensity format")


    points = []
    for v in range(rgb.size[1]):
        for u in range(rgb.size[0]):
            color = rgb.getpixel((u,v))
            Z = depth.getpixel((u,v)) / scalingFactor
            if Z==0: continue
            X = (u - centerX) * Z / focalLength
            Y = (v - centerY) * Z / focalLength
            points.append("%f %f %f %d %d %d 0\n"%(X,Y,Z,color[0],color[1],color[2]))
    file = open(ply_file,"w")
    file.write('''ply
format ascii 1.0
element vertex %d
property float x
property float y
property float z
property uchar red
property uchar green
property uchar blue
property uchar alpha
end_header
%s
'''%(len(points),"".join(points)))
    file.close()

if __name__ == '__main__':
    parser = argparse.ArgumentParser(description='''
    This script reads a registered pair of color and depth images and generates a colored 3D point cloud in the
    PLY format.
    ''')
    parser.add_argument('rgb_file', help='input color image (format: png)')
    parser.add_argument('depth_file', help='input depth image (format: png)')
    parser.add_argument('ply_file', help='output PLY file (format: ply)')
    args = parser.parse_args()

    generate_pointcloud(args.rgb_file,args.depth_file,args.ply_file)
実行して点群ファイルを作成します。
python generate_pointcloud.py rgbd_dataset_freiburg1_desk/rgb/1305031455.891657.png rgbd_dataset_freiburg1_desk/depth/1305031455.908418.png sample1.ply
python generate_pointcloud.py rgbd_dataset_freiburg1_desk/rgb/1305031464.127681.png rgbd_dataset_freiburg1_desk/depth/1305031464.115837.png sample2.ply
Open3Dでも同じように点群を作成できます。
import open3d as o3d
import argparse


def generate_pointcloud_open3d(rgb_file, depth_file, ply_file):
    # Open3DでRGBと深度画像を読み込む
    color_raw = o3d.io.read_image(rgb_file)
    depth_raw = o3d.io.read_image(depth_file)

    # Open3DのRGBDImageを作成
    rgbd_image = o3d.geometry.RGBDImage.create_from_color_and_depth(
        color_raw, depth_raw, depth_scale=5000.0, depth_trunc=3.0, convert_rgb_to_intensity=False)

    # カメラ内部パラメータ
    intrinsic = o3d.camera.PinholeCameraIntrinsic()
    intrinsic.set_intrinsics(width=640, height=480, fx=525.0, fy=525.0, cx=319.5, cy=239.5)

    # 点群を生成
    pcd = o3d.geometry.PointCloud.create_from_rgbd_image(rgbd_image, intrinsic)

    # PLY形式で点群を保存
    o3d.io.write_point_cloud(ply_file, pcd)


if __name__ == '__main__':
    parser = argparse.ArgumentParser(description="Generate a colored 3D point cloud from a color and a depth image using Open3D.")
    parser.add_argument('rgb_file', help='input color image (format: png)')
    parser.add_argument('depth_file', help='input depth image (format: png)')
    parser.add_argument('ply_file', help='output PLY file (format: ply)')
    args = parser.parse_args()

    generate_pointcloud_open3d(args.rgb_file, args.depth_file, args.ply_file)
作成した点群を表示するには次のコードを実行します。
import open3d as o3d

pcd = o3d.io.read_point_cloud("sample1.ply")
o3d.visualization.draw_geometries([pcd])
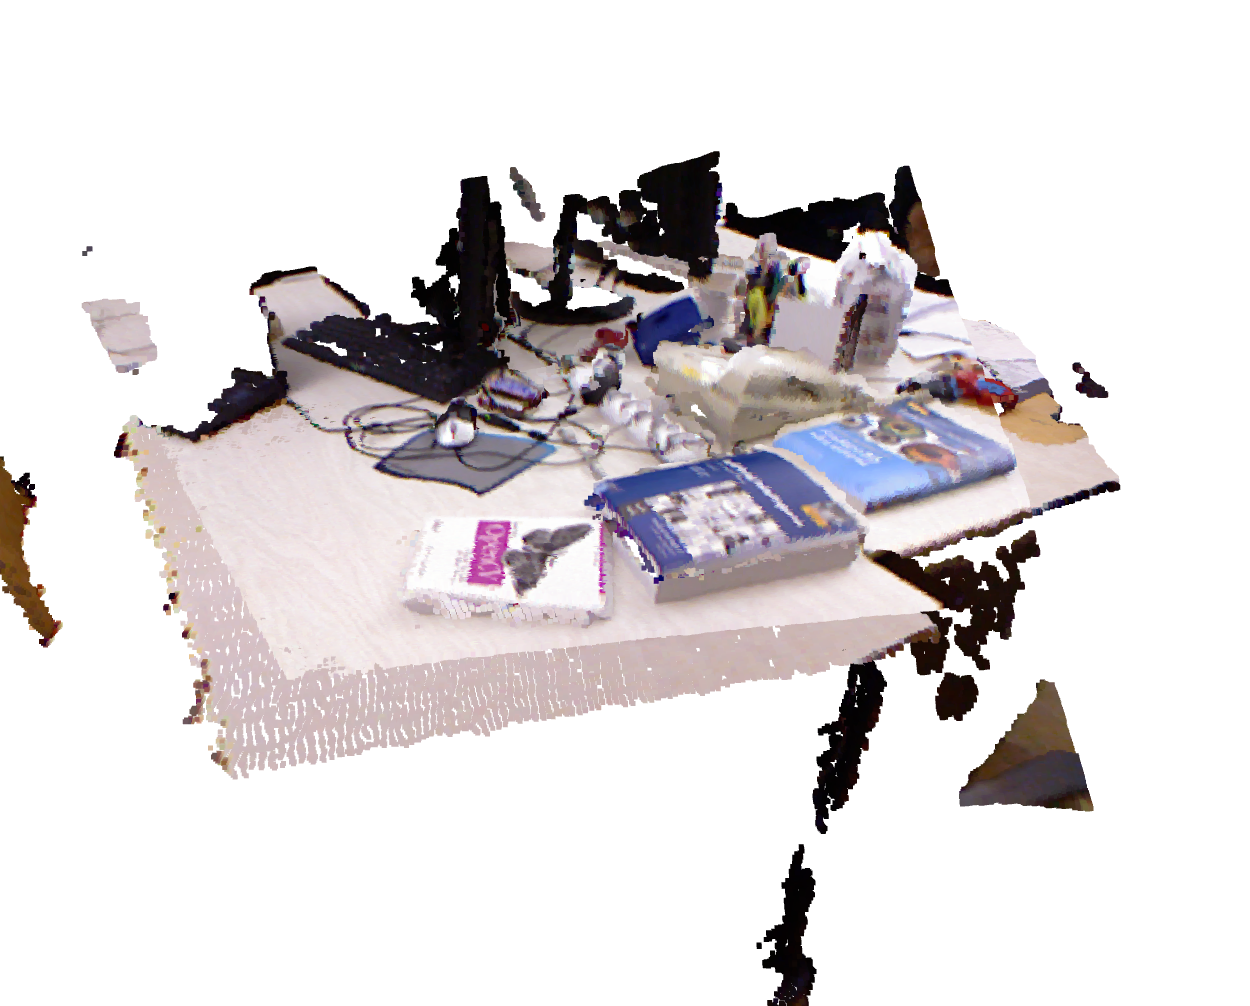
作成した複数の点群を、センサーの位置を使用して世界座標に変換し、マージして表示してみます。次のコードを実行します。
import numpy as np
import open3d as o3d
from scipy.spatial.transform import Rotation

pcd1 = o3d.io.read_point_cloud("sample1.ply")
pcd2 = o3d.io.read_point_cloud("sample2.ply")

# timestamp tx ty tz qx qy qz qw
# 1305031455.8995 1.1347 0.0097 1.5684 0.8253 0.4005 -0.2093 -0.3387
tx, ty, tz, qx, qy, qz, qw = 1.1347, 0.0097, 1.5684, 0.8253, 0.4005, -0.2093, -0.3387
rotation = Rotation.from_quat([qx, qy, qz, qw])
rotation_matrix = rotation.as_matrix()
transform_matrix = np.eye(4)
transform_matrix[:3, :3] = rotation_matrix
transform_matrix[:3, 3] = np.array([tx, ty, tz])
transform_matrix_1 = transform_matrix.copy()

# timestamp tx ty tz qx qy qz qw
# 1305031464.1193 -0.2598 -0.3259 1.5639 0.9049 -0.1485 0.1165 -0.3816
tx, ty, tz, qx, qy, qz, qw = -0.2598, -0.3259, 1.5639, 0.9049, -0.1485, 0.1165, -0.3816
rotation = Rotation.from_quat([qx, qy, qz, qw])
rotation_matrix = rotation.as_matrix()
transform_matrix = np.eye(4)
transform_matrix[:3, :3] = rotation_matrix
transform_matrix[:3, 3] = np.array([tx, ty, tz])
transform_matrix_2 = transform_matrix.copy()

pcd1.transform(transform_matrix_1)
pcd2.transform(transform_matrix_2)
pcd = pcd1 + pcd2
o3d.visualization.draw_geometries([pcd])
以上
参考
-
J. Sturm, N. Engelhard, F. Endres, W. Burgard, D. Cremers, "A Benchmark for the Evaluation of RGB-D SLAM Systems," Proc. of the International Conference on Intelligent Robot Systems (IROS), Oct. 2012. ↩