はじめに
TorchserveはAWSとFacebookが連携して開発したPyTorchのオープンソースモデルサービスライブラリです。Pytorchで記述したモデルクラスと重みファイルを与えるだけでホストを可能にし、APIエンドポイントを提供してくれます。Inference APIで推論を、Management APIでモデルの管理ができます。
詳細はTorchServeのドキュメントを参照してください。
Amazon Web Services ブログの「TorchServe を使用した大規模な推論のための PyTorch モデルをデプロイする」を読んでAWS EC2上でTorchserveを実行してみました。以下では手順とその周辺の話、dockerでの実行を紹介します。
参考
手順
EC2インスタンス作成
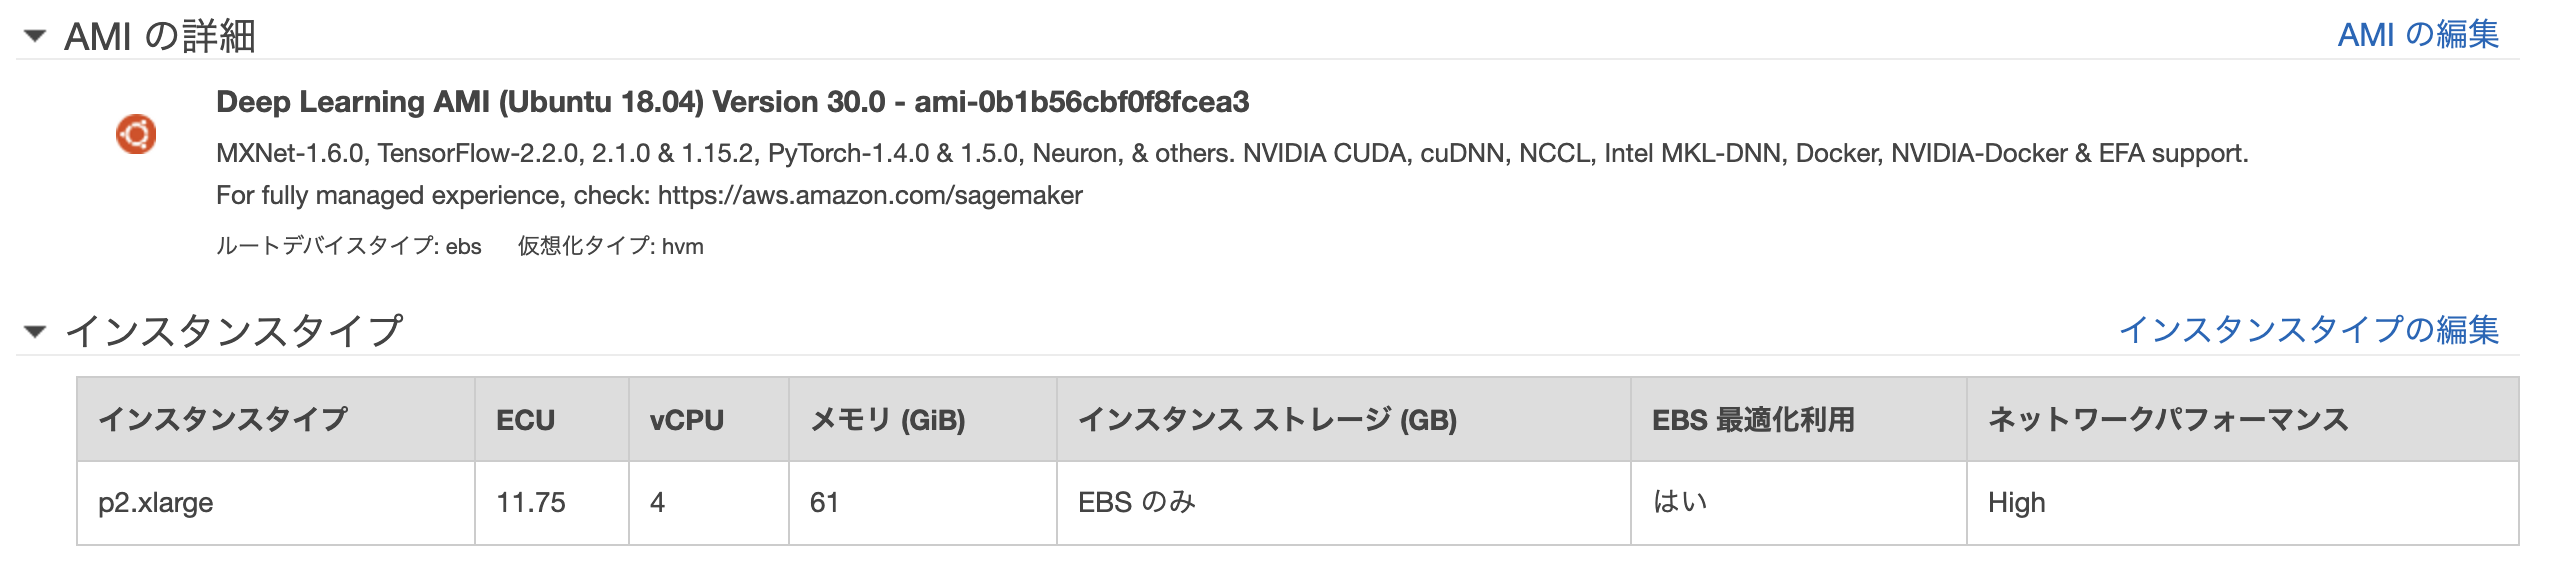
AMIの検索バーに「Deep Learning AMI」と入力し、使用するAMIを検索します。今回は「Deep Learning AMI (Ubuntu 18.04) Version 30.0 - ami-0b1b56cbf0f8fcea3」を使用しました。インスタンスタイプは「p2.xlarge」を使用しました。セキュリティグループは開発環境からssh、httpを接続できるように設定し、他の設定はすべてデフォルトのままにしています。
環境構築
EC2にログインして環境を構築します。
~$ ls
LICENSE                README     examples  tools
Nvidia_Cloud_EULA.pdf  anaconda3  src       tutorials
torchserveはJava8以降のJavaが必要です。チュートリアルに合わせて、Java11をインストールします。インストール後使用するJavaをJava11に切り替えます。
~$ sudo apt-get install openjdk-11-jdk
~$ update-java-alternatives -l
java-1.11.0-openjdk-amd64      1111       /usr/lib/jvm/java-1.11.0-openjdk-amd64
java-1.8.0-openjdk-amd64       1081       /usr/lib/jvm/java-1.8.0-openjdk-amd64
~$ sudo update-alternatives --config java
There are 2 choices for the alternative java (providing /usr/bin/java).

  Selection    Path                                            Priority   Status
------------------------------------------------------------
  0            /usr/lib/jvm/java-11-openjdk-amd64/bin/java      1111      auto mode
* 1            /usr/lib/jvm/java-11-openjdk-amd64/bin/java      1111      manual mode
  2            /usr/lib/jvm/java-8-openjdk-amd64/jre/bin/java   1081      manual mode

Press <enter> to keep the current choice[*], or type selection number: 1
Pythonの環境を構築します。仮想環境を作成します。仮想環境にtorchserve関連のライブラリをインストールします。
~$ mkdir torchserve-examples
~$ cd torchserve-examples
~/torchserve-examples$ python -m venv venv
~/torchserve-examples$ source venv/bin/activate
(venv):~/torchserve-examples$ pip install torch torchtext torchvision sentencepiece psutil future
(venv):~/torchserve-examples$ pip install torchserve torch-model-archiver
ホストするモデルを準備します。今回は公式リポジトリに公開されているモデルを使用します。
(venv):~/torchserve-examples$ git clone https://github.com/pytorch/serve.git
(venv):~/torchserve-examples$ wget https://download.pytorch.org/models/densenet161-8d451a50.pth
(venv):~/torchserve-examples$ ls
densenet161-8d451a50.pth  serve  venv
今回使用するモデルはserve/examples/image_classifier/densenet_161/model.pyに格納してあります。
from torchvision.models.densenet import DenseNet


class ImageClassifier(DenseNet):
    def __init__(self):
        super(ImageClassifier, self).__init__(48, (6, 12, 36, 24), 96)

    def load_state_dict(self, state_dict, strict=True):
        # '.'s are no longer allowed in module names, but previous _DenseLayer
        # has keys 'norm.1', 'relu.1', 'conv.1', 'norm.2', 'relu.2', 'conv.2'.
        # They are also in the checkpoints in model_urls. This pattern is used
        # to find such keys.
        # Credit - https://github.com/pytorch/vision/blob/master/torchvision/models/densenet.py#def _load_state_dict()
        import re
        pattern = re.compile(r'^(.*denselayer\d+\.(?:norm|relu|conv))\.((?:[12])\.(?:weight|bias|running_mean|running_var))$')

        for key in list(state_dict.keys()):
            res = pattern.match(key)
            if res:
                new_key = res.group(1) + res.group(2)
                state_dict[new_key] = state_dict[key]
                del state_dict[key]

        return super(ImageClassifier, self).load_state_dict(state_dict, strict)
以前の_DenseLayerではレイヤーの名前が'norm.1', 'relu.1', 'conv.1', 'norm.2', 'relu.2', 'conv.2'でドットが入っていましたが、現在の_DenseLayerではドットが使用できません。以前の重みファイルを現在のモデルで使用するために、DenseNetを継承して、リネームしているだけです。継承元のDenseNetはこちらで見ることが出来ます。
class DenseNet(nn.Module):
    r"""Densenet-BC model class, based on
    `"Densely Connected Convolutional Networks" <https://arxiv.org/pdf/1608.06993.pdf>`_

    Args:
        growth_rate (int) - how many filters to add each layer (`k` in paper)
        block_config (list of 4 ints) - how many layers in each pooling block
        num_init_features (int) - the number of filters to learn in the first convolution layer
        bn_size (int) - multiplicative factor for number of bottle neck layers
          (i.e. bn_size * k features in the bottleneck layer)
        drop_rate (float) - dropout rate after each dense layer
        num_classes (int) - number of classification classes
        memory_efficient (bool) - If True, uses checkpointing. Much more memory efficient,
          but slower. Default: *False*. See `"paper" <https://arxiv.org/pdf/1707.06990.pdf>`_
    """

    def __init__(self, growth_rate=32, block_config=(6, 12, 24, 16),
                 num_init_features=64, bn_size=4, drop_rate=0, num_classes=1000, memory_efficient=False):

        super(DenseNet, self).__init__()

        # First convolution
        self.features = nn.Sequential(OrderedDict([
            ('conv0', nn.Conv2d(3, num_init_features, kernel_size=7, stride=2,
                                padding=3, bias=False)),
            ('norm0', nn.BatchNorm2d(num_init_features)),
            ('relu0', nn.ReLU(inplace=True)),
            ('pool0', nn.MaxPool2d(kernel_size=3, stride=2, padding=1)),
        ]))

        # Each denseblock
        num_features = num_init_features
        for i, num_layers in enumerate(block_config):
            block = _DenseBlock(
                num_layers=num_layers,
                num_input_features=num_features,
                bn_size=bn_size,
                growth_rate=growth_rate,
                drop_rate=drop_rate,
                memory_efficient=memory_efficient
            )
            self.features.add_module('denseblock%d' % (i + 1), block)
            num_features = num_features + num_layers * growth_rate
            if i != len(block_config) - 1:
                trans = _Transition(num_input_features=num_features,
                                    num_output_features=num_features // 2)
                self.features.add_module('transition%d' % (i + 1), trans)
                num_features = num_features // 2

        # Final batch norm
        self.features.add_module('norm5', nn.BatchNorm2d(num_features))

        # Linear layer
        self.classifier = nn.Linear(num_features, num_classes)

        # Official init from torch repo.
        for m in self.modules():
            if isinstance(m, nn.Conv2d):
                nn.init.kaiming_normal_(m.weight)
            elif isinstance(m, nn.BatchNorm2d):
                nn.init.constant_(m.weight, 1)
                nn.init.constant_(m.bias, 0)
            elif isinstance(m, nn.Linear):
                nn.init.constant_(m.bias, 0)

    def forward(self, x):
        features = self.features(x)
        out = F.relu(features, inplace=True)
        out = F.adaptive_avg_pool2d(out, (1, 1))
        out = torch.flatten(out, 1)
        out = self.classifier(out)
        return out


class _DenseBlock(nn.ModuleDict):
    _version = 2

    def __init__(self, num_layers, num_input_features, bn_size, growth_rate, drop_rate, memory_efficient=False):
        super(_DenseBlock, self).__init__()
        for i in range(num_layers):
            layer = _DenseLayer(
                num_input_features + i * growth_rate,
                growth_rate=growth_rate,
                bn_size=bn_size,
                drop_rate=drop_rate,
                memory_efficient=memory_efficient,
            )
            self.add_module('denselayer%d' % (i + 1), layer)

    def forward(self, init_features):
        features = [init_features]
        for name, layer in self.items():
            new_features = layer(features)
            features.append(new_features)
        return torch.cat(features, 1)


class _DenseLayer(nn.Module):
    def __init__(self, num_input_features, growth_rate, bn_size, drop_rate, memory_efficient=False):
        super(_DenseLayer, self).__init__()
        self.add_module('norm1', nn.BatchNorm2d(num_input_features)),
        self.add_module('relu1', nn.ReLU(inplace=True)),
        self.add_module('conv1', nn.Conv2d(num_input_features, bn_size *
                                           growth_rate, kernel_size=1, stride=1,
                                           bias=False)),
        self.add_module('norm2', nn.BatchNorm2d(bn_size * growth_rate)),
        self.add_module('relu2', nn.ReLU(inplace=True)),
        self.add_module('conv2', nn.Conv2d(bn_size * growth_rate, growth_rate,
                                           kernel_size=3, stride=1, padding=1,
                                           bias=False)),
        self.drop_rate = float(drop_rate)
        self.memory_efficient = memory_efficient

    def bn_function(self, inputs):
        # type: (List[Tensor]) -> Tensor
        concated_features = torch.cat(inputs, 1)
        bottleneck_output = self.conv1(self.relu1(self.norm1(concated_features)))  # noqa: T484
        return bottleneck_output

    # todo: rewrite when torchscript supports any
    def any_requires_grad(self, input):
        # type: (List[Tensor]) -> bool
        for tensor in input:
            if tensor.requires_grad:
                return True
        return False

    @torch.jit.unused  # noqa: T484
    def call_checkpoint_bottleneck(self, input):
        # type: (List[Tensor]) -> Tensor
        def closure(*inputs):
            return self.bn_function(inputs)

        return cp.checkpoint(closure, *input)

    @torch.jit._overload_method  # noqa: F811
    def forward(self, input):
        # type: (List[Tensor]) -> (Tensor)
        pass

    @torch.jit._overload_method  # noqa: F811
    def forward(self, input):
        # type: (Tensor) -> (Tensor)
        pass

    # torchscript does not yet support *args, so we overload method
    # allowing it to take either a List[Tensor] or single Tensor
    def forward(self, input):  # noqa: F811
        if isinstance(input, Tensor):
            prev_features = [input]
        else:
            prev_features = input

        if self.memory_efficient and self.any_requires_grad(prev_features):
            if torch.jit.is_scripting():
                raise Exception("Memory Efficient not supported in JIT")

            bottleneck_output = self.call_checkpoint_bottleneck(prev_features)
        else:
            bottleneck_output = self.bn_function(prev_features)

        new_features = self.conv2(self.relu2(self.norm2(bottleneck_output)))
        if self.drop_rate > 0:
            new_features = F.dropout(new_features, p=self.drop_rate,
                                     training=self.training)
        return new_features

(以下略)
このようにserveするモデルはnn.Moduleを継承したモデルクラスを用意すれば良いです。上の例はちょっとわかりにくかったので、serve/examples/image_classifier/mnist/mnist.pyを見ると分かりやすいです。
import torch
from torch import nn
import torch.nn.functional as F


class Net(nn.Module):
    def __init__(self):
        super(Net, self).__init__()
        self.conv1 = nn.Conv2d(1, 32, 3, 1)
        self.conv2 = nn.Conv2d(32, 64, 3, 1)
        self.dropout1 = nn.Dropout2d(0.25)
        self.dropout2 = nn.Dropout2d(0.5)
        self.fc1 = nn.Linear(9216, 128)
        self.fc2 = nn.Linear(128, 10)

    def forward(self, x):
        x = self.conv1(x)
        x = F.relu(x)
        x = self.conv2(x)
        x = F.max_pool2d(x, 2)
        x = self.dropout1(x)
        x = torch.flatten(x, 1)
        x = self.fc1(x)
        x = F.relu(x)
        x = self.dropout2(x)
        x = self.fc2(x)
        output = F.log_softmax(x, dim=1)
        return output
モデルのホスト
さて、いよいよモデルをホストします。torch-model-archiverでモデルをデプロイするための形式へ変換します。
(venv):~/torchserve-examples$ mkdir model_store
(venv):~/torchserve-examples$ torch-model-archiver --model-name densenet161 \
--version 1.0 --model-file serve/examples/image_classifier/densenet_161/model.py \
--serialized-file densenet161-8d451a50.pth \
--export-path model_store \
--extra-files serve/examples/image_classifier/index_to_name.json \
--handler image_classifier
(venv):~/torchserve-examples$ ls model_store/
densenet161.mar
densenet161.marというファイルが出来ています。オプションの説明はこちらにあります。
(venv):~/torchserve-examples$ torch-model-archiver -h
usage: torch-model-archiver [-h] --model-name MODEL_NAME --serialized-file
                            SERIALIZED_FILE [--model-file MODEL_FILE]
                            --handler HANDLER [--source-vocab SOURCE_VOCAB]
                            [--extra-files EXTRA_FILES]
                            [--runtime {python,python2,python3}]
                            [--export-path EXPORT_PATH]
                            [--archive-format {tgz,no-archive,default}] [-f]
                            -v VERSION

Torch Model Archiver Tool

optional arguments:
  -h, --help            show this help message and exit
  --model-name MODEL_NAME
                        Exported model name. Exported file will be named as
                        model-name.mar and saved in current working directory if no --export-path is
                        specified, else it will be saved under the export path
  --serialized-file SERIALIZED_FILE
                        Path to .pt or .pth file containing state_dict in case of eager mode
                        or an executable ScriptModule in case of TorchScript.
  --model-file MODEL_FILE
                        Path to python file containing model architecture.
                        This parameter is mandatory for eager mode models.
                        The model architecture file must contain only one
                        class definition extended from torch.nn.modules.
  --handler HANDLER     TorchServe's default handler name
                         or handler python file path to handle custom TorchServe inference logic.
  --source-vocab SOURCE_VOCAB
                        Vocab file for source language. Required for text based models.
  --extra-files EXTRA_FILES
                        Comma separated path to extra dependency files.
  --runtime {python,python2,python3}
                        The runtime specifies which language to run your inference code on.
                        The default runtime is "python".
  --export-path EXPORT_PATH
                        Path where the exported .mar file will be saved. This is an optional
                        parameter. If --export-path is not specified, the file will be saved in the
                        current working directory.
  --archive-format {tgz,no-archive,default}
                        The format in which the model artifacts are archived.
                        "tgz": This creates the model-archive in <model-name>.tar.gz format.
                        If platform hosting TorchServe requires model-artifacts to be in ".tar.gz"
                        use this option.
                        "no-archive": This option creates an non-archived version of model artifacts
                        at "export-path/{model-name}" location. As a result of this choice,
                        MANIFEST file will be created at "export-path/{model-name}" location
                        without archiving these model files
                        "default": This creates the model-archive in <model-name>.mar format.
                        This is the default archiving format. Models archived in this format
                        will be readily hostable on native TorchServe.
  -f, --force           When the -f or --force flag is specified, an existing .mar file with same
                        name as that provided in --model-name in the path specified by --export-path
                        will overwritten
  -v VERSION, --version VERSION
                        Model's version
今回使用したオプションは下記の通り。
| 項目 | 内容 |
|---|---|
| model-name | 変換して出力するファイルの名前 |
| version | モデルのバージョン |
| model-file | モデルの.pyファイルのパス |
| serialized-file | モデルの重みファイルのパス |
| export-path | 変換後のファイルの出力先のパス |
| extra-files | 予測したインデックスを文字列に変換するルールを記載したjsonを指定します |
| handler | InputとOutputを決めるハンドラを指定する(image_classifier / object_detector / text_classifier / image_segmenter) 自作も可能 |
extra-filesには予測したインデックスを文字列に変換するルールindex_to_name.jsonを指定しています。
※jsonの中身は{"0": ["n01440764", "tench"], "1": ["n01443537", "goldfish"], "2": ["n01484850", "great_white_shark"],...となっているのですが、配列の最初の成分が何を表しているのかよくわかりませんでした。また、extra-filesを指定しない場合はホストしても503エラーが発生してしまうようです。
ハンドラは自分で実装することができます。handleメソッドがエントリポイントになります。引数はdataとcontextで、dataはリクエストの配列、contextのプロパティはこちらで見ることが出来ます。詳しくはドキュメントを参照してください。
MNISTの例がserve/examples/image_classifier/mnist/mnist_handler.pyにあります。
import io
import logging
import numpy as np
import os
import torch
from PIL import Image
from torch.autograd import Variable
from torchvision import transforms

logger = logging.getLogger(__name__)


class MNISTDigitClassifier(object):
    """
    MNISTDigitClassifier handler class. This handler takes a greyscale image
    and returns the digit in that image.
    """

    def __init__(self):
        self.model = None
        self.mapping = None
        self.device = None
        self.initialized = False

    def initialize(self, ctx):
        """First try to load torchscript else load eager mode state_dict based model"""

        properties = ctx.system_properties
        self.device = torch.device("cuda:" + str(properties.get("gpu_id")) if torch.cuda.is_available() else "cpu")
        model_dir = properties.get("model_dir")

        # Read model serialize/pt file
        model_pt_path = os.path.join(model_dir, "mnist_cnn.pt")
        # Read model definition file
        model_def_path = os.path.join(model_dir, "mnist.py")
        if not os.path.isfile(model_def_path):
            raise RuntimeError("Missing the model definition file")

        from mnist import Net
        state_dict = torch.load(model_pt_path, map_location=self.device)
        self.model = Net()
        self.model.load_state_dict(state_dict)
        self.model.to(self.device)
        self.model.eval()

        logger.debug('Model file {0} loaded successfully'.format(model_pt_path))
        self.initialized = True

    def preprocess(self, data):
        """
         Scales, crops, and normalizes a PIL image for a MNIST model,
         returns an Numpy array
        """
        image = data[0].get("data")
        if image is None:
            image = data[0].get("body")

        mnist_transform = transforms.Compose([
            transforms.ToTensor(),
            transforms.Normalize((0.1307,), (0.3081,))
        ])
        image = Image.open(io.BytesIO(image))
        image = mnist_transform(image)
        return image

    def inference(self, img, topk=5):
        ''' Predict the class (or classes) of an image using a trained deep learning model.
        '''
        # Convert 2D image to 1D vector
        img = np.expand_dims(img, 0)
        img = torch.from_numpy(img)

        self.model.eval()
        inputs = Variable(img).to(self.device)
        outputs = self.model.forward(inputs)

        _, y_hat = outputs.max(1)
        predicted_idx = str(y_hat.item())
        return [predicted_idx]

    def postprocess(self, inference_output):
        return inference_output


_service = MNISTDigitClassifier()


def handle(data, context):
    if not _service.initialized:
        _service.initialize(context)

    if data is None:
        return None

    data = _service.preprocess(data)
    data = _service.inference(data)
    data = _service.postprocess(data)

    return data
モデルをホストします。--model-storeに.marファイルが格納されているディレクトリを指定します。
--modelsにモデル名=ファイルパスの形式で指定します。モデルが複数ある場合はカンマ区切りで複数指定できます。
(venv):~/torchserve-examples$ torchserve --start --model-store model_store --models densenet161=densenet161.mar
同一ホスト上で推論APIにリクエストしてみます。エンドポイントは/predictions/{モデル名}となります。
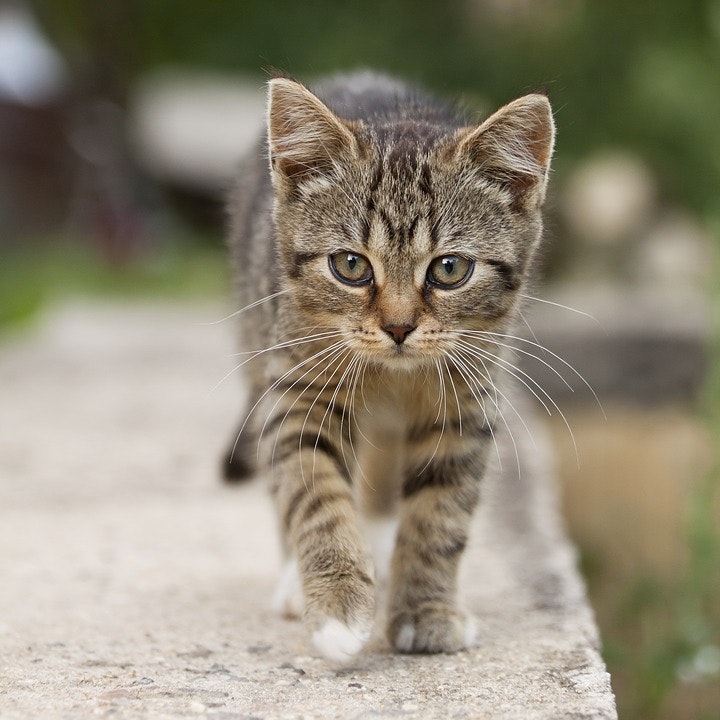
$ curl -O https://s3.amazonaws.com/model-server/inputs/kitten.jpg
$ curl -X POST http://127.0.0.1:8080/predictions/densenet161 -T kitten.jpg
[
  {
    "tiger_cat": 0.4693354070186615
  },
  {
    "tabby": 0.46338820457458496
  },
  {
    "Egyptian_cat": 0.06456134468317032
  },
  {
    "lynx": 0.0012828148901462555
  },
  {
    "plastic_bag": 0.00023322994820773602
  }
]
ハンドラにimage_classifierを指定しているので、上位5つの予測確率を返却します。tiger_catはとら猫で、tabbyはぶち猫です(違いがわからん)。とりあえず猫と予測できていることがわかります。
モデルの管理
管理APIがポート8081で提供されています。
(venv):~/torchserve-examples$ curl "http://127.0.0.1:8081/models"
{
  "models": [
    {
      "modelName": "densenet161",
      "modelUrl": "densenet161.mar"
    }
  ]
}
モデルがもう一つ用意されているとします。下記のコードで準備しましょう。
(venv):~/torchserve-examples$ wget https://download.pytorch.org/models/fasterrcnn_resnet50_fpn_coco-258fb6c6.pth
(venv):~/torchserve-examples$ torch-model-archiver --model-name fastrcnn --version 1.0 \
--model-file serve/examples/object_detector/fast-rcnn/model.py \
--serialized-file fasterrcnn_resnet50_fpn_coco-258fb6c6.pth \
--export-path model_store \
--handler object_detector \
--extra-files serve/examples/object_detector/index_to_name.json
管理APIからモデルを登録します。
$ curl -X POST "http://127.0.0.1:8081/models?url=fastrcnn.mar"
{
  "status": "Model \"fastrcnn\" Version: 1.0 registered with 0 initial workers. Use scale workers API to add workers for the model."
}
$ curl "http://127.0.0.1:8081/models"
{
  "models": [
    {
      "modelName": "densenet161",
      "modelUrl": "densenet161.mar"
    },
    {
      "modelName": "fastrcnn",
      "modelUrl": "fastrcnn.mar"
    }
  ]
}
新しいモデルにはワーカーが割り当てられていないため、次のコードでワーカーの最小数を設定します。
$ curl -v -X PUT "http://127.0.0.1:8081/models/fastrcnn?min_worker=2"
$ curl "http://localhost:8081/models/fastrcnn"
[
  {
    "modelName": "fastrcnn",
    "modelVersion": "1.0",
    "modelUrl": "fastrcnn.mar",
    "runtime": "python",
    "minWorkers": 2,
    "maxWorkers": 2,
    "batchSize": 1,
    "maxBatchDelay": 100,
    "loadedAtStartup": false,
    "workers": [
      {
        "id": "9001",
        "startTime": "2020-07-15T13:55:11.813Z",
        "status": "READY",
        "gpu": true,
        "memoryUsage": 0
      },
      {
        "id": "9002",
        "startTime": "2020-07-15T13:55:11.813Z",
        "status": "READY",
        "gpu": true,
        "memoryUsage": 0
      }
    ]
  }
]
モデルの登録解除もできます。
$ curl -X DELETE http://localhost:8081/models/fastrcnn/
{
  "status": "Model \"fastrcnn\" unregistered"
}
$ curl "http://127.0.0.1:8081/models"
{
  "models": [
    {
      "modelName": "densenet161",
      "modelUrl": "densenet161.mar"
    }
  ]
}
デフォルトではローカルホストからしかAPIにアクセスできないので、外部からもアクセスできるようにします。config.propertiesを作成します。
(venv):~/torchserve-examples$ touch config.properties
中身は次のようにします。
inference_address=http://0.0.0.0:8080
--ts-configにconfig.propertiesを設定します。
(venv):~/torchserve-examples$ torchserve --start --model-store model_store --models densenet161=densenet161.mar --ts-config config.properties
外部からAPIにアクセスできるようになっています。
$ curl -X POST http://<host ip address>:8080/predictions/densenet161 -T kitten.jpg
SSLの設定やCORSの設定はこちらを参照してください。
dockerによるデプロイ
~$ docker --version
Docker version 19.03.11, build 42e35e61f3
CUDAのバージョンを確認します。バージョンは10.0でした。
~$ nvcc -V
nvcc: NVIDIA (R) Cuda compiler driver
Copyright (c) 2005-2018 NVIDIA Corporation
Built on Sat_Aug_25_21:08:01_CDT_2018
Cuda compilation tools, release 10.0, V10.0.130
cuDNNのバージョンを確認します。バージョンは7.5.1でした。
~$ cat /usr/local/cuda/include/cudnn.h | grep CUDNN_MAJOR -A 2
# define CUDNN_MAJOR 7
# define CUDNN_MINOR 5
# define CUDNN_PATCHLEVEL 1
--
# define CUDNN_VERSION (CUDNN_MAJOR * 1000 + CUDNN_MINOR * 100 + CUDNN_PATCHLEVEL)

# include "driver_types.h"
GPU対応のコンテナがcuda10.1-cudnn7のみ対応なので、まずCUDAのバージョンを変更します。変更の仕方はこちらに記載があります。
~$ sudo rm /usr/local/cuda
~$ sudo ln -s /usr/local/cuda-10.1 /usr/local/cuda
~$ nvcc -V
nvcc: NVIDIA (R) Cuda compiler driver
Copyright (c) 2005-2019 NVIDIA Corporation
Built on Sun_Jul_28_19:07:16_PDT_2019
Cuda compilation tools, release 10.1, V10.1.243
ちゃんと10.1になっています。
次にdocker imageを作ります。上記の操作を詰め込んだDockerfileおよびconfig.propertiesを作成します。作業ディレクトリは~/torchserve-examples2としました。
torchserve-examples2/
 ├ Dockerfile
 └ config.properties
FROM alpine/git AS build

WORKDIR /work

COPY . .

RUN git clone https://github.com/pytorch/serve.git && \
    wget https://download.pytorch.org/models/densenet161-8d451a50.pth && \
    mkdir model_store

# FROM pytorch/torchserve:0.1.1-cpu
FROM pytorch/torchserve:0.1.1-cuda10.1-cudnn7-runtime

COPY --from=build /work /home/model-server

WORKDIR /home/model-server

RUN torch-model-archiver --model-name densenet161 \
    --version 1.0 --model-file serve/examples/image_classifier/densenet_161/model.py \
    --serialized-file densenet161-8d451a50.pth \
    --export-path /home/model-server/model-store \
    --extra-files serve/examples/image_classifier/index_to_name.json \
    --handler image_classifier

CMD ["torchserve", \
    "--start",\
    "--models", "densenet161=densenet161.mar",\
    "--ts-config", "config.properties"]
inference_address=http://0.0.0.0:8080
model_store=/home/model-server/model-store
ここで、torchserveコンテナにはgitやwgetが入っていないので、ビルドコンテナと実行コンテナを分けて作成しました。
次のコマンドでコンテナを実行します。
~$ docker build -t sample/torchserve:latest .
~$ docker run -d --rm -t -p 8080:8080 -p 8081:8081 sample/torchserve:latest
開発機からAPIにリクエストします。
$ curl -X POST http://<<host ip address>>:8080/predictions/densenet161 -T kitten.jpg
[
  {
    "tiger_cat": 0.4693359136581421
  },
  {
    "tabby": 0.4633873701095581
  },
  {
    "Egyptian_cat": 0.06456154584884644
  },
  {
    "lynx": 0.001282821292988956
  },
  {
    "plastic_bag": 0.00023323031200561672
  }
]
その他メモ
- 認証機能はありません。
- デフォルトでは、TorchServe はログメッセージを stderr および stout に出力します。TorchServe は log4j を使用し、log4j プロパティを変更することでロギングをカスタマイズできます。