概要
画像レジストレーションを例に、ホモグラフィ行列を計算する方法を紹介します。
画像レジストレーション
画像レジストレーションとは、2つの画像を位置合わせすることであり、コンピュータビジョンや画像処理の分野で広く使用されています。
ホモグラフィ行列は、2つの平面の間の射影変換を表す行列であり、画像レジストレーションに使用されます。ホモグラフィ行列を使用することにより、2つの画像の座標系を変換することができ、2つの画像を正確に重ね合わせることができます。
ホモグラフィ行列は、最低4つの点の対応関係を使用して計算されます。つまり、1つの画像内の4つの点ともう1つの画像内の対応する4つの点を知っている必要があります。この情報を使用して、ホモグラフィ行列を計算し、2つの画像を正確に重ね合わせることができます。

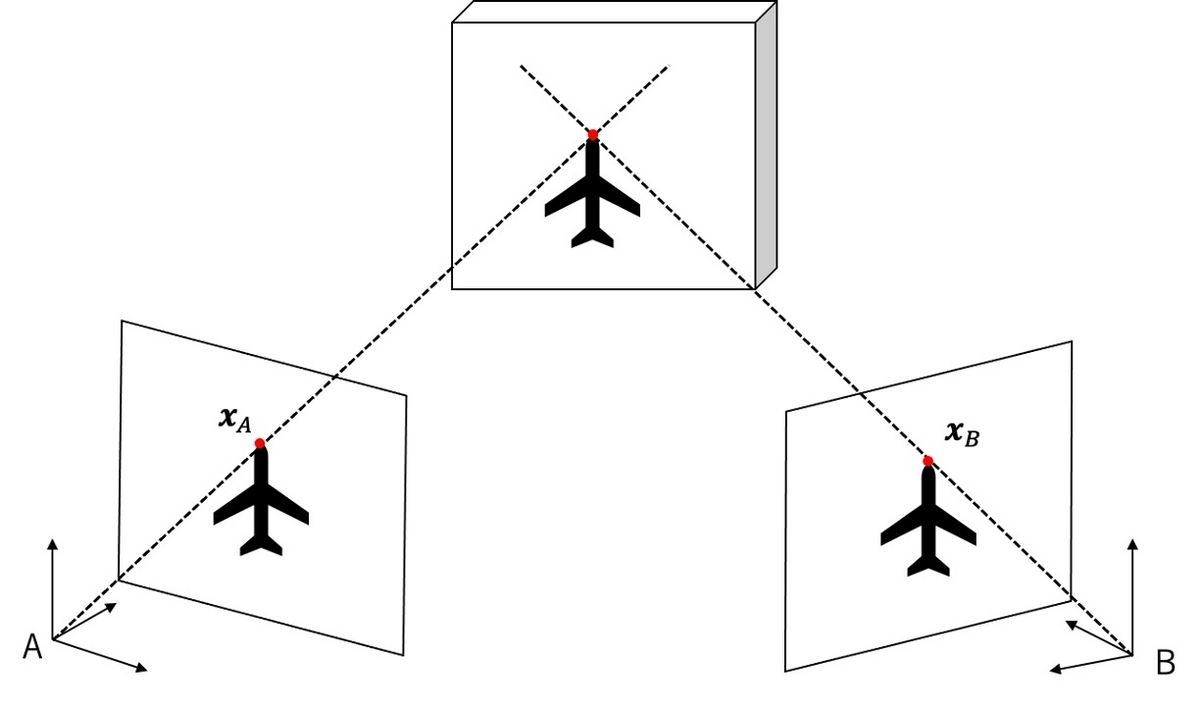
ホモグラフィ行列の計算を解説します。ある対象物を2台のカメラで撮影した場合を考えます。それぞれのカメラで撮影された画像をAおよびBとします。画像間の対応する点の一つを$\boldsymbol{x}_A, \boldsymbol{x}_B$とします。
\boldsymbol{x}_A = \begin{pmatrix}
 x_A \\ y_A
\end{pmatrix},
\boldsymbol{x}_B = \begin{pmatrix}
 x_B \\ y_B
\end{pmatrix}.
射影変換は座標に1次元加えることで、すっきりとした式で書くことができます。座標値を1次元拡張し、値を$1$とします。
\tilde{\boldsymbol{x}}_A = \begin{pmatrix}
 x_A \\ y_A  \\ 1
\end{pmatrix},
\tilde{\boldsymbol{x}}_B = \begin{pmatrix}
 x_B \\ y_B \\ 1
\end{pmatrix}.
ホモグラフィ行列を$(H)_{ij}=h_{ij}$とすると、射影変換は次のように書けます。
s \begin{pmatrix}
 x_A \\ y_A  \\ 1
\end{pmatrix}
= \begin{pmatrix}
 h_{11} & h_{12}  & h_{13} \\
 h_{21} & h_{22}  & h_{23} \\
 h_{31} & h_{32}  & 1
\end{pmatrix}
\begin{pmatrix}
 x_B \\ y_B  \\ 1
\end{pmatrix}
.
$s$は$h_{31},h_{32}$で表すことができるので、ホモグラフィ行列の自由度は8です。画像間の対応する点1つにつき方程式が2本立つので、最低4点あればホモグラフィ行列を求めることができます。4点より多くある場合は、最小二乗法等でホモグラフィ行列を求めることができます。本解説では、最小二乗法を使用してホモグラフィ行列を求めます。
式を展開して整理し直すと、次のように書き換えられます。
\begin{pmatrix}
 x_B & y_B & 1 & 0 & 0 & 0 & -x_A x_B &- x_A y_B  \\
 0 & 0 & 0 & x_B & y_B & 1 & -y_A x_B &- y_A y_B
\end{pmatrix}
\begin{pmatrix}
 h_{11} \\
 h_{12}  \\
 h_{13} \\
 h_{21} \\
 h_{22}  \\
 h_{23} \\
 h_{31} \\
 h_{32}
\end{pmatrix}
=
\begin{pmatrix}
 x_A \\
 y_A  \\
\end{pmatrix}
.
画像間の対応する点が$N$個ある場合、記号を整理して次のように書きます。
X = \begin{pmatrix}
 x_B^{1} & y_B^{1} & 1 & 0 & 0 & 0 & -x_A^{1} x_B^{1} &- x_A^{1} y_B^{1}  \\
 0 & 0 & 0 & x_B^{1} & y_B^{1} & 1 & -y_A^{1} x_B^{1} &- y_A^{1} y_B^{1} \\
\cdots \\
\cdots \\
 x_B^{N} & y_B^{N} & 1 & 0 & 0 & 0 & -x_A^{N} x_B^{N} &- x_A^{N} y_B^{N}  \\
 0 & 0 & 0 & x_B^{N} & y_B^{N} & 1 & -y_A^{N} x_B^{N} &- y_A^{N} y_B^{N}
\end{pmatrix}, \\
\boldsymbol{y} = \begin{pmatrix}
x_A^{1} \\
y_A^{1} \\
\cdots \\
\cdots \\
x_A^{N} \\
y_A^{N} \\
\end{pmatrix},
\boldsymbol{h} = \begin{pmatrix}
 h_{11} \\
 h_{12}  \\
 h_{13} \\
 h_{21} \\
 h_{22}  \\
 h_{23} \\
 h_{31} \\
 h_{32}
\end{pmatrix}
.
以上の記号を用いてホモグラフィ変換は次のようになります。
\begin{align}
X \boldsymbol{h} = \boldsymbol{y}
\end{align}
これは解析的に解くことができて、次のようになります。
\begin{align}
& X \boldsymbol{h} = \boldsymbol{y} \\
\Leftrightarrow & X^\top X \boldsymbol{h} = X^\top \boldsymbol{y} \\
\Leftrightarrow & \boldsymbol{h} = (X^\top X)^{-1} X^\top
\end{align}
$X^\top X$は$8\times8$行列なので、逆行列も比較的求めやすいです。
また、RANSAC回帰等を用いて、外れ値を除きながら回帰分析をしても良いです。画像レジストレーションの場合は、画像のディスクリプタを用いて座標を対応させます。これらの対応点には誤った対応点も含まれるため、外れ値に強い手法を使ったほうが良いです。
実装
データはOpenCVのリポジトリのデータをダウンロードしました。
"""
Copyright 2023 ground0state
Released under the MIT license
"""
from random import Random
from os.path import join

import cv2
import numpy as np
from sklearn.linear_model import LinearRegression


def get_n_trials(n, p=0.99, w=0.2):
    nume = np.log(1-p)
    deno = np.log(1-np.power(w, n))
    return int(nume / deno) + 1


def get_sift_matches(img1, img2, n_matches=None):
    sift = cv2.SIFT_create()
    keypoints1, descriptors1 = sift.detectAndCompute(img1, None)
    keypoints2, descriptors2 = sift.detectAndCompute(img2, None)

    bf = cv2.BFMatcher()
    matches = bf.match(descriptors1, descriptors2)
    matches = sorted(matches, key=lambda x: x.distance)[:n_matches]
    return matches, keypoints1, keypoints2


def _create_homography_matrix(src_point, dst_point):
    x1, y1 = dst_point
    x2, y2 = src_point
    matrix = [[x2, y2, 1, 0, 0, 0, -x1*x2, -x1*y2],
              [0, 0, 0, x2, y2, 1, -y1*x2, -y1*y2]]
    return matrix, [x1, y1]


def _estimate_homography(
        src_points, dst_points, max_iters=5000, reprojection_threshold=5, seed=0, verbose=0):
    random = Random(seed)

    X, y = zip(*[_create_homography_matrix(src_pt, dst_pt)
                 for src_pt, dst_pt in zip(src_points, dst_points)])
    X = np.concatenate(X).astype(np.float32)
    y = np.concatenate(y).astype(np.float32)

    n_points = len(src_points)
    n_sample = 4
    magic_number = 15
    n_trials = min(max_iters, get_n_trials(n_sample, w=magic_number/n_points))
    if verbose >= 1:
        print("  n_trials:", n_trials)

    n_inlier = 0
    for i_iter in range(n_trials):
        sampled_idx = random.sample(range(n_points), n_sample)
        sampled_X, sampled_y = zip(
            *[_create_homography_matrix(src_points[i], dst_points[i]) for i in sampled_idx])
        sampled_X = np.concatenate(sampled_X)
        sampled_y = np.concatenate(sampled_y)

        estimator = LinearRegression(
            fit_intercept=False).fit(sampled_X, sampled_y)
        y_pred = estimator.predict(X)

        residual_distance = np.linalg.norm(
            y_pred.reshape(-1, 2) - y.reshape(-1, 2), axis=1)

        temp_inlier_mask = residual_distance <= reprojection_threshold
        temp_n_inlier = temp_inlier_mask.sum()

        if temp_n_inlier > n_inlier:
            n_inlier = temp_n_inlier
            inlier_mask = temp_inlier_mask

            if verbose >= 2:
                print(f"  trial_id: {i_iter}, n_inlier_points: {n_inlier}")

    if verbose >= 1:
        print(f"  n_inlier_points: {n_inlier}")

    selected_X, selected_y = zip(*[_create_homography_matrix(
        src_points[i], dst_points[i]) for i in range(len(inlier_mask)) if inlier_mask[i]])

    selected_X = np.concatenate(selected_X)
    selected_y = np.concatenate(selected_y)

    estimator = LinearRegression(
        fit_intercept=False).fit(selected_X, selected_y)
    h = estimator.coef_.copy()
    h = np.concatenate([h, [1]])
    h = h.reshape(3, 3)
    return h


def find_homography(
    matches,
    src_keypoints,
    dst_keypoints,
    max_iters=5000,
    reprojection_threshold=5,
    seed=0,
    verbose=0
):
    src_points, dst_points = [], []
    for i_match in matches:
        src_points.append(src_keypoints[i_match.trainIdx].pt)
        dst_points.append(dst_keypoints[i_match.queryIdx].pt)
    h = _estimate_homography(
        src_points,
        dst_points,
        max_iters=max_iters,
        reprojection_threshold=reprojection_threshold,
        seed=seed,
        verbose=verbose)
    return h


def apply_homography(src_image, dst_image, h):
    result = cv2.warpPerspective(src_image, h, dst_image.shape[:2][::-1])
    return result


def blend_image(src_image, dst_image):
    result = cv2.addWeighted(dst_image, 0.5, src_image, 0.5, 0)
    return result


def find_homography_opencv(
    matches,
    src_keypoints,
    dst_keypoints,
    max_iters=5000,
    reprojection_threshold=5.0,
):
    dst_kpt = np.float32(
        [dst_keypoints[m.queryIdx].pt for m in matches]).reshape(-1, 1, 2)
    src_kpt = np.float32(
        [src_keypoints[m.trainIdx].pt for m in matches]).reshape(-1, 1, 2)
    h, mask = cv2.findHomography(
        src_kpt, dst_kpt, cv2.RANSAC,
        ransacReprojThreshold=reprojection_threshold,
        maxIters=max_iters)
    return h


def main():
    # Parameters ---------------
    seed = 0
    data_dir = "../data"
    src_image_name = "leuvenB.jpg"
    dst_image_name = "leuvenA.jpg"
    n_matches = 100
    max_iters = 5000
    verbose = 2
    # --------------------------

    dst_image = cv2.imread(
        join(data_dir, dst_image_name), cv2.IMREAD_COLOR)
    src_image = cv2.imread(
        join(data_dir, src_image_name), cv2.IMREAD_COLOR)

    dst_image_gray = cv2.cvtColor(dst_image, cv2.COLOR_BGR2GRAY)
    src_image_gray = cv2.cvtColor(src_image, cv2.COLOR_BGR2GRAY)

    matches, dst_keypoints, src_keypoints = get_sift_matches(
        dst_image_gray, src_image_gray, n_matches)

    h = find_homography(matches, src_keypoints, dst_keypoints,
                        max_iters=max_iters, seed=seed, verbose=verbose)

    # OpenCVを使う場合はこっち
    # h = find_homography_opencv(
    #     matches, src_keypoints, dst_keypoints,
    #     max_iters=max_iters)

    result = apply_homography(src_image, dst_image, h)
    blended = blend_image(result, dst_image)

    cv2.imwrite("warp.jpg", result)
    cv2.imwrite("blend.jpg", blended)


if __name__ == "__main__":
    main()
dst_image

src_image

blended

Reference
中村恭之, 小枝正直, 上田悦子,『OpenCVによるコンピュータビジョン・機械学習入門』, 講談社サイエンティフィク, 2017.