はじめに
PythonからOpenCVを使ってStructure From Motionを試すための環境構築手順です。
OpenCVのcontribにはsfmモジュールが含まれていますが、pipやcondaでinstallできるビルド済みのopencv-contrib-pythonパッケージにはsfmモジュールが含まれてないようです(多分)。
そこでcontribを含めて、ソースからビルドを行います。
参考
- OpenCV -- Installation in MacOS
- SFM module installation
- Compiling OpenCV with Structure From Motion module Python bindings
- OpenCV configuration options reference
前提
-
gcc、g++、cmake、git、miniconda、brewはインストール済み。 - 今回はminicondaを使用してPython3.9の環境を使います。
OpenCVのビルド
minicondaを使用してPython3.9の環境を用意します。
conda create -n py39 python=3.9
sfmモジュールが依存するものをインストールします。
brew install eigen
brew install gflags
brew install glog
brew install ceres-solver
OpenCVのソースをダウンロードします。<my_working_directory>は作業用のディレクトリです。
cd ~/<my_working_directory>
git clone https://github.com/opencv/opencv.git
git clone https://github.com/opencv/opencv_contrib.git
sfmモジュールのソースを少しいじります。
Pythonのbindingをつくりたい関数にCV_EXPORTS_Wをつけます。複数の関数をbindingする場合はオーバーロードできない場合があるので、CV_EXPORTS_AS()を使用して名前をつけます。
CERES_FOUNDに関係なくコンパイルされるようにします。#if defined(CV_DOXYGEN) || defined(CERES_FOUND)をコメントアウトします。
また、points2d、points3d、Ps、Rs、Tsの型を変更します。
#ifndef __OPENCV_SFM_RECONSTRUCT_HPP__
#define __OPENCV_SFM_RECONSTRUCT_HPP__

#include <vector>
#include <string>

#include <opencv2/core.hpp>

namespace cv
{
namespace sfm
{

//! @addtogroup reconstruction
//! @{

//#if defined(CV_DOXYGEN) || defined(CERES_FOUND)  // コメントアウト

CV_EXPORTS
void
reconstruct(InputArrayOfArrays points2d, OutputArrayOfArrays Ps, OutputArrayOfArrays points3d,
            InputOutputArray K, bool is_projective = false);

CV_EXPORTS
void
reconstruct(InputArrayOfArrays points2d, OutputArrayOfArrays Rs, OutputArrayOfArrays Ts,
            InputOutputArray K, OutputArrayOfArrays points3d, bool is_projective = false);

CV_EXPORTS
void
reconstruct(const std::vector<String> images, OutputArrayOfArrays Ps, OutputArrayOfArrays points3d,
            InputOutputArray K, bool is_projective = false);

CV_EXPORTS_W  // CV_EXPORTSからCV_EXPORTS_Wに変更
void
reconstruct(const std::vector<String> images, OutputArrayOfArrays Rs, OutputArrayOfArrays Ts,
            InputOutputArray K, OutputArrayOfArrays points3d, bool is_projective = false);

//#endif /* CV_DOXYGEN || CERES_FOUND */  // 消す

//! @} sfm

} /* namespace cv */
} /* namespace sfm */

#endif
build用のディレクトリを作成します。
mkdir build && cd build
cmakeを実行します。
cmake ../opencv \
-DOPENCV_EXTRA_MODULES_PATH='../opencv_contrib/modules' \
-DCMAKE_BUILD_TYPE=Release \
-DBUILD_EXAMPLES=ON \
-DBUILD_opencv_python3=ON \
-DPYTHON_EXECUTABLE=/Users/abet/opt/miniconda3/envs/py39/bin/python \
-DPYTHON3_EXECUTABLE=/Users/abet/opt/miniconda3/envs/py39/bin/python \
-DPYTHON3_INCLUDE_DIRS=/Users/abet/opt/miniconda3/envs/py39/include/python3.9 \
-DPYTHON3_NUMPY_INCLUDE_DIRS=/Users/abet/opt/miniconda3/envs/py39/lib/python3.9/site-packages/numpy/core/include \
-DBUILD_JPEG_TURBO_DISABLE=ON
-DBUILD_TESTS=OFF
-DBUILD_ZLIB=OFF
コツは-DBUILD_ZLIB=OFFです。MacbookでCommandLineToolsが入っている環境では、CommandLineTools配下のzlibを探しにいってしまうみたいで、ビルドがうまくいきません。
また、こちらを参考に、-DBUILD_JPEG_TURBO_DISABLE=ONとします。
実行後、色々出力されますが、下記の項目あたりをチェックしておけば良さそうです。
-- General configuration for OpenCV 4.5.5-dev =====================================
--   Version control:               4.5.5-337-g767857c516  # バージョン
--
--   Extra modules:
--     Location (extra):            /Users/abet/Documents/repository/opencv_exp/opencv_contrib/modules  # contribが含まれているか
--     Version control (extra):     4.5.5-66-gb8e4061a
--
--   Platform:
--     Timestamp:                   2022-04-28T09:07:14Z
--     Host:                        Darwin 21.4.0 x86_64
--     CMake:                       3.23.1
--     CMake generator:             Unix Makefiles
--     CMake build tool:            /usr/bin/make
--     Configuration:               Release


--   C/C++:
--     Built as dynamic libs?:      YES
--     C++ standard:                11
--     C++ Compiler:                /Library/Developer/CommandLineTools/usr/bin/c++  (ver 13.0.0.13000027)


--   OpenCV modules:
--     To be built:                 alphamat aruco barcode bgsegm bioinspired calib3d ccalib core datasets dnn dnn_objdetect dnn_superres dpm face features2d flann freetype fuzzy gapi hdf hfs highgui img_hash imgcodecs imgproc intensity_transform line_descriptor mcc ml objdetect optflow phase_unwrapping photo plot python3 quality rapid reg rgbd saliency sfm shape stereo stitching structured_light superres surface_matching text tracking ts video videoio videostab viz wechat_qrcode xfeatures2d ximgproc xobjdetect xphoto
--     Disabled:                    world
--     Disabled by dependency:      -
--     Unavailable:                 cudaarithm cudabgsegm cudacodec cudafeatures2d cudafilters cudaimgproc cudalegacy cudaobjdetect cudaoptflow cudastereo cudawarping cudev cvv java julia matlab ovis python2
--     Applications:                tests perf_tests examples apps
--     Documentation:               NO
--     Non-free algorithms:         NO


--
--   Media I/O:
--     ZLib:                        /Library/Developer/CommandLineTools/SDKs/MacOSX12.3.sdk/usr/lib/libz.tbd (ver 1.2.11)
--     JPEG:                        build-libjpeg-turbo (ver 2.1.2-62)
--     WEBP:                        build (ver encoder: 0x020f)
--     PNG:                         libpng (ver 1.6.37)
--     TIFF:                        libtiff (ver 42 / 4.2.0)
--     JPEG 2000:                   build (ver 2.4.0)
--     OpenEXR:                     OpenEXR::OpenEXR (ver 3.1.5)
--     HDR:                         YES
--     SUNRASTER:                   YES
--     PXM:                         YES
--     PFM:                         YES


--   Other third-party libraries:
--     Intel IPP:                   2020.0.0 Gold [2020.0.0]
--            at:                   /Users/abet/Documents/repository/opencv_exp/build/3rdparty/ippicv/ippicv_mac/icv
--     Intel IPP IW:                sources (2020.0.0)
--               at:                /Users/abet/Documents/repository/opencv_exp/build/3rdparty/ippicv/ippicv_mac/iw
--     Lapack:                      YES (/Library/Developer/CommandLineTools/SDKs/MacOSX12.3.sdk/System/Library/Frameworks/Accelerate.framework -lm -ldl)
--     Eigen:                       YES (ver 3.4.0)
--     Custom HAL:                  NO
--     Protobuf:                    build (3.19.1)


--   Python 3:  # 下記項目が埋まっていればpython用のビルドが実行されます。
--     Interpreter:                 /Users/abet/opt/miniconda3/envs/py39/bin/python (ver 3.9.12)
--     Libraries:                   /Users/abet/opt/miniconda3/envs/py39/lib/libpython3.9.dylib (ver 3.9.12)
--     numpy:                       /Users/abet/opt/miniconda3/envs/py39/lib/python3.9/site-packages/numpy/core/include (ver 1.21.5)
--     install path:                lib/python3.9/site-packages/cv2/python-3.9
--
--   Python (for build):            /Users/abet/opt/miniconda3/envs/py39/bin/python
ビルドを行います。
make -j4
Python用のインストールを行います。
cd /python_loader
conda activate py39
python setup.py install
c++で使う場合は、buildディレクトリでmake installします。
brewでインストールしたGCCを使う場合[未解決]
zlibをインストールします。
brew install zlib
cmakeを実行します。-DCMAKE_CXX_COMPILERオプションでg++を指定します。
cmake ../opencv \
-DOPENCV_EXTRA_MODULES_PATH='../opencv_contrib/modules' \
-DCMAKE_CXX_COMPILER='/usr/local/bin/g++' \
-DCMAKE_BUILD_TYPE=Release \
-DBUILD_EXAMPLES=ON \
-DBUILD_opencv_python3=ON \
-DPYTHON_EXECUTABLE=/Users/abet/opt/miniconda3/envs/py39/bin/python \
-DPYTHON3_EXECUTABLE=/Users/abet/opt/miniconda3/envs/py39/bin/python \
-DPYTHON3_INCLUDE_DIRS=/Users/abet/opt/miniconda3/envs/py39/include/python3.9 \
-DPYTHON3_NUMPY_INCLUDE_DIRS=/Users/abet/opt/miniconda3/envs/py39/lib/python3.9/site-packages/numpy/core/include \
-DBUILD_JPEG_TURBO_DISABLE=ON
-DBUILD_TESTS=OFF
-DBUILD_ZLIB=OFF
CMakeCache.txtを開いて、ZLIB_INCLUDE_DIR:PATHとZLIB_LIBRARY_RELEASE:FILEPATHをbrewでインストールしたzlibのパスに書き換えます。
//Path to a file.
ZLIB_INCLUDE_DIR:PATH=/usr/local/Cellar/zlib/1.2.12/include/

//Path to a library.
ZLIB_LIBRARY_RELEASE:FILEPATH=/usr/local/Cellar/zlib/1.2.12/lib/libz.dylib
もう一度cmakeを実行すると標準出力にビルドの詳細が表示されますが、コンパイラがg++になっています。
--   C/C++:
--     Built as dynamic libs?:      YES
--     C++ standard:                11
--     C++ Compiler:                /usr/local/bin/g++  (ver 11.2.0)  # コンパイラ
ビルドを行います。
make -j4
ここでビルドエラー。
make[2]: *** [modules/imgcodecs/CMakeFiles/opencv_imgcodecs.dir/src/apple_conversions.mm.o] Error 1
make[1]: *** [modules/imgcodecs/CMakeFiles/opencv_imgcodecs.dir/all] Error 2
make: *** [all] Error 2
Macではgcc使うなとアドバイスあり。
Structure From Motionを試す
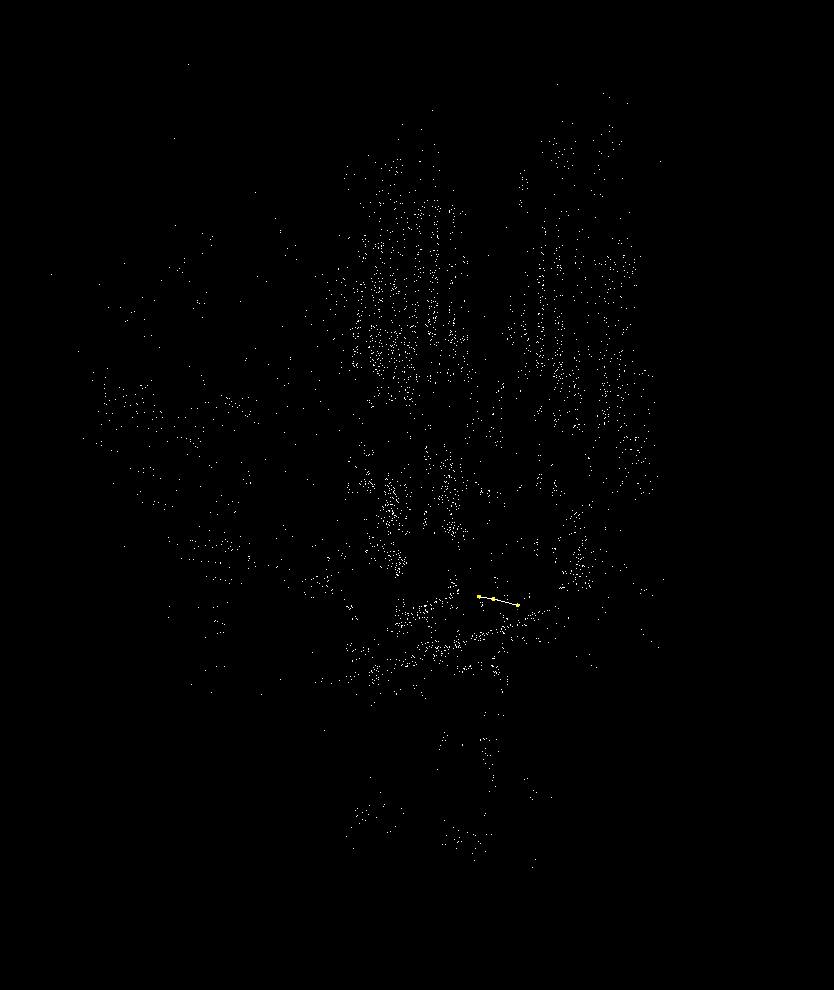
opencv_contrib/modules/sfm/samples/data/imagesにサンプル画像があるので、これを使用します。Structure From Motionを実行して、被写体の点群とカメラの位置を取得します。
import cv2
import numpy as np


def main():

    # カメラの内部パラメータに関する変数(キャリブレーションした値を入れる)
    f = 1100.0  # 焦点距離
    cx = 300.0  # 画像中心(x) pixel
    cy = 500.0  # 画像中心(y) pixel

    # 入力画像に関する変数
    # 入力画像の数
    NUM_IMG = 3

    # 入力ファイル名のセット
    image_files = []
    for i in range(NUM_IMG):
        image_files.append(f"./resized_IMG_{2889+i}.jpg")

    # 内部パラメータ行列の生成
    K = np.array([
        [f, 0, cx],
        [0, f, cy, ],
        [0, 0, 1]
    ], dtype=np.float32)

    # SfMモジュールを用いた複数の画像データからの3次元再構成(点群が計算される)s
    is_projective = True
    Rs_est, ts_est, K, points3d_estimated = cv2.sfm.reconstruct(
        images=image_files, K=K, is_projective=is_projective)

    print('shape---')
    print('Rs_est:', len(Rs_est), Rs_est[0].shape)  # num_images tuple of array(3, 3)
    print('ts_est:', len(ts_est), ts_est[0].shape)  # num_images tuple of array(3, 1)
    print('K:', K.shape)  # tuple of array(3, 3)
    print('points3d_estimated:', len(points3d_estimated), points3d_estimated[0].shape)  # num_point tuple of array(3, 1)
    print(K)

    # 結果の表示(Vizを使用する)
    window = cv2.viz.Viz3d("Coordinate Frame")
    window.setWindowSize(window_size=(1280, 720))
    # 指定しないと背景は黒
    window.setBackgroundColor(color=cv2.viz.Color().black())

    # 推定された3次元位置をセット
    point_cloud_est = []
    for i in range(len(points3d_estimated)):
        point_cloud_est.append(points3d_estimated[i].T)
    point_cloud_est = np.array(point_cloud_est)

    cloud_widget = cv2.viz.WCloud(point_cloud_est, cv2.viz.Color.white())
    window.showWidget("point_cloud", cloud_widget)

    # カメラ位置のセット
    path = []
    for i in range(len(Rs_est)):
        camera_matrix = cv2.viz.Affine3d(Rs_est[i], ts_est[i]).mat().reshape(1, 16)
        path.append(camera_matrix)
    path = np.array(path)

    trajectory_widget = cv2.viz.WTrajectory(
        path=path,
        display_mode=cv2.viz.PyWTrajectory_BOTH,
        scale=0.2,
        color=cv2.viz.Color.green()
    )
    window.showWidget("cameras_frames_and_lines", trajectory_widget)

    frustums_widget = cv2.viz.WTrajectoryFrustums(path=path, K=K, scale=0.1, color=cv2.viz.Color.yellow())
    window.showWidget("cameras_frustums", frustums_widget)

    pose = cv2.viz.Affine3d(Rs_est[0], ts_est[0])
    window.setViewerPose(pose)

    window.spin()


if __name__ == "__main__":
    main()
Pythonでのウィジェットの使い方はopencv_contrib/modules/viz/misc/python/test/test_viz_simple.pyのコードが参考になります。
カメラと同じ視点の画像。
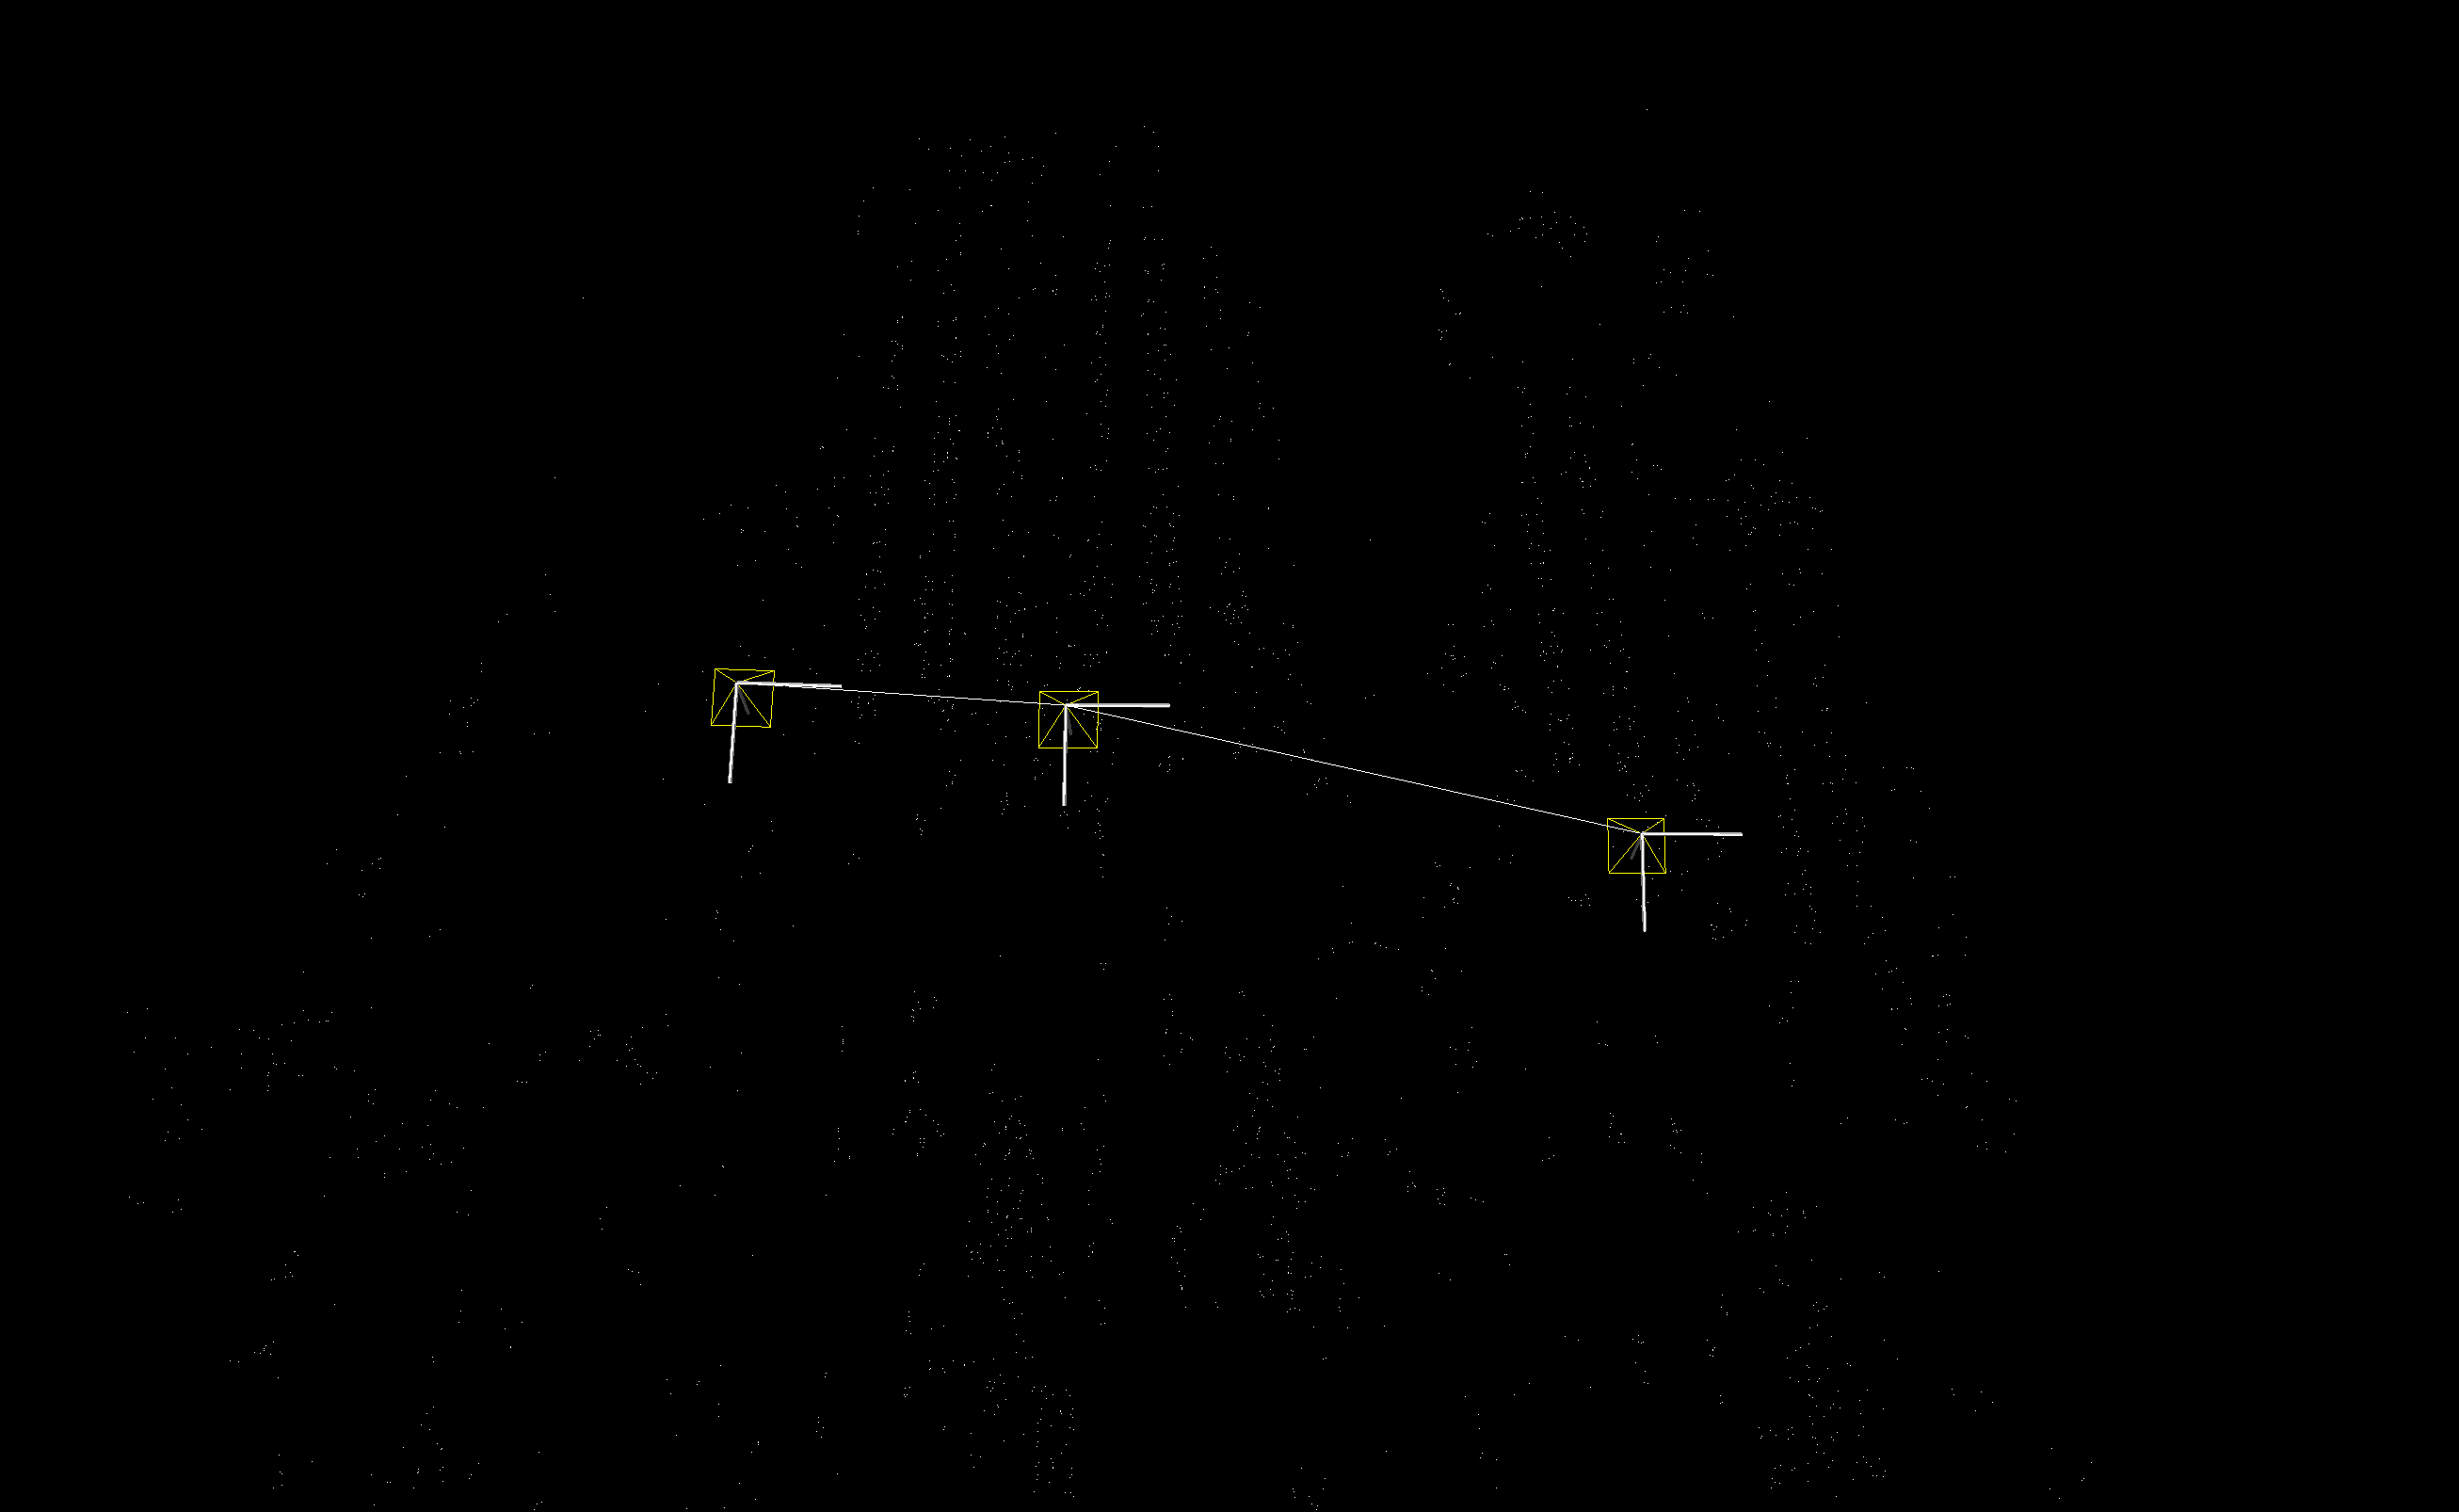
引きの視点の画像。
おわりに
PythonのOpenCVでStructure From Motionをするのはテクニカルすぎるので、OpenSfM
とかopenMVGを使ったほうがよさそうです。