はじめに
スクロールを行った際、画面内に対象物が入った時にJavaScriptを実行するという処理を学習したため、まとめたいと思います。
もくじ
- Intersection Observerとは
- 基本的な記述
- options
- おわり
1. Intersection Observerとは
Intersection Observerをそれぞれ日本語にすると、以下のように訳されます。
| Intersection | 交差、交差点 |
|---|---|
| Observer | 監視する者、観察者 |
このことから、Intersection Observerは「(物体の)交差を監視する者」という意味になります。
「物体の交差」とは、配置されている物体がスクロールされることで画面内(window内)に入ったり、出たりすることを「物体の交差」と表現されます。
そして、Intersection Observerはこの交差を監視しています。
2. 基本的な使い方
まずは、以下のようにnew IntersectionObserverへcallback関数を渡してあげ、それを変数io(Intersection Observerの略)とします。
const io = new IntersectionObserver(callback);
次に、どのDOMを監視するのか、監視対象のDOMを登録します。
const io = new IntersectionObserver(callback);

const item = document.querySelector('.item');
io.observe(item);
監視対象のDOMを登録するには、querySelectorで要素を取ってきて、それを変数に格納する。
と言う流れです。
上記のコードでは、class="item"がふられている要素を監視対象としたいため、classの要素をquerySelectorで取ってきて、それをitemという変数に格納しています。
そして、io.observe(item);とすることで、itemを監視対象に登録します。
こうすることで、登録されたitemが画面内に入ったり/画面外に出たりする時に、IntersectionObserverがそれを監視し、その度にcallback関数が呼び出されます。
画面内に入った時、出た時の定義方法
callbackの中身を記述していきます。
// const item = document.querySelector('.item');

const callback = function(entries, observer) {
  entries.forEach(entry => {
    if(entry.isIntersecting) {
      entry.target.classList.add('inview');
    } else {
      entry.target.classList.remove('inview');
    }
  });
}

// const io = new IntersectionObserver(callback);
// io.observe(item);
まず、entries.foreachでどの要素が入ったのか/出たのかを確認。
そして、foreachの引数をentryとします。
このentryの中に、それぞれの要素(今回ではitemが)が含まれています。
条件分岐のところでは、`entry.isIntersecting`がtrueの場合、つまり今回の場合では画面内にitemが入ればclass="inview"を追加(add)、falseであればclass="inview"を削除(remove)するという記述になります。
if(entry.isIntersecting) {
      entry.target.classList.add('inview');
    } else {
      entry.target.classList.remove('inview');
    }
entry.target.classList.add('inview');のtargetに、監視対象のDOMが格納されています。
そして、trueの場合そのDOMに対してclassの付与を行なっています(falseの場合はcalssを削除)。
監視対象が画面内に入った時点で監視を終えたい場合は、observer.unobserve(entry.target);と記述することで、監視を終了することができます。
const item = document.querySelector('.item');

const callback = function(entries, observer) {
  entries.forEach(entry => {
    if(entry.isIntersecting) {
      entry.target.classList.add('inview');

      observer.unobserve(entry.target); // ← 画面内に入ったタイミングで監視を終了

    } else {
      entry.target.classList.remove('inview');
    }
  });
}

const io = new IntersectionObserver(callback);
io.observe(item);
3. options
Intersection Observerは第二引数にoptionsを取ることができます。
こんな感じ。
const io = new IntersectionObserver(callback, options);
optionsの定義は以下のように記述します。
const options = {
    root: null,
    rootMargin: "-100px 0px 0px 0px", // 上 右 下 左
    threshold: [0, 0.5, 1]
};
主なプロパティです。
| プロパティ | 設定内容 |
|---|---|
| root | 交差対象としたい親要素の設定(基本的には現在表示されている画面で設定) |
| rootMargin | デフォルト値は0px。 上記の設定では、画面の内側から見て上から100pxたったところが交差対象となる(pxが正の数字であれば外側)。 px をつけないとエラーになるので注意! |
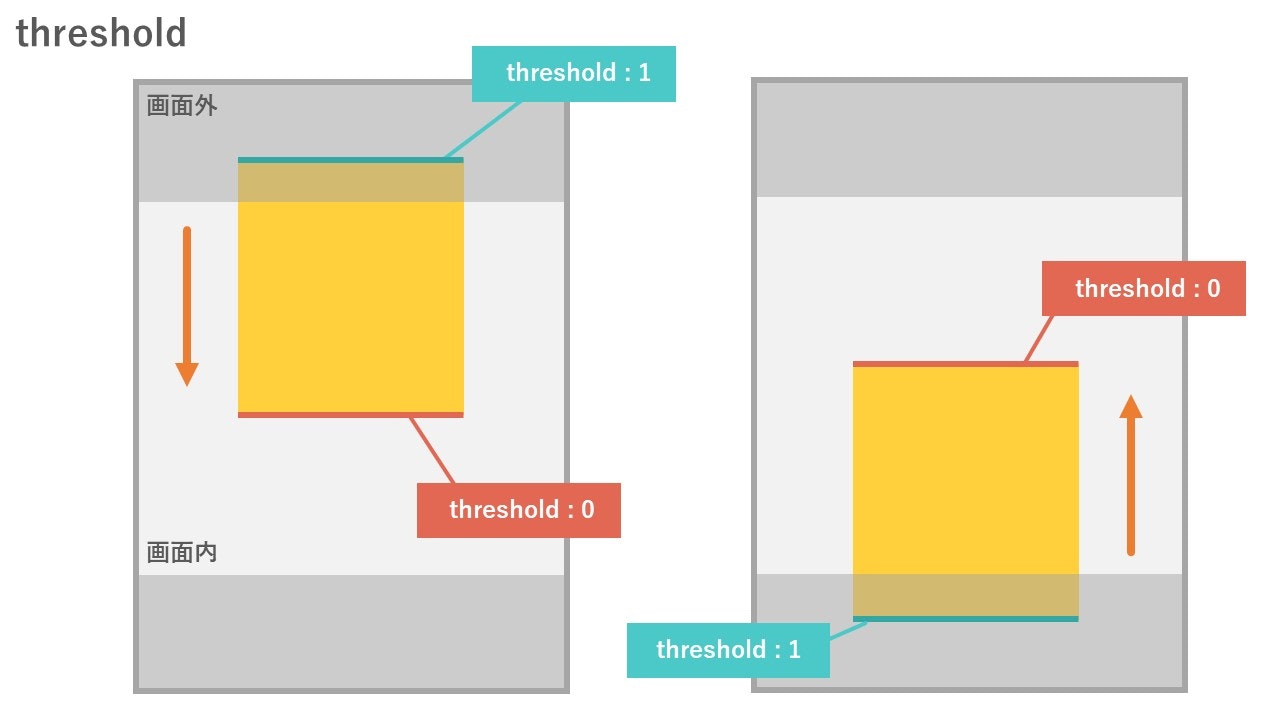
| threshold | デフォルト値は0。 threshold:1と設定すると、監視対象が画面内に全て入るまでは交差していないとみなされる。 配列で値を取ることもできる。 |
4. おわり
スクロールするたびに画像がぽんぽん出てくるサイトの裏側はこういう風になってるのかな。
Intersection Observer、上手に使いこなせるようになるぞ!

