導入手順
IIS(Internet Information Services)を有効化する
-
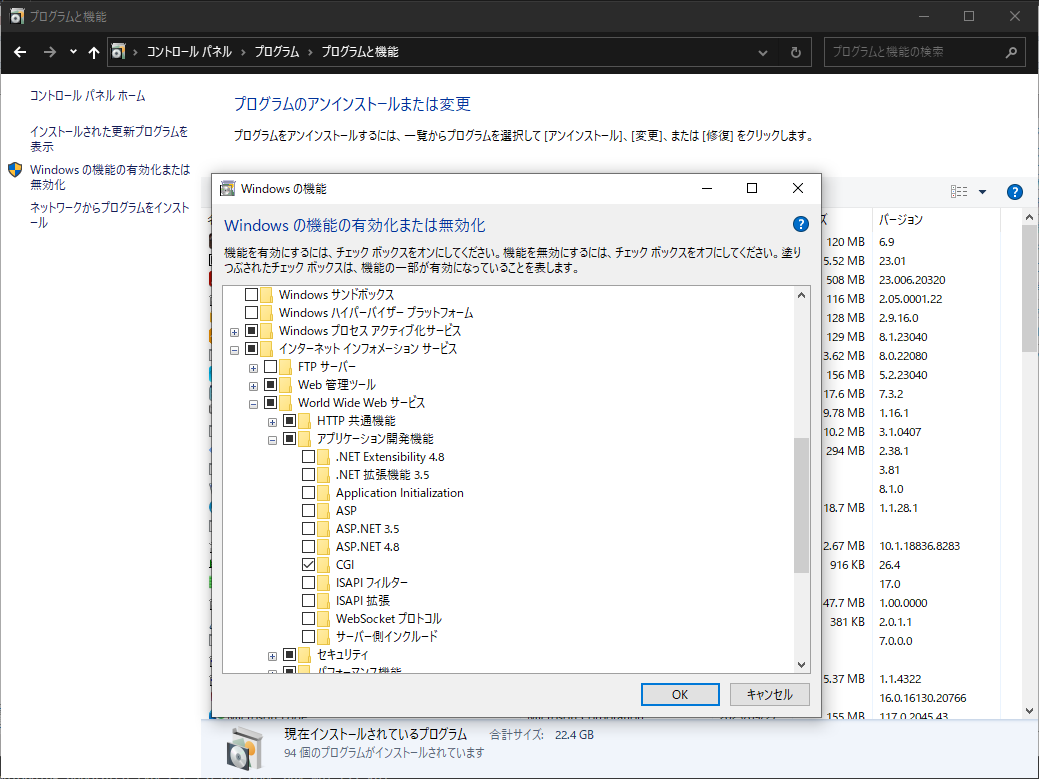
コントロールパネル -> プログラム -> プログラムと機能 -> Windows の機能の有効化または無効化から以下を有効化する。
- Windowsプロセスアクティブ化サービス
- インターネットインフォメーションサービス
- CGI
-
インターネットインフォメーションサービス(IIS)マネージャーを開く
-
Default Web Siteの下記フォルダを開く
C:\inetpub\wwwroot -
Webアプリ用のフォルダを作成する
mkdir webapp -
Default Web Siteを右クリックして、アプリケーションの追加を押す
Webアプリケーションのエイリアス(ドメイン以下のURL) = WebApp
物理パス = C:\inetpub\wwwroot\webapp

-
[オプション] ファイアーウォールの設定からポートを開く
設定 -> ネットワークとインターネット -> Windows ファイアウォール -> 詳細設定からIISを有効化するだけで、ポート80が解放される場合もあります。
-
ハンドラーマッピング->スクリプトマップの追加を押して、下記を追加する
- 要求パス = *.py
- 実行可能ファイル = "C:\Users\ユーザー名\AppData\Local\Programs\Python\Python311\python.exe" %s %s
- 名前 = Python311


-
%SystemRoot%\System32\inetsrv\config\applicationHost.configを開く
-
下記を修正する
- <section name="handlers" overrideModeDefault="Deny" /> + <section name="handlers" overrideModeDefault="Allow" /> -
念のため、IISホームから再起動をする
フォルダの権限設定
-
C:\inetpub\wwwrootを開く
-
webappフォルダを右クリック->プロパティ->セキュリティ->編集->追加で以下のユーザーを追加する
- PC-NAME\IUSR
- PC-NAME\IIS_IUSRS
デフォルトフォルダの場合、すでに追加されている場合もあります。
Administrator出ない場合、ログインユーザーも追加する必要があります。 -
Pythonフォルダを開く
C:\Users\ユーザー名\AppData\Local\Programs\Python -
対象のバージョンのフォルダへもIISのユーザー権限を与える
- PC-NAME\IUSR
- PC-NAME\IIS_IUSRS
web.configの設定
- webappのフォルダ下にweb.configファイルを作成し、メモ帳で開く
- 下記を記載して、保存する
- FastCGIを使用する方法
※5行目のPythonのパスは各PCで確認し、修正する
web.config<?xml version="1.0" encoding="utf-8"?> <configuration> <system.webServer> <handlers> <add name="Python FastCGI" path="*" verb="*" modules="FastCgiModule" scriptProcessor="C:\Users\Administrator\AppData\Local\Programs\Python\Python311\python.exe|C:\Users\Administrator\AppData\Local\Programs\Python\Python311\Lib\site-packages\wfastcgi.py" resourceType="Unspecified" requireAccess="Script" /> </handlers> <httpErrors errorMode="Detailed" /> <staticContent> <remove fileExtension=".py" /> </staticContent> </system.webServer> <appSettings> <!-- Required settings --> <add key="WSGI_HANDLER" value="myapp.wsgi_app"/> <add key="PYTHONPATH" value="C:\inetpub\wwwroot\webapp" /> <add key="WSGI_LOG" value="C:\inetpub\wwwroot\webapp\wfastcgi.log"/> </appSettings> </configuration>- httpPlatformを使用する方法(Microsoft推奨)
<?xml version="1.0" encoding="utf-8"?> <configuration> <system.webServer> <handlers> <!-- httpPlatformモジュールを追加 --> <add name="httpPlatformHandler" path="*" verb="*" modules="httpPlatformHandler" resourceType="Unspecified" /> </handlers> <httpPlatform processPath="C:\Users\Administrator\AppData\Local\Programs\Python\Python311\Scripts\uvicorn.exe" arguments="myapp:app --port %HTTP_PLATFORM_PORT%" stdoutLogEnabled="true" stdoutLogFile="C:\inetpub\wwwroot\webapp\wfastcgi.log" startupTimeLimit="60" processesPerApplication="16" > <environmentVariables> <environmentVariable name="SERVER_PORT" value="%HTTP_PLATFORM_PORT%" /> <environmentVariable name="FastAPI_APP" value="C:\inetpub\wwwroot\webapp\myapp.py" /> </environmentVariables> </httpPlatform> </system.webServer> </configuration> - FastCGIを使用する方法
- ログ用の記録ファイルとして、wfastcgi.logをテキストファイルとして作成する
- 右クリック->プロパティ->セキュリティ->編集->追加から、wfastcgi.logに書き込み権限を付与する
- PC-NAME\IUSR
- PC-NAME\IIS_IUSRS
PythonライブラリのInstallとコード記入
- 必要なライブラリをインストールする
pip install wfastcgi ※マイクロソフト純正ライブラリ
pip install fastapi
pip install a2wsgi - 下記コマンドを実行して、IIS 構成で wfastcgi を有効する
wfastcgi-enable - 同フォルダにmyapp.pyを作成し、下記を記載する
from fastapi import FastAPI
from a2wsgi import ASGIMiddleware
import json
from starlette.middleware.cors import CORSMiddleware

app = FastAPI()

app.add_middleware(
    CORSMiddleware,
    allow_origins=["*"],
    allow_credentials=True,
    allow_methods=["*"],
    allow_headers=["*"]
)

@app.get("/WebApp")
def read_main():
 return {
        'statusCode': 200,
        'headers': {
            'Access-Control-Allow-Origin': '*',
            'Content-Type': 'application/json'
        },
        'body': json.dumps('Hello World!')
    }

@app.post("/WebApp")
def read_main():
 #return {"message": "Hello World"}
 return {
        'statusCode': 200,
        'headers': {
            'Access-Control-Allow-Origin': '*',
            'Content-Type': 'application/json'
        },
        'body': json.dumps('Hello World!')
    }

wsgi_app = ASGIMiddleware(app)
ブラウザで確認
- 対象サーバーのIPアドレス/WebAppをブラウザで開いてみる
- 下記が表示されたら成功!
{
    "statusCode": 200,
    "headers": {
        "Access-Control-Allow-Origin": "*",
        "Content-Type": "application/json"
    },
    "body": "\"Lambda\\u304b\\u3089\\u306e\\u8fd4\\u4fe1\""
}
リクエスト容量制限 413 Error (Request Entity Too Large)
413エラーが出た場合、デフォルトのリクエスト容量制限では、受け取ることができないため、IISの設定を変更する必要がある。
下記、Microsoft公式記事を参照して、いくつか変更する。
- インターネット インフォメーション サービス (IIS) マネージャーを開く
- [ホーム] ウィンドウで、[要求フィルター] をダブルクリックする
- [操作] ペインの [機能設定の編集] をクリックする。
- それぞれ適切な値に変更する
- 許可されたコンテンツの最大長:3000000000バイト
- URLの最大長:2048000バイト
- クエリ文字列の最大長:1024000バイト
- インターネット インフォメーション サービス (IIS) マネージャーを開く
- サイトを選択する
- 構成エディターをクリックする
- セクションでsystem.webServerのserverRuntimeをクリックする
- maxRequestEntryAllowedとuploadReadAheadSizeの値を変更する
- 右上の適用を押す
Fast CGI アプリケーションの要求タイムアウト設定も変更する必要がある
- インターネット インフォメーション サービス (IIS) マネージャーを開く
- FastCGIの設定をクリックする
- 右上の編集を押す
- 要求タイムアウトの値を変更する
ファイルURLをダウンロードさせるIIS設定
- 仮想ディレクトリの追加を押して、ディレクトリを追加する
- 作成した仮想ディレクトリを押し、HTTP応答ヘッダーを押す
- 右側の追加を押す
- 応答ヘッダーの名前と値を入力する
名前:Content-Disposition
値:*.txt
これで対象サーバーのフォルダの.txtファイルはブラウザで開くと強制的にダウンロードされる
参考文献