はじめに
Kivyに関する調べ物をしていて見つけた記事が凄く面白かったので、許可をもらって翻訳しました。
原文の著者
Roberto Ulloaさんという方です。that doesn't make any sense…というBlogを公開していて、今回の翻訳はそこに書かれていた記事の一つです。又Kivyに関する以下の本も出版しているようで、
- Kivy: Interactive Applications in Python
- Kivy - Interactive Applications and Games in Python Second Edition
Kivyの(というかProgrammingの)かなりの熟練者のようです。
訳
原文:
Rotate, Translate, Scale and RelativeLayout in Kivy
Rotate, Translate, Scale and RelativeLayout in Kivy – undercovered!
私はKivyにおいて変換(回転、移動、拡大縮小)をしようとして躓いています。ドキュメントがいうには「各Widgetは元からそれぞれのCanvasを持っている」だそうですが、実際には全てのWidgetが同じCanvasを共有しているようにしか思えないのです。以下のコードを見て下さい。
from kivy.app import App
from kivy.uix.widget import Widget


class Example(Widget):
    pass


class ExampleApp(App):

    def build(self):
        return Example()


ExampleApp().run()
<Example>:
    Button:
        pos: [0,0]
        size_hint: [None, None]
        size: [200,200]
        canvas.after:
            Line:                      # A
                circle: [50, 100, 50]  # A
            Translate:                 # B
                x: 100                 # B
            Line:                      # C
                circle: [50, 100, 50]  # C
    Button:
        pos: [200,0]
        size_hint: [None, None]
        size: [200,200]
        background_color: [0,0,1,1]
大きさ(200, 200)のButtonが二つありますね。私はそれらを横に並べたかったので一つは座標(0, 0)に、もう一つは座標(200, 0)に配置しました。それから一つ目のButtonには次の様に二つの円を横に並ぶように描きました。
- 座標(50, 100)を中心に半径50pxの円を描画(A行)
- 座標系をxの正方向に100px(円の直径分)ずらす(B行)
- 座標(50, 100)を中心に半径50pxの円を描画(C行)
そして以下のコマンド
python main.py --size=500x200
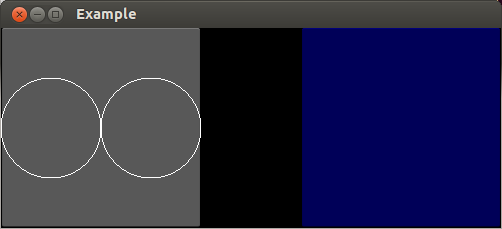
を実行したところ結果は以下のようになりました。
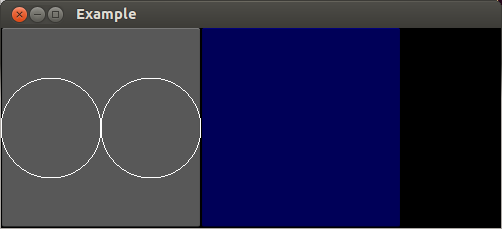
どうしてButtonの間に黒い隙間があるの!?期待していたのは以下の結果なのに。
どうやらB行のTranslateがその後の描画命令全てに影響しているようです。それも自身のWidgetだけでなくWindow全体に。だから私はCanvasが共有されているようにしか思えないのです。
解決法
上記の問題を直すには以下の方法があります。
方法1 行った座標系に対する操作を個別に戻す
<Example>:
    Button:
        pos: [0,0]
        size_hint: [None, None]
        size: [200,200]
        canvas.after:
            Line:
                circle: [50, 100, 50]
            Translate:
                x: 100
            Line:
                circle: [50, 100, 50]
            Translate:   # 追加した行
                x: -100  # 追加した行
    Button:
        pos: [200,0]
        size_hint: [None, None]
        size: [200,200]
        background_color: [0,0,1,1]
方法2 RelativeLayoutを使う
ButtonをRelativeLayoutの中に入れるだけで解決します。
<Example>:
    RelativeLayout:
        pos: [0,0]
        Button:
            pos: [0,0]
            size_hint: [None, None]
            size: [200,200]
            canvas.after:
                Line:
                    circle: [50, 100, 50]
                Translate:
                    x: 100
                Line:
                    circle: [50, 100, 50]
    Button:
        pos: [200,0]
        size_hint: [None, None]
        size: [200,200]
        background_color: [0,0,1,1]
方法3 PushMatrixとPopMatrixを使う
<Example>:
    Button:
        pos: [0,0]
        size_hint: [None, None]
        size: [200,200]
        canvas.after:
            PushMatrix:
            Line:
                circle: [50, 100, 50]
            Translate:
                x: 100
            Line:
                circle: [50, 100, 50]
            PopMatrix:
    Button:
        pos: [200,0]
        size_hint: [None, None]
        size: [200,200]
        background_color: [0,0,1,1]
PushMatrixとPopMatrixによってMatrixの状態を保存復元しているわけです。そしてこれはRelativeLayoutが内部で行っていることでもあります。

