はじめに
とりあえず動かしてみたい方々向けです。
公式のドキュメントをやってみた感じのものになっています。
前提
Cognitoでユーザープールとアプリケーションクライアントを既に作成している事を前提にしています。
ユーザー自身でユーザー登録が出来るように「セルフサービスのサインアップ」は有効にしておいて下さい。
成果物
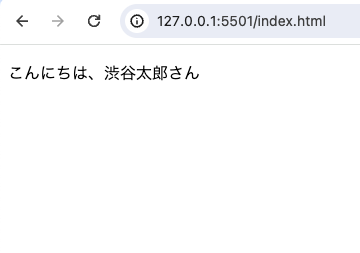
順に操作した上でページ遷移すると、ログインユーザー名が表示されます。
↓
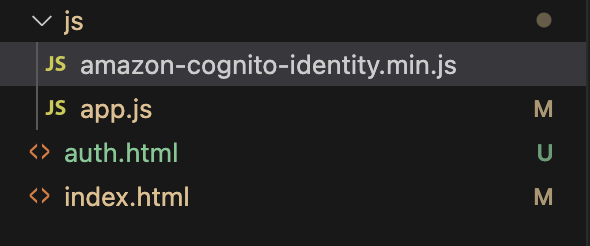
ディレクトリ構成
auth.htmlに色々まとまっています。index.htmlには「ようこそ、ゲストさん」と表示されています。しかし、ログインすると「ようこそ、渋谷太郎さん」のように表示されます。
★マークをつけた3つを空ファイルで作成して下さい。
.
├── auth.html ★
├── index.html  ★
└── js
    ├── amazon-cognito-identity.min.js ※後でインストール
    └── app.js  ★
ログインのイメージ
有効なトークン群をローカルストレージに持っている状態がログインしている状態です。
大雑把に下図のイメージです。

ローカルストレージのデータはページ遷移しても取得出来ます。
cognitoライブラリをインストール
CDNでの配布がありません。npmでインストールします。
必要なのは1ファイルのみ。
node_modulesやpackage.jsonは不要なので後で削除します。
// 初期化
npm init -y

// ライブラリインストール
npm i amazon-cognito-identity-js
node_modulesの中からamazon-cognito-identity.min.jsを探します。

jsディレクトリに移動させます。
amazon-cognito-identity.min.js以外は不要です。
下記3つ削除して下さい。
- package.json
- package-lock.json
- node_modules/
最終的に↓のようになればOKです。
ユーザー登録・確認・ログイン画面
auth.htmlを置き換える。
<!DOCTYPE html>
<html lang="ja">
<head>
  <meta charset="UTF-8">
  <meta name="viewport" content="width=device-width, initial-scale=1.0">
  <title>Document</title>
</head>
<body>
  <main>
      <h2>ユーザー登録</h2>
      <form name="signup">
        <div>
          <label for="email">ユーザー名:</label>
          <input type="text" name="user" />
        </div>
        <div>
          <label for="email">メールアドレス:</label>
          <input type="text" name="email" />
        </div>
        <div>
          <label for="password">パスワード:</label>
          <input type="password" name="password" />
        </div>
        <div>
          <input type="submit" value="登録" />
        </div>
      </form>
      <h2>ユーザー検証</h2>
      <form name="confirm">
        <div>
          <label for="email">メールアドレス:</label>
          <input type="text"name="email" />
        </div>
        <div>
          <label for="password">検証コード:</label>
          <input type="text" name="code" />
        </div>
        <div>
          <input type="submit" name="submit" value="検証" />
        </div>
      </form>
      <h2>ログイン</h2>
      <form name="login">
        <div>
          <label for="email">メールアドレス:</label>
          <input type="text"name="email" />
        </div>
        <div>
          <label for="password">パスワード:</label>
          <input type="password" name="password" />
        </div>
        <div>
          <input type="submit" name="submit" value="検証" />
        </div>
      </form>
  </main>
  <script src="./js/amazon-cognito-identity.min.js"></script>
  <script src="./js/app.js"></script>
  <script>

    // ユーザー登録
    const formSignUp = document.forms['signup'];

    formSignUp.addEventListener('submit', e => {
      e.preventDefault();
      const user = formSignUp.elements['user'].value;
      const email = formSignUp.elements['email'].value;
      const password = formSignUp.elements['password'].value;
      signUp(user, email, password);
    });

    // ユーザー検証
    const formVeryficate = document.forms['confirm'];

    formVeryficate.addEventListener('submit', e => {
      e.preventDefault();
      const email = formVeryficate.elements['email'].value;
      const code = formVeryficate.elements['code'].value;
      confirm(email, code);
    });

    // ログイン
    const loginForm = document.forms['login'];

    loginForm.addEventListener('submit', e => {
      e.preventDefault();
      const email = loginForm.elements['email'].value;
      const password = loginForm.elements['password'].value;
      login(email, password);
    });

  </script>
</body>
</html>
app.jsを置き換える。
const poolData = {
  // ご自身のユーザープールID
	UserPoolId: '',

  // ご自身のクライアントID
  // 「アプリケーションの統合」タブに移動して最後までスクロール
	ClientId: '',
};

const userPool = new AmazonCognitoIdentity.CognitoUserPool(poolData);

function signUp (user, email, password) {

  const attributeUserName = new AmazonCognitoIdentity.CognitoUserAttribute({
    Name: 'name',
    Value: user
  });

  const attributeList = [attributeUserName];

  userPool.signUp(
    email,
    password,
    attributeList,
    null,
    function (err, result) {
      if (err) {
        alert(err.message || JSON.stringify(err));
        return;
      }
      const cognitoUser = result.user;
      console.log(`${cognitoUser.getUsername()}に確認のメールを送りました`);
    }
  );
}

function confirm (email, code) {

  const userData = {
    Username: email,
    Pool: userPool,
  };
  const cognitoUser = new AmazonCognitoIdentity.CognitoUser(userData);

  cognitoUser.confirmRegistration(code, true, function (err, result) {
    if (err) {
      alert(err.message || JSON.stringify(err));
      return;
    }
    console.log('ユーザー検証成功');
  });
}

function login (email, password) {

  const cognitoUser = new AmazonCognitoIdentity.CognitoUser({
    Username: email,
    Pool: userPool,
  });

  const authenticationDetails = new AmazonCognitoIdentity.AuthenticationDetails({
    Username: email,
    Password: password
  });

  cognitoUser.authenticateUser(authenticationDetails, {

    onSuccess: async function (res) {
      // console.log({ res });
      console.log('ログイン成功');
      // リダイレクト
      // window.location.href = '/index.html';
    },

    onFailure: function (err) {
      alert(err.message || JSON.stringify(err));
    },

  });
}

function getUser() {

  // ローカルストレージからユーザー取得
  const cognitoUser = userPool.getCurrentUser();
  if(!cognitoUser) {
    alert('current user doesnt exist');
    window.location.href = '/auth.html';
    return;
  }

  cognitoUser.getSession((err, session) => {
    if(err) {
      alert(err.message || JSON.stringify(err));
    }
    cognitoUser.getUserData((err,result) => {
      if(err) {
        // エラー処理
        alert(err.message || JSON.stringify(err));
        return;
      }
      const userData = result.UserAttributes.reduce((wip, e) => {
        wip[e.Name] = e.Value;
        return wip;
      }, {});

      document.querySelector('p').innerText = `こんにちは、${userData.name}さん`;

    });
  })

}
index.htmlを置き換える。
<!DOCTYPE html>
<html lang="ja">
<head>
  <meta charset="UTF-8">
  <meta name="viewport" content="width=device-width, initial-scale=1.0">
  <title>Document</title>
</head>
<body>
  <main>
    <p>こんにちは、ゲストさん</p>
  </main>
  <script src="./js/amazon-cognito-identity.min.js"></script>
  <script src="./js/app.js"></script>
  <script>
      getUser();
  </script>
</body>
</html>
動かしてみる
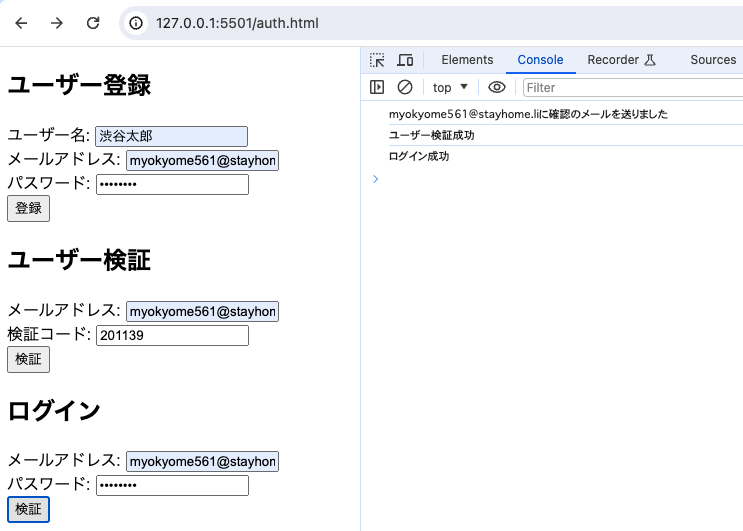
認証ページにアクセス
ローカルホストを立ち上げた上で/auth.htmlにアクセス。
ユーザー登録
メールアドレスは有効なものを使って下さい。検証コードが飛んで来ます。
パスワードは半角英数記号8文字以上などパスワードポリシーに従って下さい。
「登録」すると下記のようにconsoleにメールを送った趣旨の文が表示されます。

ユーザー検証
登録したメールアドレスに検証コードが送られています。それを使って「検証」します。

ログイン
「ユーザー検証成功」の文字をconsoleで確認した上でログインに進みます。

トークンを取得出来ている事を確認
開発者ツールで「Application」タブを開きLocal Strageの項目を確認して下さい。
ログインに成功するとaccessTokenやidTokenなどが表示されます。

上記のデータはページ遷移しても取得出来ます。このデータの有無やデータの有効期限を見てログインしているかどうかを判別します。
こんにちは⚫︎⚫︎さん
/index.htmlに移動します。
登録したユーザー名で「こんにちは⚫︎⚫︎さん」と表示されます。

おわりに
シンプルに実装することを第一にしました。なので色々端折っています。
理解をゼロからイチにする的な感じで役に立てて貰えたら幸いです。