成果物

↓

ログインの仕組みのイメージ
大雑把に下図のイメージの理解です。

前提
フロントの実装に焦点を当てています。
Cognitoでユーザープールとアプリケーションクライアントを予め作成して下さい。
「セルフサービスのサインアップ」は有効にして下さい。
ユーザーが自分でユーザー登録出来るように作りたいです。
ディレクトリ構成(完成時)
ほぼデフォルトのままです。
.
├── astro.config.mjs
├── package-lock.json
├── package.json
├── public
│   └── favicon.svg
├── src
│   ├── env.d.ts
│   ├── layouts
│   │   └── Layout.astro
│   └── pages
│       ├── auth.astro
│       └── index.astro
└── tsconfig.json
手順
- プロジェクト作成
- Aamplifyインストール
- auth.astro作成
- index.astro変更
プロジェクト作成
npm create astro@latest
Aamplifyインストール
Amplifyライブラリをインストールします。
npm install aws-amplify
auth.astro作成
/src/pages/auth.astroを以下の内容で作成します。
---
import Layout from '../layouts/Layout.astro';
---

<Layout title="認証ページ">
	<main>
    <h2>ユーザー登録</h2>
    <form name="signup">
      <div>
        <label for="email">ユーザー名:</label>
        <input type="text" name="user" />
      </div>
      <div>
        <label for="email">メールアドレス:</label>
        <input type="text" name="email" />
      </div>
      <div>
        <label for="password">パスワード:</label>
        <input type="password" name="password" />
      </div>
      <div>
        <input type="submit" value="登録" />
      </div>
    </form>
    <h2>ユーザー検証</h2>
    <form name="confirm">
      <div>
        <label for="email">メールアドレス:</label>
        <input type="text"name="email" />
      </div>
      <div>
        <label for="password">検証コード:</label>
        <input type="text" name="code" />
      </div>
      <div>
        <input type="submit" name="submit" value="検証" />
      </div>
    </form>
    <h2>ログイン</h2>
    <form name="login">
      <div>
        <label for="email">メールアドレス:</label>
        <input type="text"name="email" />
      </div>
      <div>
        <label for="password">パスワード:</label>
        <input type="password" name="password" />
      </div>
      <div>
        <input type="submit" name="submit" value="ログイン" />
      </div>
    </form>
  </main>
</Layout>

<script>

  import { Amplify } from 'aws-amplify';
  import { signIn, signUp, confirmSignUp } from 'aws-amplify/auth'

  Amplify.configure({
    Auth: {
      Cognito: {
        userPoolId: 'ご自身のユーザープールID',
        userPoolClientId: 'ご自身のクライアントID',
      }
    }
  });

  // ユーザー登録
  const formSignUp = document.forms['signup'];

  formSignUp.addEventListener('submit', async e => {
    e.preventDefault();
    const user = formSignUp.elements['user'].value;
    const email = formSignUp.elements['email'].value;
    const password = formSignUp.elements['password'].value;
    const { isSignUpComplete, userId, nextStep } = await signUp({
      username: email,
      password: password,
      options: {
        userAttributes: {
          name: user,
        },
      }
    });
    console.log({ isSignUpComplete, userId, nextStep });
    console.log(`${email}に確認のメールを送りました。`);
  });

  // ユーザー検証
  const formVeryficate = document.forms['confirm'];

  formVeryficate.addEventListener('submit', async e => {
    e.preventDefault();
    const email = formVeryficate.elements['email'].value;
    const code = formVeryficate.elements['code'].value;
    const { isSignUpComplete, nextStep } = await confirmSignUp({
      username: email,
      confirmationCode: code
    });
    console.log({ isSignUpComplete, nextStep });
    console.log(`ユーザー検証成功`);
  });

  // ログイン
  const loginForm = document.forms['login'];

  loginForm.addEventListener('submit', async e => {
    e.preventDefault();
    const email = loginForm.elements['email'].value;
    const password = loginForm.elements['password'].value;

    try {
      const result = await signIn({
        username: email,
        password: password,
      });
      console.log(result);
      console.log(`ログイン成功`);
    } catch (err) {
      console.log(err);
    }

  });
</script>

<style>
  main {
    padding: 0 16px;
    /* width: 640px;
    margin: 0 auto; */
  }
  h2 {
    margin-top: 24px;
  }
  form > div {
    margin-top: 16px;
    display: flex;
  }
  label {
    display: block;
    width: 160px;
  }
</style>
index.astro変更
/src/pages/index.astroを以下のように変更します。
---
import Layout from '../layouts/Layout.astro';
---

<Layout title="トップページ">
	<main>
    <p id="greet">こんにちは、ゲストさん</p>
	</main>
</Layout>

<script>
  import { Amplify } from 'aws-amplify';
  import { fetchUserAttributes, fetchAuthSession } from 'aws-amplify/auth'

  Amplify.configure({
    Auth: {
      Cognito: {
        userPoolId: 'ご自身のユーザープールID',
        userPoolClientId: 'ご自身のクライアントID',
      }
    }
  });

  try {
    // ログイン時に保存したアクセストークンを使いCognitoにユーザー情報を取りに行く
    const userInfo = await fetchUserAttributes();
    console.log({ userInfo });
    // アクセストークンを使い、APIGWなどを叩きたい場合は以下でアクセストークンを取得出来る
    const { tokens: { accessToken } } = await fetchAuthSession();
    console.log( accessToken );

    document.getElementById('greet').innerText = `こんにちは、${userInfo.name}さん`;
  } catch (err) {
    console.log(err);
  }

</script>

<style>
  main {
    padding: 0 16px;
    /* width: 640px;
    margin: 0 auto; */
  }
  p {
    margin-top: 24px;
  }
</style>
ユーザー登録
npm run devしてauthページ(http://localhost:4321/auth)にアクセスします。

ユーザー検証
ユーザー登録すると、入力したメールアドレス宛に検証コードが届きます。

ログイン
ログイン成功の文字がConsoleに出力されます。

ユーザーページ
トップページ(http://localhost:4321)にアクセスします。
登録したユーザー名で「こんにちは、⚫︎⚫︎さん」と表示されます。
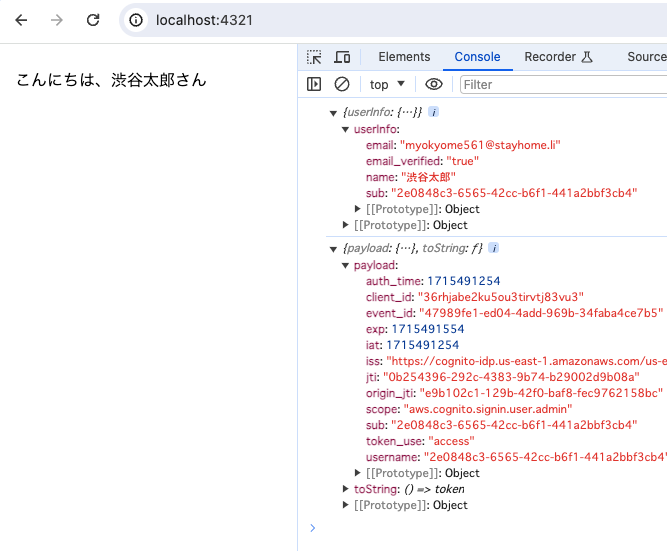
ユーザー名(⚫︎⚫︎さん)を何処で取得しているか?
ログインするとアクセストークンなどがブラウザのローカルストレージに保存されます。
fetchUserAttributes( )をすると、ローカルストレージよりアクセストークンを取り出して、Cognitoからユーザー情報を取得しているようです。
開発者ツールの「Network」タブにてAccessTokenを送信している事が確認出来ます。

アクセストークンを使いAPIGWなどにアクセスしたい
index.astroに記述しましたが、fetchAuthSession( )でアクセストークンを取得出来ます。
アクセストークンをtoString()するとJWTになります。
おわりに
ざっくり理解するためにシンプルに作ることを目標にしました。
実際のプロジェクトだと、ログインを制御するコンポーネントを作ったりするのかな、と想像しています。一旦、動かして見たかったぐらいの気持ちだったので、ここまでの実装にとどめております。悪しからずです。