■ IFTTT とは
例:
If This = trigger =Watson Assistant Solutions or others
Then That = action = external services
■WA-IFTTT シナリオの例
流れ:
1.use /converse api (text:Remind me to pick up the 2.shopping,userid:XXX_XX_XXX_XXX) ->
3.response “Email reminder sent” will be returned ->
4.send a mail to XXX@XX.XXX.XXX automatically ->
5.receive the mail
■document
■Deploying an IFTTT service
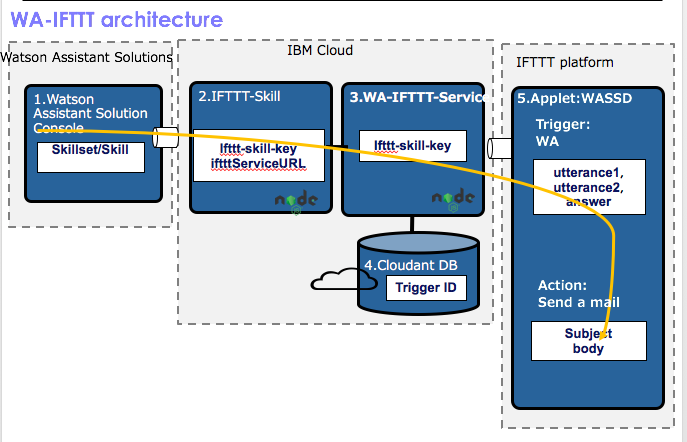
概要:IFTTTでWatson Assistant Solutions instanceをtriggerとして、appletがWatson Assistant Solutions instanceで何か入力すると、何のactionになるかが定義されます。また、このサービスは特定のAPI(IFTTT-skill)を使って、Watson Assistant Solutions instanceと連携します。
事前準備
-
Install Git.
-
Get access to your Watson Assistant Solutions instance on IBM Cloud. For instructions, see Access your Watson Assistance instance.
https://watson-personal-assistant-toolkit.mybluemix.net -
Register for an IBM Cloud account.
-
Install the IBM Cloud cli tool.
$ curl -fsSL https://clis.ng.bluemix.net/install/osx | sh
Step 1: Create an IFTTT service for your trigger on the IFTTT platform
要注意:もしIFTTT service何かの原因でうまく行ってない場合、旧IFTTT serviceを削除して、最初の最初からやり直した方が無事です。
-
Create a developer account on the IFTTT plaform.
-
Go the Platform page.
-
Click Sign up.
-
Verify your email address.
-
Specify a service name that describes your Watson Assistant Solutions service.
https://platform.ifttt.com/services/new
service name: Watson Assistant Solutions super SD (任意でok) -
Select an organization.
Organization: ibm (任意でok) -
Create a new service ID. The service ID is a short, unique name to be used as your service’s identifier and in its IFTTT URLs.
IFTTT service ID: wassd (任意でokが、なるべく簡単のがいい。これからのSSO登録に使われる) -
Click Create.
-
Click the API tab.
https://platform.ifttt.com/services/wassd/api -
Copy the service key that is provided for your service and save it for later use.
-
Register your new IFTTT service as an application that uses IBMid at https://w3.innovate.ibm.com/tools/sso/home.html.
要注意:w3idではなく、IBMidです!!!!!!!!但し、原因も不明ですが、既に登録したIBMid(メールアドレス・パスワードが未登録を見えようなので、Connection TestでのIBMidログイン画面が出たら、そこに再びIBMid(w3idのメールアドレスをIBMidとして)を再登録してください。 -
Note: The following redirect_uri = https://ifttt.com/channels/paste-your-service-id-here/authorize should be authorized. Substitute paste-your-service-id-here with the service ID from step 6.
redirect_uri = https://ifttt.com/channels/wassd/authorize
Application Details
Friendly Name: Watson Assistant Solution SD (任意でok)
Application Description: WA-IFTTT (任意でok)
...
そのほかも任意でok
Grant Types
Authorization Code:YES
Refresh Token: YES
Implicit:NO
Password:NO
Client Credentials:NO
Step 2: Configure and deploy a service on IBM Cloud
WA-IFTTT-service を作成します。
-
Clone the WA-IFTTT service boilerplate. Contact the Watson Assistant Solutions team for access to the service boilerplate.
https://github.ibm.com/ConsumerIoT/WA-IFTTT-Service
$ git clone git@github.ibm.com:WA-IFTTT/WA-IFTTT-Service.git -
In the top-level directory of the service repository, change the name of the configuration file from /config_template.json to /config.json.
-
Modify or add the following configuration parameters.
- service_key: IFTTT service key, can be found under API tab in IFTTT Platform dashboard.

- wa_api_url: Enter https://watson-personal-assistant-toolkit.mybluemix.net

- wa_api_key: Your Watson Assistant Solutions instance API key.

- oauth: Add values for client_id, client_secret, authorization_url, token_url, and introspect_url based on the values provided when you register the service for an IBMid.

- ifttt-skill-key: A GUID your create for your skill. Save it for later use in your IFTTT skill configuration.a random key, which have to be equals to the key in IFTTT-Skill/res/assets/manifest.json


`要注意:ifttt-skill-key: Its ok that you've generated it, just make sure its the same in the skill and in the service.`


 WA-IFTTT service boilerplateの  /config.json
    {

      "service_key":"",

      "wa_api_url":"https://watson-personal-assistant-toolkit.mybluemix.net",

      "wa_api_key":"",

      "oauth":{

        "client_id": "",

        "client_secret": "",

        "authorization_url": "https://prepiam.toronto.ca.ibm.com/idaas/oidc/endpoint/default/authorize",

        "token_url": "https://prepiam.toronto.ca.ibm.com/idaas/oidc/endpoint/default/token",

        "introspect_url": "https://prepiam.toronto.ca.ibm.com/idaas/oidc/endpoint/default/introspect"

      },

      "ifttt-skill-key": "wassd"

    }
- Push the service to IBM Cloud. Use the bx app push command. Important: You must associate your service with a Cloudant database. If you want to use another database at the data layer, see ./api/helpers/dal/cloudDAL.js or /api/helpers/dal/simpleDAL.js in your local repository for an example of how to configure the database. Take note of the external URL of this service.
`cloudantDBの作成が必要!`


`IBM Cloud カタログでcloudantDBサービスの追加:https://console.bluemix.net/dashboard/apps/`


WA-IFTTT service boilerplateの ./api/helpers/dal/cloudDAL.js
    修正前:

    //data abstraction layer

    let Cloudant = require('cloudant');

    let cloudant_url;
    修正後:

    //data abstraction layer

    var Cloudant = require('cloudant');

    var cloudant_url="https://xxxxxxx-bluemix:xxxxxxx-bluemix.cloudant.com";
$ bx app push
また、documentに記載されないですが、下記のnameの変更も必要です。
WA-IFTTT service boilerplateの /mainfest.yaml
applications:
 - name: WA-IFTTT-Service-XXX
   random-route: true
   memory: 512M
Step 3: Update your IFTTT service configuration
- Update your service configuration on the IFTTT platform.
`https://platform.ifttt.com/services/wassd/apiで IFTTTのconfigurationを更新します。`
-
Click the API tab.
-
Paste your IFTTT service URL into the IFTTT API URL field.
`IBM cloud dashboardでIFTTT service URL/ IFTTT API URLを確認できます。`
`IFTTT service URL/ IFTTT API URL:https://wa-ifttt-service-XXX.mybluemix.net`
Step 4: Configure OAuth2 authentication for your IFTTT service
-
Click the API tab.
-
Click Authentication.
-
Select the option My API has users with expiring OAuth2 access tokens and uses refresh tokens.
-
Enter values for the following parameters to configure authentication:
下図は正しいバージョン!

- Client ID:  Client ID provided by your OAuth2 provider.

- Client secret: Client secret provided by your OAuth2 provider.

- Authorization URL: paste-your-WA-IFTTT-Service-URL-here/oauth2/authorize?scope=paste-scope-here. A user is redirected to this URL to authenticate (the service redirects this call to your OAuth2 provider).

 `要注意:     ?scope=openid      は必ず付いてください!!!!!!!!`

`https://wa-ifttt-service-XXX.mybluemix.net/oauth2/authorize?scope=openid`

 - Token URL:  paste-your-WA-IFTTT-Service-URL-here/oauth2/token. A user authorization code is exchanged for an access token at this URL (the service redirects this call to your OAuth2 provider).

  `https://wa-ifttt-service-XXX.mybluemix.net/oauth2/token`

 - Redirect URL: The URL that the user is redirected back to after the request is authorized.  Enter: https://ifttt.com/channel/paste-your-service-id-here/authorize where service ID is the service ID you set in the service configuration. Make sure that this url is authorized as a redirect uri in the settings of your OAuth2 provider. For more information, see the authentication flow topic in the IFTTT platform documentation.


 `https://ifttt.com/channels/wassd/authorize `

 `okを押してから更新できた。 `
Step 5: Create a new trigger
Complete these steps on the IFTTT platform.
-
Click the API tab.
-
Click Triggers.
-
Enter descriptions for the following trigger parameters:
-
name: The name of the trigger. Voice Command
-
Description: A description of the trigger. This trigger fires whenever your Waston Assistant hears one of the commands mentioned.
-
Endpoint: A reference to the Watson Assistant Solutions service. For all Watson Assistant Solutions IFTTT services, enter wa_commands.
要注意: wa_commandsは固定です!自由に変更できません
WA-IFTTT-Service boilerplate /swagger.yamlで定義されたためです
- Add trigger fields to make the trigger more relevant to the end-user or to narrow the scope of the trigger. For utterance1, enter:
これは原因不明ですが、作成したtirgger fieldsを編集できない・・編集ボタンがあるのに・・・>_<

    →firefoxだとだめ。

    →chromeだとうまく編集できた。
-
label1: Provide a description of the trigger field. For an utterance, this is usually in the form of a question.
-
Optional helper text: Provide an explanation of the question or answer.
-
Key name: Enter utterance.
-
Configure a validation rule for the input type (for example, text). Enter:
-
Input type: Select from text input, drop-down list, or location-based input.
-
Input validation: Specify whether validation is required. no
-
Validation rule: If validation is required, select a validation rule.
-
Repeat these steps for utterance 2 and specify utterance2 as the key name.
-
Repeat these steps for the answer your assistant provides in addition to invoking the action. Specify answer as the key name.
    要注意:Key name:utterance1、Key name:utterance2 、Key name:answer は WA-IFTTT-Service boilerplateで定義されたため、これはそのまま使うと無事です!そのほかは任意です。


    label:utterance1

    Optional helper text:First possible utterance(Example:Remind me to pick up the shopping)

    Key name:utterance1

    Input validation: Validation required

    Validation rule: Text must not be blank


    label:utterance2

    Optional helper text:optional(Example:shopping)

    Key name:utterance2

    Input Type:text input

    Input validation:No validation required


    label:Answer

    Optional helper text:The answer that Watson Assistant will say back when trigger was fired.(Example:Email reminder sent)

    Key name:answer

    Input Type:text input

    Input validation:No validation required
- Specify the verbiage (text) that is displayed for the trigger when you select your Watson Assistant Solutions IFTTT service in the trigger. For example, When you say fields.utterance1 or fields.utterance2. In this example, if utterance1 is “hello” and utterance2 is “hi”, the applet describes the trigger as “When you say hello or hi”.
  documentの書き方は全部信じることはだめ!!!

 「 when you say fields.utterance1 or fields.utterance2  」ではなく、
 「 when you say {{fields.utterance1}} or {{fields.utterance2}}  」です。
- Add an ingredient. Ingredients are passed to the action. Enter the following values:
   これは既存のものなので新規必要がないかも

    Name: CreatedAt
    Slug: createdatではなく、created_atです! (documentにcreatedatけど、createdatだとendpoint test はずっと失敗した・・・・>_<)

    Note: Date and time the event was created
    Type: Select Date and time (ISO8801)
Step 6: Test the endpoint
Verify that IFTTT can communicate with your IFTTT service endpoint.
- Click Endpoint tests and verify that the message Success! All endpoint tests passed.
`https://platform.ifttt.com/services/wassd/api/endpoint_tests`
`Success!  All endpoint tests passed.ができたら、OK`
Step 7: Test the OAuth flow
- Verify that the OAuth flow is set up correctly between your IFTTT service endpoint and the IFTTT platform. Click Connection tests and verify that the message Success! Connection tests successful.
`https://platform.ifttt.com/services/wassd/api/connection_test`

`この時点で、WA-IFTTT-Service と IFTTT platform 間の疎通ができたことを確認した。`
■Deploying the IFTTT skill
The Watson Assistant Solutions offering provides a boilerplate in Node.js for creating an IFTTT skill.
IFTTT skillを作成するためのNode.js boilerplateが提供されている。
About this task
The IFTTT skill boilerplate uses a dedicated IFTTT nlu.
You must not change the nlu type in the manifest file of the skill.要注意:manifest fileのnlu typeを変更できません!
    It has an "ifttt nlu" that works as the following:

    * when gets an evaluate call, it fetches from WA-IFTTT-Service (which is configured in manifest.json in "iftttServiceEndpoint" field) all of the defined triggers for the user-id and returns confidence 1 iff there is a perfect match to one of the utterance

    * later when WA chooses this skill, it does a "fire-trigger" action with the triggerId from the evaluation response
Before you begin
-
Get access to your Watson Assistant Solutions instance. For instructions, see Access your Watson Assistance instance.
-
Install GIT.
-
Install NodeJS
-
Clone the IFTTT skill boilerplate. Contact the Watson Assistant Solutions team for access to the service boilerplate.
https://github.ibm.com/ConsumerIoT/IFTTTSkill
$ git clone git@github.ibm.com:ConsumerIoT/IFTTTSkill.git -
If you plan to host your skill on IBM Cloud, register for an IBM Cloud account.
-
If you plan to host your skill on IBM Cloud, install the IBM Cloud CLI tool.
-
Deploy an IFTTT service.
Complete these steps to clone, deploy, and register the IFTTT skill with your instance.

###**Step 1: Create the IFTTT skill**


まずはIFTTT skillを作成します。
    nameに関わっている箇所:

    1./manifest.yml   name、host

    2./IFTTTSkill/res/assets/manifest.json  name
- From the skill boilerplate top-level directory, optionally edit the IFTTT skill manifest file if you want to change the skill name, author, host name, or domain.
IFTTTSkill boilerplate で/manifest.yml
applications:
   path:
   buildpack: sdk-for-nodejs
   no-route: false
   memory: 128M
   instances: 1
   domain: mybluemix.net
   name: XXXiftttskill0627                ->renameが必須
   host: XXXiftttskill0627                ->renameが必須
   disk_quota: 256M
-
Optionally specify the port that the skill will listen on. In the IFTTT skill boilerplate, the default port is 10011. If you have multiple skills deployed on your local system, you might want to change the port number. Edit the .env.sample file and rename it .env.
このstepはやらないくてもいい。-
In the skill manifest file, ./res/assets/manifest.json, specify the following parameters:
-
iftttServiceEndpoint: The URL of your IFTTT service endpoint.
-
ifttt-skill-key: The skill key you specified when you configured your IFTTT service.a random key, which have to be equals to the key in WA-IFTTT-Service/config/config.json
IFTTTSkill/res/assets/manifest.json
-
    {

      "name": "XXXiftttskill0627",

      "description": "A skill that works with WA-IFTTT Service",

      "private": false,

      "author": "IBM",

      "version": "0.0.1",

      "license": "Apache-2.0",

      "threshold": 0.85,

      "languages": [

        "en-US"

      ],

      "nlu": [

        "iftttNlu", "skill"          ->これは変更できません!

      ],

      "tags": [

        "ifttt skill"

      ],

      "iftttServiceEndpoint": "https://wa-ifttt-service-XXX.mybluemix.net",

      "ifttt-skill-key": "wassd"

    }
-
Test that you can communicate with your skill on your local system.
-
Start your skill from the top-level directory of your skill. Enter: npm run start
`$ npm run start`
- Start a web browser and open the conversation REST API in the Swagger UI. Enter: http://localhost:10013. The swagger documentation page is displayed.
`http://localhost:10013/docs/`
Step 2: Deploy your IFTTT skill.
IBM cloudにIFTTT skill をdeployする。
If you want to host your skill on third-party cloud platform, follow the instructions for deploying applications from your cloud provided.
-
Open the IBM Cloud CLI.
-
To log in to IBM Cloud, enter bx login -a my.bluemix.net -o paste-your-IBMid-here -s dev
-
To push your skill to IBM Cloud, enter bx app push. An App started message is displayed.
`$ bx api https://api.ng.bluemix.net  `
`$ bx login -sso`
`$ bx target -o XXXXX@XX.XXX.com -s XXXXXX`
`$ bx app push`
Step 3: Register your skill with your Watson Assistant Solutions instance
Watson Assistant Solutions consoleにIFTTT skillを登録する
方法1:Watson Assistant Solutions consoleに 作成したskill end point URLを使って、skill/skillsetを登録する
(今回はこれで登録した)
- Log in to the Watson Assistant Solutions console.
    https://watson-personal-assistant-toolkit.mybluemix.net

    wa api-key = XXXXXXXXXXXXXXXXXXXXXXXXXXXXXX
- Click the Skills tab and click Add Skill. Specify the skill end point URL and the skill name.
    URL:XXXiftttskill0627.mybluemix.net

    Skill name:XXXiftttskill0627

    skill key:XXXXXXXXXXXXXXXXXXXXXXXXXXXXXX
- Follow the on-screen dialog to review and test your skill and to optionally add your skill to a new or existing skill set.
方法2:Conversation REST APIでskill/skillsetを登録する
-
Alternatively, use the following endpoints of the Conversation REST API to register your skill:
-
Skills: Register a skill and create a skill set.
-
SkillSets: Create a skill set and add skills to a skill set. For more information about the Conversation REST API, click Conversation API on the home page to view the Swagger specification.
    Create a skillSet: post /v2/api/skillSets

    Skill name:XXXiftttskill0627

    Add one or more skills to a skillSet: put /v2/api/skillSets/{skillSetName}

    https://watson-personal-assistant-toolkit.mybluemix.net/docs/?api_key=263a63f6-4e5e-4a6e-b59b-962050b3e7b0
■Creating an IFTTT applet
You can create an applet on IFTTT to link two independent services.
IFTTTを利用して、二つ独立なサービスを連結できます。
Important: In alpha mode, you can use a converse request to the Watson Assistant Solutions service as a trigger only. You can use another service as the action.
The applet that you create is enabled only for the user who creates it.
alpha modeでは、Watson Assistant Solutions service のみはtriggerとしてconverse requestを使えます。他のサービスは actionとして使えます。
Before you begin
-
Deploy an IFTTT service in your environment.
-
Deploy an IFTTT skill in your environment.
-
If you configured your IFTTT service to use IBMID authentication, register for an IBMid.
-
Register for an account on IFTTT.
Procedure
To create an IFTTT applet that uses the Watson Assistant Solution service in its trigger, complete these steps:
-
Log in to the IFTTT website.
-
Under your user name, click New Applet.
-
Configure the trigger which will start your applet.
-
Click the plus sign in IF This.
-
In the search field, enter your IFTTT service name.
-
Click on your service.
-
Click Connect.
-
When prompted, enter your log in details (for example, IBMid and password).
-
Click Voice Command.
-
Specify at least one utterance to be matched. For example, “turn off the lights”.
-
Specify an answer. For example, “the lights are turning off”. The answer is included in the response from Watson Assistant Solutions to the user when the action is invoked.
-
Click Create trigger.
-
Configure the action that your applet with perform when the trigger fires.
-
Click the plus sign before THAT.
-
Select a service, for example, send an email.
-
Click Connect.
-
Authorize the service.
-
Complete the action fields. For example, specify the text to include in the subject and body of the email.
-
Click Create action.
-
Give your applet a name and save it. The applet is enabled by default.
要注意:この時点で、CloudantDB 側にtriggerのUtterance1,2,answerなど情報docが生成されたはずです。 つまり、WA-IFTTT-service 、CloudantDBとIFTTTのapplet間のconnectionができたことを確認できた。
■Tutorial - creating an IFTTT applet
The high-level steps in this tutorial are as follows:
Create an account on the IFTTT platform.

Deploy an IFTTT service for your environment.

Deploy a IFTTT skill in your environment.

Create an applet that uses Watson Assistant Solutions service in its trigger.

Test that the applet works.
Step 1: Create an IFTTT service on the IFTTT platform
IFTTT platformでIFTTT サービス(Watson Assistant Solutions service)を作成する。
-
Create a developer account on the IFTTT plaform.
-
Go the Platform page.
-
Click Sign up.
-
Verify your email address.
-
Specify a service name that describes your Watson Assistant Solutions service.
-
Select an organization.
-
Create a new service ID. The service ID is a short, unique name to be used as your service’s identifier and in its IFTTT URLs.
-
Click Create.
-
Click the API tab.
-
Copy the service key that is provided for your service and save it for later use.
-
Register your new IFTTT service as an application that uses IBMid at https://w3.innovate.ibm.com/tools/sso/home.html.
Step 2: Configure and deploy a service on IBM Cloud
WA-IFTTT service の属性を設定して、IBM cloudにpushして、 WA-IFTTT service URLが生成される。
-
Clone the WA-IFTTT service boilerplate. Contact the Watson Assistant Solutions team for access to the service boilerplate.
-
In the top-level directory of the service repository, change the name of the configuration file from /config_template.json to /config.json.
-
Modify or add the following configuration parameters. service_key: The key provided on the API tab.
-
wa_api_url: Enter https://watson-personal-assistant-toolkit.mybluemix.net
-
wa_api_key: Your Watson Assistant Solutions instance API key.
-
oauth: Add values for client_id, client_secret, authorization_url, token_url, and introspect_url based on the values provided when you register the service for an IBMid.
-
ifttt-skill-key: A GUID your create for your skill. Save it for later use in your IFTTT skill configuration.
-
Push the service to IBM Cloud. Important: You must associate your service with a Cloudant database. Take note of the external URL of this service.
**具体的な情報を前文を参考してください。**
Step 3: Update the IFTTT service configuration on IFTTT
IFTTT platformでIFTTT API URLを追加する。
-
Click the API tab.
-
Paste the WA-IFTTT service URL into the IFTTT API URL field.
Step 4: Configure OAuth2 authentication for your IFTTT service
In this tutorial, we use IBMids to authenticate users.
IFTTT サービスのOAuth2認証を設定する。
-
Click the API tab.
-
Click Authentication.
-
Select the option My API has users with expiring OAuth2 access tokens and uses refresh tokens.
-
Enter values for the following parameters to configure authentication: Client ID: Client ID provided by your OAuth2 provider.
-
Client secret: Client secret provided by your OAuth2 provider.
-
Authorization URL: URL provided by your OAuth2 provider. A user is redirected to this URL to authenticate.
-
Token URL: URL provided by your OAuth2 provider. A user authorization code is exchanged for an access token at this URL.
-
edirect URL: URL that the user is redirected back to after the request is authorized. Enter: https://ifttt.com/channel/paste-your-service-id-here/authorize were service ID is the service_id you set in the service configuration.
Step 5: Create a new trigger
新しいtriggerを作成する。
-
Click the API tab.
-
Click Triggers.
-
Enter descriptions for the following trigger parameters: name: The name of the trigger.
-
Description: This trigger fires whenever you say one of the utterances.
-
Endpoint: Enter wa_commands.
-
Add trigger fields. For utterance1, enter:
label1: Enter Utterance1
Optional helper text: Enter An utterance that the trigger will fire on (otherwise known as a targer keyword).
Key name: Enter utterance1

Input type: Select Text input

Input validation: Select Validation required

Validation rule: Select Text must not be blank
- For utterance2, enter:
label1: Enter Utterance2

Optional helper text: Enter A second utterance that the trigger will fire on.

Key name: Enter utterance2

Input type: Select Text input

Input validation: Select No validation required
- For the answer, enter:
Label: Enter answer.

Optional helper text: Enter The answer that Watson Assistant Solutions gives when a trigger is fired.

Key name: Enter answer

Input type: Select Text input

Input validation: Select No validation required
- Specify the verbiage. Enter:
you say fields.utterance1 or fields.utterance2
- Configure an ingredient for the trigger. Enter:
Name: Enter CreatedAt

Slug: Enter createdat

Note:Enter Date and time event was created

Type: Select Date and time (ISO8601)
-
Verify that IFTTT can communicate with your IFTTT servcie endpoint.
-
Click Endpoint tests and verify that the message Success! All endpoint tests passed.
-
Verify that the OAuth flow is set up correctly between your IFTTT service endpoint and the IFTTT platform.
-
Click Connection tests and verify that the message Success! Connection tests successful.
Step 6: Clone, register, and deploy the IFTTT skill
IFTTT Skill をIBM cloudにpushして、 WA-IFTTT skill URLが生成される。
そして、このskillをWASに登録する。
-
Clone the IFTTT skill boilerplate. Contact the Watson Assistant Solutions team for access to the service boilerplate.
-
In the skilll manifest file, ./res/assets/manifest.json, specify the following parameters:
-
ftttServiceEndpoint: The URL of your IFTTT service endpoint.
-
ifttt-skill-key: The skill key you specified when you created an IFTTT service on the IFTTT platform.
-
Push the skill to IBM Cloud. Use the bx app push command.
-
Register the skill with your Watson Assistant Solutions instance. For more information about deploying the IFTTT skill, see Deplying the IFTTT skill .
Step 7: Create an applet on IFTTT
IFTTT platformでappletを作成する。
-
Log in to the IFTTT website.
-
Under your user name, click New Applet.
-
Configure the trigger which will start your applet.
-
Click the plus sign in IF This.
-
In the search field, enter the name of your service you created using Watson Assistant Solutions.
-
Select your service.
-
Click Connect.
-
When prompted, enter your IBMid and password to authenticate.
-
Click Voice Command.
-
Specify the first utterance to be matched.
For example, “Remind me to pick up the shopping”.
-
Specify an answer.
For example, “Email reminder sent”.
-
Click Create trigger.
-
Configure the action that your applet with perform when the trigger fires.
-
Click the plus sign before THAT.
-
Select send an email.
-
Click Connect.
-
Authorize the service.
-
Complete the action fields.
-
For the subject field, add the text Reminder: shopping. In the body, add Do some shopping after work.
-
Click Create action.
-
Give your applet a unique name and save it. The applet is enabled by default.
Step 8: Test the rule using Watson Assistant Solutions
- Log in to the Watson Assistant Solutions console with your IBMid.
https://watson-personal-assistant-toolkit.mybluemix.net

wa api-key = XXXXXXXXXXXXXXXXX
- On the chat interface, select the IFTTT skill.
chat interfaceは三つ方法があります。
1.WAS console     (userID指定されないので、今回は×)

2./converse API  (ok)

3.WA app chat (使い方:https://qiita.com/gosairei1207/items/d3055997b21bbb46c734)
- Enter: Remind me to pick up the shopping.
方法./converse APIを利用する場合、

要注意:userID必須なので、IBMidを使ってください!

request
    {

      "text": "Remind me to pick up the shopping",
      "language": "en-US",
      "userID": "XXXX_XX_XXX_com",
      "clientID": "client-001",
      "deviceType": "phone",
      "additionalInformation": {
       "context": {}
      }
    }

    response    Email reminder sentが返してくればOK~


    {

      "reject": false,

      "error": 200,

      "deleteSkillSession": true,

      "captureInput": false,

      "speech": {

        "text": "Email reminder sent"

      },

      "skill": {

        "name": "XXiftttskill0627",
        "intents": [
         {
            "intent": "fire-trigger",
            "confidence": 1
          }
        ],

       "entities": [
        {}
        ],
        "confidence": 1
      },
      "additionalInformation": {
        "context": {}
      }
    }
この時点で、WAS console とIFTTTskillとWA-IFTTT-service間のconnectionができたことを確認できた。

つまり、trigger was be fired ことが確認できた。

ちなみに、この時点でIFTTTのActivityでappletの動作状況を確認してみると、「Applet Ran」になっています。
- Go to the email account associated with your IFTTT account.
`しばらく待つと、(IFTTT can have a delay since trigger was fired until action is happening)`
- Verify that you receive a email with Reminder: shopping in the subject line and Do some shopping after work in the body.
メールが届いた〜〜
この時点で、下図のように1~5までのconncetionができた!