はじめに
先日社内の勉強会で、コンテナに関する勉強会をやることになりました。コンテナについて学ぶにはとりあえずハンズオンだろうという考えで資料を作成していましたが、
「勉強会中に実行環境用意する時間なくね...?」
という当たり前のことに気づき、勉強会参加者のための実行環境を用意する必要が出てきました。そこで今回、ブラウザだけで利用できるコンテナの実行環境を用意したので、その方法についてシェアできればと思います。
今回作成したファイルは以下にあります。
https://github.com/sogawa-yk/se-learning-hub-handson <- アプリ側
https://github.com/sogawa-yk/manifests <- k8sに適用するマニフェストたち
用意する環境
今回用意する環境に求められていたのは、大きく言えば次の三つです。
- ブラウザだけで簡単に利用できる
- ユーザーごとに異なる実行環境を提供する
- ユーザー数は事前にわからない(規模感はわかる)
- dockerが実行できる
この要件でぱっと思いついたのは、kodekloudのようなサービスです。kubekloudでは、登録したユーザーごとにラボ環境を用意して、簡単にKubernetesのハンズオンを行えるようになっています。
そこで今回は、kodekloudに倣った(倣ったというには稚拙すぎる)、ユーザーごとのシェル環境(dockerコマンドが実行可能)を用意しました。
完成品のイメージ
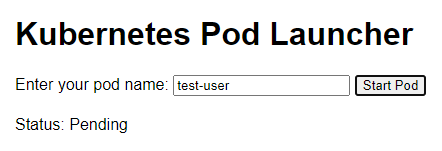
ユーザーは以下のようなシェル環境起動用のページにアクセスします。

Enter your pod nameの欄に、適当なユーザー名を入力して、Start Podボタンをクリックします。クリックすると以下のように起動状態が分かるようになっています。

起動が完了すると、シェル環境のページにリダイレクトされ、以下のようなページが表示されます。

これだけでハンズオン環境が用意できます!(ユーザーから見れば)
どうやって作ったか
今回この環境を用意するにあたって、利用したのは以下のような技術です。
- Kubernetes(計算基盤として)
- ttyd(ブラウザでシェル環境を表示するため)
- dind(コンテナ上でdocker環境を用意するため)
これらの技術を使ってどうやって作ったか、まずは概要から説明します。
概要
イメージは上図のようになります。
まずはユーザーはttyd+dindのPod起動用のページにアクセスし、そこで起動ボタンを押すと、バックエンドのロジックでKubernetes上にttyd+dindのPodと、そのPodにアクセスするためのService, Ingressが作成されます。作成完了後、作成したPodのページにリダイレクトします。ちなみに、Pod起動用のページに行くためのLBとIngressのLBを分けているのは、諸事情(実装時の知識不足)です。分けずに実装することもできますが、修正するのが面倒くさくなってしまいそのままにしています。Ingressもまとめてルールにできますが、そこも知識不足&そこまで考えるのが面倒になりました。すみません。
なにやら大分無駄の多い実装ですが、とりあえずこれで進めます。
Pod起動用のページを作る
Pod起動用のページで実装したロジックの大部分は、みんな大好きchatGPTさんに作ってもらいました。ありがとう、chatGPT。
「chatGPTに作ってもらったので説明は省きまーす」と言いたいところですが、それでは記事の意味がないので少し説明したいと思います。
Pod起動用のページを作るためのファイルは、以下のようなファイルになっています。
.
├── Dockerfile
├── app
│   ├── k8s_client.py
│   ├── routes.py
│   ├── run.py
│   └── static
│       └── index.html
├── manifests
│   ├── ingress-template.yaml
│   ├── web-shell-service-template.yaml
│   └── web-shell-template.yaml
└── requirements.txt

3 directories, 9 files
appの中にはwebサーバのflask用のコード(run.py, routes.py)と、ユーザーごとのマニフェストファイルを作成、適用するためのコード(k8s_client.py)、実際に表示するページのコード(static/index.html)が含まれています。manifestsの中には、作成するマニフェストファイルのテンプレートが入っています。実際マニフェストを作成・適用する際は、このテンプレートをちょっとだけ編集してクラスターに適用します。
テンプレートのマニフェストファイル
「ちょっと編集するってどれくらい編集しますのん?」と感じると思いますので、少しお見せしたいと思います。
例えば、シェル環境(ttyd+dind)のPodのマニフェストファイルのテンプレートは以下のような内容です。
apiVersion: v1
kind: Pod
metadata:
  name: {pod_name}
  labels:
    app: web-shell
    user-id: {pod_name}
spec:
  containers:
    - name: ttyd
      image: kix.ocir.io/orasejapan/se-learning-hub/web-shell/ttyd:latest
      ports:
        - containerPort: 7681
      env:
        - name: DOCKER_HOST
          value: "tcp://localhost:2375"

    - name: docker-daemon
      image: kix.ocir.io/orasejapan/se-learning-hub/web-shell/dind:latest
      securityContext:
        privileged: true
      ports:
        - containerPort: 2375
編集するのはなんと、pod_nameだけです。serviceやingressも同様です。
マニフェストを編集・適用するロジック
では、pod_nameはどのように編集しているかと言いますと、以下のようにしています。
def create_pod(pod_name):
    # マニフェストファイルからPodを作成
    template_pod_manifest_path = '/config/web-shell-template.yaml'
    template_svc_manifest_path = '/config/web-shell-service-template.yaml'
    template_ingress_manifest_path = '/config/ingress-template.yaml'
    output_path = '/config/'
    try:
        # Podマニフェスト生成
        with open(template_pod_manifest_path, 'r') as file:
            template = file.read()
        pod_manifest_yaml = template.format(pod_name=pod_name)
        pod_manifest_path = output_path + pod_name + '.yaml'
        with open(pod_manifest_path, 'w') as file:
            file.write(pod_manifest_yaml)

        # Serviceマニフェスト生成
        with open(template_svc_manifest_path, 'r') as file:
            template = file.read()
        svc_manifest_yaml = template.format(pod_name=pod_name)
        svc_manifest_path = output_path + pod_name + '-service.yaml'
        with open(svc_manifest_path, 'w') as file:
            file.write(svc_manifest_yaml)

        # Ingressマニフェストの生成
        with open(template_ingress_manifest_path, 'r') as file:
            template = file.read()
        ingress_manifest_yaml = template.format(pod_name=pod_name)
        ingress_manifest_path = output_path + pod_name + '-ingress.yaml'
        with open(ingress_manifest_path, 'w') as file:
            file.write(ingress_manifest_yaml)

        # マニフェスト適用
        utils.create_from_yaml(client.ApiClient(), yaml_file=pod_manifest_path, namespace='se-learning-hub')
        utils.create_from_yaml(client.ApiClient(), yaml_file=svc_manifest_path, namespace='se-learning-hub')
        utils.create_from_yaml(client.ApiClient(), yaml_file=ingress_manifest_path, namespace='se-learning-hub')
        return "Pod creation initiated successfully."
    except Exception as e:
        print(f"Failed to create pod: {str(e)}", file=sys.stderr)
        return f"Failed to create pod: {str(e)}"
「長くて読む気が起きないよ」という方のために、簡単に説明しますと、
- マニフェストのテンプレートファイルを読み込み
- pod_nameに受け取った値を入れる(これはユーザーが入力したユーザー名)
- pod_nameを入れた結果をyamlファイルとして書き込む
- そのyamlファイルをk8sクラスタに適用
これをpod, service, ingressに対して同様に実行しています。ちなみに、このバックエンドロジックはttyd+dindのPodと同じクラスター上にあるので、
config.load_incluster_config()
だけでマニフェスト適用が行えます。ただ、事前にPod作成などのロール適用は必要ですが。
ここまでのロジックによって、ttyd+dindのPod, そのPod用のservice, ingressのデプロイが可能になりました!(Ingressはルール追記でええやろがい!というツッコミに対しては、前述のとおり技術不足です。やる気が出たときに修正します。)
Podの状態を把握するロジック
ここに関してはロジックというほどでもないですが、一応Podの起動状態(Pending等)が起動ボタンを押してからリアルタイムで反映されるようにしているのでその実装について少し触れたいと思います。
static/index.htmlの中に、ステータス取得と、リダイレクトのためのjavascriptが仕込まれています。
    const INGRESS_IP = "{{ ingress_ip }}";

    function checkStatus(podName) {
      fetch(`/api/status/${podName}`)
        .then(response => response.json())
        .then(data => {
          if (data.status === 'Running') {
            setTimeout(() => {
              window.location.href = `http://${INGRESS_IP}/env/${podName}`; // Redirect after 5 seconds
            }, 5000);
          } else {
            document.getElementById('status').innerHTML = `Status: ${data.status}`;
            setTimeout(() => checkStatus(podName), 1000); // Check status every 1 second
          }
        })
        .catch(error => {
          document.getElementById('status').innerHTML = 'Error fetching status: ' + error.message;
          console.error('Error:', error);
        });
    }
from flask import Blueprint, jsonify, send_from_directory, request, render_template
from k8s_client import create_pod, get_pod_status
from flask import current_app as app
import os

main = Blueprint('main', __name__)

@main.route('/')
def index():
    ingress_ip = os.getenv('INGRESS_IP')
    return render_template('index.html', ingress_ip=ingress_ip)

@main.route('/api/start-pod', methods=['POST'])
def start_pod():
    pod_name = request.form['user-name']
    create_pod(pod_name)
    return jsonify({'podName': pod_name}), 200

@main.route('/api/status/<pod_name>', methods=['GET'])
def status(pod_name):
    status = get_pod_status(pod_name)
    return jsonify({'status': status}), 200
flask側に/api/status/<pod_name>というパスで各Podの状態を取得できるエンドポイントを用意しているので、そこからPodの状態を取得します。Podの状態がRunningの場合、5秒待ってからリダイレクトするようにしています(すぐリダイレクトするとうまく接続できなかったり、dockerdが動いていなかったりするため)。また、それ以外の状態の場合はその状態を出力(Idがstatusの要素に格納)します。INGRESS用LBのIPアドレスは、環境変数から指定します。環境変数は、kubernetesの項で設定方法を説明します。
ttydとdindのコンテナイメージを作成する
ここは実際のシェル環境の部分なので非常に大事な部分なのですが、そんなに複雑なことは何もなく、ただそれぞれのDockerfileを作るだけでOKです。実際にKubernetesに乗っける際には、ttydのコンテナとdindのコンテナをまとめてPodとして乗せます。
# Docker in Docker の公式イメージを使用
FROM docker:dind

# /etc/docker ディレクトリの作成
RUN mkdir -p /etc/docker

# Dockerデーモンの設定
# TLSを無効にしてHTTPで通信する設定ファイルを作成
RUN echo '{ "hosts": ["tcp://0.0.0.0:2375", "unix:///var/run/docker.sock"] }' > /etc/docker/daemon.json

# ポート2375を開放(Docker API用)
EXPOSE 2375

# Dockerデーモンをカスタム設定ファイルで直接起動
CMD ["dockerd", "--config-file=/etc/docker/daemon.json"]
FROM ubuntu:latest

# 必要なパッケージのインストール
RUN apt-get update && apt-get install -y \
  ttyd \
  bash \
  curl \
  software-properties-common \
  apt-transport-https \
  gnupg \
  git \
  && rm -rf /var/lib/apt/lists/*

# Docker CLIをインストール
RUN curl -fsSL https://download.docker.com/linux/ubuntu/gpg | apt-key add - \
  && add-apt-repository "deb [arch=amd64] https://download.docker.com/linux/ubuntu $(lsb_release -cs) stable" \
  && apt-get update \
  && apt-get install -y docker-ce-cli

# 環境変数の設定、Docker Daemonのアドレスを指定
ENV DOCKER_HOST=tcp://docker-daemon:2375

# ハンズオン資材をDL
RUN git clone https://github.com/sogawa-yk/se-learning-hub-handson.git

# ttydを使ってbashを公開
CMD ["ttyd", "bash"]
「dindのイメージでttydも動かせばええやんけ!なんで二つもコンテナ立てんねん!」というツッコミはごもっともなのですが、dindのイメージがなかなか扱いが難しく、ttydがうまく動かせなかったのでこのような構成になっています(逆もしかり)。
Kubernetesにリソースをデプロイ
ここまでで用意したコンテナイメージをもとに、Kubernetesに各リソースをデプロイしていきます。今回はイングレスのLBとウェブサーバ用のLBは別のものを使っているので、デプロイするべきなのは
- webサーバ用のDeployment
- webサーバ用のService (LoadBalancer)
- flaskサーバからkubernetesクラスタにpod等をアップロードするためのrole
- roleをサービスアカウントに適用するためのRoleBinding
になります。他のリソース(ttyd+dindのPod、そのPod用のService、Ingress)は動的にwebサーバ側でapplyしていくので、事前にapplyする必要はありません。
applyは、以下のコマンドで実行します。
kubectl apply -f web.yaml
kubectl apply -f web-service.yaml
kubectl apply -f role.yaml
kubectl apply -f role-binding.yaml
webサーバ用のDeployment
webサーバ用のDeploymentのマニフェストファイルは以下のようなものです。環境変数の値は各自で埋めていただく必要があります。
apiVersion: apps/v1
kind: Deployment
metadata:
  name: web
spec:
  replicas: 1
  selector:
    matchLabels:
      app: web
  template:
    metadata:
      labels:
        app: web
    spec:
      containers:
        - name: web
          image: kix.ocir.io/orasejapan/se-learning-hub/web:1.6
          ports:
            - containerPort: 80
          env:
            - name: INGRESS_IP
              value: "${INGRESS_IP}"
環境変数を埋める際は、例えば以下のように埋めることができます。
export INGRESS_IP=<ipアドレス>
envsubst < web.yaml.template > web.yaml
webサーバ用のService
webサーバ用のService (LoadBalancer)配下のようなマニフェストファイルでデプロイできます。
---
apiVersion: v1
kind: Service
metadata:
  name: web-service
  labels:
    app: web
  annotations:
    oci.oraclecloud.com/load-balancer-type: "lb"
    service.beta.kubernetes.io/oci-load-balancer-shape: "flexible"
    service.beta.kubernetes.io/oci-load-balancer-shape-flex-min: "10"
    service.beta.kubernetes.io/oci-load-balancer-shape-flex-max: "30"
spec:
  type: LoadBalancer
  ports:
    - port: 8080
      targetPort: 80
      nodePort: 30080
  selector:
    app: web
このServiceとwebサーバのPodの結び付けは、app: webのラベルで行っています。また、今回OCI上のマネージドKubernetesサービス(OKE)を使っているので、OCI上のロードバランサ―のための設定項目をannotationsで設定しています。
flaskサーバからkubernetesクラスタにpod等をアップロードするためのrole
kubernetesでは、事前にroleを設定しておくことで、そのネームスペースにおいてクラスターのリソースを操作する権限を、ユーザーやサービスアカウント等に与えることができます。今回はflaskが動いているpodにKubernetesのリソースを操作する権限を与えたいので、サービスアカウントのロールを作成します。
apiVersion: rbac.authorization.k8s.io/v1
kind: Role
metadata:
  namespace: se-learning-hub
  name: pod-manager
rules:
  - apiGroups: [""]
    resources: ["pods"]
    verbs: ["get", "list", "watch", "create", "delete"] # Pod に対する権限
  - apiGroups: [""]
    resources: ["services"]
    verbs: ["get", "list", "watch", "create", "delete"] # Service に対する権限
  - apiGroups: ["networking.k8s.io"]
    resources: ["ingresses"]
    verbs: ["create", "get", "list", "watch", "delete", "update"]
roleをサービスアカウントに適用するためのRoleBinding
roleを作成しただけでは、roleの定義が作成されただけで適用はされません。そのため、RoleBindingを作成して、サービスアカウントに作成したroleを適用する必要があります。
apiVersion: rbac.authorization.k8s.io/v1
kind: RoleBinding
metadata:
  name: manage-pods
  namespace: se-learning-hub
subjects:
  - kind: ServiceAccount
    name: default
    namespace: se-learning-hub
roleRef:
  kind: Role
  name: pod-manager
  apiGroup: rbac.authorization.k8s.io
さいごに
上記の様な工程を踏んで、無事にブラウザで完結する、社内勉強用のコンテナ実行環境が構築できました。まだまだ粗い部分があり、改善の余地はありますが、ハンズオンの時間くらいは耐えるくらいの完成度になっています。もし同様の環境が必要になっているような方がいらっしゃれば参考にしていただければと思います。
