目的
きっかけが多いので箇条書きにしてみます。
- Todoリスト作りたい
- JavaScriptが流行っているらしい
- Node.jsなるものが流行っているらしい
- React.jsなるものがすごい便利らしい
- かっこいいテキストエディタを作れるDraft.jsというライブラリがあるらしい
- Draft.jsの入れ子リスト(NestedList)が使えたら便利だなぁ
- なんだかよくわからないけど入れ子リスト(NestedList)を作れた ← イマココ
上記から読み取れる(?)ように本記事の目的は「NestedListのいじり方」の私的メモです。
簡単に作れるよみたいなことがDraft.jsの本家HPに書いてあったけど、結構ハマったのでメモ書きしたいのです。
NestedListとは
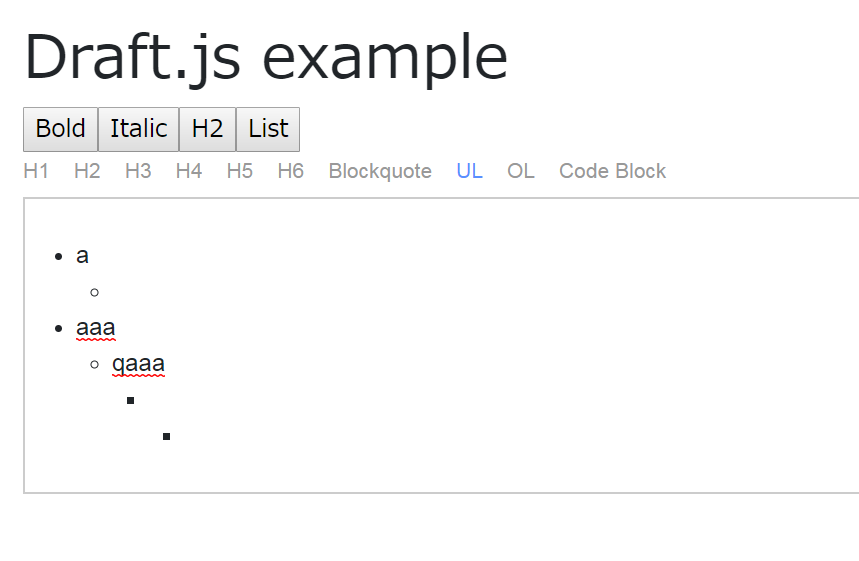
こういうやつのこと。リストが入れ子になってます。
NestedListに期待する機能
要求としてはそこまで多く無いけど、いざやろうってなったらきっとめんどくさい機能がまあまああります。キーの設定とか。
以下のような機能がほしいです。しかも簡単に扱いたいよ。
- Tabを押したら深さが増えてほしい(画像中のaの下の白丸みたいな感じ)
- Shift+Tabを押したら深さが減ってほしい(画像中のaaaみたいな感じ)
- 管理は楽めに
- デザインも楽に変えたい
Draft.jsの雛形
Draft.jsの雛形をまず下記します。
editor.js
import React from 'react';
import {Editor, EditorState, RichUtils} from 'draft-js';
import './editor.css';

class MyEditor extends React.Component {
  constructor(props) {
    super(props);
    // 初期化
    this.state = {editorState: EditorState.createEmpty()};
    this.onChange = (editorState) => this.setState({editorState});
    this.focus = () => this.refs.editor.focus();

    // ショートカットキーの設定
    this.handleKeyCommand = this._handleKeyCommand.bind(this);
    // Tab: 深さ+1, Shift+Tab: 深さ-1 の設定の参照
    this.onTab = this._onTab.bind(this);
  }

  /* Tab: 深さ+1, Shift+Tab: 深さ-1 の設定の本体 */
  _onTab(e){
    const newEditorState = RichUtils.onTab(e, this.state.editorState, 4);
    this.onChange(newEditorState);
  }
  /* ハンドルキーの定義 */
  _handleKeyCommand(command, editorState) {
    const newState = RichUtils.handleKeyCommand(editorState, command);
    if (newState) {
      this.onChange(newState);
      return 'handled';
    }
    return 'not-handled';
  }
  /* クリックイベント */
  _onBoldClick(e){
    this.onChange(RichUtils.toggleInlineStyle(this.state.editorState, 'BOLD'));
    // e.preventDefault();
  }
  _onItalicClick(e){
    this.onChange(RichUtils.toggleInlineStyle(this.state.editorState, 'ITALIC'));
    // e.preventDefault();
  }
  _onHeaderTwoClick(e){
    this.onChange(RichUtils.toggleBlockType(this.state.editorState, 'header-two'));
    // e.preventDefault();
  }
  _onUnoderedListClick(e){
    this.onChange(RichUtils.toggleBlockType(this.state.editorState, 'unordered-list-item'));
    // e.preventDefault();
  }

  /* レンダリング */
  render() {
    return (
      <div style={styles.root}>
      <h1>Draft.js example</h1>
    {/* Bold */}
      <button onMouseDown={this._onBoldClick.bind(this)}>Bold</button>
    {/* Italic*/}
      <button onMouseDown={this._onItalicClick.bind(this)}>Italic</button>
    {/* H2 */}
      <button onMouseDown={this._onHeaderTwoClick.bind(this)}>H2</button>
    {/* List */}
      <button onMouseDown={this._onUnoderedListClick.bind(this)}>List</button>
    {/* Editor */}
      <div style={styles.editor} onClick={this.focus}>
      <Editor
        editorState={this.state.editorState}
        onChange={this.onChange}
        handleKeyCommand={this.handleKeyCommand}
        onTab={this.onTab} // onTabを結びつける
        ref = "editor"
      />
      </div>
      </div>
    );
  }
}

const styles = {
  root: {
    fontFamily: 'sans-serif',
    padding: 20,
    width: 600,
  },
  editor: {
    fontFamily: 'YuGothic,\'Helvetica\', sans-serif',
    border: '1px solid #ccc',
    cursor: 'text',
    minHeight: 80,
    minWidth: 800,
    padding: 10,
  },
  button: {
    marginTop: 10,
    textAlign: 'center',
  },
};

export default MyEditor;
NestedListの設定
上記でなが~く書きましたが大事なのは以下の部分だけです。
[editor.js]
1. コンストラクタでthis.onTabを_this.onTabにbindする
2. _onTabメソッドの中でRichUtils.onTabによってEditorStateを更新する
3. <Editor>のプロパティonTabにthis.onTabを設定する
[editor.css]
1. public-DraftStyleDefault-depthX (X=0, 1, 2, 3, 4, ...)でデザインを設定する
※editor.cssの中身はDraft.jsについてくるDraft.cssをほぼまるまるコピーしたものです。
editor.js(大事なところバージョン)
import './editor.css'; // NestedListのデザインを入れる
class MyEditor extends React.Component {
  constructor(props) {
   .....略......
    // Tab: 深さ+1, Shift+Tab: 深さ-1 の設定の参照
    this.onTab = this._onTab.bind(this);
  }

  /* Tab: 深さ+1, Shift+Tab: 深さ-1 の設定の本体 */
  _onTab(e){
    const newEditorState = RichUtils.onTab(e, this.state.editorState, 4);
    this.onChange(newEditorState);
  }
  .....略.....
  /* レンダリング */
  render() {
    return (
  .....略.....
      <Editor
        ....略....
        onTab={this.onTab} // onTabを結びつける
        ....略....
      />
editor.css
/* リストに深さによってマージン深さ設定 depth0~depth4 */
.public-DraftStyleDefault-depth0 {
  margin-left: 1.5em
}
.public-DraftStyleDefault-depth1 {
  margin-left: 3em
}
.public-DraftStyleDefault-depth2 {
  margin-left: 4.5em
}
.public-DraftStyleDefault-depth3 {
  margin-left: 6em
}
.public-DraftStyleDefault-depth4 {
  margin-left: 7.5em
}

/* リストに深さによってリスト文頭の記号設定 */
/* depth0 */
.public-DraftStyleDefault-unorderedListItem.public-DraftStyleDefault-depth0 {
  list-style-type: disc
}
/* depth1 */
.public-DraftStyleDefault-unorderedListItem.public-DraftStyleDefault-depth1 {
  list-style-type: circle
}
/* depth2~ */
.public-DraftStyleDefault-unorderedListItem {
  list-style-type: square;
  position: relative
}
まとめ
ここまでで何がまとまったかわかんないけどまとめてみます。
- コンストラクタでthis.onTabを_this.onTabにbindする
- _onTabメソッドの中でRichUtils.onTabによってEditorStateを更新する
- <Editor>のプロパティonTabにthis.onTabを設定する
- public-DraftStyleDefault-depthX (X=0, 1, 2, 3, 4, ...)でデザインを設定するためにcssをインポートする
これらを守ればNestedListは使えるみたい。
まあ実装出来てよかった。