TL;DR
手元のPC(元APEX Legends用)を画像判定の機械学習用のマシンにした時のメモ。やっている内容は文末の参考資料とほぼ一緒。
知り合いの若手に公式読めと言われたので、その辺のリンクを合わせて書き出してみる。
前提
ローカル環境
| # | 主要カテゴリ | スペック等 |
|---|---|---|
| 1 | OS | Ubuntu 22.04 LTS |
| 2 | CPU | Intel gen11 Core i7 |
| 3 | GPU | Nvidia GTX 3600 |
| 3 | Main Board | MSI PRO Z690-A DDR4 |
| 4 | Memory | 64GB |
| 5 | Storage | SATA SSD 1GB |
Dockerの起動モード
rootlessで起動させない!安全性のためrootlessで起動させたかったが、22.04は動作保証外だった😭。
https://matsuand.github.io/docs.docker.jp.onthefly/engine/security/rootless/
手順
概要
- Ubuntu Serverのインストール準備
- Ubuntu Serverのインストール
- Nouveauのアンインストールとインストールをしないための設定
- NVIDIA driverのインストール
- CUDA Toolkitのインストール
- cuDNNのインストール
- Docker Engineのインストール
- NVIDIA Container Toolkitのインストール
Ubuntu Serverのインストール準備
注意 ここはWindows 11で作業した
Ubuntu DesktopではなくUbuntu Serverにしたのは、EC2にログインしたときにX Windowを立ち上げることが想定しずらいので、ひとまずServerにしてみる。
ダウンロードサイトはこちら
https://jp.ubuntu.com/download
iso形式のファイルがダウンロードされるので、書き込みは参考資料に従ってRufusでUSBにBoot USBを作る。
PCを再起動し、BIOS設定画面に入ってBoot順序でUSBメモリが最優先になるようにしておく。
Ubuntu Serverのインストール
インストーラーが立ち上がったら、公式のインストール手順に従ってインストールを進めていく。
自分が変更したのは、「8. Configure storage」でWindows 11が入ってない空のSATA SSDを選択した程度。
インストール後は再びマザーボードのBIOS設定画面に入り、Boot順序を調整する。内蔵ストレージの中でもどのドライブを優先するか設定する項目があるので、そこでWindows 11が入っているNVMe SSDではなく、Ubuntuの入ったSATA SSDが先になるようにする。GRUBの設定は特にしていないが、Ubuntu以外にもWindowsのBoot Managerが選択できるようになっていて、試しにWindows 11を選択してみたが、問題なくWindows 11を立ち上げることもできた。
Nouveauのアンインストールとインストールをしないための設定
Nouveauが何たるかはWikipediaのNouveauのページを読んでみるといいでしょう。
sudo vi /etc/modprobe.d/blacklist-nouveau.conf
以下を追記
blacklist nouveau
options nouveau modeset=0
initramfsを更新する。
sudo update-initramfs -u
sudo reboot
【TODO】この手順は参考資料の丸パクリなので、なんでinitramfsの更新が必要なのか私が理解していないので、後ほど調べてアップデートする。
NVIDIA driverのインストール
公式ページはこちら
sudo ubuntu-drivers list --gpgpu
nvidia-driver-535-server-open, (kernel modules provided by linux-modules-nvidia-535-server-open-generic)
nvidia-driver-535, (kernel modules provided by linux-modules-nvidia-535-generic)
nvidia-driver-550-server-open, (kernel modules provided by nvidia-dkms-550-server-open)
nvidia-driver-535-server, (kernel modules provided by linux-modules-nvidia-535-server-generic)
nvidia-driver-550-server, (kernel modules provided by nvidia-dkms-550-server)
nvidia-driver-545, (kernel modules provided by linux-modules-nvidia-545-generic)
nvidia-driver-470, (kernel modules provided by linux-modules-nvidia-470-generic)
nvidia-driver-535-open, (kernel modules provided by linux-modules-nvidia-535-open-generic)
nvidia-driver-545-open, (kernel modules provided by linux-modules-nvidia-545-open-generic)
nvidia-driver-470-server, (kernel modules provided by linux-modules-nvidia-470-server-generic)
正直これが一番こまった。と言うかまだ困っている。結局どれが正解なんだ!
今の所うまくいっているもの
| # | Version | OK/NG |
|---|---|---|
| 1. | nvidia-driver-535-server | OK |
| 2. | nvidia-driver-550-server | NG: 認識してくれない。しかもバージョン指定しないとこれが入る! |
インストールには次のコマンドを実行、続けて再起動
sudo apt install -y nvidia-driver-535-server
sudo reboot
※公式ではubuntu-drivers toolを用いたインストールが推奨されていたが、僕のマシンではこれは認識されなかった。(時間のあるとき再検証)
sudo ubuntu-drivers install --gpgpu
続いて、この後何度となく尾鷲になるnvidia-smiが含まれるパッケージをインストール。もしかしたら後ろに-serverがつかないドライバーならこのパッケージはインストールする必要はないかも。
sudo apt install nvidia-utils-535-server
CUDA Toolkitのインストール
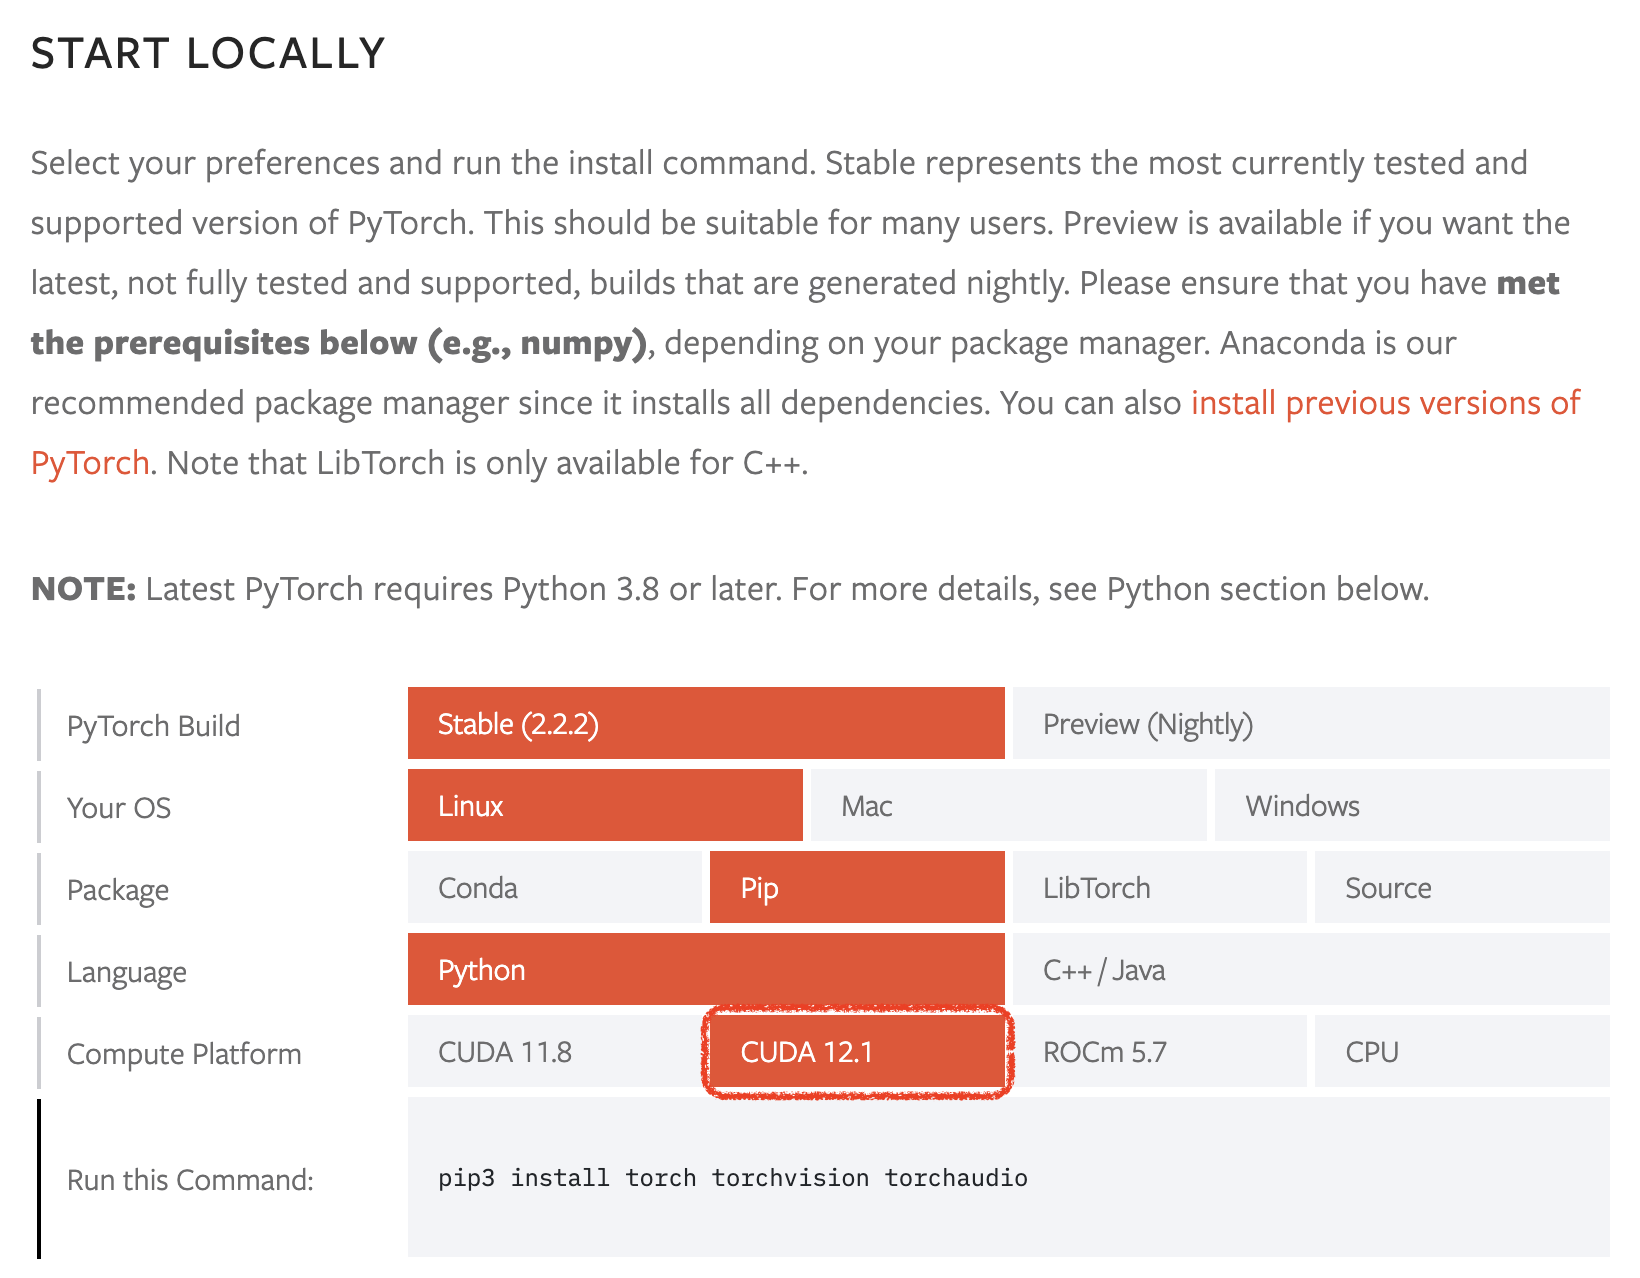
公式はこちらなのだが、なにせ最新版はこの後入れる予定のPyTorchが対応していない、、、もし私と同じようにPyTorchの利用を目的とするのであれば、先にどのバージョンがあうか調べておいた方がいい。PyTorchの公式はこちら

こちらをみる限り対応しているCUDAのバージョンは12.1か11.8のようです。私は12.1の方を選びました。
そこれでCUDA Toolkit Archiveから対応バージョンをダウンロードします。自動実行形式を選ぶとインストールがとても楽です。

この画面の下に具体的なダウンロードと実行コマンドが表示されます。それをコピペして実行します。
wget https://developer.download.nvidia.com/compute/cuda/12.1.1/local_installers/cuda_12.1.1_530.30.02_linux.run
sudo sh cuda_12.1.1_530.30.02_linux.run
すると大体こんな感じで画面が進みます。

すでにドライバーがインストール済みだが進むかどうか問われているのでContinueを選ぶ。

ライセンスに同意するか問われているので、acceptと入力してリターンキーを押す。

最後は古いバージョンのドライバーがインストールされないように、Driverの項目のXを外してInstallを選ぶ。
※こう考えると、530-serverは選択肢になかったがそれよりちょい新しい535-serverを選択したのは正解だったのかも。
cuDNNのインストール
cuDNNの公式はこちら
ここはちょっと先人と考えが違うのだが、公式に従って最新版をインストールしてみる。と言うのも、PyTorchの要件にcuDNNのバージョンがないからだ。ただし、CUDAのバージョンは合わせるものとする。そして最後にまた再起動する。インストール手順は公式の記載の通り。
wget https://developer.download.nvidia.com/compute/cudnn/9.1.0/local_installers/cudnn-local-repo-ubuntu2204-9.1.0_1.0-1_amd64.deb
sudo dpkg -i cudnn-local-repo-ubuntu2204-9.1.0_1.0-1_amd64.deb
sudo cp /var/cudnn-local-repo-ubuntu2204-9.1.0/cudnn-*-keyring.gpg /usr/share/keyrings/
sudo apt-get update
sudo apt-get -y install cudnn-cuda-12
sudo reboot
Docker Engineのインストール
Dockerの公式はこちら
以下、公式から転載。
# Add Docker's official GPG key:
sudo apt-get update
sudo apt-get install ca-certificates curl
sudo install -m 0755 -d /etc/apt/keyrings
sudo curl -fsSL https://download.docker.com/linux/ubuntu/gpg -o /etc/apt/keyrings/docker.asc
sudo chmod a+r /etc/apt/keyrings/docker.asc

# Add the repository to Apt sources:
echo \
  "deb [arch=$(dpkg --print-architecture) signed-by=/etc/apt/keyrings/docker.asc] https://download.docker.com/linux/ubuntu \
  $(. /etc/os-release && echo "$VERSION_CODENAME") stable" | \
  sudo tee /etc/apt/sources.list.d/docker.list > /dev/null
sudo apt-get update
sudo apt-get install docker-ce docker-ce-cli containerd.io docker-buildx-plugin docker-compose-plugin
NVIDIA Container Toolkitのインストール
下記のコマンドを実行する。
curl -fsSL https://nvidia.github.io/libnvidia-container/gpgkey | sudo gpg --dearmor -o /usr/share/keyrings/nvidia-container-toolkit-keyring.gpg \
  && curl -s -L https://nvidia.github.io/libnvidia-container/stable/deb/nvidia-container-toolkit.list | \
    sed 's#deb https://#deb [signed-by=/usr/share/keyrings/nvidia-container-toolkit-keyring.gpg] https://#g' | \
    sudo tee /etc/apt/sources.list.d/nvidia-container-toolkit.list
sed -i -e '/experimental/ s/^#//g' /etc/apt/sources.list.d/nvidia-container-toolkit.list
sudo apt-get update
Install the NVIDIA Container Toolkit packages:
sudo apt-get install -y nvidia-container-toolkit
sudo nvidia-ctk runtime configure --runtime=docker
sudo systemctl restart docker
動作確認
docker run --rm --gpus all nvcr.io/nvidia/cuda:12.1.1-cudnn8-devel-ubuntu22.04 bash -c "nvidia-smi; nvcc -V"
==========
== CUDA ==
==========

CUDA Version 12.1.1

Container image Copyright (c) 2016-2023, NVIDIA CORPORATION & AFFILIATES. All rights reserved.

This container image and its contents are governed by the NVIDIA Deep Learning Container License.
By pulling and using the container, you accept the terms and conditions of this license:
https://developer.nvidia.com/ngc/nvidia-deep-learning-container-license

A copy of this license is made available in this container at /NGC-DL-CONTAINER-LICENSE for your convenience.

Tue Apr 16 14:40:05 2024
+---------------------------------------------------------------------------------------+
| NVIDIA-SMI 535.161.08             Driver Version: 535.161.08   CUDA Version: 12.2     |
|-----------------------------------------+----------------------+----------------------+
| GPU  Name                 Persistence-M | Bus-Id        Disp.A | Volatile Uncorr. ECC |
| Fan  Temp   Perf          Pwr:Usage/Cap |         Memory-Usage | GPU-Util  Compute M. |
|                                         |                      |               MIG M. |
|=========================================+======================+======================|
|   0  NVIDIA GeForce RTX 3060        On  | 00000000:01:00.0 Off |                  N/A |
|  0%   38C    P8              13W / 170W |      1MiB / 12288MiB |      0%      Default |
|                                         |                      |                  N/A |
+-----------------------------------------+----------------------+----------------------+

+---------------------------------------------------------------------------------------+
| Processes:                                                                            |
|  GPU   GI   CI        PID   Type   Process name                            GPU Memory |
|        ID   ID                                                             Usage      |
|=======================================================================================|
|  No running processes found                                                           |
+---------------------------------------------------------------------------------------+
nvcc: NVIDIA (R) Cuda compiler driver
Copyright (c) 2005-2023 NVIDIA Corporation
Built on Mon_Apr__3_17:16:06_PDT_2023
Cuda compilation tools, release 12.1, V12.1.105
Build cuda_12.1.r12.1/compiler.32688072_0
お世話になったコマンドと設定
nvidia-smi
ビデオカードを認識しているのか確認するために何度となく、ホストOS、コンテナ内で活躍した。
ちなみに下記のようにオプションをつけると強制的にCPUとGPUを繋ぎっぱなしにしたり、オンデマンドで接続するよう切り離したりできる。
- sudo nvidia-smi -pm 1
- sudo nvidia-smi -pm 0
$ nvidia-smi
Tue Apr 16 14:19:35 2024
+---------------------------------------------------------------------------------------+
| NVIDIA-SMI 535.161.08             Driver Version: 535.161.08   CUDA Version: 12.2     |
|-----------------------------------------+----------------------+----------------------+
| GPU  Name                 Persistence-M | Bus-Id        Disp.A | Volatile Uncorr. ECC |
| Fan  Temp   Perf          Pwr:Usage/Cap |         Memory-Usage | GPU-Util  Compute M. |
|                                         |                      |               MIG M. |
|=========================================+======================+======================|
|   0  NVIDIA GeForce RTX 3060        Off | 00000000:01:00.0 Off |                  N/A |
|  0%   38C    P8              13W / 170W |      1MiB / 12288MiB |      0%      Default |
|                                         |                      |                  N/A |
+-----------------------------------------+----------------------+----------------------+

+---------------------------------------------------------------------------------------+
| Processes:                                                                            |
|  GPU   GI   CI        PID   Type   Process name                            GPU Memory |
|        ID   ID                                                             Usage      |
|=======================================================================================|
|  No running processes found                                                           |
+---------------------------------------------------------------------------------------+
TODO:他はあとで書き足す。
作業中にハマった罠
Ubuntuをインストールしたら、Ubuntuが立ち上がらなくなって黒画面になった。
ついでになぜかBIOSにも入れなくなった(ように見えた)。しかし、UbuntuをインストールしたSSDを物理的に外すとWindows 11は普通に立ち上がる。
モニターがG-Syncに対応していないのかそれともHDMIケーブルがわるかったのか?ひとまずG-Sync対応のモニターに変えたら無事映るようになった。
そこに辿り着くまでBIOSを強制アップデートなど何度となく繰り返してその間の憤り感が半端なかった。
Ubuntuを再起動すると、なぜかGPUを使うコンテナ立ち上げ時にエラーとなる。
【未解決】ldconfigが悪いだなんだ、Stack Over Flowとか出てたが、色々試しても根本解決に至らず。
docker run --rm --gpus all nvcr.io/nvidia/cuda:11.7.1-cudnn8-devel-ubuntu22.04 bash -c "nvidia-smi; nvcc -V"
docker: Error response from daemon: failed to create task for container: failed to create shim task: OCI runtime create failed: runc create failed: unable to start container process: error during container init: error running hook #0: error running hook: exit status 1, stdout: , stderr: Auto-detected mode as 'legacy'
nvidia-container-cli: initialization error: load library failed: libnvidia-ml.so.1: cannot open shared object file: no such file or directory: unknown.
【暫定対策】
なぜか、Dockerを再インストールすると、うまく動くようになる。
sudo apt autoremove -y docker-ce docker-ce-cli containerd.io docker-buildx-plugin docker-compose-plugin
sudo apt install -y docker-ce docker-ce-cli containerd.io docker-buildx-plugin docker-compose-plugin
上記コマンドを打つのすら面倒になってきたので.bashrcの下にaliasを設定した。
alias redoc='sudo apt autoremove -y docker-ce docker-ce-cli containerd.io docker-buildx-plugin docker-compose-plugin;sudo apt install -y docker-ce docker-ce-cli containerd.io docker-buildx-plugin docker-compose-plugin'
参考資料
以上