Hexabaseはエンタープライズ企業向けのBaaS(Backend as a Service)を提供しています。認証やデータストア(データベース)、ファイルストレージ、FaaS(Function as a Service)といった機能があります。

今回はそんなHexabaseとblastengineを使ってお問い合わせフォームを実装します。
コード
今回のコードはhttps://github.com/blastengineMania/hexabase-nextjs-contact にアップしてあります。実装時の参考にしてください。
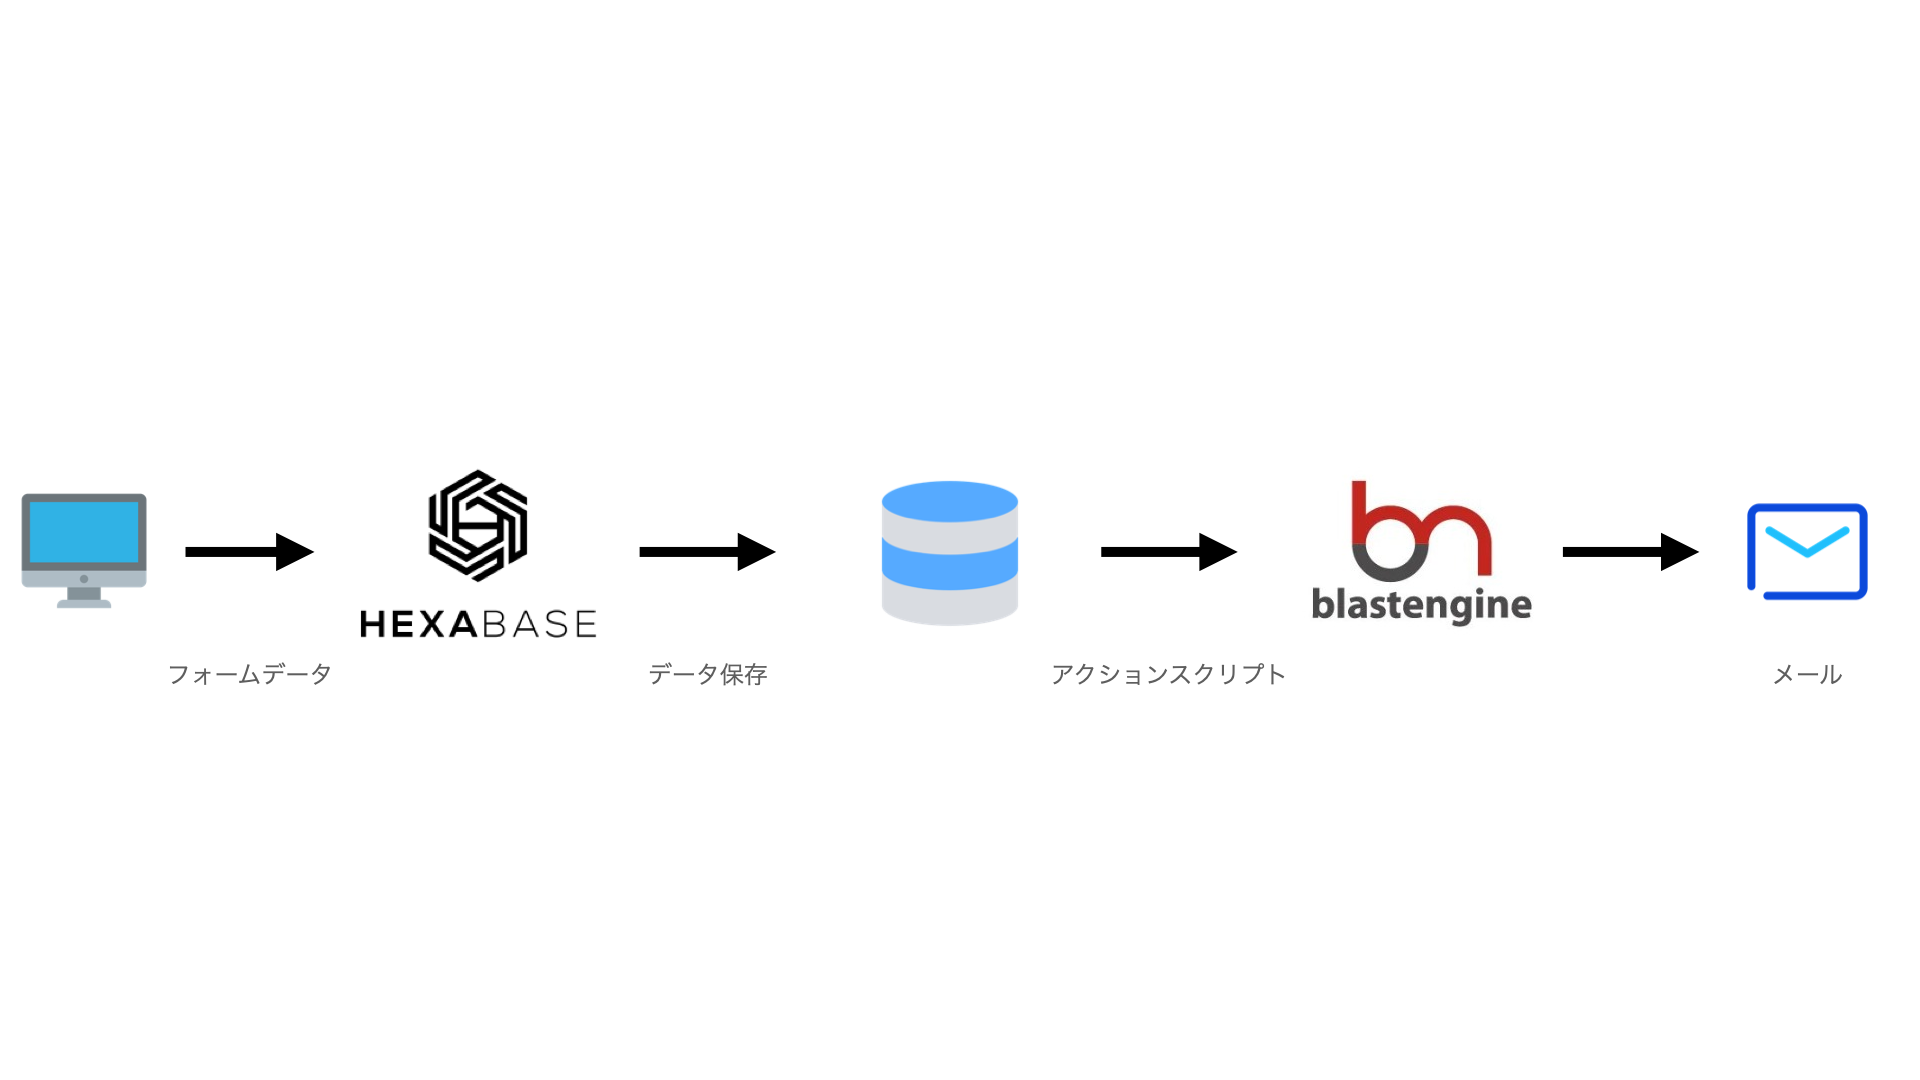
アーキテクチャ
今回のアーキテクチャは以下のようになります。Hexabaseのデータストアにお問い合わせ内容を登録した際に、それをフックとしてアクションスクリプト(Hexbaseの提供するFaaS)を呼び出します。その内容をblastengineに送ることで、お問い合わせ主への確認メールや自分たちへの通知を行います。
blastengineの準備
ユーザ登録する
blastengineにユーザ登録します。管理画面に入るためのユーザID、パスワードが手に入るので、ログインします(ユーザIDは後で使います)。
送信元ドメインのSPFを設定する
送信元として利用するドメイン(自分で持っているもの)の設定をします。これは任意のドメイン管理サービスで設定できますが、TXTレコードに以下のSPFを追加します。
txt @ v=spf1 include:spf.besender.jp ~all
APIキーを取得する
ログイン後、管理画面の右上にある設定メニューに移動します。

そして設定の中で、APIキーを取得します。

Hexabaseの準備
まずHexabase側の準備です。以下を順番に作成します。
- ワークスペース
任意の名前でOKです。ワークスペースIDはメモしておきます。 - プロジェクト
任意の名前でOKです。プロジェクトIDはメモしておきます。 - データストア
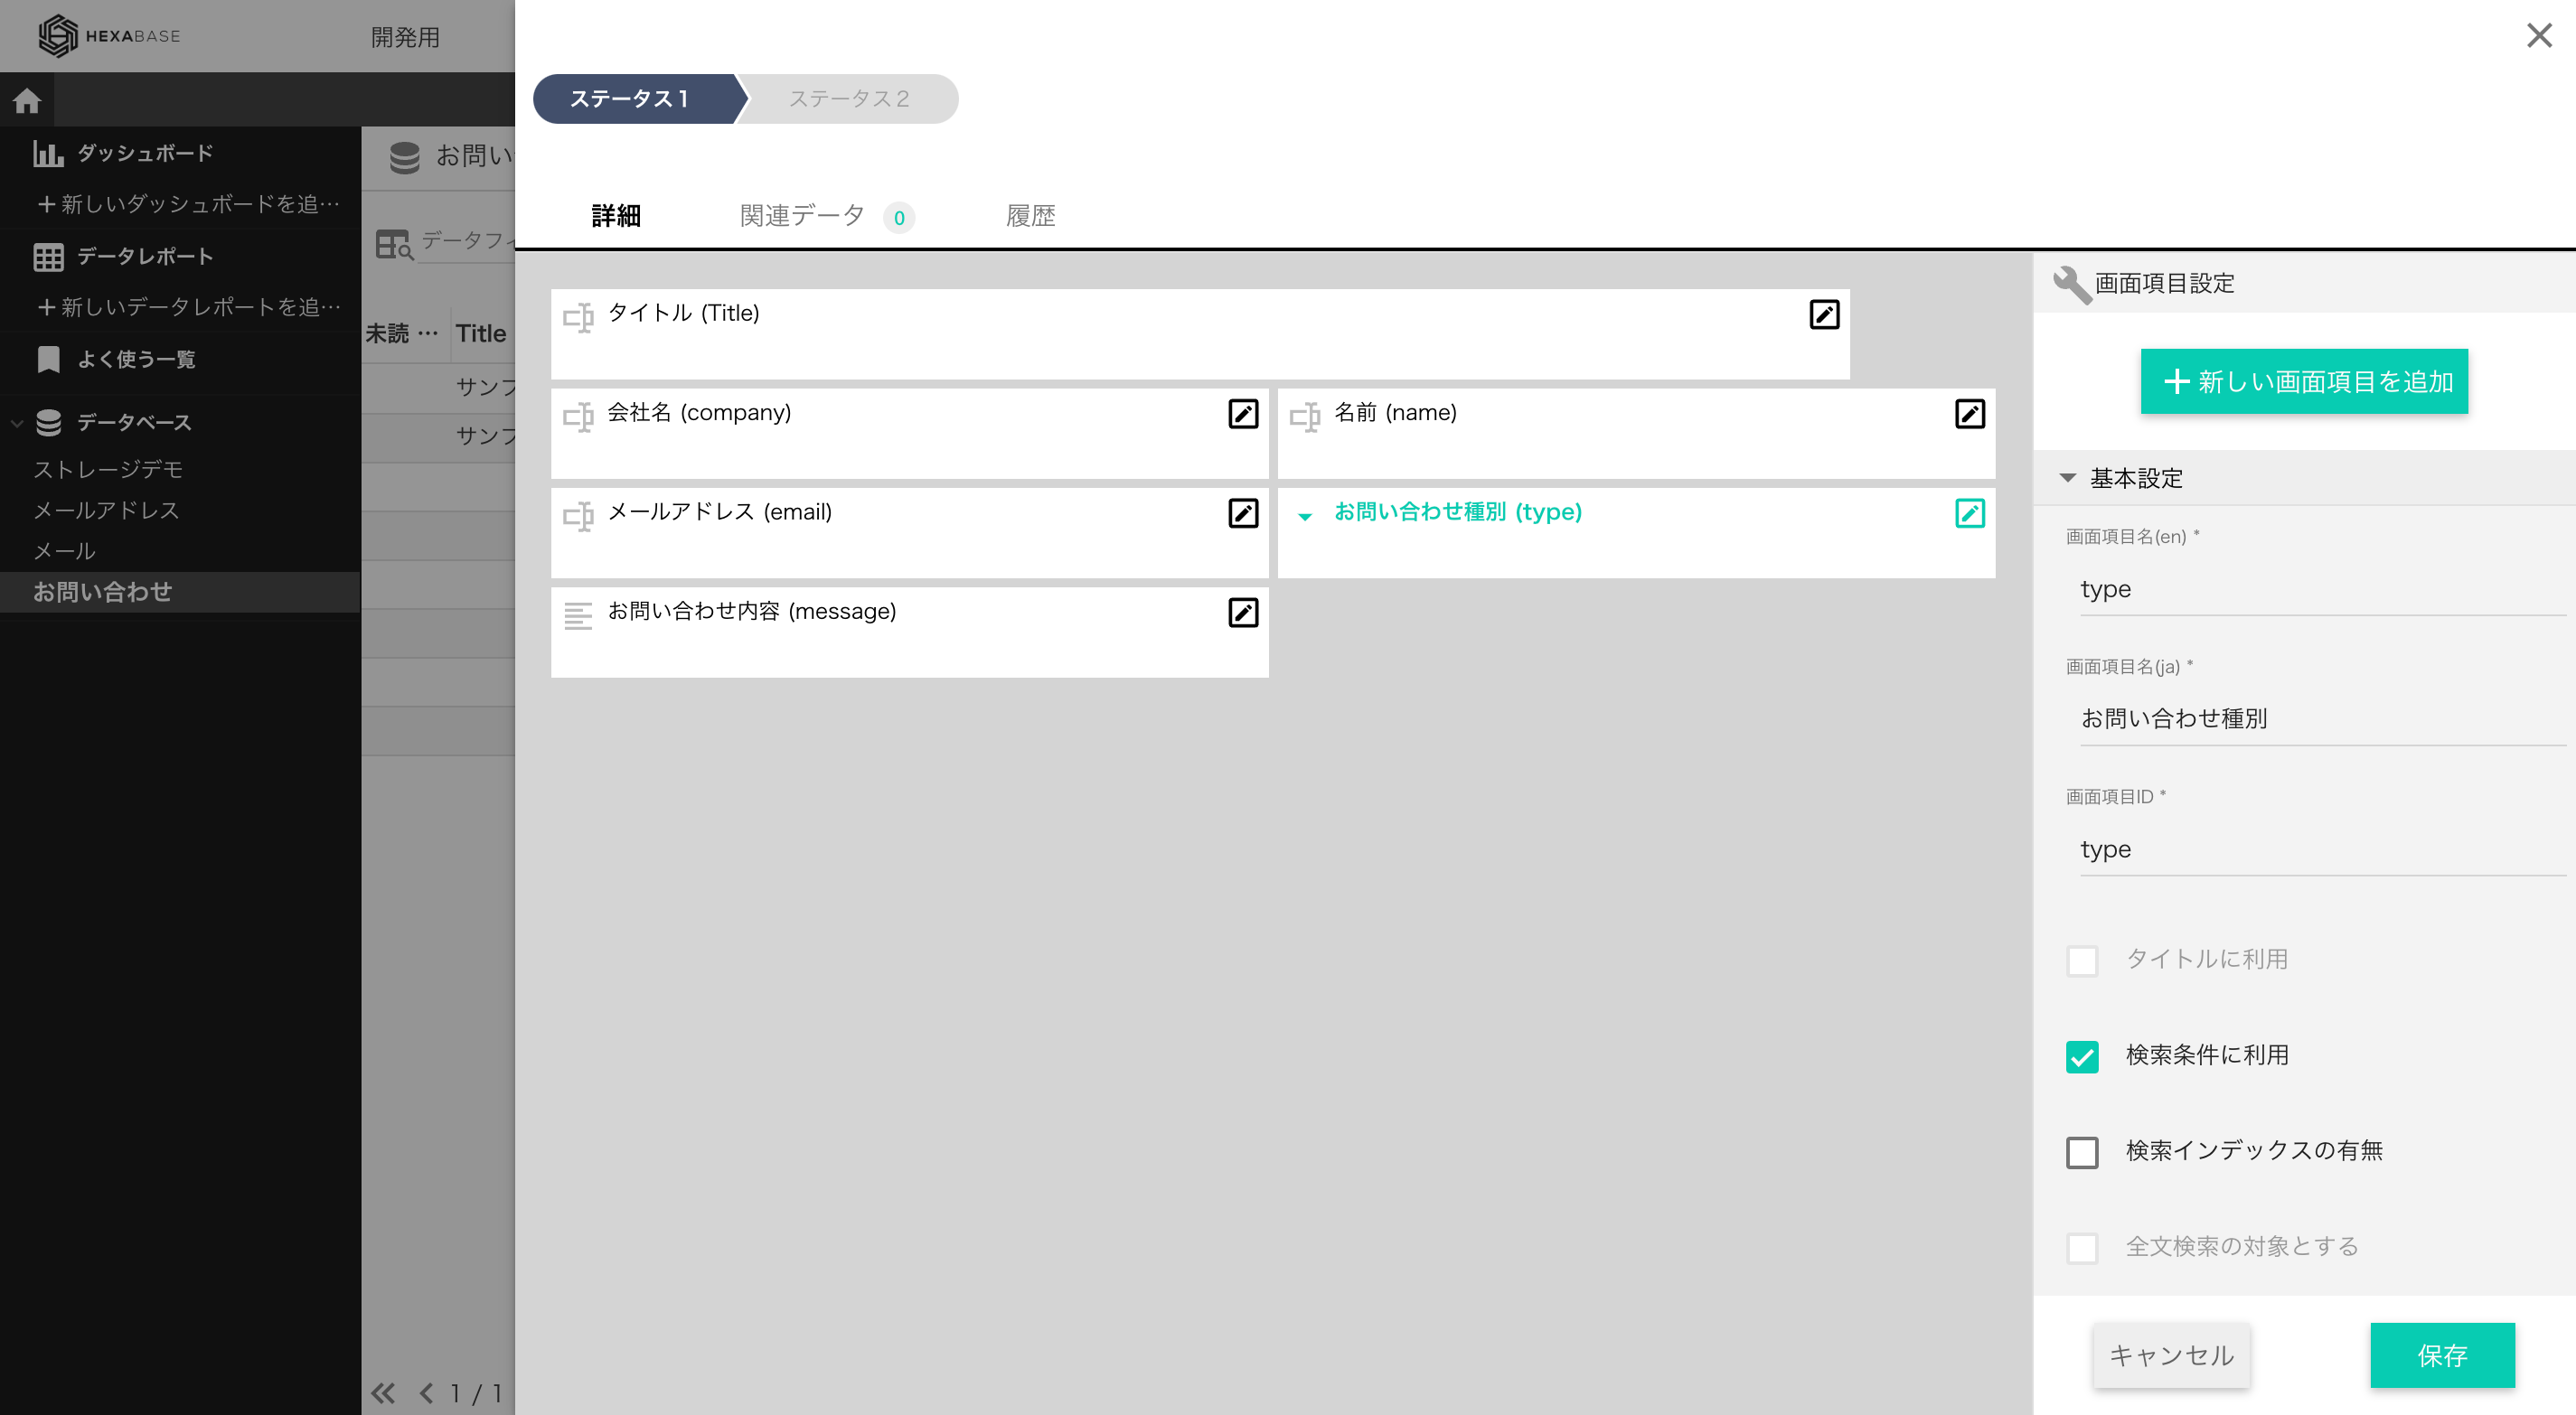
日本語名「お問い合わせ」、英語名はContactとします。データストアIDもContactとします。
データストアの設計
お問い合わせテーブルは、以下の項目を持っています。
| 項目 | 型 | 英語名&ID |
|---|---|---|
| 会社名 | テキスト | company |
| 名前 | テキスト | name |
| メールアドレス | テキスト | mailaddress |
| 問い合わせ種別 | 選択 | type |
| 問い合わせ内容 | テキスト | body |
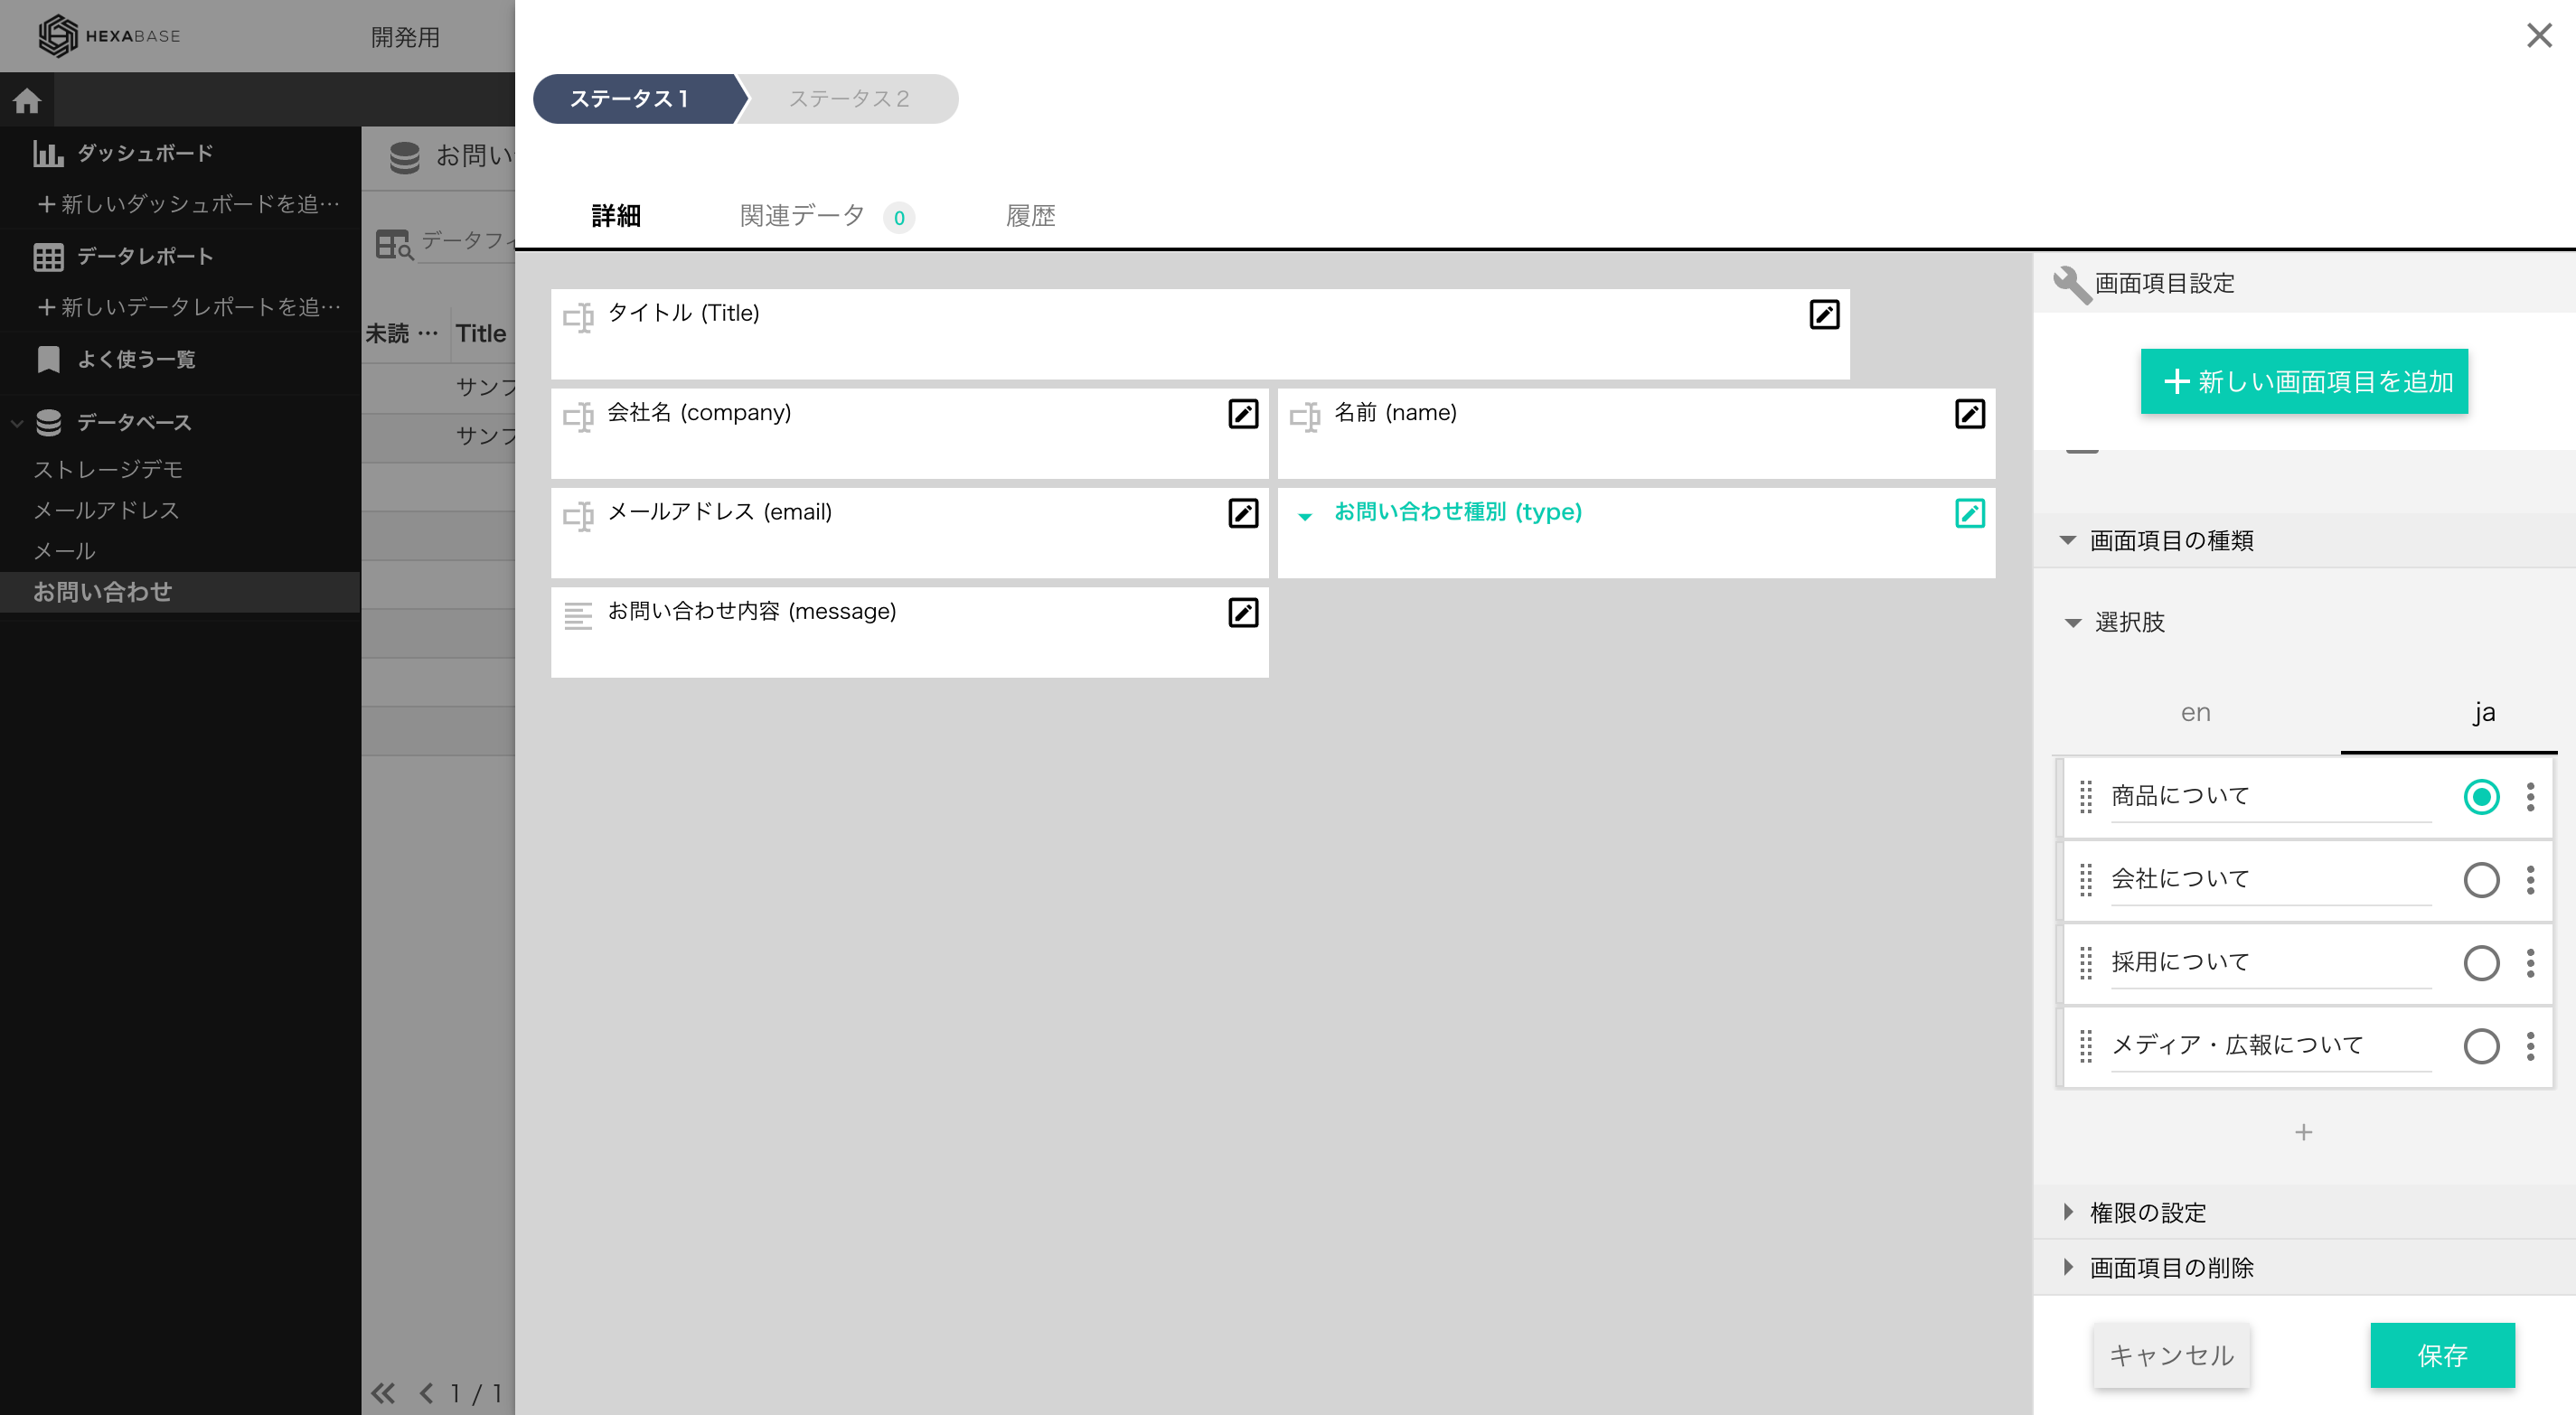
選択肢の用意
問い合わせ種別の選択肢を、以下のように作成します。英語名とIDは同じにしておきます。
| 日本語名 | 英語名&ID |
|---|---|
| 会社について | Company |
| 製品について | Product |
| 採用について | Recruitment |
| PR&広報 | PR |
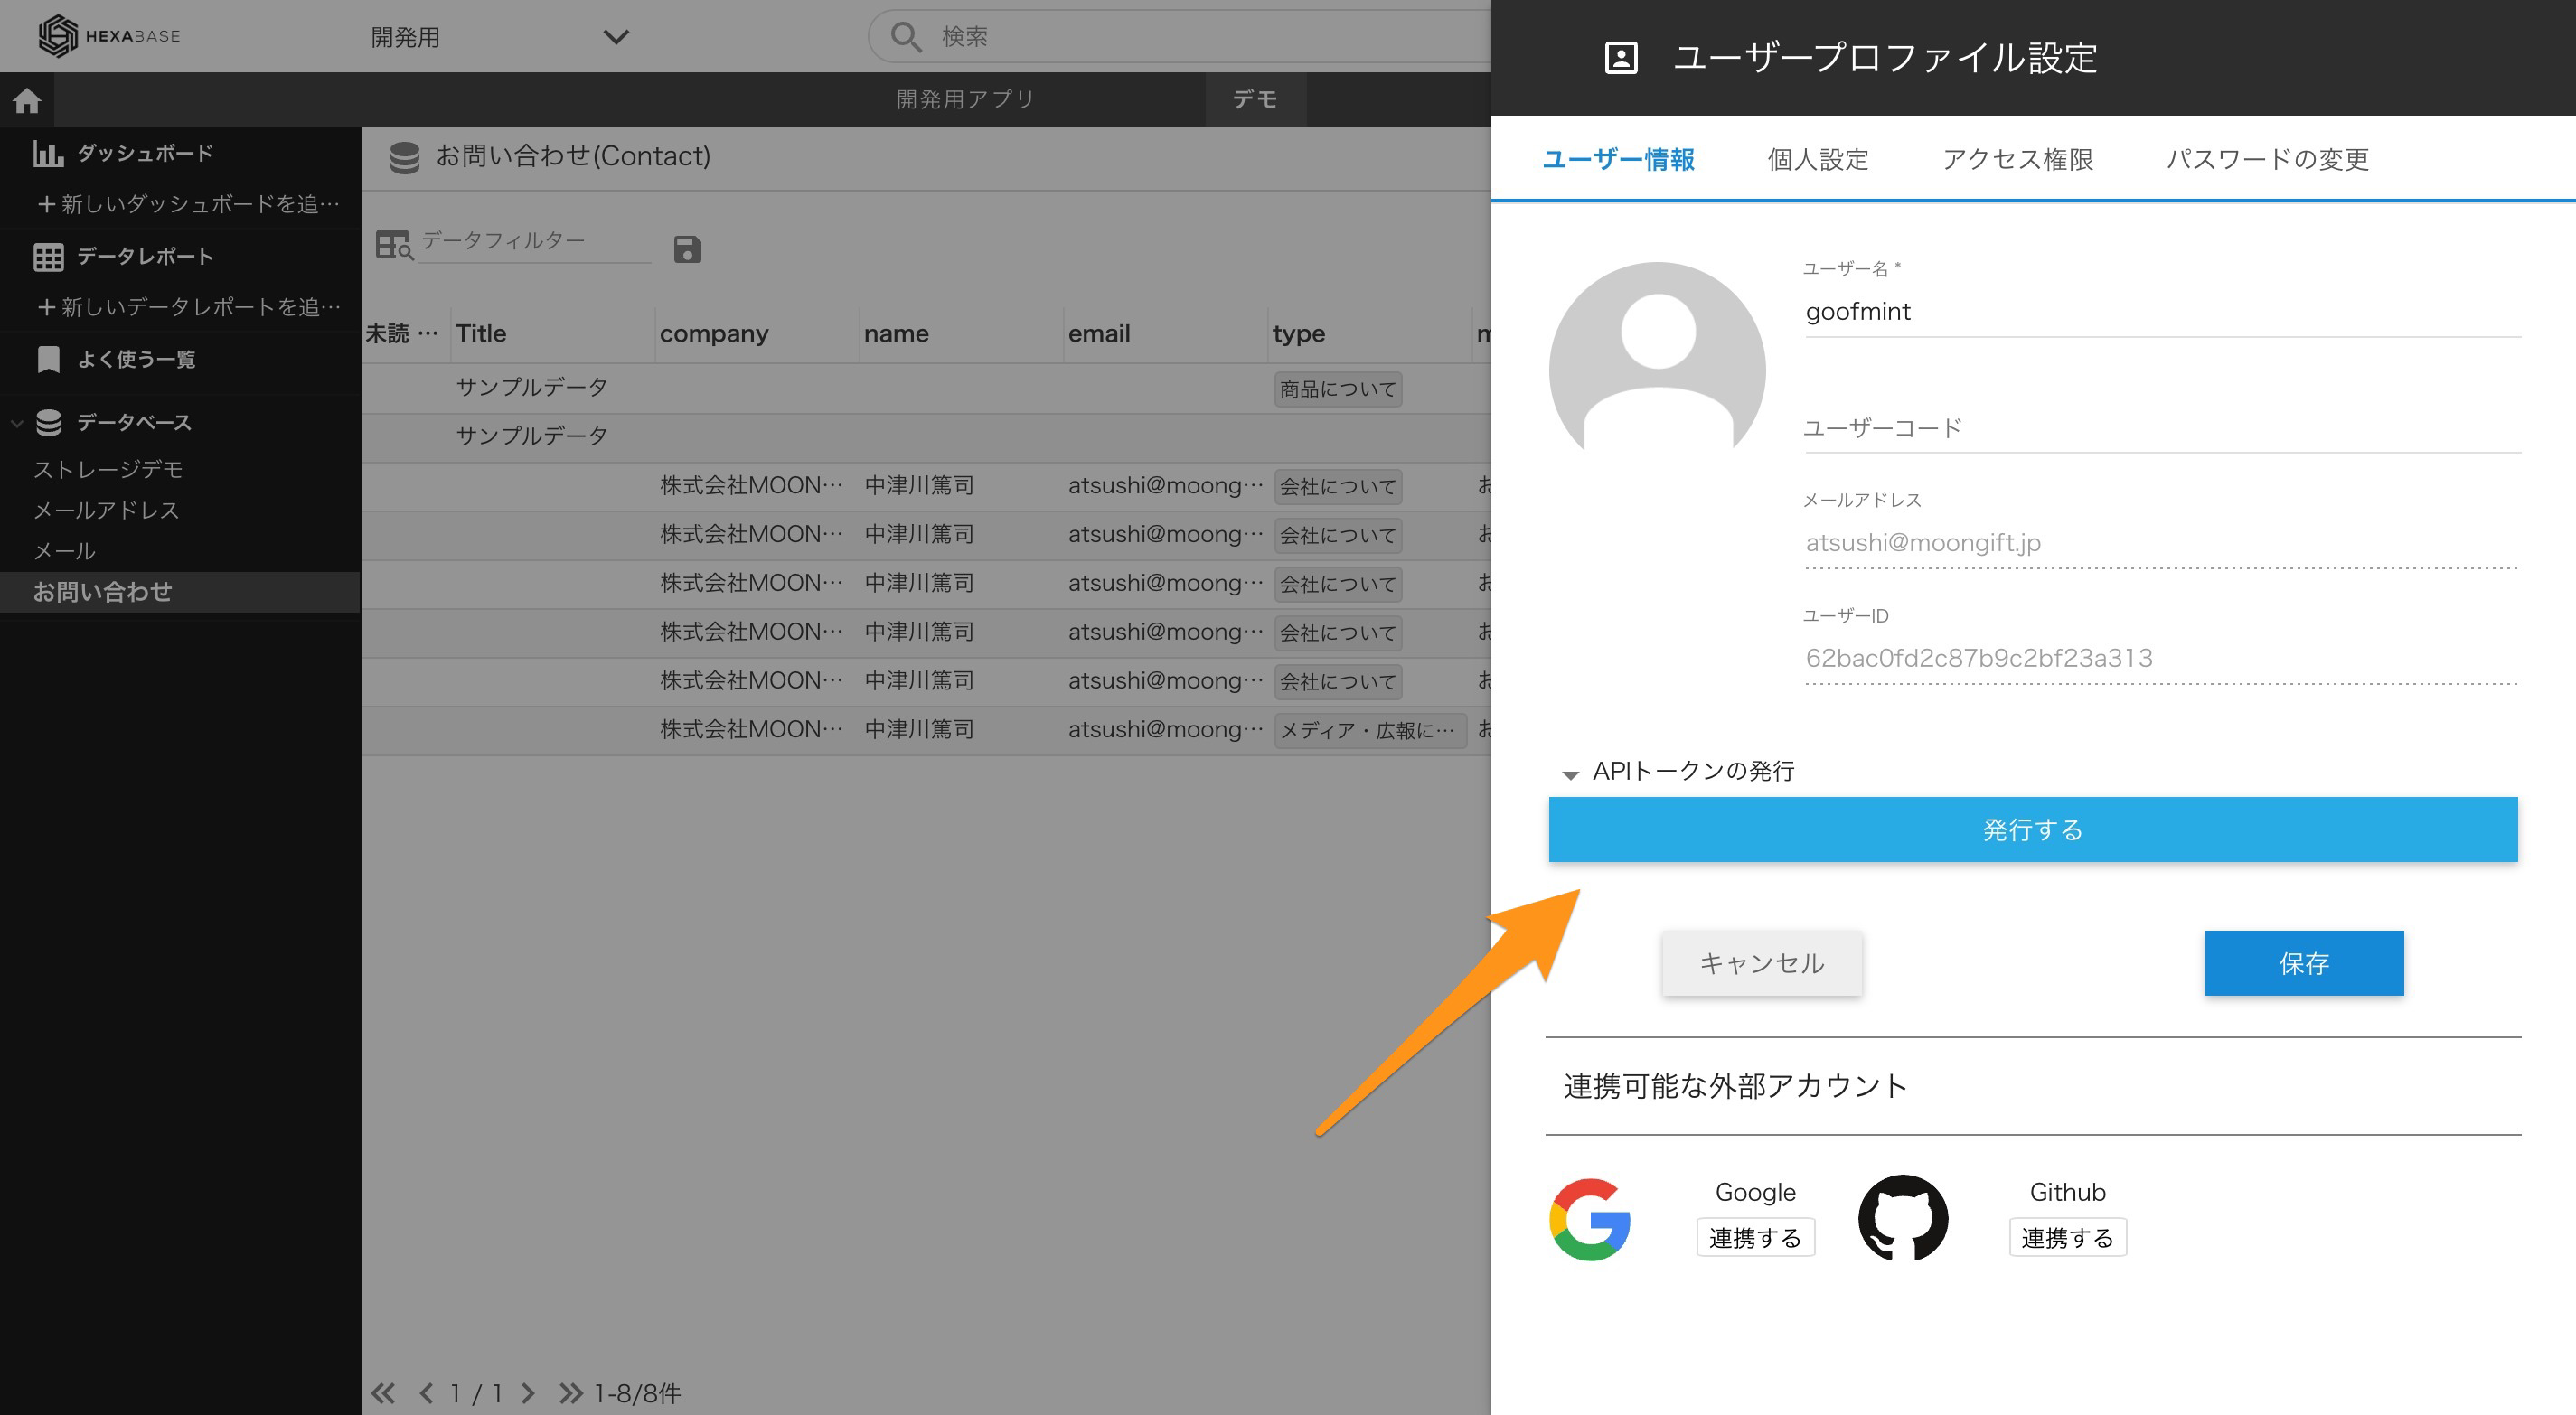
パブリックトークンの準備
Hexabaseでは認証して利用するのが基本ですが、お問い合わせの場合は認証は使わないでしょう。そこで、特定のユーザー情報に紐付くパブリックトークンを生成します。なお、執筆現在ではワークスペースごとの設定が必要です(要問い合わせ)。
実装について
フロントエンド
フロントエンドはNext.jsで実装します。入力項目は以下の通りです。これは先ほどのデータストアの設計と合わせています。
| 項目 | 型 | 変数名 |
|---|---|---|
| 会社名 | テキスト | company |
| 名前 | テキスト | name |
| メールアドレス | テキスト | mailaddress |
| 問い合わせ種別 | 選択 | type |
| 問い合わせ内容 | テキスト | body |
コードは以下のようになります。
ステートの準備
今回は以下のステートを用意しています。
// フォームの型
type formData = {
  company: string;
  name: string;
  email: string;
  type: string;
  message: string;
};

// 選択項目の型
type SelectOption = {
  label: string;
  value: string;
};

// フォームのデフォルト値
const defaultValue: formData = {
	company: '',
	name: '',
	email: '',
	type: '',
	message: '',
};
const [form, setForm] = useState<formData>(defaultValue);
const [options, setOptions] = useState<SelectOption[]>([]);
const [project, setProject] = useState<Project>(null);
表示されたタイミングの処理
表示された際に、選択肢「問い合わせ種別」を作成します。
useEffect(() => {
	initialize();
}, []);

const initialize = async () => {
	// パブリックトークンをセット
	await client.setToken(process.env.NEXT_PUBLIC_PUBLIC_TOKEN!);
	// 利用するワークスペースをセット
	await client.setWorkspace(process.env.NEXT_PUBLIC_WORKSPACE_ID!);
	// 利用するプロジェクトをセット
	const project = await client.currentWorkspace.project(
		process.env.NEXT_PUBLIC_PROJECT_ID!
	);
	// プロジェクトはuseStateを使って更新
	setProject(project);
	// 利用するデータストアをセット
	const datastore = await project.datastore(
		process.env.NEXT_PUBLIC_DATASTORE_ID!
	);
	// フィールドデータを取得
	const field = await datastore.field('type');
	// フィールドデータから選択肢を取得
	const options = await field.options();
	// フォームの初期値をセット
	setForm({ ...form, ...{ type: options[0].id } });
	// 選択肢をセット
	setOptions(
		options.map((option) => {
			return {
				value: option.id,
				label: option.value.ja,
			};
		})
	);
};
これで options を使って選択肢を表示できます。
<div className="block type">
	<label htmlFor="frm-type">お問い合わせ種別</label>
	<select
		onChange={(e) =>
			setForm({ ...form, ...{ type: e.target.value } })
		}
	>
		{options.map((option) => (
			<option value={option.value}>{option.label}</option>
		))}
	</select>
</div>
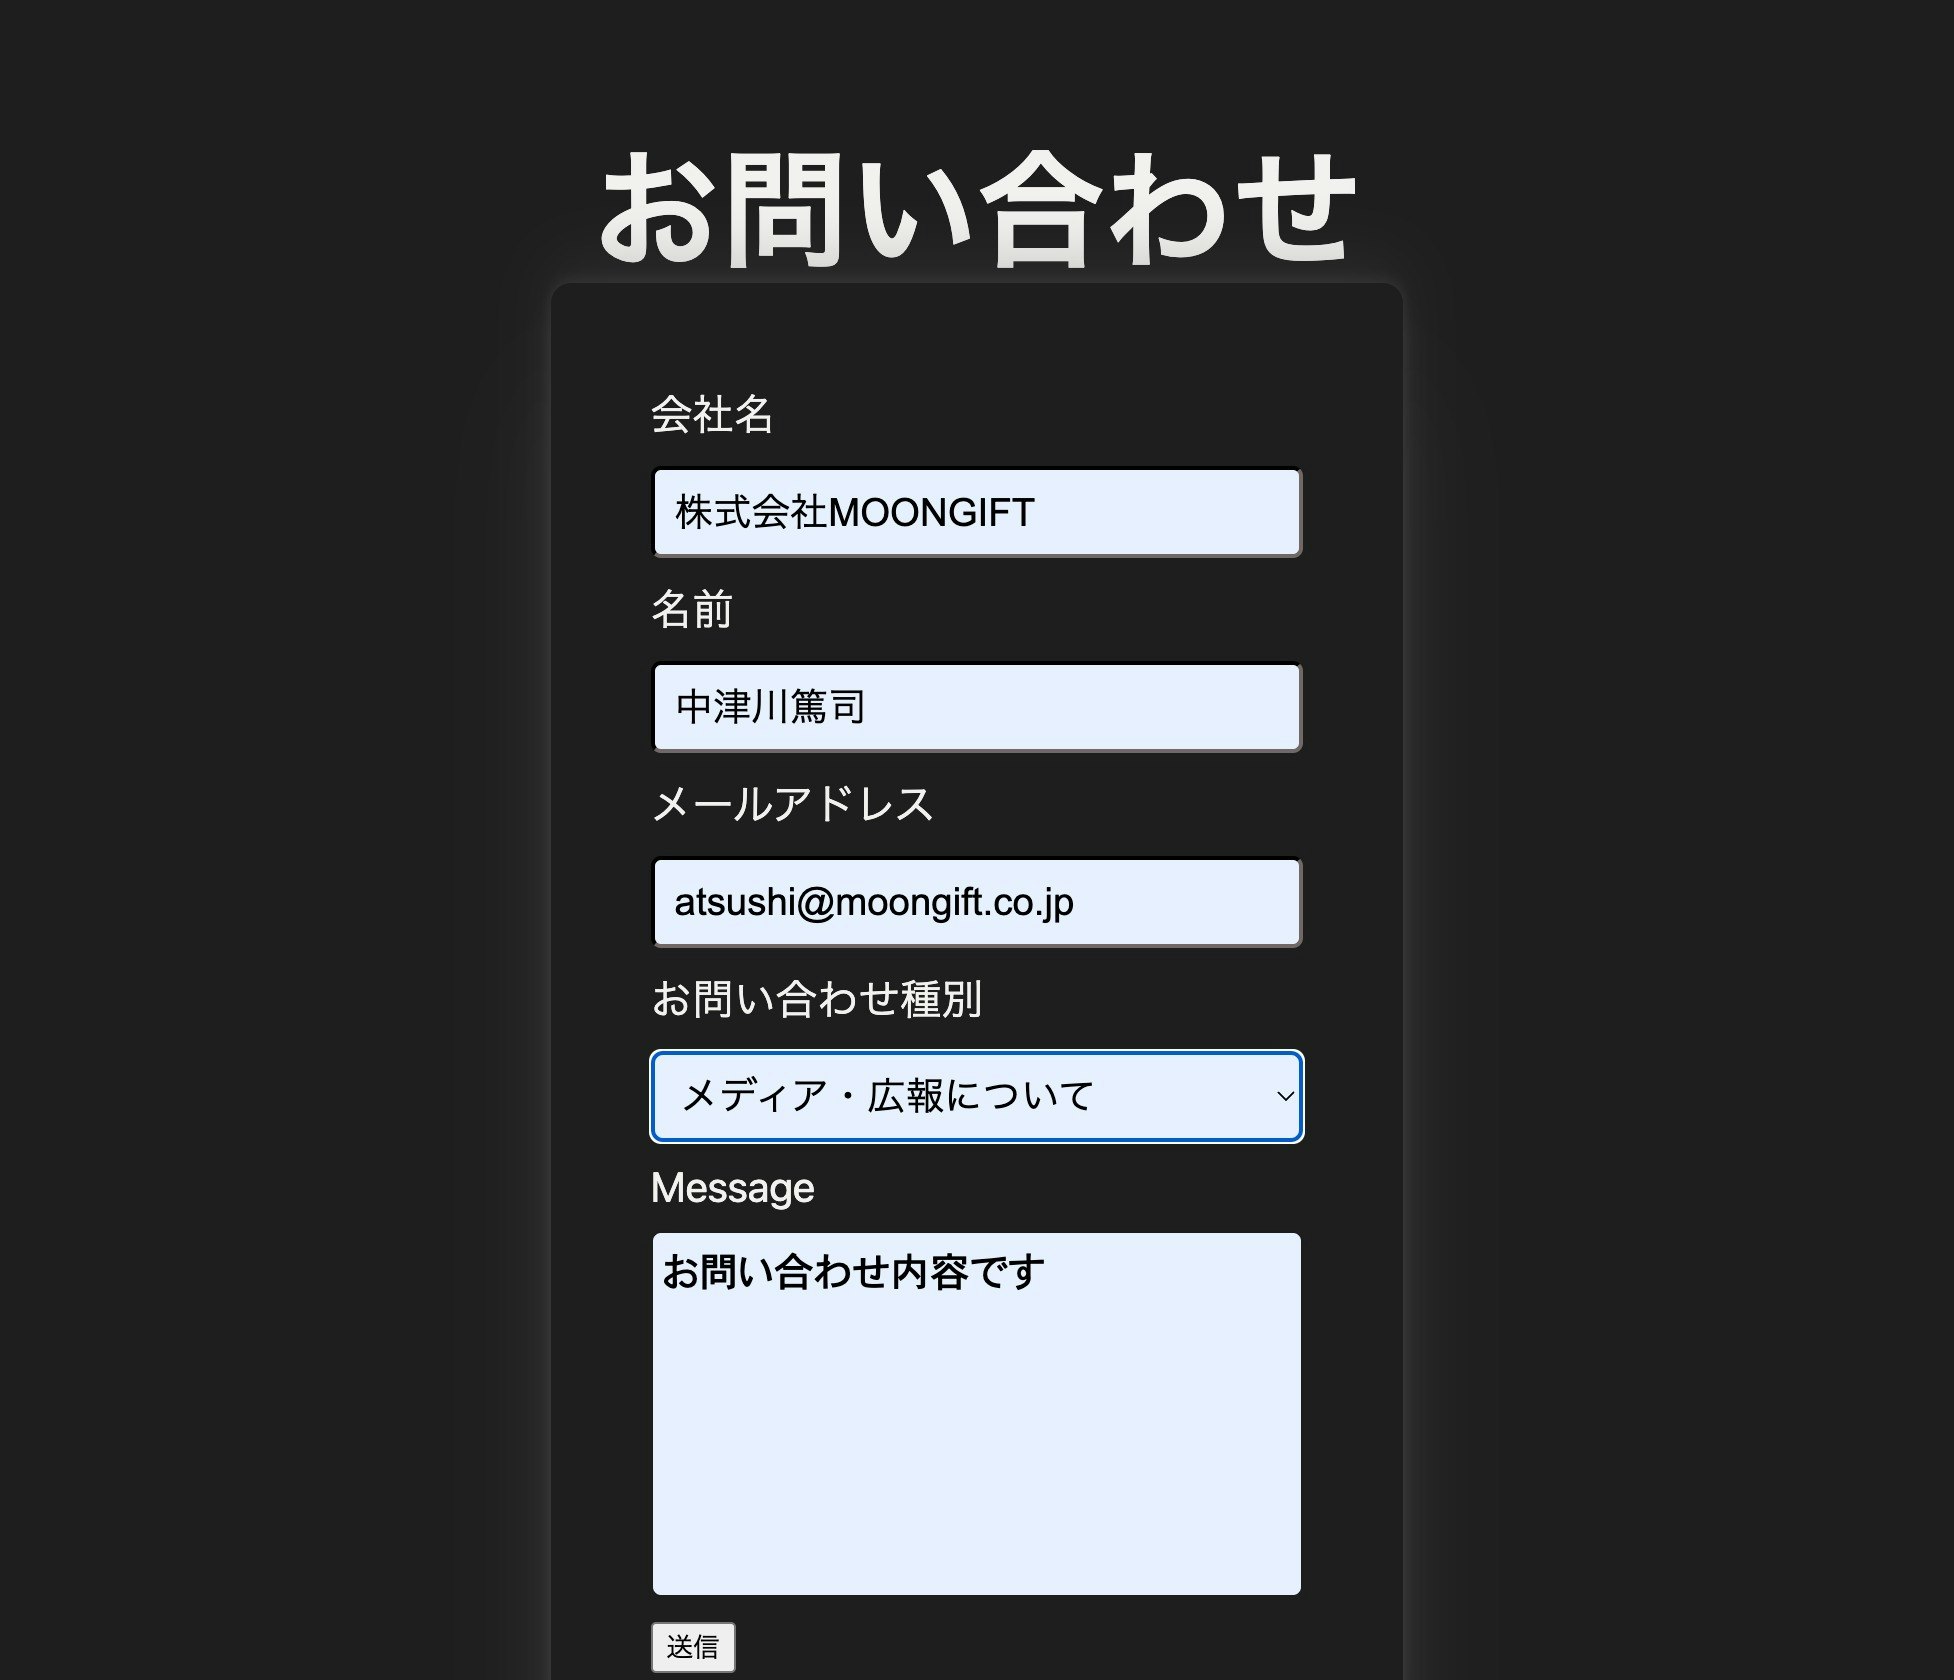
フォームについて
フォームは以下のようになります。入力されたら、その値をフォームに反映しています。ボタンやフォームの送信時には send 関数を呼んでいます。
<>
	<div className={styles.container}>
		<Head>
			<title>お問い合わせ</title>
		</Head>

		<main className={styles.main}>
			<h3 className={styles.title}>お問い合わせ</h3>
			<form className="container" onSubmit={send}>
				<div className="company block">
					<label htmlFor="frm-company">会社名</label>
					<input
						id="frm-company"
						type="text"
						value={form.company}
						autoComplete="company"
						onChange={(e) =>
							setForm({ ...form, ...{ company: e.target.value } })
						}
						required
					/>
				</div>
				<div className="account block">
					<label htmlFor="frm-name">名前</label>
					<input
						id="frm-name"
						type="text"
						value={form.name}
						autoComplete="name"
						onChange={(e) =>
							setForm({ ...form, ...{ name: e.target.value } })
						}
						required
					/>
				</div>
				<div className="email block">
					<label htmlFor="frm-email">メールアドレス</label>
					<input
						id="frm-email"
						type="email"
						value={form.email}
						autoComplete="email"
						onChange={(e) =>
							setForm({ ...form, ...{ email: e.target.value } })
						}
						required
					/>
				</div>
				<div className="block type">
					<label htmlFor="frm-type">お問い合わせ種別</label>
					<select
						onChange={(e) =>
							setForm({ ...form, ...{ type: e.target.value } })
						}
					>
						{options.map((option) => (
							<option value={option.value}>{option.label}</option>
						))}
					</select>
				</div>
				<div className="message block">
					<label htmlFor="frm-message">Message</label>
					<textarea
						id="frm-message"
						rows={6}
						value={form.message}
						onChange={(e) =>
							setForm({ ...form, ...{ message: e.target.value } })
						}
					>
					</textarea>
				</div>
				<button onClick={send}>送信</button>
			</form>
		</main>
	</div>
</>
また、CSS(global.css)は以下のようになります。
html,
body {
  padding: 0;
  margin: 0;
  font-family: -apple-system, BlinkMacSystemFont, Segoe UI, Roboto, Oxygen,
    Ubuntu, Cantarell, Fira Sans, Droid Sans, Helvetica Neue, sans-serif;
  background: #1e1e1e;
  min-height: 100vh;
  display: flex;
  color: rgb(243, 241, 239);
  justify-content: center;
  align-items: center;
}

.block {
  display: flex;
  flex-direction: column;
}

.name {
  display: flex;
  flex-direction: row;
  justify-content: space-between;
}

.container {
  font-size: 1.3rem;
  border-radius: 10px;
  width: 85%;
  padding: 50px;
  box-shadow: 0 54px 55px rgb(78 78 78 / 25%), 0 -12px 30px rgb(78 78 78 / 25%),
    0 4px 6px rgb(78 78 78 / 25%), 0 12px 13px rgb(78 78 78 / 25%),
    0 -3px 5px rgb(78 78 78 / 25%);
}

.container input {
  font-size: 1.2rem;
  margin: 10px 0 10px 0px;
  border-color: rgb(31, 28, 28);
  padding: 10px;
  border-radius: 5px;
  background-color: #e8f0fe;
}

.container select {
  font-size: 1.2rem;
  margin: 10px 0 10px 0px;
  border-color: rgb(31, 28, 28);
  padding: 10px;
  border-radius: 5px;
  background-color: #e8f0fe;
}

.container textarea {
  margin: 10px 0 10px 0px;
  padding: 5px;
  border-color: rgb(31, 28, 28);
  border-radius: 5px;
  background-color: #e8f0fe;
  font-size: 20px;
}

.container h1 {
  text-align: center;
  font-weight: 600;
}

.name div {
  display: flex;
  flex-direction: column;
}

.block button {
  padding: 10px;
  font-size: 20px;
  width: 30%;
  border: 3px solid black;
  border-radius: 5px;
}

.button {
  display: flex;
  align-items: center;
}

textarea {
  resize: none;
}
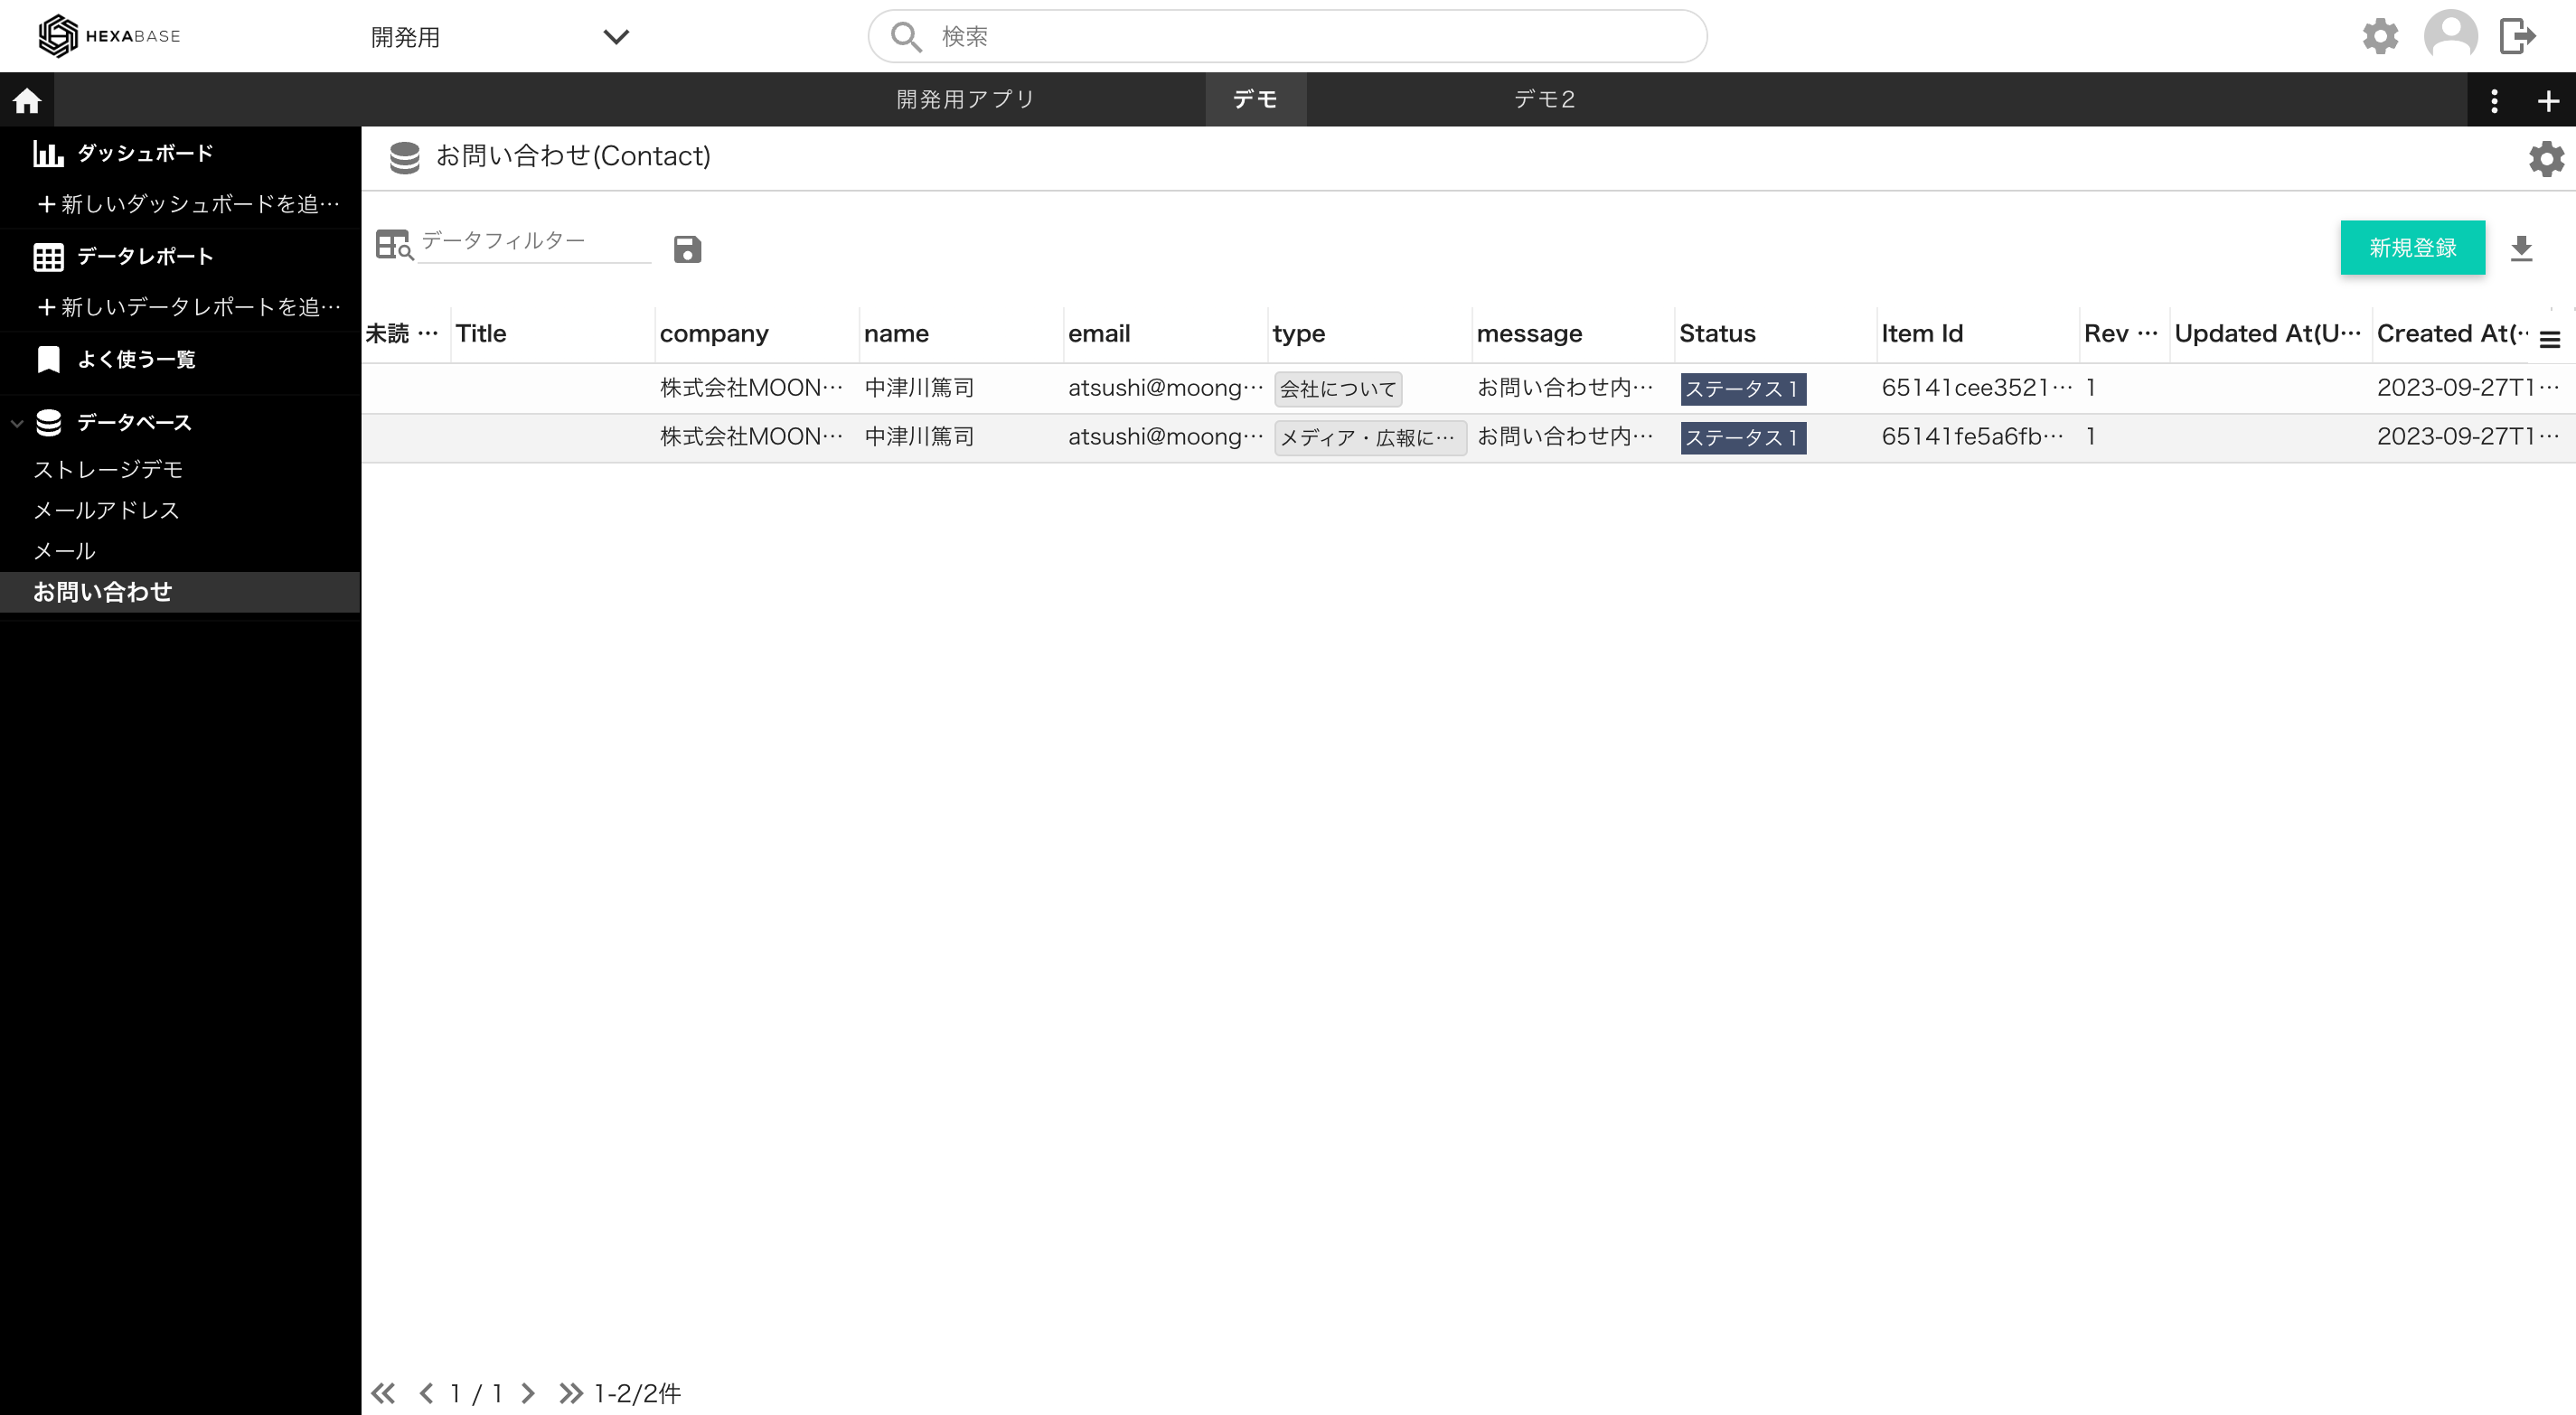
送信した際の処理
送信ボタンを押した際の処理として、Hexabaseにレコードを保存します。これはHexabaseのTypeScript SDKを使って実装しています。
const send = async (e) => {
	e.preventDefault();
	// お問い合わせが入るテーブル
	const datastore = await project.datastore(
		process.env.NEXT_PUBLIC_DATASTORE_ID!
	);
	// お問い合わせ種別のフィールドを取得
	const field = await datastore.field('type');
	// お問い合わせの選択肢を取得
	const options = await field.options();
	// 該当する選択肢を取得
	const option = options.find((option) => option.id === form.type);
	// レコードを作成
	const item = await datastore.item();
	// レコードにフォームの入力値を適用して、保存
	await item
		.set('company', form.company)
		.set('name', form.name)
		.set('type', option.id)
		.set('email', form.email)
		.set('message', form.message)
		.save();
	// 送信完了のアラート
	alert('送信しました');
	// 入力値を初期化
	setForm(defaultValue);
};
アクションスクリプト
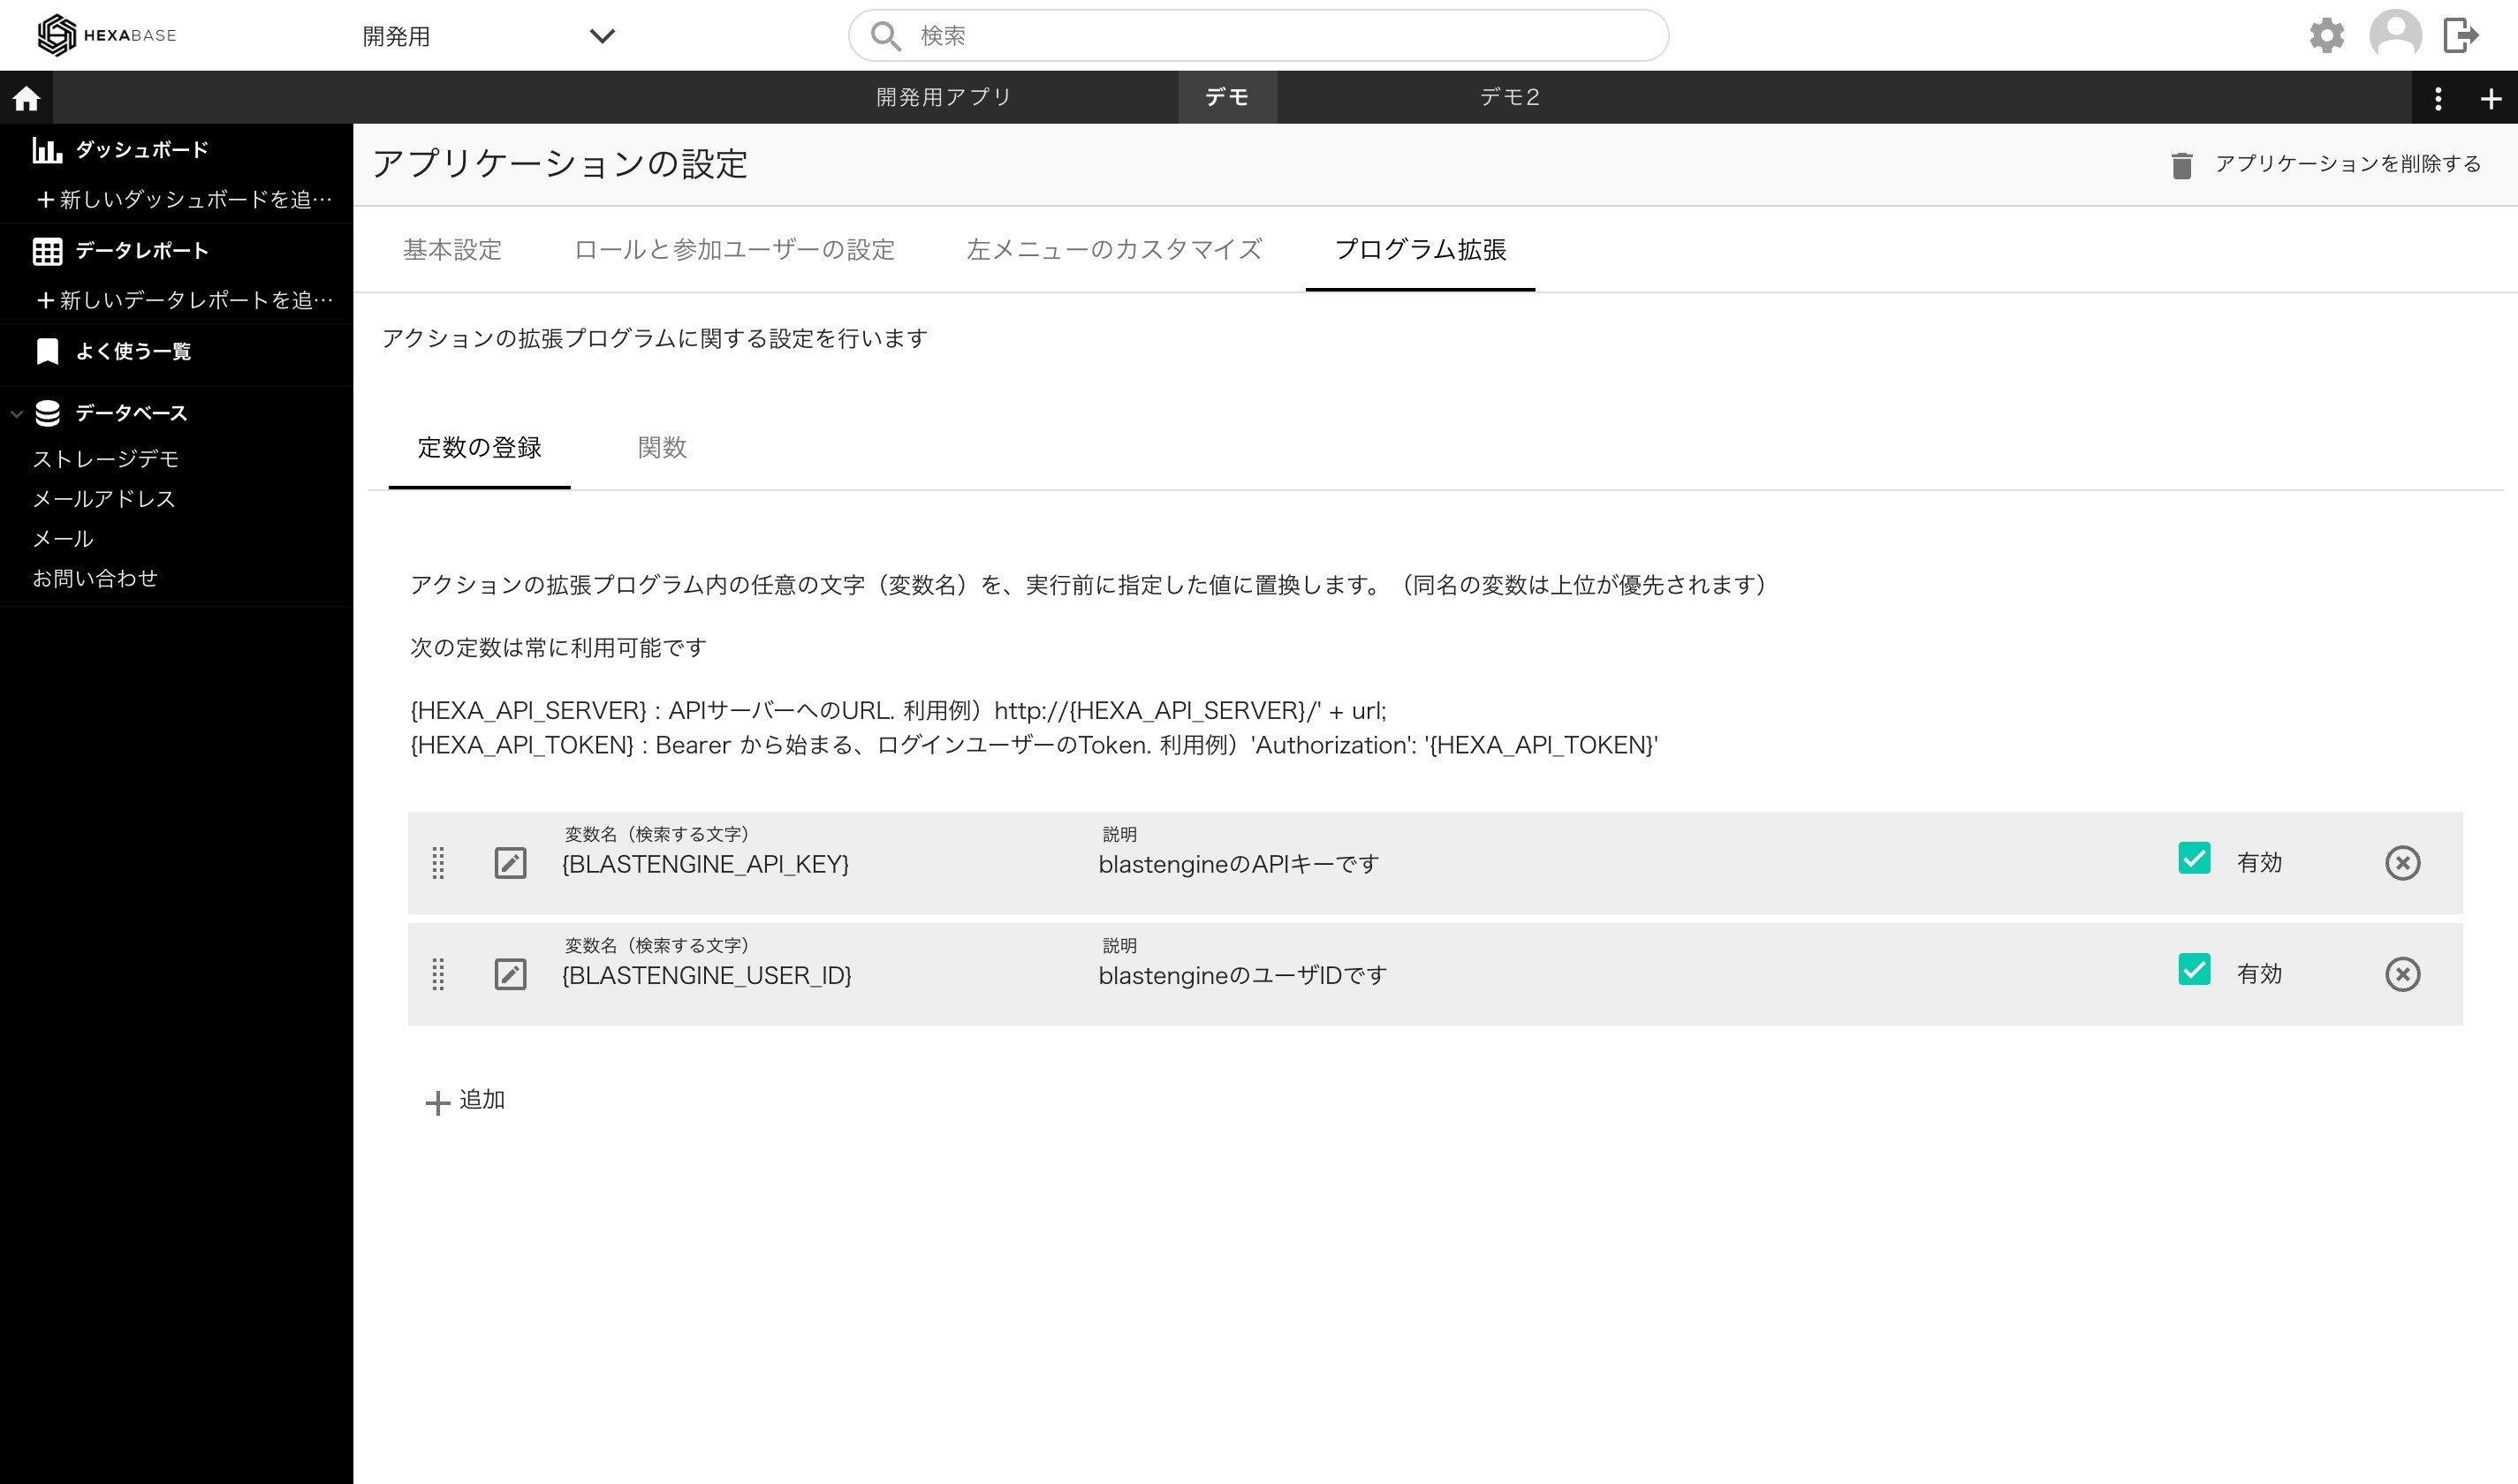
データストアへの保存処理ができたので、保存をトリガーとしたアクションスクリプトを作成します。まず、blastengineに関連する環境設定を2つ追加します。これはアプリケーション設定のプログラム拡張より行います。
| 環境設定名 | 値 |
|---|---|
| BLASTENGINE_USER_ID | 先ほど作成したAPIユーザー名 |
| BLASTENGINE_API_KEY | 先ほど作成したAPIキー |

データストアのアクションスクリプトを追加
続けて、新規保存処理時のアクションスクリプトを追加します。これはHexabaseの管理画面、データストアの設定画面で作成します。
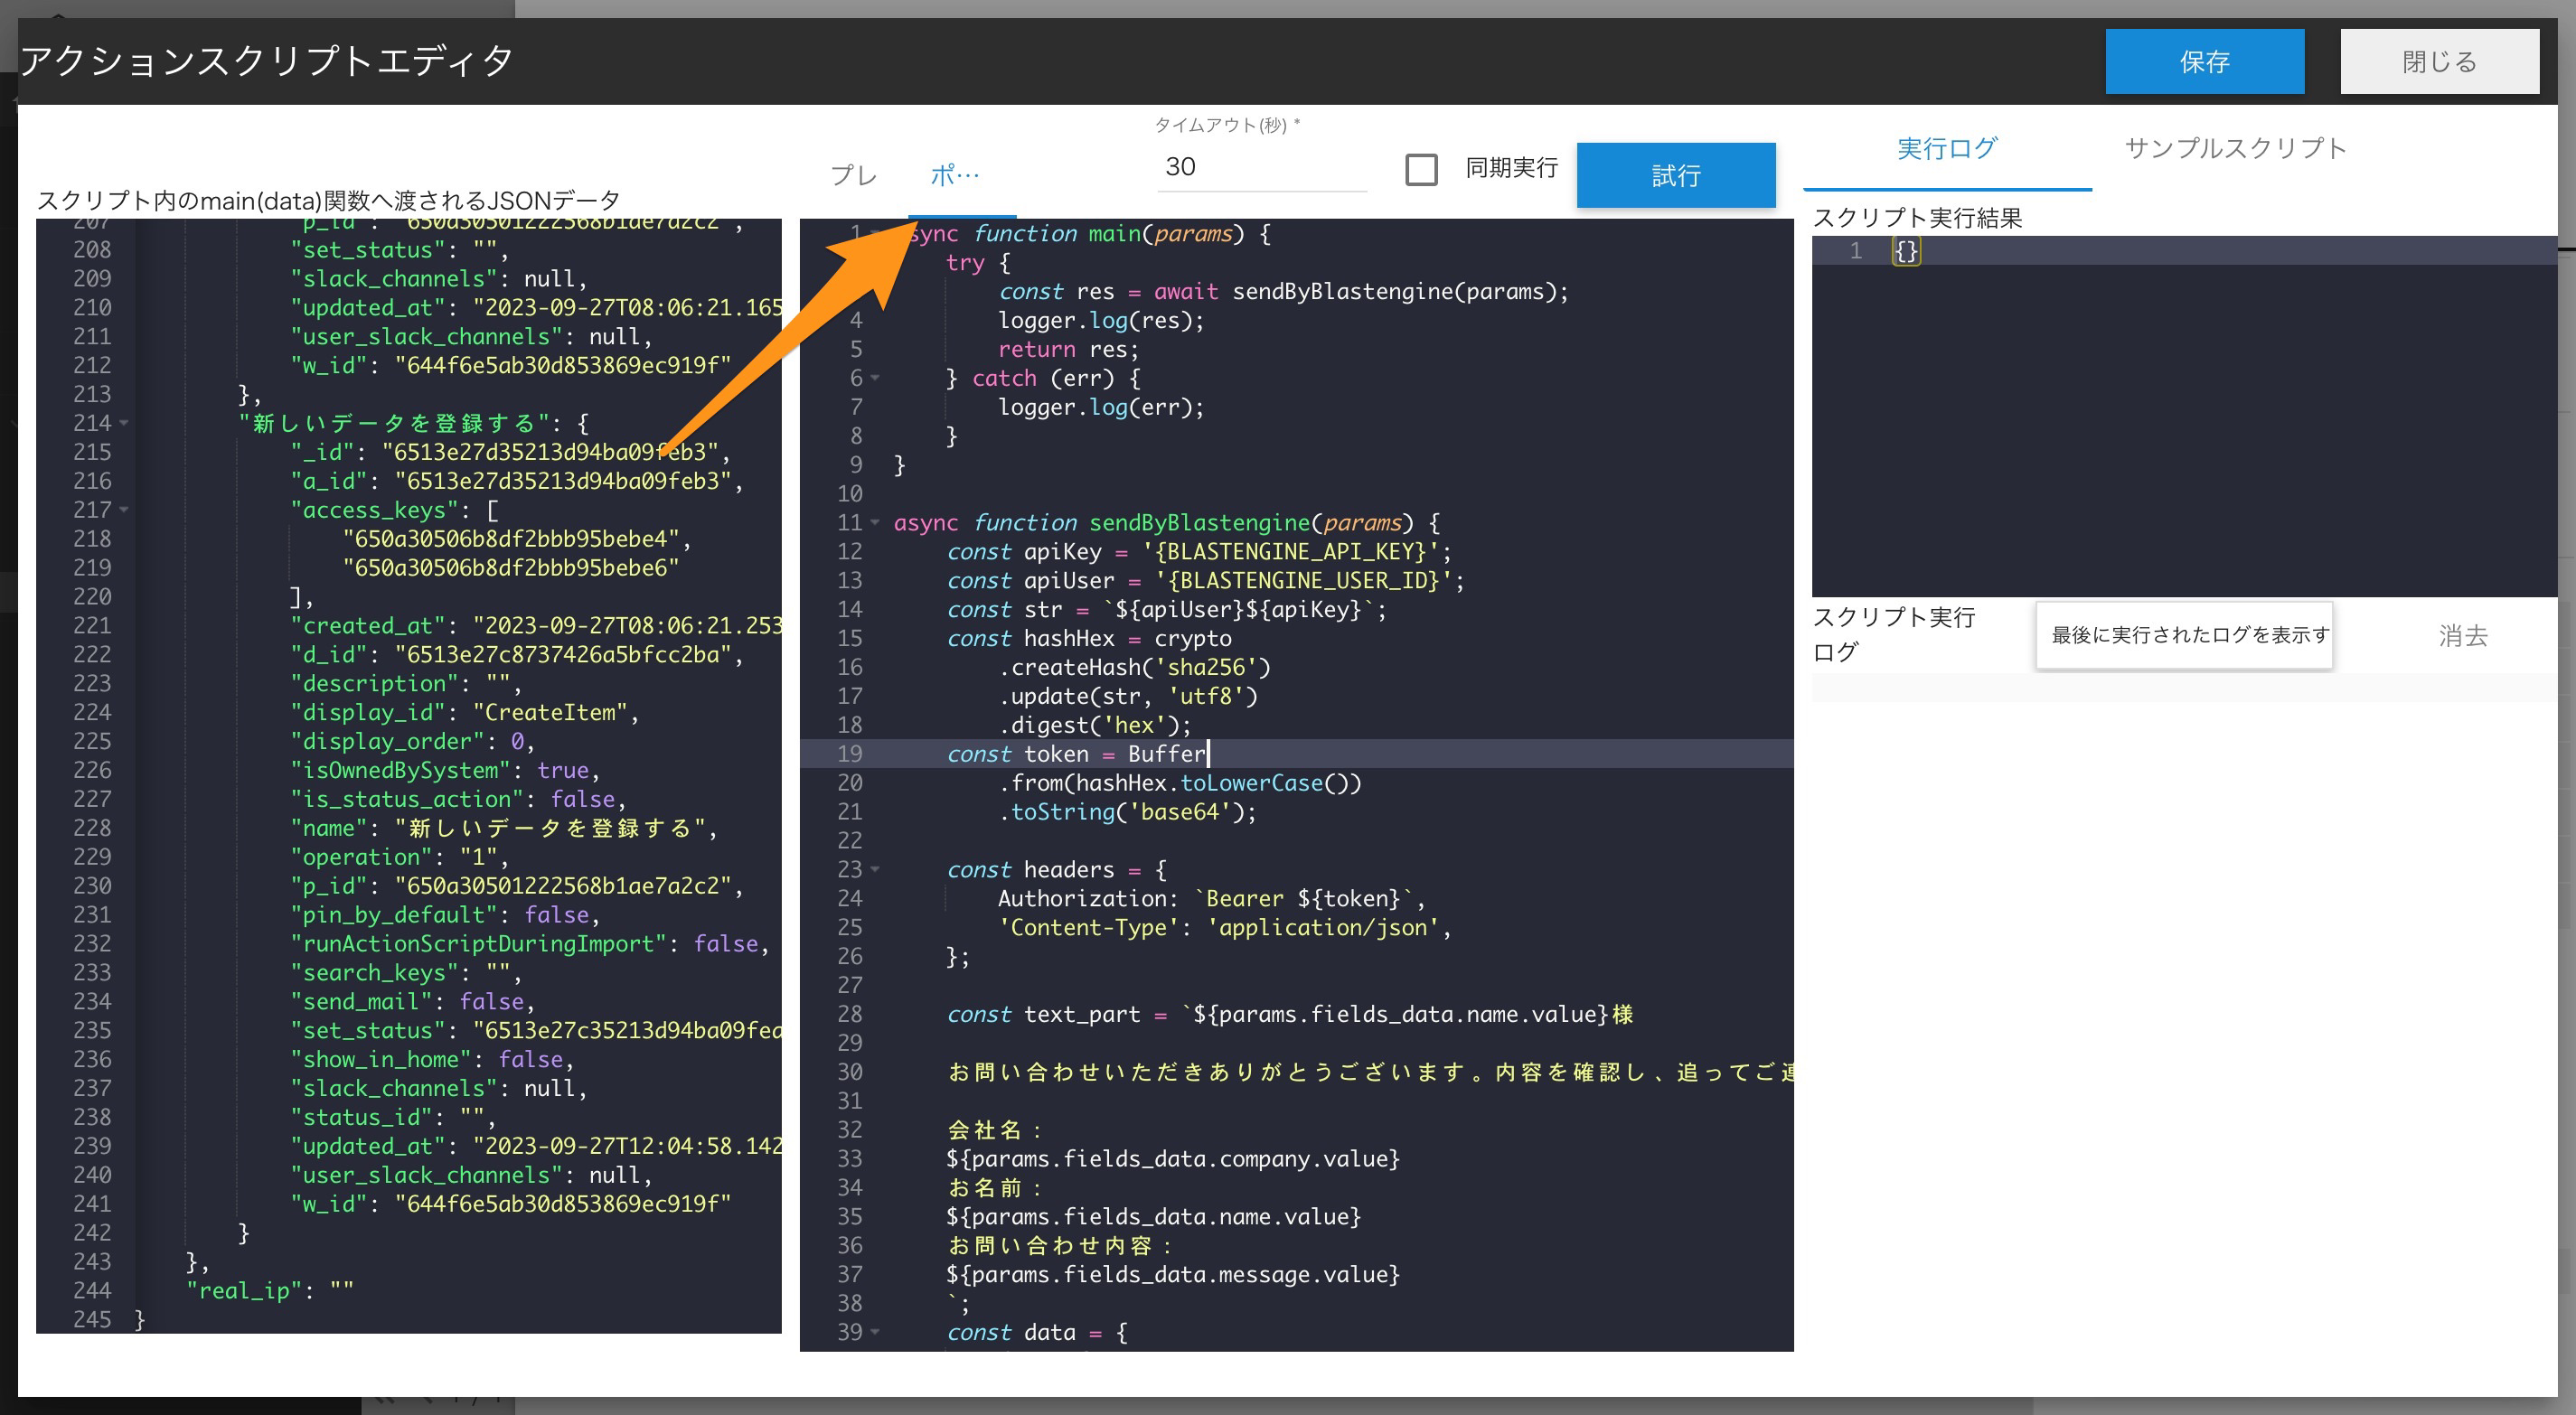
実際のコードは以下のようになります。このコードは ポスト (データ保存後)の処理として実行します。
コードの基本
Hexabaseのアクションスクリプトでは、main関数が呼ばれます。つまり、以下のようになります。この時、レコードデータが引数として渡されます。
async function main(params) {

}
今回は以下のようにし、 sendByBlastengine 関数を呼んでいます。
async function main(params) {
    try {
        const res = await sendByBlastengine(params);
        logger.log(res);
        return res;
    } catch (err) {
        logger.log(err);
    }
}

async function sendByBlastengine(params) {
}
以下は sendByBlastengine 関数内の実装です。
トークンを生成する
先ほど環境変数に指定したAPIユーザー名、APIキーを使ってトークンを生成します。このトークンはHTTPリクエストのヘッダーに対して、利用します。
const apiKey = '{BLASTENGINE_API_KEY}';
const apiUser = '{BLASTENGINE_USER_ID}';
const str = `${apiUser}${apiKey}`;
const hashHex = crypto
	.createHash('sha256')
	.update(str, 'utf8')
	.digest('hex');
const token = Buffer
	.from(hashHex.toLowerCase())
	.toString('base64');
const headers = {
		Authorization: `Bearer ${token}`,
	'Content-Type': 'application/json',
};
件名・本文を用意する
続けてメール送信する内容を準備します。
const text_part = `${params.fields_data.name.value}様

お問い合わせいただきありがとうございます。内容を確認し、追ってご連絡いたします。

会社名:
${params.fields_data.company.value}
お名前:
${params.fields_data.name.value}
お問い合わせ内容:
${params.fields_data.message.value}
`;
const data = {
from: {
	email: 'no-reply@blastengine.jp',
	name: '管理者'
},
to: params.fields_data.email.value || 'info@blastengine.jp',
subject: 'お問い合わせありがとうございます',
encode: 'UTF-8',
text_part,
};
最後にネットワークライブラリの axios を使って、blastengineにメール送信を行います。
return axios.post('<https://app.engn.jp/api/v1/deliveries/transaction>', data, { headers });
スクリプト全体は以下のようになります。
async function main(params) {
    try {
        const res = await sendByBlastengine(params);
        logger.log(res);
        return res;
    } catch (err) {
        logger.log(err);
    }
}

async function sendByBlastengine(params) {
    const apiKey = '{BLASTENGINE_API_KEY}';
    const apiUser = '{BLASTENGINE_USER_ID}';
    const str = `${apiUser}${apiKey}`;
    const hashHex = crypto
    	.createHash('sha256')
    	.update(str, 'utf8')
    	.digest('hex');
    const token = Buffer
    	.from(hashHex.toLowerCase())
    	.toString('base64');

    const headers = {
        Authorization: `Bearer ${token}`,
    	'Content-Type': 'application/json',
    };

    const text_part = `${params.fields_data.name.value}様

    お問い合わせいただきありがとうございます。内容を確認し、追ってご連絡いたします。

    会社名:
    ${params.fields_data.company.value}
    お名前:
    ${params.fields_data.name.value}
    お問い合わせ内容:
    ${params.fields_data.message.value}
    `;
    const data = {
		from: {
			email: 'no-reply@blastengine.jp',
			name: '管理者'
		},
		to: params.fields_data.email.value || 'info@blastengine.jp',
		subject: 'お問い合わせありがとうございます',
		encode: 'UTF-8',
		text_part,
	};

    return axios.post('<https://app.engn.jp/api/v1/deliveries/transaction>', data, { headers });
};
まとめ
今回はHexabaseとblastengine、Next.jsを使ってお問い合わせフォームを作成しました。入力項目の選択肢を含め、Hexabase側で管理できるので修正も容易です。
今回はメール本文を直書きしていますが、Hexabaseのデータストアに保存しておいても良いでしょう。その場合は、アクションスクリプト側でデータストアから取得して利用することになります。