高火力 DOKはコンテナー型のGPUサービスで、NVIDIA V100やH100を実行時間課金で利用できるサービスです。
今回はこの高火力 DOKを使って、FramePackを試してみました。
FramePackについて
FramePackはStable DiffusionのWebUIであるFooocusなどを開発しているlllyasviel氏が開発しているオープンソースの動画生成AIです。GPUスペックが低くても利用できる点が特徴です。最初のフレームになる画像と、プロンプトを指定して動画を生成します。
参考
lllyasviel/FramePack: Lets make video diffusion practical!のFramePack/demo_gradio.py at main · lllyasviel/FramePackをベースに進めます。このデモコードはGradioが立ち上がりますが、その部分を取り除いてCLI実行できるようにしています。
とりあえず試す
コンテナレジストリにプッシュ済みのイメージを使って実行してみたい方は、高火力 DOKにて新しいタスクを作成し、以下の情報を入力してください。HF_TOKENはHuggingFaceのトークンを指定してください。IMAGE_URLは最初のフレームになる画像のURLを指定してください。
なお、モデルはH100を選択してください。V100ではメモリ不足で実行できません。
| 項目 | 設定 |
|---|---|
| イメージ | dok-handson.sakuracr.jp/framepack |
| 環境変数 | HF_TOKEN = "YOUR_HF_TOKEN" PROMPT = In breakdancing, spinning around with your head down. IMAGE_URL = "画像のURL" |
PROMPTは生成する画像の指示内容です。この他、以下のプロパティが指定できます。
| 項目 | 説明 | デフォルト |
|---|---|---|
| SEED | 乱数シードを指定します | 31337 |
| VIDEO_LENGTH | 動画の長さを指定します | 5.0 |
| STEPS | ステップ数を指定します | 25 |
| GS | グローバルステップ数を指定します | 10.0 |
| GPU_MEMORY_PRESERVATION | GPUメモリの予約量を指定します。GPUのメモリが少ない場合に指定します | 6.0 |
| USE_TEACACHE | ティーチェックを使用するかどうかを指定します。GPUメモリが少ない場合に指定します | |
| S3_BUCKET | オブジェクトストレージのバケット名を指定します | |
| S3_ENDPOINT | オブジェクトストレージのエンドポイントを指定します | |
| S3_SECRET | オブジェクトストレージのシークレットアクセスキーを指定します | |
| S3_TOKEN | オブジェクトストレージのアクセスキーIDを指定します |
S3_で始まる環境変数は、さくらのオブジェクトストレージに画像を保存するためのものです。保存しない場合には指定しなくても問題ありません(Amazon S3なども利用できます)。さくらのオブジェクトストレージを利用する場合には、オブジェクトストレージ サービス基本情報 | さくらのクラウド マニュアルを参照してください。
以下はウインドミルのイラスト(ダンス) | かわいいフリー素材集 いらすとやをお借りして実行した結果です。

コンテナイメージの作成と登録
上記タスクで利用したDockerイメージを作成する手順は以下の通りです。完成版はgoofmint/dok-framepackにありますので、実装時の参考にしてください。
Dockerfile の作成
FramePack/demo_gradio.py at main · lllyasviel/FramePackの内容に沿って、Dockerfileを作成します。
ベースイメージ
ベースは nvidia/cuda:12.5.1-devel-ubuntu22.04 です。
FROM nvidia/cuda:12.5.1-devel-ubuntu22.04
ENV DEBIAN_FRONTEND=noninteractive
ライブラリのインストール
Pythonと、必要なライブラリをインストールします。
# 必要なパッケージのインストール
# /appはアプリのディレクトリ、/opt/artifactはアウトプット先のディレクトリ
RUN apt-get update && \
    apt-get install -y \
        git \
        python3 \
        python3-pip \
	libgl1 \
	libglib2.0-0 \
      && \
    mkdir /app /opt/artifact && \
    apt-get clean && \
    rm -rf /var/lib/apt/lists/*

WORKDIR /app
RUN git clone https://github.com/lllyasviel/FramePack.git
WORKDIR /app/FramePack
# 依存ライブラリのインストール
RUN pip install -r requirements.txt
そして、別途必要なライブラリをインストールします。PyTorchやFlashAttentionなどをインストールします。
RUN pip install torchvision boto3 argparse
後は 後述する runner.py と、 docker-entrypoint.sh をコピーします。
COPY runner.py /app/FramePack/runner.py
WORKDIR /
COPY docker-entrypoint.sh /docker-entrypoint.sh
# 実行権限を付与
RUN chmod +x /docker-entrypoint.sh

# Dockerコンテナー起動時に実行するスクリプトを指定して実行
CMD ["/bin/bash", "/docker-entrypoint.sh"]
Dockerfile全体
Dockerfileの全体は以下の通りです。
FROM nvidia/cuda:12.5.1-devel-ubuntu22.04
ENV DEBIAN_FRONTEND=noninteractive

# 必要なパッケージのインストール
# /appはアプリのディレクトリ、/opt/artifactはアウトプット先のディレクトリ
RUN apt-get update && \
    apt-get install -y \
        git \
        python3 \
        python3-pip \
	libgl1 \
	libglib2.0-0 \
      && \
    mkdir /app /opt/artifact && \
    apt-get clean && \
    rm -rf /var/lib/apt/lists/*

WORKDIR /app
RUN git clone https://github.com/lllyasviel/FramePack.git
WORKDIR /app/FramePack
# 依存ライブラリのインストール
RUN pip install -r requirements.txt

RUN pip install torchvision boto3 argparse

COPY runner.py /app/FramePack/runner.py
WORKDIR /
COPY docker-entrypoint.sh /docker-entrypoint.sh
# 実行権限を付与
RUN chmod +x /docker-entrypoint.sh

# Dockerコンテナー起動時に実行するスクリプトを指定して実行
CMD ["/bin/bash", "/docker-entrypoint.sh"]
docker-entrypoint.sh の作成
docker-entrypoint.sh はDockerコンテナー起動時に実行するスクリプトです。ここでは環境変数をチェックして、 runner.py を呼び出します。以下の内容で作成します。PROMTは必須で、他は任意です。SAKURA_ ではじまる環境変数は、高火力 DOK実行時に自動的に渡される変数になります。
#!/bin/bash
export TZ=${TZ:-Asia/Tokyo}

# 必須環境変数のチェック
missing=0

check_required() {
  if [ -z "${!1}" ]; then
    echo "Error: $1 is required but not set."
    missing=1
  fi
}

check_required IMAGE_URL
check_required PROMPT
check_required SAKURA_ARTIFACT_DIR
check_required SAKURA_TASK_ID
check_required HF_TOKEN

if [ "$missing" -eq 1 ]; then
  echo "Please set all required environment variables."
  exit 1
fi

# runner.py を引数付きで実行
pushd /app/FramePack
  python3 runner.py \
    --image_url "$IMAGE_URL" \
    --prompt "$PROMPT" \
    --output "$SAKURA_ARTIFACT_DIR" \
    --id "$SAKURA_TASK_ID" \
    ${S3_BUCKET:+--s3-bucket "$S3_BUCKET"} \
    ${S3_ENDPOINT:+--s3-endpoint "$S3_ENDPOINT"} \
    ${S3_SECRET:+--s3-secret "$S3_SECRET"} \
    ${S3_TOKEN:+--s3-token "$S3_TOKEN"} \
    --seed "${SEED:-31337}" \
    --video_length "${VIDEO_LENGTH:-5.0}" \
    --steps "${STEPS:-25}" \
    --gs "${GS:-10.0}" \
    --gpu_memory_preservation "${GPU_MEMORY_PRESERVATION:-6.0}" \
    ${USE_TEACACHE:+--use_teacache} \
    --hf_token "$HF_TOKEN"
popd
runner.py の作成
runner.py は実際に処理を行うスクリプトです。まず必要なライブラリをインポートします。
# 必要なライブラリのインポート
import argparse  # コマンドライン引数の処理用
import os
import torch  # PyTorch: 機械学習ライブラリ
import numpy as np  # 数値計算用ライブラリ
import einops  # テンソルの形状を簡単に変換できるライブラリ
import traceback  # エラー時に詳細なスタックトレースを取得するため
import requests  # HTTPリクエストを送るライブラリ
import boto3  # AWS S3との連携用ライブラリ
from PIL import Image  # 画像の読み込みと処理に使う
from io import BytesIO  # バイナリデータの入出力に使う

# 外部のヘルパーモジュールの読み込み(事前に定義された処理)
from diffusers_helper.hf_login import login
from diffusers_helper.hunyuan import encode_prompt_conds, vae_decode, vae_encode, vae_decode_fake
from diffusers_helper.utils import save_bcthw_as_mp4, crop_or_pad_yield_mask, soft_append_bcthw, resize_and_center_crop, state_dict_weighted_merge, state_dict_offset_merge, generate_timestamp
from diffusers_helper.models.hunyuan_video_packed import HunyuanVideoTransformer3DModelPacked
from diffusers_helper.pipelines.k_diffusion_hunyuan import sample_hunyuan
from diffusers_helper.memory import gpu, get_cuda_free_memory_gb, unload_complete_models, load_model_as_complete, move_model_to_device_with_memory_preservation
from diffusers_helper.clip_vision import hf_clip_vision_encode
from diffusers_helper.bucket_tools import find_nearest_bucket

# モデル定義用ライブラリ
from transformers import LlamaModel, CLIPTextModel, LlamaTokenizerFast, CLIPTokenizer, SiglipImageProcessor, SiglipVisionModel
from diffusers import AutoencoderKLHunyuanVideo
パラメータの取得
docker-entrypoint.sh から渡されたパラメータを取得します。
# コマンドライン引数のパーサー設定
parser = argparse.ArgumentParser()
parser.add_argument('--image_url', type=str, required=True, help='URL of input image')  # 入力画像のURL
parser.add_argument('--prompt', type=str, required=True, help='Prompt text')  # 動画生成用のプロンプト(説明文)
parser.add_argument('--output', type=str, required=True, help='Output mp4 dir name')  # 出力動画の保存ディレクトリ
parser.add_argument('--id', default='', help='タスクIDを指定します。')  # 出力ファイル名の一部になるID
parser.add_argument('--s3-bucket', help='S3のバケットを指定します。')  # S3アップロード用の設定
parser.add_argument('--s3-endpoint', help='S3互換エンドポイントのURLを指定します。')
parser.add_argument('--s3-secret', help='S3のシークレットアクセスキーを指定します。')
parser.add_argument('--s3-token', help='S3のアクセスキーIDを指定します。')
parser.add_argument('--seed', type=int, default=31337)  # 乱数シード(結果の再現性のため)
parser.add_argument('--video_length', type=float, default=5.0)  # 動画の長さ(秒)
parser.add_argument('--steps', type=int, default=25)  # サンプリングステップ数
parser.add_argument('--gs', type=float, default=10.0)  # guidance scale: 生成の強さ
parser.add_argument('--gpu_memory_preservation', type=float, default=6.0)  # GPUのメモリ制限
parser.add_argument('--use_teacache', action='store_true')  # TEACacheを使うかどうか(高速化)
parser.add_argument('--hf_token', type=str, required=True, help='Hugging Face access token')  # モデル取得用トークン
args = parser.parse_args()
Hugging Faceトークンの設定
Hugging Faceのトークンを設定します。これにより、Hugging Faceのモデルをダウンロードできるようになります。
# Hugging Faceのキャッシュ保存先を指定
os.environ['HF_HOME'] = os.path.abspath('./hf_download')

# Hugging Faceにログイン
login(args.hf_token)
オブジェクトストレージ用のオブジェクトを準備
S3_ではじまる環境変数があれば、それを使ってS3オブジェクトを作成します。
s3 = None
if args.s3_token and args.s3_secret and args.s3_bucket:
    # S3クライアントの作成
    s3 = boto3.client(
        's3',
        endpoint_url=args.s3_endpoint if args.s3_endpoint else None,
        aws_access_key_id=args.s3_token,
        aws_secret_access_key=args.s3_secret)
モデルの準備
今回は Janus-1.3B を利用しています。この他、 Janus-Pro-1B や Janus-Pro-7B などが用意されています。
# GPUの空きメモリを確認
free_mem_gb = get_cuda_free_memory_gb(gpu)
high_vram = free_mem_gb > 60  # 60GB以上なら高性能GPUと判断

# モデルのロード(複数のテキスト・画像・VAE・トランスフォーマー)
text_encoder = LlamaModel.from_pretrained("hunyuanvideo-community/HunyuanVideo", subfolder='text_encoder', torch_dtype=torch.float16).to(gpu)
text_encoder_2 = CLIPTextModel.from_pretrained("hunyuanvideo-community/HunyuanVideo", subfolder='text_encoder_2', torch_dtype=torch.float16).to(gpu)
tokenizer = LlamaTokenizerFast.from_pretrained("hunyuanvideo-community/HunyuanVideo", subfolder='tokenizer')
tokenizer_2 = CLIPTokenizer.from_pretrained("hunyuanvideo-community/HunyuanVideo", subfolder='tokenizer_2')
vae = AutoencoderKLHunyuanVideo.from_pretrained("hunyuanvideo-community/HunyuanVideo", subfolder='vae', torch_dtype=torch.float16).to(gpu)
feature_extractor = SiglipImageProcessor.from_pretrained("lllyasviel/flux_redux_bfl", subfolder='feature_extractor')
image_encoder = SiglipVisionModel.from_pretrained("lllyasviel/flux_redux_bfl", subfolder='image_encoder', torch_dtype=torch.float16).to(gpu)
transformer = HunyuanVideoTransformer3DModelPacked.from_pretrained('lllyasviel/FramePackI2V_HY', torch_dtype=torch.bfloat16).to(gpu)
画像の読み込みと前処理
画像URLで指定された画像を読み込み、正規化します。
# 画像の読み込みと前処理
response = requests.get(args.image_url)
image = Image.open(BytesIO(response.content)).convert("RGB")
image_np = np.array(image)
H, W, _ = image_np.shape
height, width = find_nearest_bucket(H, W, resolution=640)  # モデルに合う解像度へ変換
image_np = resize_and_center_crop(image_np, target_width=width, target_height=height)  # サイズ変更と中心切り抜き
input_image_pt = torch.from_numpy(image_np).float() / 127.5 - 1  # 正規化 [-1, 1]
input_image_pt = input_image_pt.permute(2, 0, 1)[None, :, None]  # [1, 3, 1, H, W] に変換
プロンプトのエンコード
プロンプトをエンコードします。LLaMAとCLIPの両方のエンコーダーを使用して、プロンプトをベクトル化します。
# プロンプトのエンコード(LLaMA + CLIP)
llama_vec, clip_l_pooler = encode_prompt_conds(args.prompt, text_encoder, text_encoder_2, tokenizer, tokenizer_2)
llama_vec_n, clip_l_pooler_n = torch.zeros_like(llama_vec), torch.zeros_like(clip_l_pooler)
llama_vec, llama_attention_mask = crop_or_pad_yield_mask(llama_vec, length=512)
llama_vec_n, llama_attention_mask_n = crop_or_pad_yield_mask(llama_vec_n, length=512)

# 画像をVAEで潜在空間にエンコード
start_latent = vae_encode(input_image_pt, vae)
image_encoder_output = hf_clip_vision_encode(image_np, feature_extractor, image_encoder)
image_encoder_last_hidden_state = image_encoder_output.last_hidden_state
サンプリングの設定など
サンプリングを設定し、Transformerを初期化します。
# サンプリング設定
steps = args.steps
latent_window_size = 9
num_frames = latent_window_size * 4 - 3
job_id = generate_timestamp()
total_latent_sections = max(round((args.video_length * 30) / (latent_window_size * 4)), 1)

# Transformerの初期化
transformer.initialize_teacache(enable_teacache=args.use_teacache, num_steps=steps)

# ランダムシードを初期化
rnd = torch.Generator("cpu").manual_seed(args.seed)

# 空の履歴テンソルを初期化
history_latents = torch.zeros(size=(1, 16, 1 + 2 + 16, height // 8, width // 8), dtype=torch.float32).cpu()
history_pixels = None

# 各セクションの長さの設定(最後に向けて短く)
latent_paddings = [3] + [2] * (total_latent_sections - 3) + [1, 0] if total_latent_sections > 4 else list(reversed(range(total_latent_sections)))
動画の生成
ここまでで準備ができたので、動画を生成します。
# メインのループ(各セクションの動画を生成)
for latent_padding in latent_paddings:
    is_last = latent_padding == 0
    latent_padding_size = latent_padding * latent_window_size

    indices = torch.arange(0, sum([1, latent_padding_size, latent_window_size, 1, 2, 16])).unsqueeze(0)
    clean_latent_indices_pre, blank_indices, latent_indices, clean_latent_indices_post, clean_latent_2x_indices, clean_latent_4x_indices = indices.split([1, latent_padding_size, latent_window_size, 1, 2, 16], dim=1)
    clean_latent_indices = torch.cat([clean_latent_indices_pre, clean_latent_indices_post], dim=1)

    clean_latents_pre = start_latent.to(history_latents)
    clean_latents_post, clean_latents_2x, clean_latents_4x = history_latents[:, :, :1 + 2 + 16, :, :].split([1, 2, 16], dim=2)
    clean_latents = torch.cat([clean_latents_pre, clean_latents_post], dim=2)

    # 動画用の潜在変数を生成
    generated_latents = sample_hunyuan(
        transformer=transformer,
        sampler='unipc',
        width=width,
        height=height,
        frames=num_frames,
        real_guidance_scale=1.0,
        distilled_guidance_scale=args.gs,
        guidance_rescale=0.0,
        num_inference_steps=steps,
        generator=rnd,
        prompt_embeds=llama_vec.to(transformer.dtype),
        prompt_embeds_mask=llama_attention_mask,
        prompt_poolers=clip_l_pooler.to(transformer.dtype),
        negative_prompt_embeds=llama_vec_n.to(transformer.dtype),
        negative_prompt_embeds_mask=llama_attention_mask_n,
        negative_prompt_poolers=clip_l_pooler_n.to(transformer.dtype),
        device=gpu,
        dtype=torch.bfloat16,
        image_embeddings=image_encoder_last_hidden_state.to(transformer.dtype),
        latent_indices=latent_indices,
        clean_latents=clean_latents,
        clean_latent_indices=clean_latent_indices,
        clean_latents_2x=clean_latents_2x,
        clean_latent_2x_indices=clean_latent_2x_indices,
        clean_latents_4x=clean_latents_4x,
        clean_latent_4x_indices=clean_latent_4x_indices,
        callback=None
    )

    if is_last:
        # 最後は元画像を先頭に追加
        generated_latents = torch.cat([start_latent.to(generated_latents), generated_latents], dim=2)

    history_latents = torch.cat([generated_latents.to(history_latents), history_latents], dim=2)
    real_history_latents = history_latents[:, :, :generated_latents.shape[2], :, :]

    if history_pixels is None:
        history_pixels = vae_decode(real_history_latents, vae).cpu()
    else:
        overlapped_frames = latent_window_size * 4 - 3
        current_pixels = vae_decode(real_history_latents[:, :, :latent_window_size * 2 + 1], vae).cpu()
        history_pixels = soft_append_bcthw(current_pixels, history_pixels, overlapped_frames)
関数を実行
最後に、出力先のファイル名を指定して、 save_bcthw_as_mp4 関数を呼び出して完了です。
# 出力ファイル名の作成
output_file_path = f"{args.output}/{args.id}.mp4"

# MP4ファイルとして保存
save_bcthw_as_mp4(history_pixels, output_file_path, fps=30, crf=16)

# S3にアップロードする場合
if s3 is not None:
    s3.upload_file(
        Filename=output_file_path,
        Bucket=args.s3_bucket,
        Key=os.path.basename(output_file_path))

print(f"Video saved to {output_file_path}")
全体の処理
runner.py の全体の処理は以下の通りです。
#!/usr/bin/env python3  # スクリプトをPython 3で実行するための指定

# 必要なライブラリのインポート
import argparse  # コマンドライン引数の処理用
import os
import torch  # PyTorch: 機械学習ライブラリ
import numpy as np  # 数値計算用ライブラリ
import einops  # テンソルの形状を簡単に変換できるライブラリ
import traceback  # エラー時に詳細なスタックトレースを取得するため
import requests  # HTTPリクエストを送るライブラリ
import boto3  # AWS S3との連携用ライブラリ
from PIL import Image  # 画像の読み込みと処理に使う
from io import BytesIO  # バイナリデータの入出力に使う

# 外部のヘルパーモジュールの読み込み(事前に定義された処理)
from diffusers_helper.hf_login import login
from diffusers_helper.hunyuan import encode_prompt_conds, vae_decode, vae_encode, vae_decode_fake
from diffusers_helper.utils import save_bcthw_as_mp4, crop_or_pad_yield_mask, soft_append_bcthw, resize_and_center_crop, state_dict_weighted_merge, state_dict_offset_merge, generate_timestamp
from diffusers_helper.models.hunyuan_video_packed import HunyuanVideoTransformer3DModelPacked
from diffusers_helper.pipelines.k_diffusion_hunyuan import sample_hunyuan
from diffusers_helper.memory import gpu, get_cuda_free_memory_gb, unload_complete_models, load_model_as_complete, move_model_to_device_with_memory_preservation
from diffusers_helper.clip_vision import hf_clip_vision_encode
from diffusers_helper.bucket_tools import find_nearest_bucket

# モデル定義用ライブラリ
from transformers import LlamaModel, CLIPTextModel, LlamaTokenizerFast, CLIPTokenizer, SiglipImageProcessor, SiglipVisionModel
from diffusers import AutoencoderKLHunyuanVideo

# コマンドライン引数のパーサー設定
parser = argparse.ArgumentParser()
parser.add_argument('--image_url', type=str, required=True, help='URL of input image')  # 入力画像のURL
parser.add_argument('--prompt', type=str, required=True, help='Prompt text')  # 動画生成用のプロンプト(説明文)
parser.add_argument('--output', type=str, required=True, help='Output mp4 dir name')  # 出力動画の保存ディレクトリ
parser.add_argument('--id', default='', help='タスクIDを指定します。')  # 出力ファイル名の一部になるID
parser.add_argument('--s3-bucket', help='S3のバケットを指定します。')  # S3アップロード用の設定
parser.add_argument('--s3-endpoint', help='S3互換エンドポイントのURLを指定します。')
parser.add_argument('--s3-secret', help='S3のシークレットアクセスキーを指定します。')
parser.add_argument('--s3-token', help='S3のアクセスキーIDを指定します。')
parser.add_argument('--seed', type=int, default=31337)  # 乱数シード(結果の再現性のため)
parser.add_argument('--video_length', type=float, default=5.0)  # 動画の長さ(秒)
parser.add_argument('--steps', type=int, default=25)  # サンプリングステップ数
parser.add_argument('--gs', type=float, default=10.0)  # guidance scale: 生成の強さ
parser.add_argument('--gpu_memory_preservation', type=float, default=6.0)  # GPUのメモリ制限
parser.add_argument('--use_teacache', action='store_true')  # TEACacheを使うかどうか(高速化)
parser.add_argument('--hf_token', type=str, required=True, help='Hugging Face access token')  # モデル取得用トークン
args = parser.parse_args()

# Hugging Faceのキャッシュ保存先を指定
os.environ['HF_HOME'] = os.path.abspath('./hf_download')

# Hugging Faceにログイン
login(args.hf_token)

# GPUの空きメモリを確認
free_mem_gb = get_cuda_free_memory_gb(gpu)
high_vram = free_mem_gb > 60  # 60GB以上なら高性能GPUと判断

s3 = None
# S3関連の情報が与えられている場合、S3クライアントを作成
if args.s3_token and args.s3_secret and args.s3_bucket:
    s3 = boto3.client(
        's3',
        endpoint_url=args.s3_endpoint if args.s3_endpoint else None,
        aws_access_key_id=args.s3_token,
        aws_secret_access_key=args.s3_secret)

# モデルのロード(複数のテキスト・画像・VAE・トランスフォーマー)
text_encoder = LlamaModel.from_pretrained("hunyuanvideo-community/HunyuanVideo", subfolder='text_encoder', torch_dtype=torch.float16).to(gpu)
text_encoder_2 = CLIPTextModel.from_pretrained("hunyuanvideo-community/HunyuanVideo", subfolder='text_encoder_2', torch_dtype=torch.float16).to(gpu)
tokenizer = LlamaTokenizerFast.from_pretrained("hunyuanvideo-community/HunyuanVideo", subfolder='tokenizer')
tokenizer_2 = CLIPTokenizer.from_pretrained("hunyuanvideo-community/HunyuanVideo", subfolder='tokenizer_2')
vae = AutoencoderKLHunyuanVideo.from_pretrained("hunyuanvideo-community/HunyuanVideo", subfolder='vae', torch_dtype=torch.float16).to(gpu)
feature_extractor = SiglipImageProcessor.from_pretrained("lllyasviel/flux_redux_bfl", subfolder='feature_extractor')
image_encoder = SiglipVisionModel.from_pretrained("lllyasviel/flux_redux_bfl", subfolder='image_encoder', torch_dtype=torch.float16).to(gpu)
transformer = HunyuanVideoTransformer3DModelPacked.from_pretrained('lllyasviel/FramePackI2V_HY', torch_dtype=torch.bfloat16).to(gpu)

# 画像の読み込みと前処理
response = requests.get(args.image_url)
image = Image.open(BytesIO(response.content)).convert("RGB")
image_np = np.array(image)
H, W, _ = image_np.shape
height, width = find_nearest_bucket(H, W, resolution=640)  # モデルに合う解像度へ変換
image_np = resize_and_center_crop(image_np, target_width=width, target_height=height)  # サイズ変更と中心切り抜き
input_image_pt = torch.from_numpy(image_np).float() / 127.5 - 1  # 正規化 [-1, 1]
input_image_pt = input_image_pt.permute(2, 0, 1)[None, :, None]  # [1, 3, 1, H, W] に変換

# プロンプトのエンコード(LLaMA + CLIP)
llama_vec, clip_l_pooler = encode_prompt_conds(args.prompt, text_encoder, text_encoder_2, tokenizer, tokenizer_2)
llama_vec_n, clip_l_pooler_n = torch.zeros_like(llama_vec), torch.zeros_like(clip_l_pooler)
llama_vec, llama_attention_mask = crop_or_pad_yield_mask(llama_vec, length=512)
llama_vec_n, llama_attention_mask_n = crop_or_pad_yield_mask(llama_vec_n, length=512)

# 画像をVAEで潜在空間にエンコード
start_latent = vae_encode(input_image_pt, vae)
image_encoder_output = hf_clip_vision_encode(image_np, feature_extractor, image_encoder)
image_encoder_last_hidden_state = image_encoder_output.last_hidden_state

# サンプリング設定
steps = args.steps
latent_window_size = 9
num_frames = latent_window_size * 4 - 3
job_id = generate_timestamp()
total_latent_sections = max(round((args.video_length * 30) / (latent_window_size * 4)), 1)

# Transformerの初期化
transformer.initialize_teacache(enable_teacache=args.use_teacache, num_steps=steps)

# ランダムシードを初期化
rnd = torch.Generator("cpu").manual_seed(args.seed)

# 空の履歴テンソルを初期化
history_latents = torch.zeros(size=(1, 16, 1 + 2 + 16, height // 8, width // 8), dtype=torch.float32).cpu()
history_pixels = None

# 各セクションの長さの設定(最後に向けて短く)
latent_paddings = [3] + [2] * (total_latent_sections - 3) + [1, 0] if total_latent_sections > 4 else list(reversed(range(total_latent_sections)))

# メインのループ(各セクションの動画を生成)
for latent_padding in latent_paddings:
    is_last = latent_padding == 0
    latent_padding_size = latent_padding * latent_window_size

    indices = torch.arange(0, sum([1, latent_padding_size, latent_window_size, 1, 2, 16])).unsqueeze(0)
    clean_latent_indices_pre, blank_indices, latent_indices, clean_latent_indices_post, clean_latent_2x_indices, clean_latent_4x_indices = indices.split([1, latent_padding_size, latent_window_size, 1, 2, 16], dim=1)
    clean_latent_indices = torch.cat([clean_latent_indices_pre, clean_latent_indices_post], dim=1)

    clean_latents_pre = start_latent.to(history_latents)
    clean_latents_post, clean_latents_2x, clean_latents_4x = history_latents[:, :, :1 + 2 + 16, :, :].split([1, 2, 16], dim=2)
    clean_latents = torch.cat([clean_latents_pre, clean_latents_post], dim=2)

    # 動画用の潜在変数を生成
    generated_latents = sample_hunyuan(
        transformer=transformer,
        sampler='unipc',
        width=width,
        height=height,
        frames=num_frames,
        real_guidance_scale=1.0,
        distilled_guidance_scale=args.gs,
        guidance_rescale=0.0,
        num_inference_steps=steps,
        generator=rnd,
        prompt_embeds=llama_vec.to(transformer.dtype),
        prompt_embeds_mask=llama_attention_mask,
        prompt_poolers=clip_l_pooler.to(transformer.dtype),
        negative_prompt_embeds=llama_vec_n.to(transformer.dtype),
        negative_prompt_embeds_mask=llama_attention_mask_n,
        negative_prompt_poolers=clip_l_pooler_n.to(transformer.dtype),
        device=gpu,
        dtype=torch.bfloat16,
        image_embeddings=image_encoder_last_hidden_state.to(transformer.dtype),
        latent_indices=latent_indices,
        clean_latents=clean_latents,
        clean_latent_indices=clean_latent_indices,
        clean_latents_2x=clean_latents_2x,
        clean_latent_2x_indices=clean_latent_2x_indices,
        clean_latents_4x=clean_latents_4x,
        clean_latent_4x_indices=clean_latent_4x_indices,
        callback=None
    )

    if is_last:
        # 最後は元画像を先頭に追加
        generated_latents = torch.cat([start_latent.to(generated_latents), generated_latents], dim=2)

    history_latents = torch.cat([generated_latents.to(history_latents), history_latents], dim=2)
    real_history_latents = history_latents[:, :, :generated_latents.shape[2], :, :]

    if history_pixels is None:
        history_pixels = vae_decode(real_history_latents, vae).cpu()
    else:
        overlapped_frames = latent_window_size * 4 - 3
        current_pixels = vae_decode(real_history_latents[:, :, :latent_window_size * 2 + 1], vae).cpu()
        history_pixels = soft_append_bcthw(current_pixels, history_pixels, overlapped_frames)

# 出力ファイル名の作成
output_file_path = f"{args.output}/{args.id}.mp4"

# MP4ファイルとして保存
save_bcthw_as_mp4(history_pixels, output_file_path, fps=30, crf=16)

# S3にアップロードする場合
if s3 is not None:
    s3.upload_file(
        Filename=output_file_path,
        Bucket=args.s3_bucket,
        Key=os.path.basename(output_file_path))

print(f"Video saved to {output_file_path}")
Dockerイメージのビルド
上記の内容で、Dockerイメージをビルドします。Linux環境などで行います。
コンテナレジストリの用意
Dockerイメージを登録するコンテナレジストリを作成します。さくらのクラウドではLAB機能で、コンテナレジストリを提供しています。さくらのクラウドにログインしたら さくらのクラウド を選択します。

左側のメニューの グローバル の中にある コンテナレジストリ を選択します。
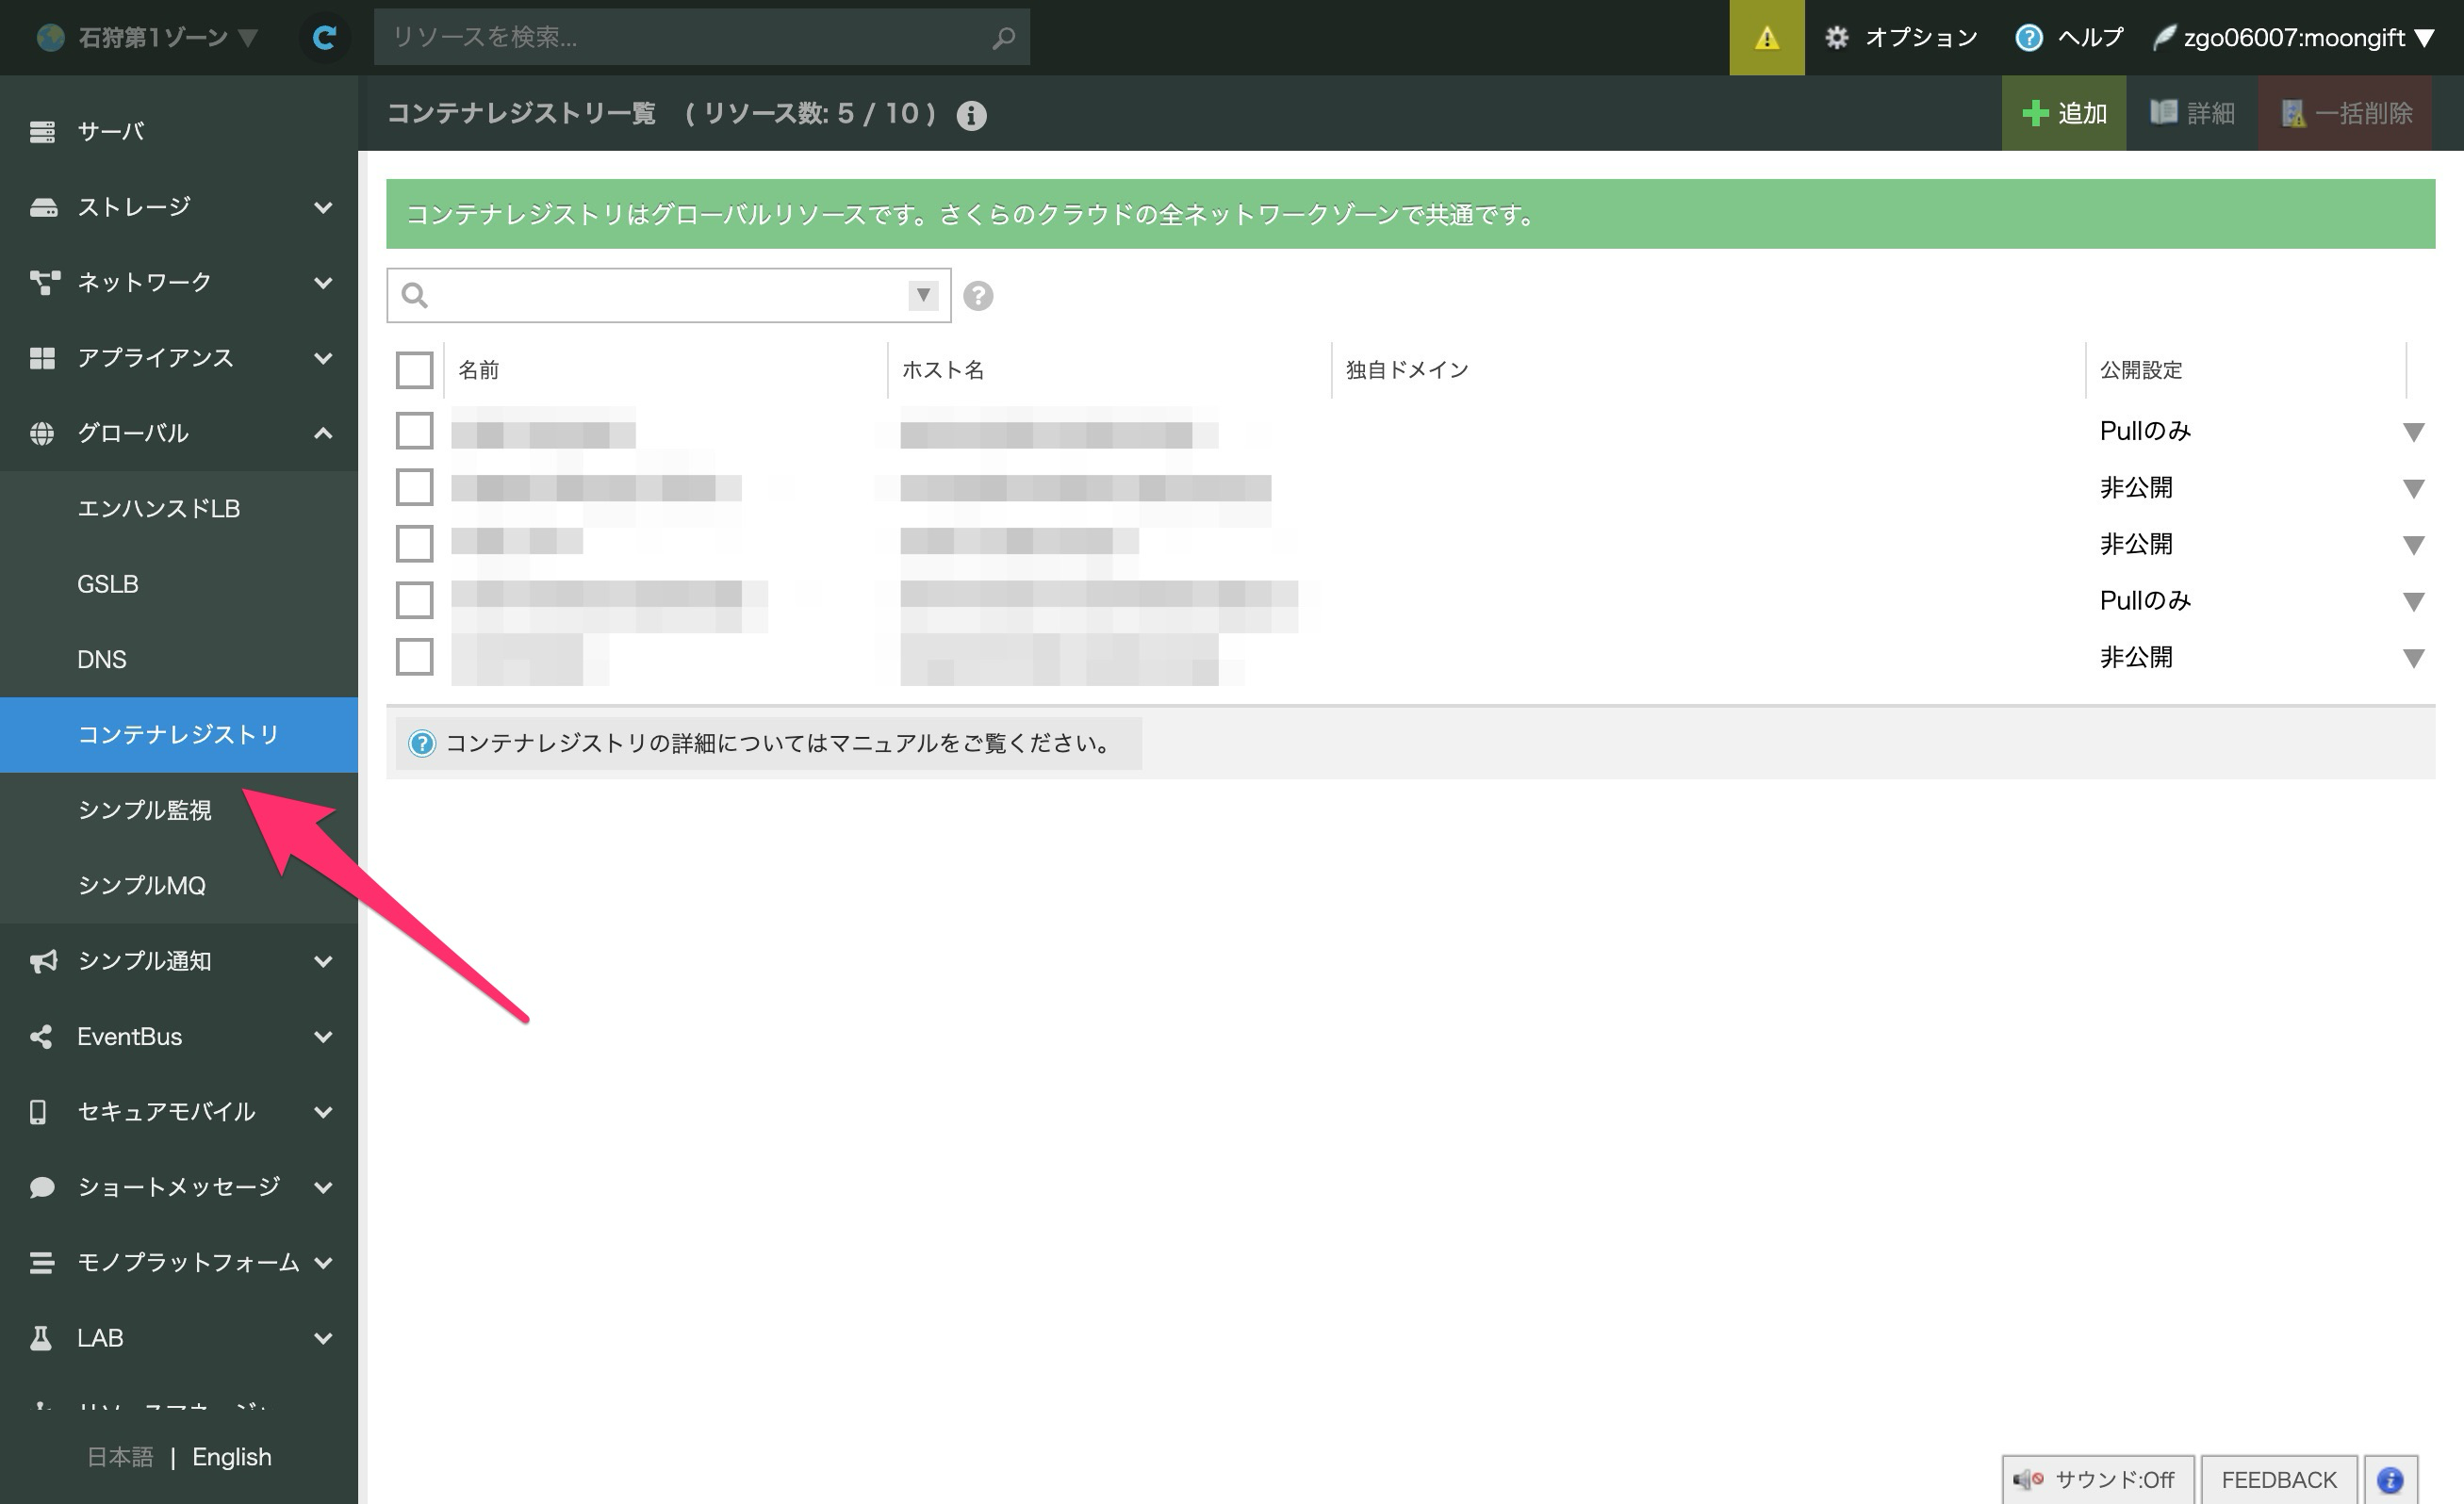
追加 を押して、コンテナレジストリを作成します。最低限、以下の入力が必要です。
| 項目 | 設定 |
|---|---|
| 名前 | 分かりやすい、任意の名前を入力してください |
| コンテナレジストリ名 | ドメイン名に使われます。以下では、 EXAMPLE.sakuracr.jp として説明します |
| 公開設定 | Pullのみとします |
ユーザーの作成
コンテナレジストリを作成したら、作成したコンテナレジストリを一覧でダブルクリックします。

詳細表示にて、ユーザータブをクリックします。

追加ボタンを押し、ユーザーを作成します。 YOUR_USER_NAME と PASSWORD は任意のものを指定してください。
| 項目 | 設定 |
|---|---|
| ユーザー名 | YOUR_USER_NAME |
| パスワード | YOUR_PASSWORD |
| ユーザ権限設定 | All |
Dockerイメージのビルド
DockerイメージはLinuxで行います。今回はUbuntu 24.04を使っています。Dockerが使える環境であれば、Windows + WSL2でも問題ありません。macOSの場合、アーキテクチャが異なるので動かせないかも知れません(未検証です)。
EXAMPLE.sakuracr.jp の部分は、作成したコンテナレジストリのドメイン名に置き換えてください。また、 framepack は任意の名前で大丈夫です(以下はその名称で読み替えてください)。
sudo docker build -t EXAMPLE.sakuracr.jp/framepack:latest .
コンテナレジストリへのログイン
作成したコンテナレジストリにログインします。ログインIDとパスワードが求められるので、作成したものを入力してください。
sudo docker login EXAMPLE.sakuracr.jp
イメージのプッシュ
作成したイメージをコンテナレジストリにプッシュします。イメージサイズが大きいので、数十分かかります。
sudo docker push EXAMPLE.sakuracr.jp/framepack:latest
タスクを作成する
後は最初と同じように高火力 DOKでタスクを作成、実行します。
| 項目 | 設定 |
|---|---|
| イメージ | dok-handson.sakuracr.jp/framepack |
| 環境変数 | HF_TOKEN = "YOUR_HF_TOKEN" PROMPT = In breakdancing, spinning around with your head down. IMAGE_URL = "画像のURL" |

実行が完了し、動画が生成できていれば成功です。
まとめ
今回はFramePackを使って、高火力 DOK上で画像生成を行いました。まずは実行できるのみ、次にDockerイメージの作成と段階的に進められるようにしています。動画生成のように、処理に時間がかかるものを利用する際に高火力 DOKは便利です。
高火力 DOKはタスクを多数立ち上げて、後は結果を待つのみと言った使い方ができます。ぜひAI・機械学習に活用してください。