NCMBはモバイルアプリ開発におけるバックエンド機能(認証、データストア、ファイルストア、プッシュ通知など)を提供しています。バックエンドなのでAPIベースで利用するのが基本で、UI(アプリ側)は各自で開発する仕組みになっています。
現在、数多くのアプリが存在し、その中には定番とも言える機能があります。そうした定番機能を各フレームワークごとに実装しておくことで、再利用性高くNCMBが利用できるかと思います。
今回は初となるFramework7で作った地図コンポーネントを紹介します。Monacaアプリでも利用可能です。
NCMBMania/framework7_map_component: Framework7とNCMBを組み合わせたUIコンポーネントです。
UIについて
コンポーネントは1つのHTMLだけで実装されているのが特徴です。そのため、基本的には以下の方法で導入・利用ができます。
- 必要なライブラリ・SDKの読み込み
- 必要なキー・トークンの取得
- NCMBとMapboxの初期化
- ルーティングの設定
- 地図UI(HTML)を配置
用意されている画面(機能)は次の通りです。
地図上にマーカーを表示する機能
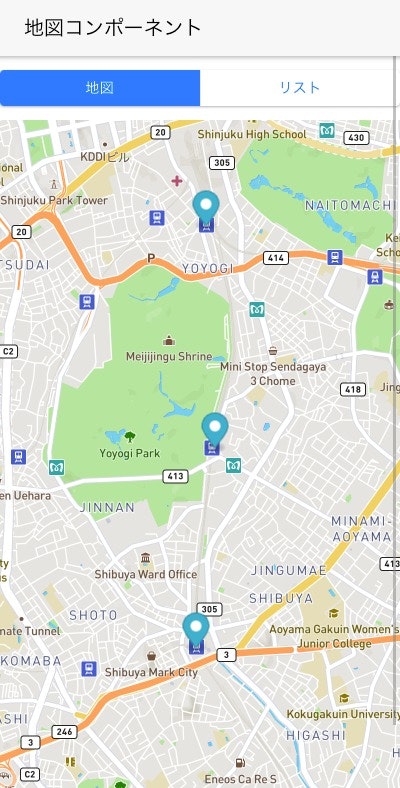
初期は現在位置を使って地図表示します。さらにその付近にある店舗を取得し、それらの店舗群の中心に地図を移動させます。
店舗の詳細を表示
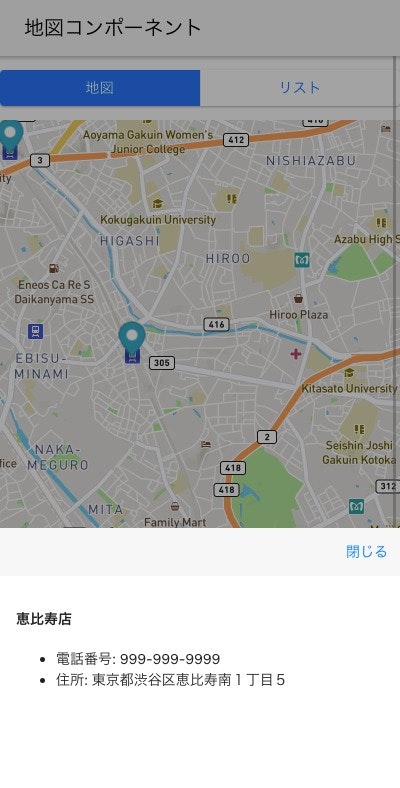
シート表示を使ってタップした店舗の情報を表示します。
店舗一覧を表示
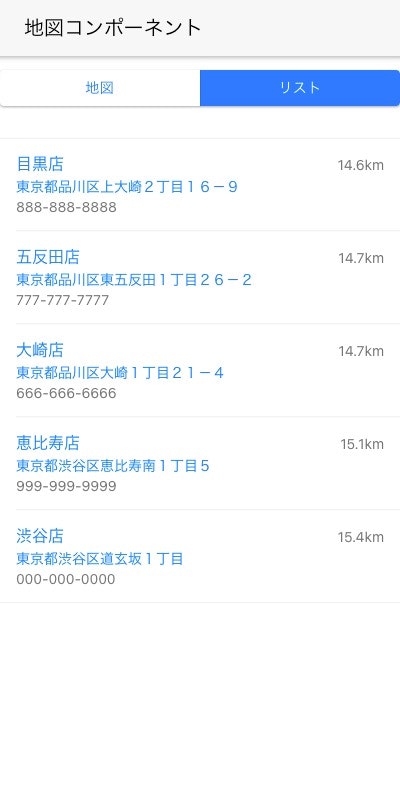
地図ではなくリスト表示もできます。
地図の移動
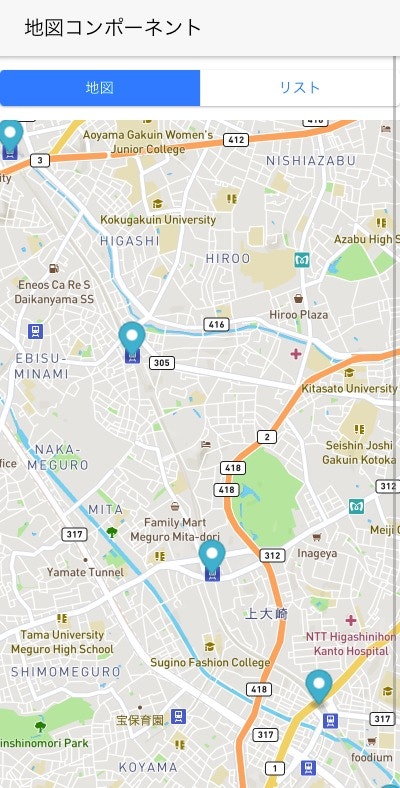
地図を移動させると、移動した場所を中心点として付近の店舗を読み込み、表示します。
使い方
ではここから使い方を紹介します。
必要なライブラリ・SDKの読み込み
今回利用しているライブラリ・SDKは次の通りです。
- Mapbox GL JS
- turf.js
- NCMB JavaScript SDK
これらを www/index.html で読み込みます。
<script src='https://api.mapbox.com/mapbox-gl-js/v2.6.1/mapbox-gl.js'></script>
<script src='https://unpkg.com/@turf/turf@6/turf.min.js'></script>
<script src="js/ncmb.min.js"></script>
MapboxではCSPの設定も必要です。以下のように worker-src blob: を追加します。
<meta http-equiv="Content-Security-Policy" content="default-src * 'self' 'unsafe-inline' 'unsafe-eval' data: content:; worker-src blob:">
必要なキー・トークンの取得
Mapboxのトークン、NCMBのアプリケーションキーとクライアントキーを取得します。
NCMBとMapboxの初期化
www/js/app.js にてNCMBとMapboxを初期化します。今回は www/js/config.json というファイルにキーやトークンを記述しているので、以下のように読み込みを行っています。
const $ = Dom7;
(async () => {
  const device = Framework7.getDevice();
	// 設定ファイルの読み込み
  const config = await (await fetch('./js/config.json')).json();
	// NCMBの初期化
  window.ncmb = new NCMB(config.applicationKey, config.clientKey);
	// Mapboxの初期化
  mapboxgl.accessToken = config.mapboxToken;

  // Framework7の初期化
  window.app = new Framework7({
    name: 'NCMB Map',
    theme: 'auto',
    el: '#app',
    id: 'com.nifcloud.mbaas.map',
    store: store,
    routes: routes,
    input: {
      scrollIntoViewOnFocus: device.cordova && !device.electron,
      scrollIntoViewCentered: device.cordova && !device.electron,
    },
    statusbar: {
      iosOverlaysWebView: true,
      androidOverlaysWebView: false,
    },
    on: {
      init: function () {
        if (this.device.cordova) {
          cordovaApp.init(this);
        }
      },
    },
  });
})();
ルーティングの設定
今回は最低限のルーティングを設定しています( www/js/routes.js )。 /map で地図コンポーネントを表示します。
const routes = [
  {
    path: '/',
    url: './index.html',
  },
  {
    path: '/map',
    componentUrl: './pages/map.html',
  },
  // Default route (404 page). MUST BE THE LAST
  {
    path: '(.*)',
    url: './pages/404.html',
  },
];
www/index.html で /map を最初に表示します。
<div id="app">
	<!-- Your main view, should have "view-main" class -->
	<div class="view view-init safe-areas" data-url="/map">
	</div>
</div>
地図UI(HTML)を配置
後は map.html をダウンロードして、www/pages/map.html に配置するだけです。
表示するデータについて
この地図コンポーネントでは、Store というデータストアのクラスに対して、次のようなフィールドを用意しています。
| フィールド名 | 型 |
|---|---|
| name | 文字列 |
| geo | 位置情報 |
| address | 文字列 |
| tel | 文字列 |
デモデータは山手線の駅一覧として geo.json を用意しています。これをNCMBのデータストアでインポートしてください。
地図コンポーネントについて
地図コンポーネントの内容は次のようになります。実装はコメントを参照してください。
<template>
  <div class="page">
    <!-- Top Navbar -->
    <div class="navbar">
      <div class="navbar-bg"></div>
      <div class="navbar-inner">
        <div class="title sliding">地図コンポーネント</div>
      </div>
    </div>
    <div class="page-content">
      <!-- 地図表示とリスト表示を切り替えます -->
      <p class="segmented segmented-raised">
        <button class="button button-map button-active" @click=${() => changeView("map")}>地図</button>
        <button class="button button-list" @click=${() => changeView("list")}>リスト</button>
      </p>
      <!-- 地図用 -->
      <span class="sub-page page-map">
        <div id='map'></div>
      </span>
      <!-- リスト用 -->
      <span class="sub-page page-list">
        <div class="list media-list">
          <ul>
            ${stores.map(store => $h`
              <li>
                <a href="#" class="item-content">
                  <div class="item-inner">
                    <div class="item-title-row">
                      <div class="item-title">${store.name}店</div>
                      <div class="item-after">${distance(store.geo)}km</div>
                    </div>
                    <div class="item-subtitle">${store.address}</div>
                    <div class="item-text">${store.tel}</div>
                  </div>
                </a>
              </li>
            `)}
          </ul>
        </div>
      </span>
    </div>
    <!-- マーカーをタップした際のシート表示用 -->
    <div class="sheet-modal store-sheet">
      <div class="toolbar">
        <div class="toolbar-inner">
          <div class="left"></div>
          <div class="right"><a class="link sheet-close" href="#">閉じる</a></div>
        </div>
      </div>
      <div class="sheet-modal-inner">
        <div class="block">
          <h4>${store.name}店</h4>
          <p>
            <ul>
              <li>電話番号: ${store.tel}</li>
              <li>住所: ${store.address}</li>
            </ul>
          </p>
        </div>
      </div>
    </div>
  </div>
</template>
<style>
  #map {
    width: 100%;
    height: 100%;
    position: relative;
  }
  canvas, .mapboxgl-canvas {
    height: 100%;
  }
  .page-list {
    display: none;
  }
</style>
<script>
  export default function (props, {$f7, $on, $onMounted, $update}) {
    // NCMBとMapboxが初期化されているかチェックします
    if (typeof ncmb === 'undefined') throw 'NCMBが初期化されていません';
    if (typeof mapboxgl.accessToken === 'undefined') throw 'Mapboxが初期化されていません';
    // 地図コンポーネントで利用している変数
    let map; // Mapbox用
    let stores = []; // NCMBから取得した店舗一覧データ用
    let store = {};  // 選択した店舗データが入ります
    let markers = []; // Mapboxのマーカー用
    let position = {}; // 現在位置や地図の中心の位置情報

    // マウントされた際に実行します
    $onMounted(async () => {
      // ローディングアイコンを表示
      app.preloader.show();
      try {
        // 現在位置を取得します
        const { coords } = (await getCurrentPosition());
        // ポジションとして緯度経度を記録します
        position = {
          latitude: coords.latitude,
          longitude: coords.longitude,
        };
        // 地図を表示します
        initMap();
        // 現在位置の付近にある店舗情報を取得します
        stores = await getStoresNear();
        // 取得した店舗を地図に表示します
        addStore();
        // 地図の表示を調整します
        fitBounds();
        // 地図をドラッグした際のイベント設定です
        map.on('dragend', moveMap);
        // ローディングアイコンを消します
        app.preloader.hide();
      } catch (e) {
        $f7.dialog.alert('初期表示中にエラーが発生しました');
      }
    });

    // 地図を移動した際のイベントです
    const moveMap = async (e) => {
      try {
        // 古いデータを消します
        initialize();
        // 地図の中心点を取得します
        const {lat, lng} = map.getCenter();
        // ポジションを更新します
        position.latitude = lat;
        position.longitude = lng;
        // 中心点の付近にある店舗情報を取得します
        stores = await getStoresWithinKilometers();
        // 取得した店舗を地図に表示します
        addStore();
      } catch (e) {
        $f7.dialog.alert('地図移動時にエラーが発生しました');
      }
    }

    // 古いデータを消します
    const initialize = () => {
      // 地図のマーカーを消します
      markers.forEach(m => m.remove());
      // 店舗情報を消します
      stores = [];
      store = {};
    }

    // 地図表示とマーカー表示を切り替えます
    const changeView = (value) => {
      // セグメントボタンのアクティブを切り替えます
      $('.segmented button').removeClass('button-active');
      $(`.button-${value}`).addClass('button-active');
      // 地図とリスト表示を切り替えます
      $('.sub-page').hide();
      // 表示を更新します
      $update();
      $(`.page-${value}`).show();
    };

    // HTML5 APIを使って現在位置を取得します
    const getCurrentPosition = () => {
      return new Promise((res, rej) => {
        navigator.geolocation
          .getCurrentPosition(res, rej);
      })
    };

    // 地図を初期化します
    const initMap = () => {
      const { latitude, longitude } = position;
      map = new mapboxgl.Map({
        container: 'map',
        style: 'mapbox://styles/mapbox/streets-v11',
        center: [longitude, latitude],
        zoom: 11,
      });
    }

    // 付近にある店舗情報を取得します
    const getStoresNear = () => {
      const { latitude, longitude } = position;
      const geo = new ncmb.GeoPoint(latitude, longitude);
      const Store = ncmb.DataStore('Store');
      return Store
        .near('geo', geo)
        .limit(5) // 件数は5件としています
        .fetchAll();
    }

    // 付近にあるデータを半径指定で取得します
    const getStoresWithinKilometers = () => {
      const { latitude, longitude } = position;
      const geo = new ncmb.GeoPoint(latitude, longitude);
      const Store = ncmb.DataStore('Store');
      return Store
        .withinKilometers('geo', geo, 5) // 5キロ指定です
        .fetchAll();
    }

    // 地図に店舗マーカーを表示します
    const addStore = () => {
      stores.forEach(store => {
        markers.push(new clickableMarker()
          .setLngLat([store.geo.longitude, store.geo.latitude])
          .setStore(store)
          .addTo(map));
      });
    };

    // 店舗情報がすべて表示される形で地図の中心点を変更します
    const fitBounds = () => {
      // turf.jsを利用します
      const line = turf.lineString(stores.map(store => [store.geo.longitude, store.geo.latitude]));
      const bbox = turf.bbox(line);
      map.fitBounds(bbox, {
        padding: {top: 10, bottom: 10, left: 10, right: 10}
      });
    }

    // 一覧表示用に、店舗までの距離を計算します
    const distance = ({ latitude, longitude }) => {
      const R = Math.PI / 180;
      latitude2 = position.latitude;
      longitude2 = position.longitude;
      latitude *= R;
      longitude *= R;
      latitude2 *= R;
      longitude2 *= R;
      return (6371
        * Math.acos(Math.cos(latitude)
        * Math.cos(latitude2)
        * Math.cos(longitude2 - longitude) + Math.sin(latitude)
        * Math.sin(latitude2))).toFixed(1);
    }

    // マーカーをタップした際にシートを表示するため、Markerクラスの処理を書き換えています
    class clickableMarker extends mapboxgl.Marker{
      // 店舗情報をクラス内に入れておきます
      setStore(store) {
        this.store = store;
        return this;
      }
      // マーカーをタップした際のイベントです
      _onMapClick(e) {
        const targetElement = e.originalEvent.target;
        const element = this._element;
        if (targetElement === element || element.contains((targetElement))) {
          // 店舗情報をセットします
          store = this.store;
          // 表示を更新します
          $update();
          // シートを表示します
          app.sheet.open('.store-sheet');
        }
      }
    }
    return $render;
  }
</script>
改修ポイント
今回は1つのHTMLのみとしているので、リスト画面で項目をタップした際のイベントは実装していません。より詳細な店舗情報を表示する際には、そうした画面を用意すると良いでしょう。
他の画面から読み込む場合にはaタグのリンクか、 $f7router.navigate で移動してください。
まとめ
地図コンポーネントを使えば、ブランドアプリを実装する際の店舗一覧画面の実装が簡単に実現できます。ぜひお試しください。