概要
RICOH THETA Sの360度映像を遠隔で視聴するための手順を紹介します。
ROS(Robot Operating System)を使えば手軽にLAN内で映像の送受信ができます。
ロボット用のミドルウェアであるROSですが、マルチプロセス・マルチデバイスなシステムの構築に非常に相性が良いです。
内容としてはほぼ既存記事の組み合わせなので、手抜きで申し訳ないですが、
詳細な手順は以下参考サイトを適宜ご参照ください。
(各セクションで参考サイト番号を付与しています)
参考サイト
[1] THETA SからOculus RiftへUSBライブストリーミング with Unity (Skybox編)
http://hammmm.hatenablog.com/entry/2015/12/23/213257
[2] Unity と ROS の通信 ( ROS# : ros-sharp )
https://kato-robotics.hatenablog.com/entry/2018/10/30/170446
[3] OculusGoをROSと通信させる
https://qiita.com/Spritaro/items/5eb99b2fcdc26a3816ce
[4] THETA S + Raspberry Pi 2でライブストリーミングしてみた
https://qiita.com/syumai/items/ccf4a0116c3986e90c74
前提知識
- Unity、ROSの開発知識
動作確認環境
- Unity: Windows10 Pro、Unity 2018.2.18f1 Personal
- ROS: Ubuntu 16.04、 ROS Kinetic
全体像
今回はローカルネットワーク環境でTHETAの映像を配信する構成とします。
ROSマシンとUnityマシンそれぞれが192.168.0.XのIPアドレスになっている前提で進めます。
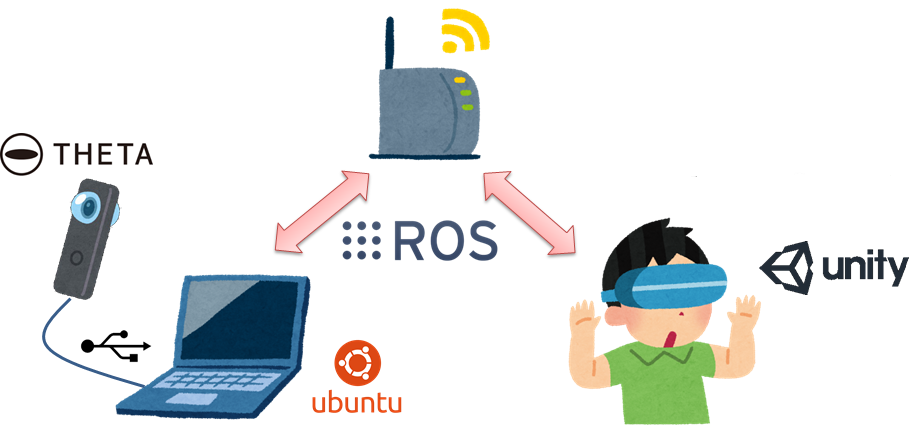
※今回VRに関する説明はしませんが、Oculus Riftでの動作も確認しています。
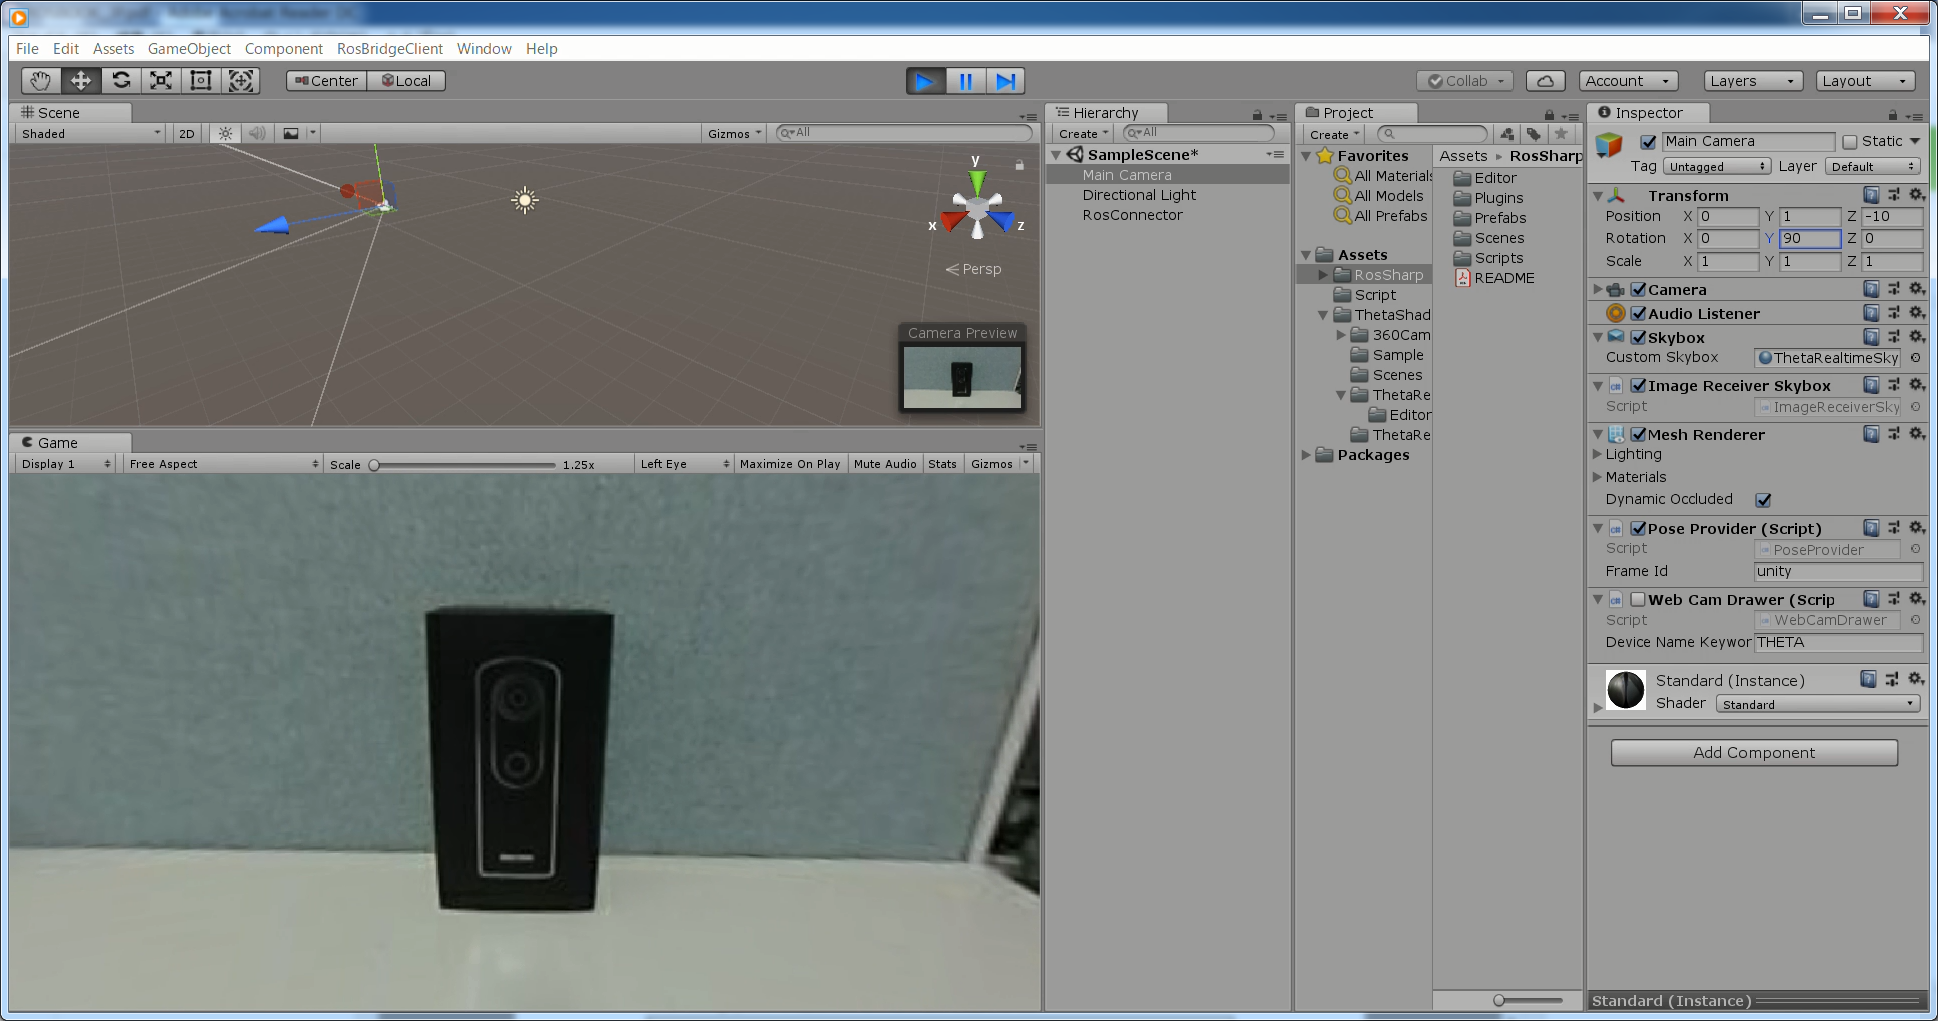
動作確認
THETAの箱を撮ってみます。
UnityでPlayするとこんな感じです。
※GIF

カメラのRotaionの値を変えると視点を変えられます。
圧縮した映像を送っているため少し画像が粗く見えます。
ROS側の設定
- rosbridge-serverをインストール [2]
UnityとROS通信するためのパッケージです。内部的にはwebsocketを使っているようです。
$ sudo apt-get install ros-kinetic-rosbridge-server
- libuvc_cameraをインストール
THETAの画像をROS形式で取り込むためのパッケージです。
なお、uvc_cameraパッケージやusb_camパッケージではエラーが出て使えませんでした。
$ sudo apt-get install libuvc_camera
- THETA Sの接続
UbuntuマシンにTHETAをUSB Streamingモードで接続します。
https://www.youtube.com/watch?v=O7-LXnPuFU0#action=share
静止画/動画切り替えボタンを押しながら電源ボタンを押せばよいです。
また、私の環境ではWi-Fiが干渉しているのか不安定になったので、THETAのWi-FiはOFFにしておいたほうがよいかもしれません。
- THETA Sの機器情報の確認 [4]
libuvc_cameraでTHETAを使用するための機器情報を確認します。
$ lsusb
出力結果
...
Bus 001 Device XXX: ID YYYY:ZZZZ Ricoh Co., Ltd
...
このYYYYとZZZZがそれぞれVendorとProductというパラメータになります。
たぶん同じだと思いますが、私の環境ではYYYY=05ca、ZZZZ=2711でした。
次に以下コマンドを実行してください(v4l2をインストールしてない場合はapt-getしておく)。
$ v4l2-ctl --list-formats-ext
出力結果
...

ioctl: VIDIOC_ENUM_FMT
Index       : 0
Type        : Video Capture
Pixel Format: 'MJPG' (compressed)
Name        : Motion-JPEG
        Size: Discrete 1280x720
                Interval: Discrete 0.067s (14.985 fps)
...
解像度が1280*720、圧縮形式がMJPG、FPSが14.985ということがわかります。
なお、Permission deniedが出る場合は/dev/video0の権限を変えておきます。
$ sudo chmod a+rw /dev/video0
- libuvc_cameraのlaunchファイルを作成
パラメータをたくさん入力するので、手間を省くためにlaunchファイルを作成しておきます。
パッケージ名はmylibuvcとします。
<launch>
  <node name="libuvc_camera" pkg="libuvc_camera" type="camera_node" output="screen">
    <param name="vendor" value="0x05ca" />
    <param name="product" value="0x2711" />
    <param name="width" value="1280" />
    <param name="height" value="720" />
    <param name="video_mode" value="mjpeg" />
    <param name="frame_rate" value="14.985" />
  </node>
</launch>
それぞれ調べたパラメータをセットしてください。
- roscoreを起動
$ roscore
- rosbridge-serverを起動 [2]
$ roslaunch rosbridge_server rosbridge_websocket.launch
起動後、Unity側のノードが接続/切断されるとメッセージが表示されます。
- libuvc_camera.launchを起動
$ roslaunch mylibuvc libuvc_camera.launch
以下のトピックがpublishされていることを確認しましょう。
/image_raw/compressed
$ rostopic list
Unity側の設定
- Projectの作成
名前を適当に決めて3Dのプロジェクトを作成してください。
- ros-sharpをダウンロード [2][3]
Unity内でROSのpublisherやsubscriberを設定するためのライブラリです。
以下サイトからRosSharp.unitypackageをダウンロードしてUnityのAssetsにインポートしてください。
https://github.com/siemens/ros-sharp/releases
なお、私の環境ではVersion 1.3だとエラーが出たためVersion 1.2cを使用しました。
【追記】1.3の対応方法をコメントいただきました!
- Theta Shader Packをダウンロード [1]
THETAの全天球映像をUnityのskyboxに貼るためのライブラリです。
外部リンク:Stereoarts Homepage
の上部にある
ThetaShaderPack_20150926.zip
をダウンロードして解凍、ThetaShaderPack.unitypackageをUnityのAssetsにインポートしてください。
- ImageReceiverSkyboxを作成 [3]
RosSharpで用意されているAssets>RosSharp>Script>MessageHandling>ImageReceiverを使えば、
画像(sensor_msgs/CompressedImage)をsubscribeしてオブジェクトのテクスチャに反映させることができます。
ここではskyboxのテクスチャに反映したいので、そこだけ修正したScriptを作成します。
ポイントとしては以下サイトにあるWebCamDrawer.csのGetTargetMaterialでSkyboxのmaterialを取得して、
Subscribeした画像のtextureを反映しているところになります。
/*
© Siemens AG, 2017-2018
Author: Dr. Martin Bischoff (martin.bischoff@siemens.com)

Licensed under the Apache License, Version 2.0 (the "License");
you may not use this file except in compliance with the License.
You may obtain a copy of the License at
<http://www.apache.org/licenses/LICENSE-2.0>.
Unless required by applicable law or agreed to in writing, software
distributed under the License is distributed on an "AS IS" BASIS,
WITHOUT WARRANTIES OR CONDITIONS OF ANY KIND, either express or implied.
See the License for the specific language governing permissions and
limitations under the License.
*/

using System;
using UnityEngine;

namespace RosSharp.RosBridgeClient
{
    [RequireComponent(typeof(MeshRenderer))]
    public class ImageReceiverSkybox : MessageReceiver
    {
        public override Type MessageType { get { return (typeof(SensorCompressedImage)); } }

        private byte[] imageData;
        private bool isMessageReceived;

        private MeshRenderer meshRenderer;
        private Texture2D texture2D;
        private Material mat;

        private void Awake()
        {
            MessageReception += ReceiveMessage;
        }
        private void Start()
        {
            texture2D = new Texture2D(1, 1);
            meshRenderer = GetComponent<MeshRenderer>();
            meshRenderer.material = new Material(Shader.Find("Standard"));
            mat = GetTargetMaterial();
            if (mat != null)
            {
                mat.mainTexture = texture2D;
                Debug.Log("Apply texture to skybox.");
            }

        }
        private void Update()
        {
            if (isMessageReceived)
            {
                ProcessMessage();
            }
        }
        private void ReceiveMessage(object sender, MessageEventArgs e)
        {
            imageData = ((SensorCompressedImage)e.Message).data;
            isMessageReceived = true;
        }

        private void ProcessMessage()
        {
            texture2D.LoadImage(imageData);
            texture2D.Apply();
            meshRenderer.material.SetTexture("_MainTex", texture2D);
            isMessageReceived = false;
        }

        private Material GetTargetMaterial()
        {
            Skybox skybox = GetComponent<Skybox>();
            if (skybox != null)
            {
                Debug.Log("Skybox components found.");
                return skybox.material;
            }
            Renderer renderer = GetComponent<Renderer>();
            if (renderer != null)
            {
                Debug.Log("Renderer components found.");
                return renderer.material;
            }
            Debug.LogError("no Renderer/Skybox components found.");
            return null;
        }
    }
}
- MainCameraにSkyboxを追加 [1]
MainCameraにAdd ComponentでSkyboxを追加します。
次に、インスペクタのCustom Skyboxに、Assets>ThetaShaderPack>ThetaRealtimeSkybox>ThetaRealtimeSkyboxマテリアルをセットします。
さらに先程作成したImageReceiverSkyboxをアタッチしておきましょう。
- RosConnectorを追加 [2][3]
UnityでROSメッセージをPublish/Subscribeしたりするためのコネクタです。
ちゃんと確認していませんが、1つのRosConnectorでsubscribeできるメッセージは1つだけのようです。
HierarchyでCreate>Create Enptyにより空のオブジェクトを作成(名前:RosConnector)します。
そのRosConnectorに Assets>RosSharp>Script>RosCommunication>RosConnector.cs をアタッチします。
次に、インスペクタのRos Bridge Server UriにROSマシンのURIをセットします。以下は例です。
ws://192.168.0.4:9090
ここで、ポート番号はROS Master(11311)ではなくrosbridge-serverのものになります(デフォルト:9090)。
- RosConnectorにSubscriberを追加 [3]
RosConnectorにAssets>RosSharp>Script>RosCommunication>Subscriberをアタッチします。
インスペクタのTopicにSubscribeする画像のトピック名/image_raw/compressedをセットします。
また、MessageReceiverにMain Cameraを設定しましょう。
- まとめ
以上により
THETA -> Ubuntu -> rosbridge-server -> RosConnector(Subscriber) -> Main Camera (ImageReceiverSkybox+Skybox)
という流れでTHETAの映像が背景に設定されます。