はじめに
環境
- Windows 11 home
- Ruby 3.1.3
- Rails 7.0.4.2
対象者
- Windows ユーザーでローカルに Ruby on Rails の環境を作りたい方
注意点
- Rails と Ruby とで対応バージョンがある程度決まっており、古いと上手くいきませんので気を付けて下さい。以下対応表になりますので参考にして下さい。
| Rails version | Ruby version |
|---|---|
| Rails 7 | Ruby 2.7.0以降が必須 |
| Rails 6 | Ruby 2.5.0以降が必須 |
| Rails 5 | Ruby 2.2.2以降が必須 |
(参考:https://railsguides.jp/upgrading_ruby_on_rails.html)
このページの説明
本ページでは、Windows11 に Ruby on Rails の環境を構築する方法を解説します。
ちなみに、Mac OS では最初から Ruby が install されているみたいです。便利…
(バージョンが古いと新しいバージョンにする必要はあります)
流れとしては、以下です。
- Ruby の install
- SQLite3 の install
- Rails の install
- Rails アプリケーションの作成
- Rails サーバーを立ち上げる
- ブラウザを開き、localhost:3000 で Rails のページを表示する
手順
1. Ruby の Install
1.1 RubyInstaller のサイトを開き、「WITH DEVKIT」の中からお好きなバージョンをクリックし install します。
私はどのバージョンでも良かったので、サイトが推奨する「Ruby+Devkit 3.1.3-1 (x64)」にしました。(赤線の箇所に、どのバージョンを install するか決めてない人は、Ruby+Devkit 3.1.3-1 (x64) が推奨だよ。って書いてます)

1.2 クリックするとダウンロードが始まりますので、少し待機です。(私の環境では 30秒くらいでした)
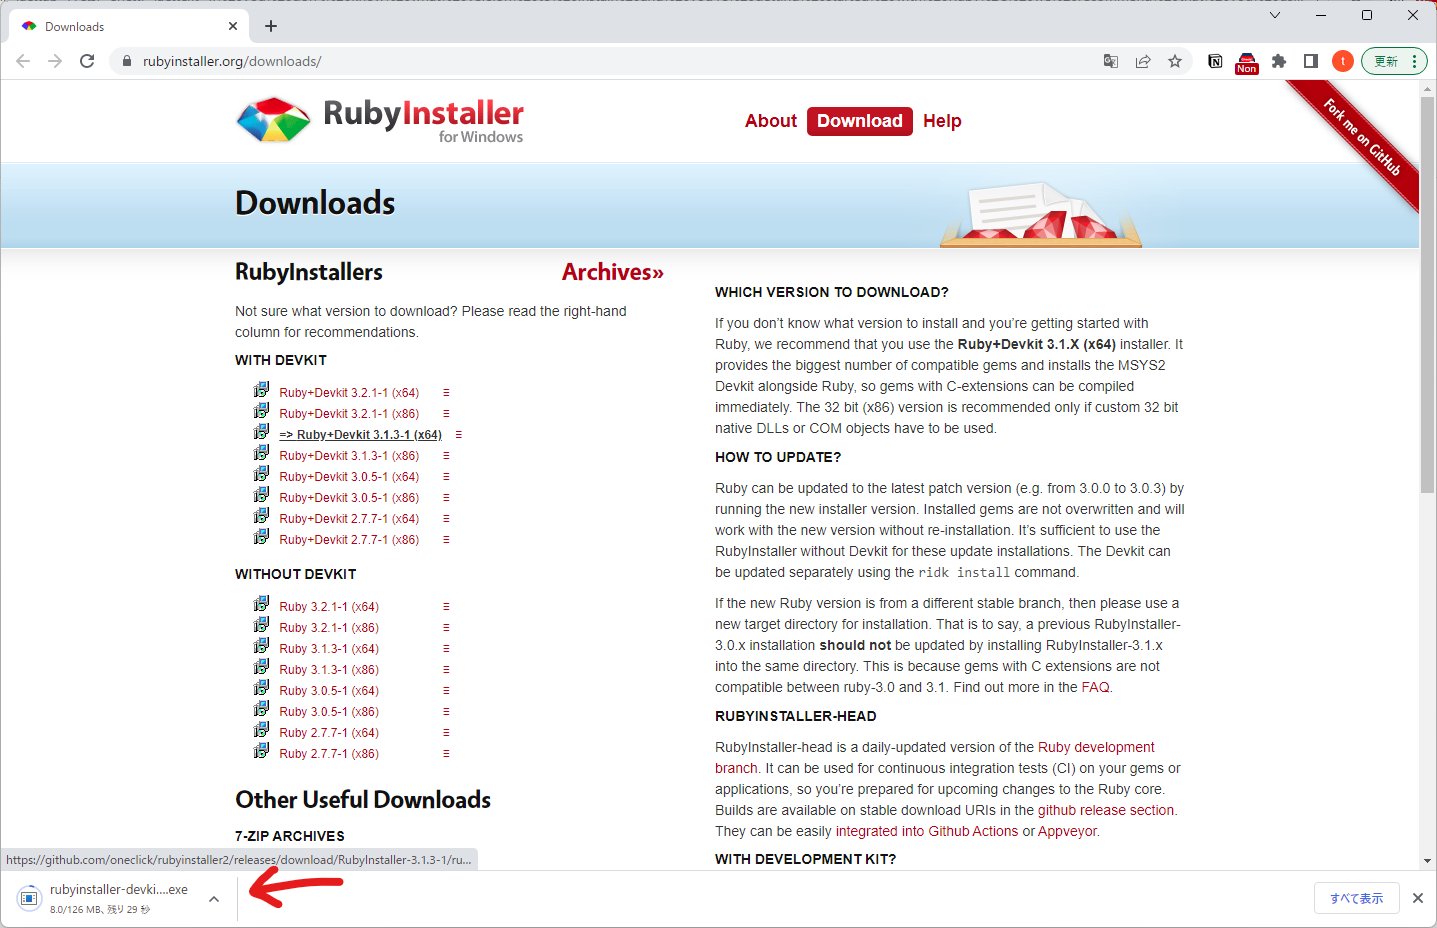
1.3 ダウンロード完了後、クリックしてファイルを開きます。

1.4 デフォルトでは、” I decline the License “ になっていますので、” I accept the License “ を選択し「Next」をクリックします。I accept the License と言うのは、ライセンスに同意します。と言う意味になります。ちなみに、I decline the License は辞退。

1.5 ここでは、インストール先とオプションを選択しますが、特に拘りなければ「install」をクリックします。

1.6 Components の画面です。ここも特に問題ないので、「Next」をクリックし次に進みます。

1.7 install が始まりますので数分待機です。(私の環境だと1~2min)

1.8 この画面が表示されたら、install 完了です。「Finish」をクリックです。

1.9 自動的にコマンドプロンプトが立ち上がり、以下のような画面が表示されます。
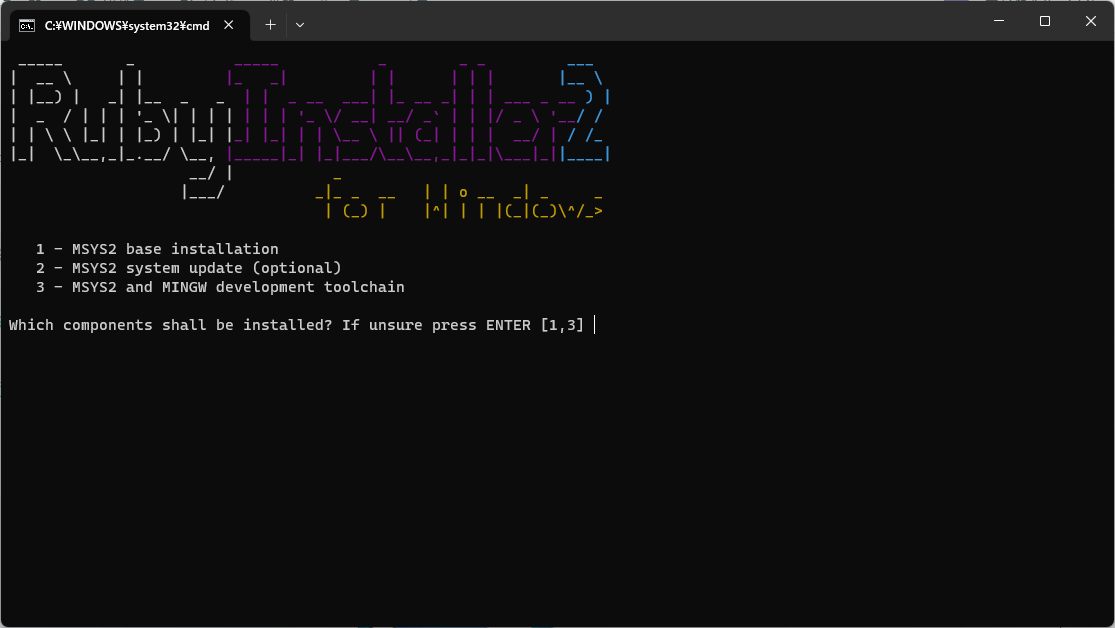
1.0.0 半角の「1,3」を入力して、「Enter」キーを押します。

1.0.1 少し放置すると以下の画面になります。この状態になったらもう一度「Enter」キーを押します。( Enter を押せばコマンドプロンプトが閉じます)

1.0.2 以上で、Ruby を install する作業は完了です。正常に install されているか確認します。検索バーに「cmd」と入力しコマンドプロンプトを開きます。
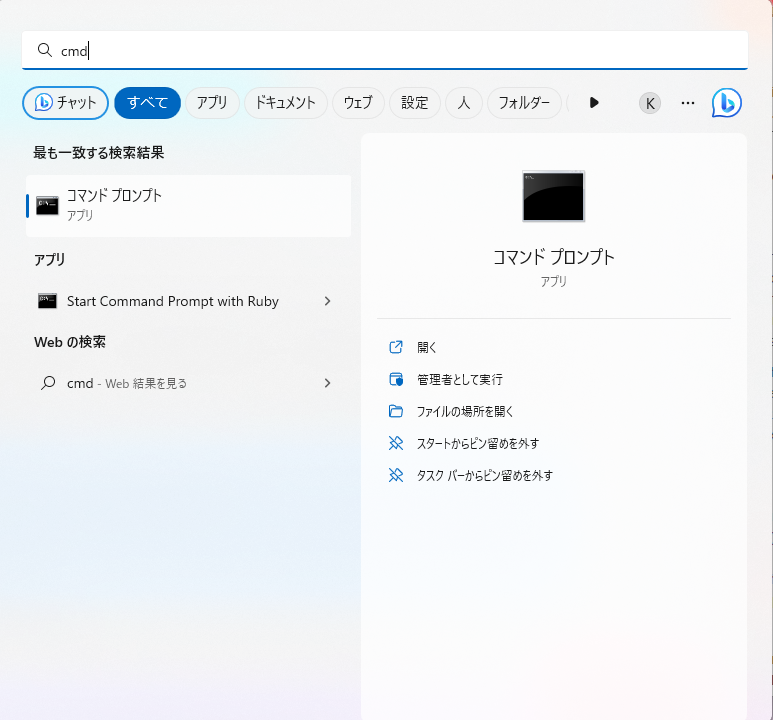
1.0.3 ruby --version と入力し「Enter」キーを押します。以下のようにバージョンが表示されたら成功です。(下記の場合だと、バージョン 3.1.3 )
C:\Users> ruby --version
ruby 3.1.3p185 (2022-11-24 revision 1a6b16756e) [x64-mingw-ucrt]

C:\Users>
これで Ruby の Install は完了です。
2. SQLite3 の Install
次に、SQLite3 を Install します。
SQLite3 は簡単に言うと、オープンソースのデータベース管理システムです。(あと軽量です)
2.1 まずは、SQLite3 のサイトを開き、「Download」をクリックします。
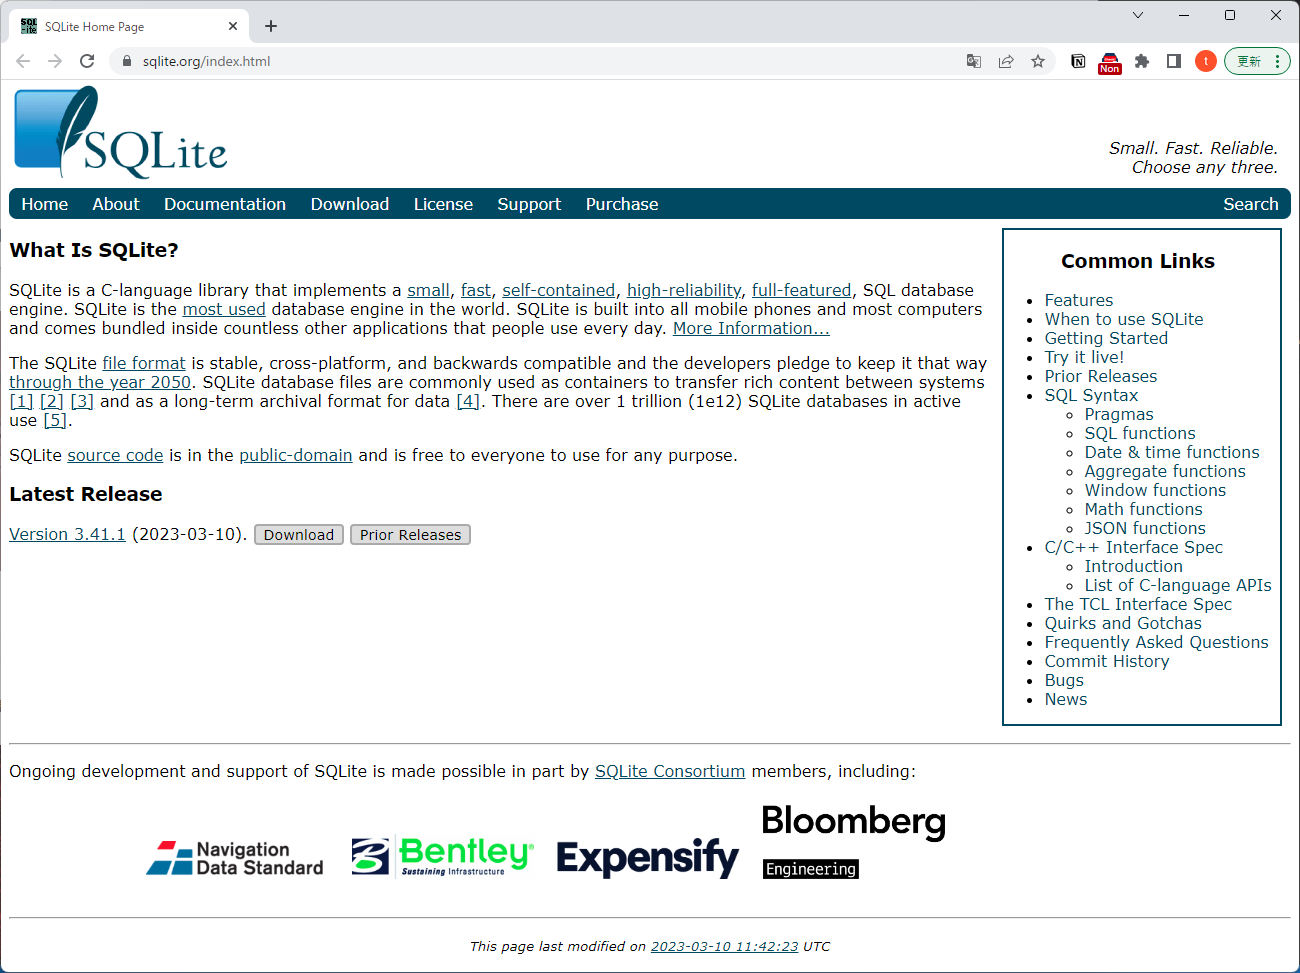
2.2 「Precompiled Binaries for Windows」の欄にある「sqlite-dll」というファイルをクリックしてダウンロードします。
32bit・64bit に関しては、ご自身の pc をご確認下さいませ。

2.3 ダウンロード完了したら、フォルダを開き「sqlite3.dll」を「C:¥Ruby26-x64¥bin」へコピーします。

2.4 先程の、SQLite3 のダウンロードページに戻り、「sqlite-tools-win32-x86-3410100.zip」というファイルもダウンロードします。

2.5 ダウンロード完了したら、フォルダを開き「sqlite3.exe」を、先程と同じフォルダ「C:¥Ruby26-x64¥bin」へコピーします。

2.6 「C:¥Ruby26-x64¥bin」に、「sqlite3.dll」と「sqlite3.exe」のファイルがコピーされている事を確認します。

これで SQLite3 の Install は完了です。
3. Ruby on Rails の Install
次は Ruby のフレームワーク、Ruby on Rails を install していきます。
3.1 検索バーに「cmd」と入力しコマンドプロンプトを開きます。
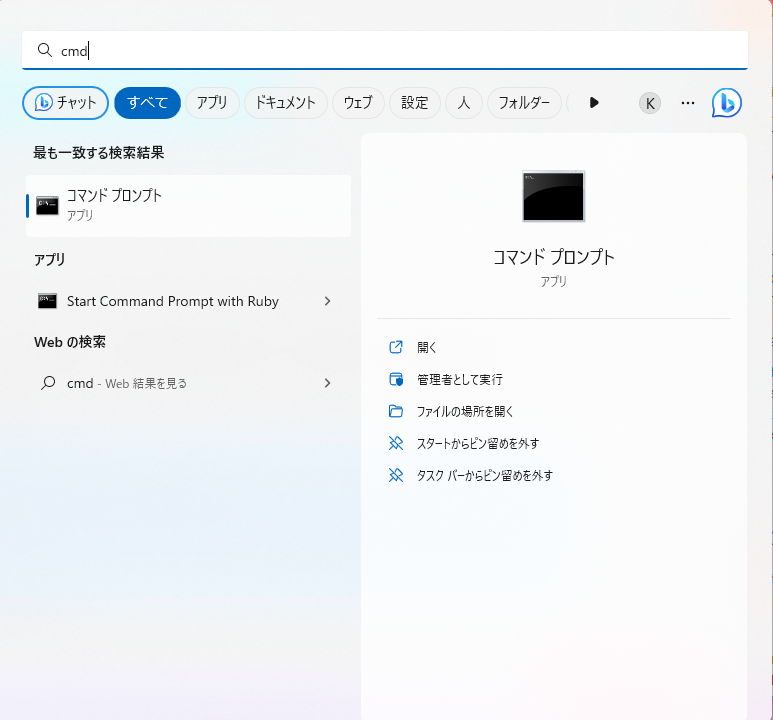
3.2 立ち上がりましたら gem install rails と入力し「Enter」キーを押します。
プロンプト(C:\Windows\System32>)が返ってきたら終了です。特にエラーが出ていない事を確認しておきましょう。
C:\Users> gem install rails

(中略)

C:\Users>
3.3 正常に Install されているか確認します。rails —-version と入力し「Enter」キーを押します。以下のようにバージョンが表示されたら成功です。(下記の場合だと、バージョン 7.0.4.2 )
C:\Users> rails --version
Rails 7.0.4.2

C:\Users>
これで Ruby on Rails の Install は完了です。
4. Railsアプリケーションの作成
ここでは、test_1 という名前の Railsアプリケーションの作成をしていきます。(アプリケーション名は、各々好きな名前で大丈夫です)
作成する際の、コマンドの書式は以下になります。
rails new アプリケーション名 -G
4.1 コマンドプロンプトを立ち上げ、rails new test_1 -G と入力し「Enter」キーを押します。
C:\Users> rails new test_1 -G
      create
      create  README.md
      create  Rakefile
      create  .ruby-version
      create  config.ru
(中略)

C:\Users>
4.2 アプリケーションが作成出来たか確認します。dir アプリケーション名 と入力し「Enter」キーを押します。私の場合だと、dir test_1 です。
以下のようになれば、問題なくフォルダが作れているので、アプリケーションも作成出来ていると判断出来ます。
C:\Users\test_1 のディレクトリ

2023/03/14  00:01    <DIR>          .
2023/03/14  00:01    <DIR>          ..
2023/03/14  00:01                11 .ruby-version
2023/03/14  00:01    <DIR>          app
2023/03/14  00:01    <DIR>          bin
2023/03/14  00:01    <DIR>          config
2023/03/14  00:01               160 config.ru
2023/03/14  00:01    <DIR>          db
2023/03/14  00:01             2,284 Gemfile
2023/03/14  00:01             5,601 Gemfile.lock
2023/03/14  00:01    <DIR>          lib
2023/03/14  00:01    <DIR>          log
2023/03/14  00:01    <DIR>          public
2023/03/14  00:01               227 Rakefile
2023/03/14  00:01               374 README.md
2023/03/14  00:01    <DIR>          storage
2023/03/14  00:01    <DIR>          test
2023/03/14  00:01    <DIR>          tmp
2023/03/14  00:01    <DIR>          vendor
               6 個のファイル               8,657 バイト
              13 個のディレクトリ  427,757,809,664 バイトの空き領域

C:\Users\test_1
これで Railsアプリケーションの作成は完了です。
5. Railsサーバーを立ち上げる
Railsサーバーを立てて、ブラウザでアクセスします。
Rails のページが表示されれば成功です。
5.1 サーバを立ち上げる際は、先程作成した Railsアプリのディレクトリに移動します。cd アプリケーション名 になります。
C:\Users\ktaka>cd test_1

C:\Users\ktaka\test_1>
5.2 rails server を実行し、サーバを立ち上げます。(停止する場合は、Ctrl + c で ok です)
C:\Users\test_1> rails server
=> Booting Puma
=> Rails 7.0.4.2 application starting in development
=> Run `bin/rails server --help` for more startup options
*** SIGUSR2 not implemented, signal based restart unavailable!
*** SIGUSR1 not implemented, signal based restart unavailable!
*** SIGHUP not implemented, signal based logs reopening unavailable!
Puma starting in single mode...
* Puma version: 5.6.5 (ruby 3.1.3-p185) ("Birdie's Version")
*  Min threads: 5
*  Max threads: 5
*  Environment: development
*          PID: 27312
* Listening on http://[::1]:3000
* Listening on http://127.0.0.1:3000
Use Ctrl-C to stop
Started GET "/" for ::1 at 2023-03-14 00:04:45 +0900
Processing by Rails::WelcomeController#index as HTML
  Rendering C:/Ruby31-x64/lib/ruby/gems/3.1.0/gems/railties-7.0.4.2/lib/rails/templates/rails/welcome/index.html.erb
  Rendered C:/Ruby31-x64/lib/ruby/gems/3.1.0/gems/railties-7.0.4.2/lib/rails/templates/rails/welcome/index.html.erb (Duration: 7.1ms | Allocations: 630)
Completed 200 OK in 81ms (Views: 27.4ms | ActiveRecord: 0.0ms | Allocations: 5170)
5.3 ブラウザを立ち上げ、「localhost:3000」と入力し「Enter」キーを押します。以下のような画面が表示されれば Railsサーバーが立っているので成功です。

まとめ
お疲れ様でした!
以上で、Windows11 に Ruby on Rails 環境構築は完了です。
Rails で色々勉強を始めたので備忘録として書かせていただきました。
今後も、Ruby に限らず色々と書く予定ですのでよろしくお願いします。
又、本ページの内容で過不足あればご指摘お願いいたします。
ここまで見ていただき、ありがとうございました!
それでは、よい Ruby ライフを!