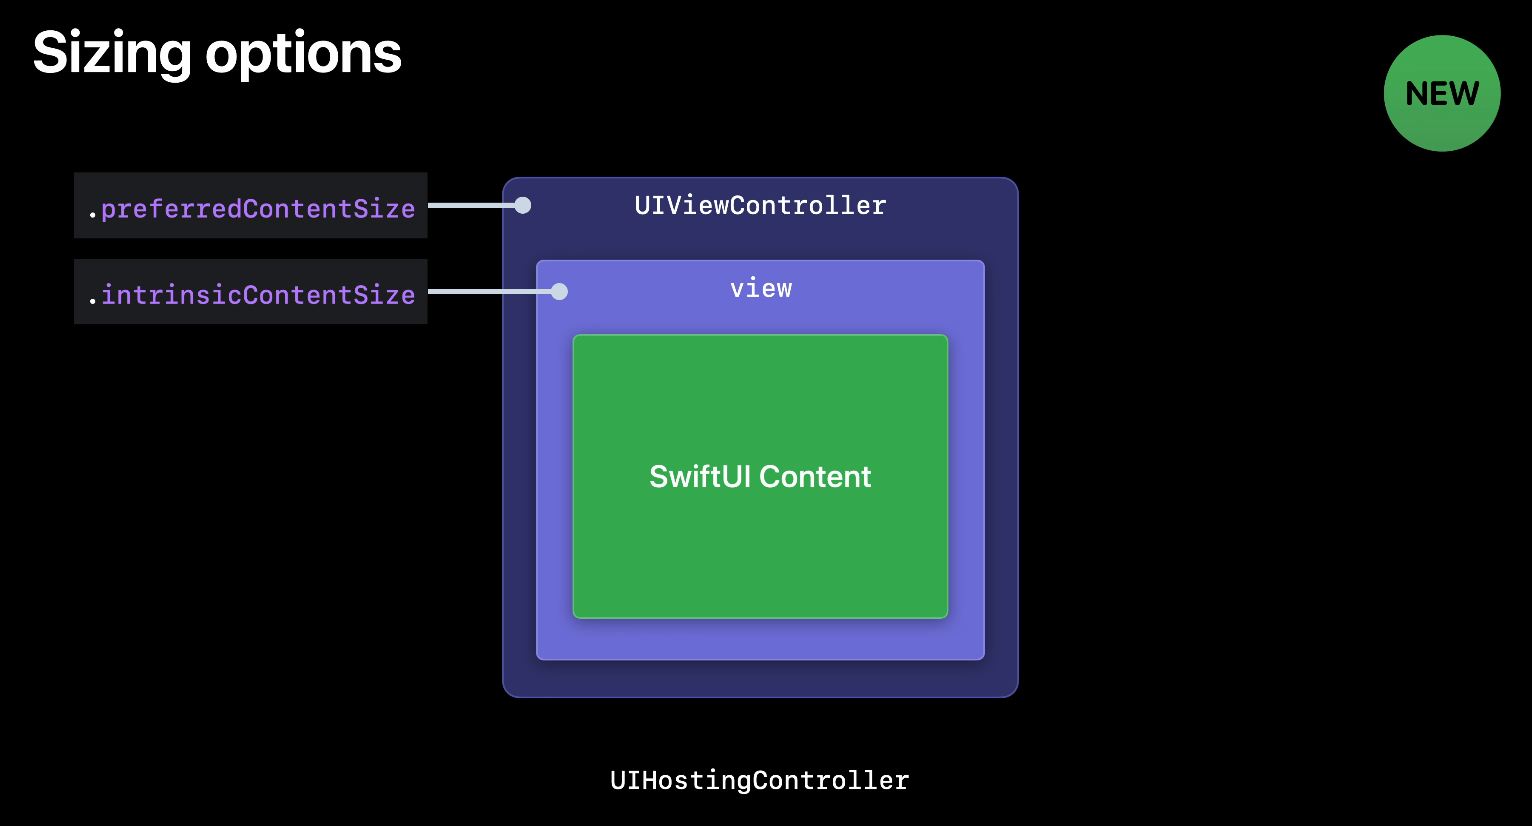
UIHostingControllerを使う際、SwiftUI側のViewのサイズ変更に合わせて、UIKit側のViewのサイズを調整しなければならないケースがあると思います。このような場合に利用できる仕組みとしてiOS 16から sizingOptions が導入されています。
sizingOptionsに設定できる値は UIHostingControllerSizingOptions というOptionSetです。
-
[]: 空の場合サイズ調整をしない。デフォルト値。 -
.preferredContentSize: SwiftUIのViewサイズに合わせて UIHostingController の preferredContentSize を更新する -
.intrinsicContentSize: SwiftUIのViewサイズに合わせて UIHostingController の view の intrinsicContentSize を更新する

WWDC2022 - Use SwiftUI with UIKit より
preferredContentSize と intrinsicContentSize とは
preferredContentSize は UIViewController が持つプロパティで、presentされたときのビューのサイズを規定するものです。主にpopoverとして表示される際に利用されます。
intrinsicContentSize は UIView が持つプロパティで、Auto Layoutでビューがレイアウトされる際に、そのビューの本来のサイズとして利用される値です。例えば UILabel では設定されているテキストにぴったり合うサイズになります。
それでは sizingOptions の .preferredContentSize と .intrinsicContentSize は具体的にどのようなときに使えばいいのでしょうか。それを以下で解説します。
sizingOptions = .preferredContentSize の利用シーン
UIHostingController をビューコントローラーとして直接 present する場合に利用します。
サンプルとして、ボタンを押すと中身のテキストが変わってサイズが変わるSwiftUIのViewを用意します。
struct PopoverContent: View {

    @State var text: String = "Hello, World!"

    private let texts = [
        "Hello, World!",
        "Hello, World!\nHello, Hello, World!",
    ]

    var body: some View {
        Button {
            text = texts.first(where: { $0 != text }) ?? ""
        } label: {
            Text(text)
        }
        .padding(16)
    }

}
続いて、ビューコントローラーに配置したボタンを押すと、UIHostingControllerを使って、上記のビューをpopoverとして表示するようにします。
final class ViewController: UIViewController {

    private let button = UIButton(type: .system)

    override func viewDidLoad() {
        super.viewDidLoad()

        button.setTitle("present", for: .normal)
        button.addAction(.init {_ in
            self.presentPopover()
        }, for: .touchUpInside)
        view.addSubview(button)
        button.translatesAutoresizingMaskIntoConstraints = false
        NSLayoutConstraint.activate([
            button.centerXAnchor.constraint(equalTo: view.centerXAnchor),
            button.centerYAnchor.constraint(equalTo: view.centerYAnchor),
        ])
    }

    private func presentPopover() {
        let hostingController = UIHostingController(rootView: PopoverContent())

        hostingController.sizingOptions = .preferredContentSize

        hostingController.modalPresentationStyle = .popover
        if let popover = hostingController.popoverPresentationController {
            popover.permittedArrowDirections = .down
            popover.sourceView = button
            popover.delegate = self
        }

        present(hostingController, animated: true)
    }
}

extension ViewController: UIPopoverPresentationControllerDelegate {
    // iPhoneでpopoverを表示するのに必要な実装
    func adaptivePresentationStyle(for controller: UIPresentationController, traitCollection: UITraitCollection) -> UIModalPresentationStyle {
        .none
    }
}
実行すると、以下のようにテキストに合わせたサイズにpopoverが自動的に調整されます。
sizingOptions = .intrinsicContentSize の利用シーン
UIHostingController を別のビューコントローラーの子として埋め込む場合に利用します。
例として、上記と同じSwiftUIのViewを利用して、今度はUIKitのビュー階層の一部として UIHostingController の view を配置します。
baseView に16ptの余白をつけて UIHostingController の view を配置しています。
final class ViewController: UIViewController {

    private let baseView = UIView()

    override func viewDidLoad() {
        super.viewDidLoad()

        baseView.backgroundColor = .lightGray
        view.addSubview(baseView)
        baseView.translatesAutoresizingMaskIntoConstraints = false
        NSLayoutConstraint.activate([
            baseView.centerXAnchor.constraint(equalTo: view.centerXAnchor),
            baseView.centerYAnchor.constraint(equalTo: view.centerYAnchor),
        ])

        layoutContent()
    }

    private func layoutContent() {
        let hostingController = UIHostingController(rootView: PopoverContent())

        hostingController.sizingOptions = .intrinsicContentSize

        addChild(hostingController)
        baseView.addSubview(hostingController.view)
        hostingController.didMove(toParent: self)

        hostingController.view.translatesAutoresizingMaskIntoConstraints = false
        let padding: CGFloat = 16
        NSLayoutConstraint.activate([
            hostingController.view.leadingAnchor.constraint(equalTo: baseView.leadingAnchor, constant: padding),
            hostingController.view.topAnchor.constraint(equalTo: baseView.topAnchor, constant: padding),
            hostingController.view.trailingAnchor.constraint(equalTo: baseView.trailingAnchor, constant: -padding),
            hostingController.view.bottomAnchor.constraint(equalTo: baseView.bottomAnchor, constant: -padding),
        ])
    }

}
SwiftUIのビューサイズに合わせて、16ptの余白を保ちながら親ビューである baseView のサイズが調整されています。
注意点
sizingOptions を指定するとSwiftUIのView更新のタイミングでUIKit側のレイアウト更新処理が走るためにパフォーマンスに影響する可能性があります。これが問題になる場合は sizingOptions を指定せずに自前でサイズ更新の制御を行うのが良いでしょう。
参考資料

