はじめに
本記事はESP8266を使って天気予報読み上げスピーカーが動くまでの過程を記録したものです。興味本位にmicropythonを使ったことで無用な苦労をしたので、同じ轍を踏まないように記録を公開します。
準備する
- Windows10のパソコン
- USBケーブル
- ESP8266のボード(ESP-WROOM-02など)
- DFPlayer
- ブレッドボード
- タクトスイッチ
- 抵抗(1kΩ)
- ジャンパー線
- スピーカー
環境を作る
1. micropythonのファームウェアを焼く
公式サイトを参照してlatestファームウェア(現時点ではesp8266-20210902-v1.17.binが最新)を焼きます。
WINDOWS環境だと下記のような感じです。
私の環境だと.pyを削除しないと動作しませんでした。
1.1. 書き込みツールをインストールする
> pip install esptool
1.2. フラッシュを消去する
通信ポートは環境に依存するので各自で調べてください。
私の環境だとこんな感じです。

> esptool --port com10 erase_flash
esptool.py v2.8
Serial port com10
Connecting....
Detecting chip type... ESP8266
Chip is ESP8266EX
Features: WiFi
Crystal is 26MHz
MAC: a0:20:a6:17:8a:53
Uploading stub...
Running stub...
Stub running...
Erasing flash (this may take a while)...
Chip erase completed successfully in 19.9s
Hard resetting via RTS pin...
1.3. ファームウェアを焼く。
512kbモジュール向けのファームウェアは内部ファイルシステムが使えないみたいなので注意が必要です。
> esptool --port com10 --baud 460800 write_flash --flash_size=detect 0 esp8266-20210902-v1.17.bin
esptool.py v2.8
Serial port com10
Connecting....
Detecting chip type... ESP8266
Chip is ESP8266EX
Features: WiFi
Crystal is 26MHz
MAC: a0:20:a6:17:8a:53
Uploading stub...
Running stub...
Stub running...
Changing baud rate to 460800
Changed.
Configuring flash size...
Auto-detected Flash size: 4MB
Flash params set to 0x0340
Compressed 493696 bytes to 329589...
Wrote 493696 bytes (329589 compressed) at 0x00000000 in 7.5 seconds (effective 526.7 kbit/s)...
Hash of data verified.

Leaving...
Hard resetting via RTS pin...
1.4. micropythonが使えるようになりました。
続いてWebREPLの設定をします。
#### 2. [WebREPL](https://micropython-docs-ja.readthedocs.io/ja/latest/esp8266/tutorial/repl.html)の環境を設定します。
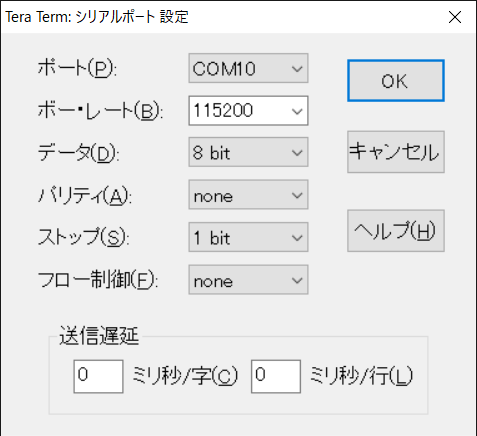
2.1. ターミナルを開きます。
Tera Termがおすすめです。
2.2. wifi接続設定のソースを入力します
アクセスポイントに合わせてessidとpasswordを設定します。REPLはCTRL+Eで挿入モードに、CTRL+Dで挿入モードを抜けることができるのでソースをコピペで挿入します。
def do_connect():
    import network
    sta_if = network.WLAN(network.STA_IF)
    if not sta_if.isconnected():
        print('connecting to network...')
        sta_if.active(True)
        sta_if.connect('essid', 'password')
        while not sta_if.isconnected():
            pass
    print('network config:', sta_if.ifconfig())
2.3. do_connect()を実行します
>>> do_connect()
network config: ('192.168.x.x', '255.255.255.0', '192.168.x.x', '192.168.x.x')
2.4. WEB-REPLを設定します
>>> import webrepl_setup
WebREPL daemon auto-start status: disabled

Would you like to (E)nable or (D)isable it running on boot?
(Empty line to quit)
> E
To enable WebREPL, you must set password for it
New password (4-9 chars): xxxxxxxxx
Confirm password: xxxxxxxxx
Changes will be activated after reboot
Would you like to reboot now? (y/n)y
2.5. 再起動する
WebREPL daemon started on ws://192.168.x.x:8266
WebREPL daemon started on ws://192.168.x.x:8266
Started webrepl in normal mode
MicroPython v1.17 on 2021-09-02; ESP module with ESP8266
Type "help()" for more information.
>>>
2.6. ここからWebREPL client for MicroPythonをダウンロードする
2.7. ブラウザでwebrepl.htmlを開く。
firefoxがおすすめです。私の環境ではgoogle chromeだと挿入モードでコピペができませんでした。

2.8. 環境構築は完了です。
これで直接PCと接続せずに開発することができます。
次回はESP8266からDFPlayer miniを制御する方法についての記事を投稿します。