はじめに
私は2022年9月からAtCoderを始めて、今までサイト内にあるコードテストを使ってPython・PyPy3で問題を解いていました。
しかし、サンプルのテスト・提出をするのに毎度コピー&ペーストするのが煩わしくコマンド一つで完結させたいのと、ローカル環境下に色々インストールすると今後依存関係等で大変になるかと思い、VSCode + Dockerを使って簡単にテスト・提出ができる環境構築を行いました。
環境はWindows10を使用しています。
準備
以下のものがインストールされていない場合は事前に準備をしておきます。
細かいインストール手順等は今回のメインではないため割愛させていただきます。
VSCode
今回はエディターにVSCodeを使用するのでインストールをします。
VSCodeからDockerのコンテナ内に入って作業行うので、拡張機能「Remote-Containers」をインストールします。
Docker
私はWindows10環境なのでDocker Desktop for Windowをインストールしました。
git
リポジトリをクローンしますので、gitをインストールします。
環境構築
- コマンドプロンプトの任意のディレクトリにて次のコマンドを実行。
$git clone https://github.com/gomatofu/atcoder_python.git $code atcoder_python - VSCodeで
Remote-Containers: Reopen in Containerを選択。
すると以下のディレクトリ構成となります。
atcoder_python/
     └ .devcontainer/
             ├ Dockerfile
             ├ devcontainer.json
             ├ docker-compose.yml
             └ requirements.txt
     └ contest/
- .devcontainer
- .devcontainer内ではPython、PyPy、online-judge-tools、atcoder-cli等のインストールの設定を記述しています。
- contest
- contest内では実際にAtCoderの問題を解いたり、テストしたりする場所として用意しています。
設定
ここからはVSCodeのターミナルで操作となります。
-
ディレクトリ:/atcoder_pythonにて次のコマンドを実行。atcoder-cli使用のためAtCoderログイン作業。
$acc login -
AtCoderのusername、passwordが聞かれるため、入力し実行。初回のみ必要となる。
-
ディレクトリ:/atcoder_pythonにて次のコマンドを実行。online-judge-tools使用のためAtCoderログイン作業。
$oj login https://beta.atcoder.jp/ -
再びAtCoderのusername、passwordが聞かれるため、入力し実行。初回のみ必要となる。警告が出るが問題ない。
-
ディレクトリ:/atcoder_pythonにて次のコマンドを実行。問題インストール時にデフォルトは1問ずつしかインストールされないが全問インストールされるように変更。
$acc config default-task-choice all -
テンプレートファイルの設定をPythonに変更するためatcoder-cliの設定フォルダへ移動。
$cd `acc config-dir` -
Pythonディレクトリを作成し、main.pyとtemplate.jsonの作成を行う。
$mkdir python $cd python $touch template.json $touch main.py $code template.json -
template.jsonの設定を行う。
template.json{ "task":{ "program": ["main.py"], "submit": "main.py" } } -
デフォルトのテンプレートをpythonに変更。
$acc config default-template python
ここまででPython、PyPyで問題を解くための設定は終わりました。
ここからはテスト・提出のコマンドが長いので、コマンドを簡単にするためエイリアス設定を行っていきます。
あくまで私がわかりやすいようにコマンド名を決めているのでお好みで変更してください。
-
.bashrcを作成します。
$cd ~ $touch .bashrc $code .bashrc -
.bashrcにエイリアス設定をしていきます。
.bashrc# PyPy3でのテスト実施 alias test='oj t -c "pypy3 main.py" -d ./tests/' # Pythonでのテスト実施 alias test2='oj t -c "python3 main.py" -d ./tests/' # PyPy3での解答提出 alias sb='acc s main.py -- --guess-python-interpreter pypy' # Pythonでの解答提出 alias sb2='acc s main.py' # コンテストフォルダへ移動 alias c='cd contest' # main.pyを開く alias o='code main.py' # 出力確認用 alias d='python main.py'
これでコマンドの設定は終わりました。
使い方
ここから実際に問題を解いていきましょう。
問題作成
contestフォルダへ移動し、acc new [ContestName]を実行すると、以下のディレクトリが作成される。
[ContestName]: は解答したいコンテストの名前を入力。(例:abc248、abc255等)
 $ acc new abc248

 contest/
     └ abc248
         ├── a
         │   ├── main.py
         │   └── tests
         │       ├── sample-1.in
         │       ├── sample-1.out
         ...
         │       ├── sample-3.in
         │       └── sample-3.out
         ├── b
         │   ├── main.py
         │   └── tests
         │       ├── sample-1.in
         │       ├── sample-1.out
         ...
         │       ├── sample-3.in
         │       └── sample-3.out
         ├── c
         │   ├── main.py
         │   └── tests
         │       ├── sample-1.in
         │       ├── sample-1.out
         ...
         │       ├── sample-3.in
         │       └── sample-3.out
         ...
         └─ contest.acc.json
解答
解答したい問題のディレクトリに移動し、main.pyを開き解答を行っていきます。
 $cd abc248	   # 解答したいコンテスト
 $cd a		   # 解答したい問題
 $o		       # main.pyを開く
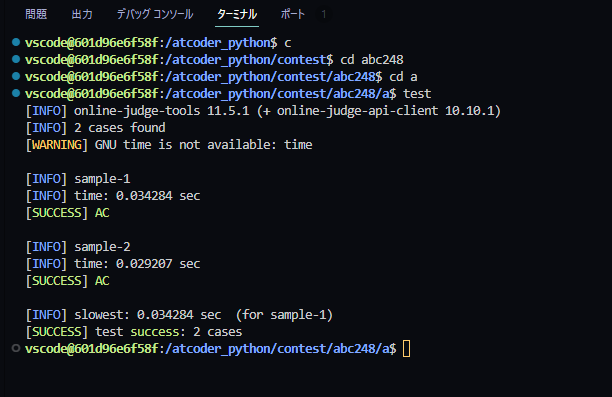
テスト
問題が解き終わったらサンプルのテストケースをもとにテストを行っていきます。
 $test	       # PyPy3でテストしたい場合
 $test2	       # Pythonでテストしたい場合
提出
問題が解き終わり提出を行っていきます。
 $sb	       # PyPy3で提出する場合
 $sb2	       # Pythonで提出する場合
提出の最終確認としてコマンドの入力を求められるので入力します。
今回は"abca"と書かれているので同じものを入力します。

AtCoderのサイト内でも確認してみると、ちゃんと提出できています。

最後に
Dockerの設定等を一から行ったのは初めてなので間違っている点もあるかもしれませんが、実際に手を動かしながら行っていくと頭の中でぼんやりしていたものがはっきりとして理解が進んだかと思います。
間違っている点を見つけましたらご指摘いただけると助かります。
環境構築に満足してしまった点はありますが、本来の目的であるAtCoderの問題を解き進め、精進していきたいと思います。
Githubのレポジトリ ↓
https://github.com/gomatofu/atcoder_python

