はじめに
本記事はZOZOテクノロジーズのTECH BLOGにも同じ内容で投稿しています。
よろしければ他の記事もご覧ください。
こんにちは!
@gold_kouと申します。
いきなりですが、皆さんはAPI仕様書をどのように管理されていらっしゃいますか?
Confluence、Wiki、Markdown、Spreadsheet、Excelなど色々手段やツールはあると思います。私が担当しているプロジェクトではOpenAPIを導入しています。
この記事ではOpenAPIの基本と実際に導入して得られたノウハウをご紹介いたします。
OpneAPIの恩恵はただの管理の仕方にとどまらないので、ぜひこの記事を読んで開発効率化のお役に立てばと思います。
また、弊社のテックブログで以前、OpenAPI(Swagger)のバージョン2系に関する開発効率を上げる!Swaggerの記法まとめ や 開発効率を上げる!Swaggerで作るWEB APIモック が投稿されておりますが、今回は対象バージョンが3系となります。
OpenAPI概要
OpenAPI Specification(OAS)
OASはREST-APIの標準仕様です。OASのことを単にOpenAPIと呼ぶこともあります。
YAMLかJSON形式で記述します。
現在はバージョン3系が最新ですので、特別な事情がない限り3系を使いましょう。
2系から3系への変更点は様々あるのですが、一番大きな変更はComponentsオブジェクト(後述)が追加されたことです。
DRYにかけるため、OpenAPIが目指している "human readable" へ近づきました。
Swagger Toolsを活用することで効率的に記述できます。
OpenAPIを使うメリットとデメリット
メリット
- 効率的に記述できる
- Swagger Editorのおかげ
- 3系からより効率的に
- human readable & machine readable
- APIクライアントとサーバースタブを自動生成できる
- OpenAPI Generatorのおかげ
- スキーマ駆動開発できる
- 開発工数を削減できる
- かっこいいビジュアルのAPI仕様書を作れる
- Swagger UIのおかげ
- バージョン管理しやすい
- 書き方に統一性を持たせられる
我々がOpenAPIを導入した理由は上記メリットのうち、特に「APIクライアントとサーバースタブを自動生成できる」点に魅力を感じたためです。
スキーマ駆動開発を実践しているわけではないのですが、APIを定義すればある程度のソースコードを自動生成できる一石二鳥感は充分な選定理由だと思います。
デメリット
- 学習コスト
- YAML/JSONの記法
- 自動生成のやり方
Swagger
OpenAPIを勉強するうえで避けては通れないSwaggerについて説明します。
まず歴史的な話なのですが、もともとOpenAPIの前段としてSwagger Specificationというものがありました。
それがOpenAPI Initiativeという団体に管理が移ったことで、名称がOpenAPI Specificationに変更されました。
しかし、ツールセットの開発は現在もSwaggerで行われているものもあり、ツール名には「Swagger」が名残で残っています。
Swagger Tools
OpenAPIを効率的に記載するためのOSSのツールセットです。
Swagger Editor
ブラウザ上で記述するタイプのエディタです。インストール不要なので手軽に試せます。
リンクはこちら
インターネット上でAPI情報を記載することに抵抗がある場合は、以下のようにローカルでDockerイメージをpullして、起動することもできます。
$ docker pull swaggerapi/swagger-editor
$ docker run -d -p 80:8080 swaggerapi/swagger-editor
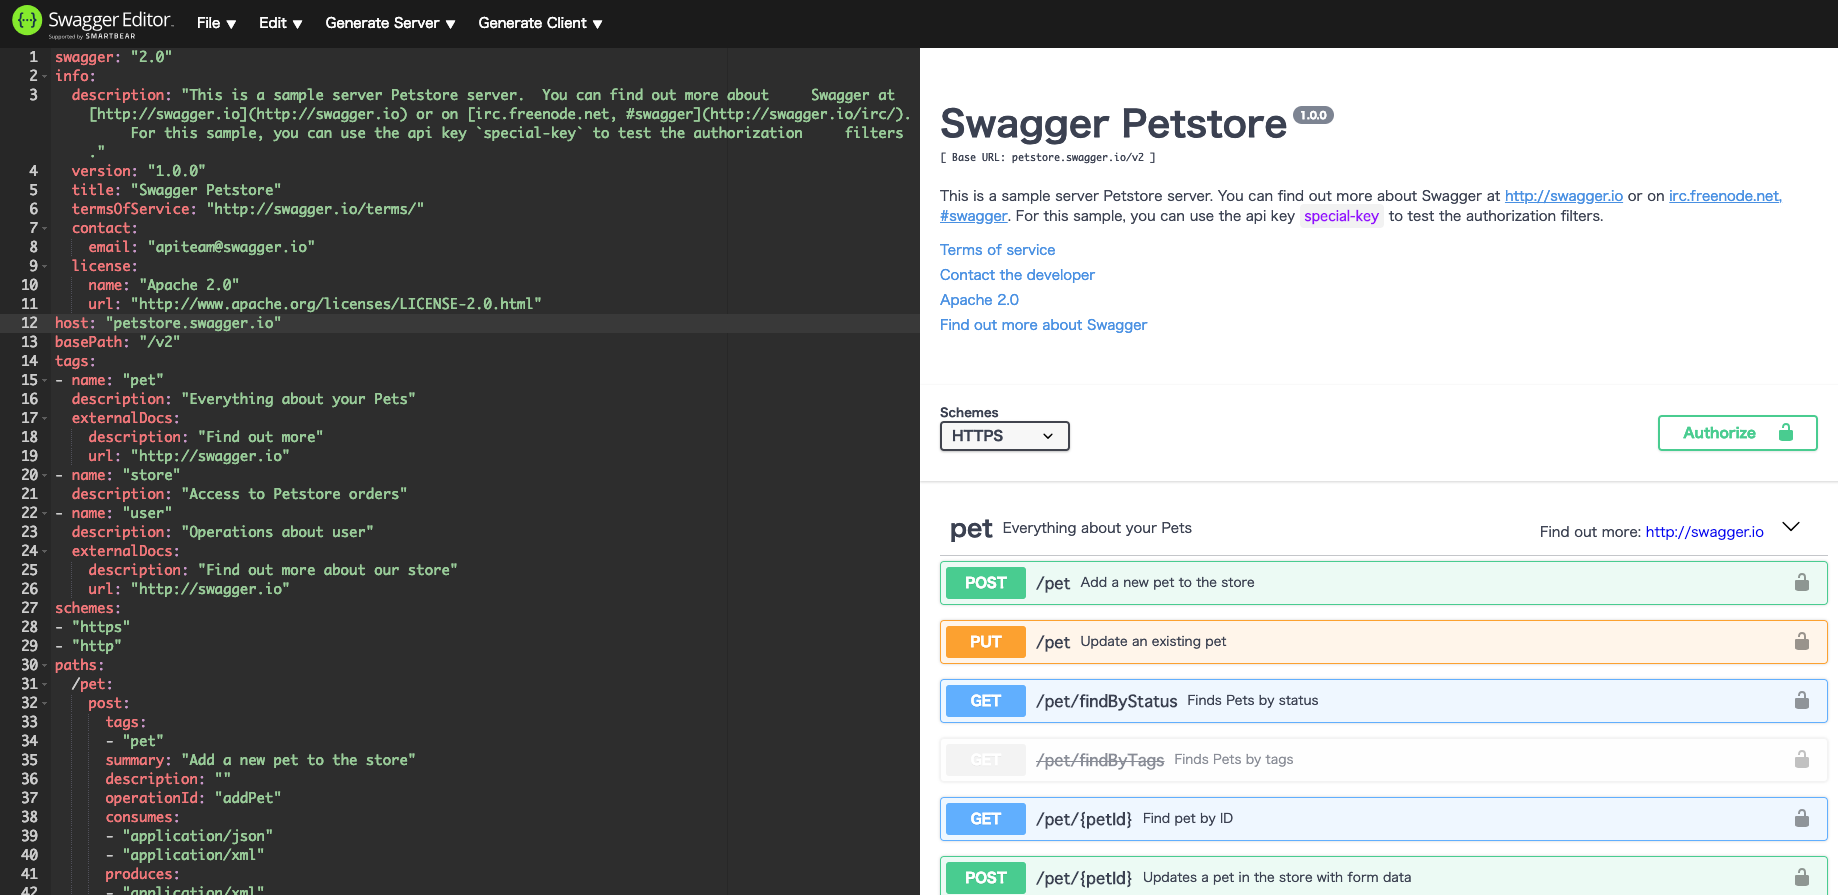
ブラウザで localhost:80 にアクセスすれば、以下が表示されます。
また、Visual Studio CodeにはSwagger Viewer(プラグイン)が用意されています。
プログラミングと同じエディタで編集できるので便利です。
Swagger UI
OpenAPIに則って記述されたスキーマをAPI仕様書化するツールです。
YAMLファイルやJSONのままでは人間には見るのが辛い部分もありますが、これを使えば統一されたカッコいいUIを提供します。
Swagger EditorやSwagger Viewerの右側はこれを利用しています。
APIクライアントツールとして利用することも可能です。認証まわりも対応していますので、トークンを埋め込んで実行することもできます。
Swagger Codegen
OpenAPIに則って記述されたスキーマからAPIクライアントとスタブサーバーを自動生成するツールです。
自動生成により開発コストを削減するだけでなく、スタブサーバーがあることでフロントエンドの開発もバックエンドの開発を待たずに進めることができます。いわゆるスキーマ駆動開発というやつですね。
3系対応を進めるためSwagger CodegenをフォークしたOpenAPI Generatorの開発がコミュニティドリブンで進んでいるそうです。
後述ですが、私の担当プロジェクトではOpenAPI GeneratorのDockerコンテナを使用しています。
OpenAPIの基本記法(YAML)
公式サンプルを中心にYAMLでの基本記法をまとめます。
読めばなんとなくわかるのですが、一応1つずつ説明していきます。
また、サンプルには無くてもよく使う記法もいくつかピックアップします。
その他の記法や詳細は公式ドキュメントをご参照ください。
ファイル名
ルートのファイル名は openapi.yml が推奨されていますが、それ以外に特に決まりはありません。
<システム名>.yml とかもよく見ます。
OpenAPIオブジェクト
openapiフィールドでOpenAPIのバージョンを設定します。
openapi: "3.0.0"
Infoオブジェクト
メタ情報を設定します。
-
versionフィールドでAPIドキュメントのバージョンを設定します。 -
titleフィールドでAPIドキュメントのタイトルを設定します。 -
descriptionフィールドで説明を設定します。 -
termsOfServiceフィールドでサービス規約を設定します。例では、内容が長くなるのでURLになっていますね。 -
contactフィールドで連絡先情報(name/email/url)を設定します。 -
licenseフィールドでライセンス情報(name/url)を設定します。
info:
  version: 1.0.0
  title: Swagger Petstore
  description: A sample API that uses a petstore as an example to demonstrate features in the OpenAPI 3.0 specification
  termsOfService: http://swagger.io/terms/
  contact:
    name: Swagger API Team
    email: apiteam@swagger.io
    url: http://swagger.io
  license:
    name: Apache 2.0
    url: https://www.apache.org/licenses/LICENSE-2.0.html
Serverオブジェクト
APIサーバー情報を設定します。
-
urlフィールドでURLを設定します。今回の具体例は1つだけですが、リスト形式で設定できるため例えば、「ローカル環境用」「ステージング環境用」「プロダクション環境用」などをそれぞれ設定することも可能です。
servers:
  - url: http://petstore.swagger.io/api
Pathsオブジェクト
各エンドポイント仕様を設定します。
-
Path Itemオブジェクト(/petsなど)で1つ以上のパスを設定します。-
Operationオブジェクト(postなど)で1つのパスの1つのメソッドの単位を設定します。-
operationIdフィールドでOpenrationオブジェクトを一意にする識別IDを設定します。APIクライアントを自動生成する際に使用されます。 -
requestBodyフィールドでリクエストボディを設定します。-
required: trueとすることでリクエスト時にこのボディがあることを必須とします。 -
contentでボディの中身を設定します。-
schemaフィールドでは$refでcomponents配下に定義したスキーマを読み込み、DRYな記述ができます。もちろんここに直接記述することもできます。また、$refは外部ファイルも読み込めるため、ファイルを分割することも可能です。
-
-
-
responsesフィールドでレスポンスを設定します。ステータスコードをキーにして、その他はdefaultとします。こちらもschemaを$refできます。 - こちらの例には無いですが、
TagsオブジェクトでOperationオブジェクトをグループ化するためのタグを設定します。-
nameフィールドでtag名を設定します。
-
-
-
paths:
  /pets:
    post:
      description: Creates a new pet in the store.  Duplicates are allowed
      operationId: addPet
      requestBody:
        description: Pet to add to the store
        required: true
        content:
          application/json:
            schema:
              $ref: '#/components/schemas/NewPet'
      responses:
        '200':
          description: pet response
          content:
            application/json:
              schema:
                $ref: '#/components/schemas/Pet'
        default:
          description: unexpected error
          content:
            application/json:
              schema:
                $ref: '#/components/schemas/Error'
-
Parameterオブジェクトでパラメータを設定します。-
nameフィールドでパラメータ名を設定します。 -
inフィールドでパラメータの場所を設定します。query/header/path/cookieのいずれかを選択します。- query:
/items?id=###のようにURL末尾に?でパラメータを設定する場合です。 - path:
/items/{itemId}のようにパス内にパラメータを埋め込む場合です。
- query:
-
requiredフィールドでパラメータが必須かどうかを設定します。inフィールドの値がpathの場合は必然的にtrueになります。
-
paths:
  /pets:
    get:
      parameters:
        - name: tags
          in: query
          description: tags to filter by
          required: false
          style: form
          schema:
            type: array
            items:
              type: string
paths:
  /pets/{id}:
    get:
      parameters:
        - name: id
          in: path
          description: ID of pet to fetch
          required: true
          schema:
            type: integer
            format: int64
Componentsオブジェクト
再利用する部品を定義します。
また、再利用しないとしてもリクエストボディやレスポンスは極力Componentsオブジェクトに記載することで、記載方法に統一性を持たせ可読性を向上できます。
-
Schemaオブジェクトでスキーマを設定します。スキーマ名(Petなど)は$refで参照する際に使用されます。スキーマ内でさらに$refして入れ子構造にすることも可能です。 -
propertiesフィールドでプロパティ(パラメータ)を設定します。 -
typeフィールドではinteger(整数)/number(少数)/string/boolean/array/objectのいずれかを設定します。 -
formatフィールドではint32/int64/float/double/byte/binary/date/date-time/passwordのいずれかを設定します。typeフィールドと組み合わせます。 -
requiredフィールドでプロパティ単位に必須パラメータを設定します。 - こちらの例には無いですが、
minimumとmaximumフィールドで数値の下限上限を設定します。 - こちらの例には無いですが、
exampleフィールドでそのプロパティが取りうる値を具体例として設定します。
components:
  schemas:
    Pet:
      allOf:
        - $ref: '#/components/schemas/NewPet'
        - required:
          - id
          properties:
            id:
              type: integer
              format: int64
    NewPet:
      required:
        - name
      properties:
        name:
          type: string
        tag:
          type: string

    Error:
      required:
        - code
        - message
      properties:
        code:
          type: integer
          format: int32
        message:
          type: string
APIクライアントとスタブサーバーを自動生成する
OpenAPIを利用するメリットの1つである自動生成についてです。
いくつか手段はありますが、今回はDockerを使用する方法です。
APIクライアント
上記の具体例でも使用していたpetstore-expanded.yamlからAPIクライアント(Go言語)を自動生成します。
$ docker run -v ${PWD}:/local openapitools/openapi-generator-cli:v3.3.4 generate -i /local/petstore-expanded.yaml -g go -o /local/out/go
[main] WARN  o.o.c.ignore.CodegenIgnoreProcessor - Output directory does not exist, or is inaccessible. No file (.openapi-generator-ignore) will be evaluated.
[main] INFO  o.o.c.languages.AbstractGoCodegen - Environment variable GO_POST_PROCESS_FILE not defined so Go code may not be properly formatted. To define it, try `export GO_POST_PROCESS_FILE="/usr/local/bin/gofmt -w"` (Linux/Mac)
[main] INFO  o.o.c.languages.AbstractGoCodegen - NOTE: To enable file post-processing, 'enablePostProcessFile' must be set to `true` (--enable-post-process-file for CLI).
[main] INFO  o.o.codegen.AbstractGenerator - writing file /local/out/go/model_error.go
[main] INFO  o.o.codegen.AbstractGenerator - writing file /local/out/go/docs/Error.md
[main] INFO  o.o.codegen.AbstractGenerator - writing file /local/out/go/model_new_pet.go
[main] INFO  o.o.codegen.AbstractGenerator - writing file /local/out/go/docs/NewPet.md
[main] INFO  o.o.codegen.AbstractGenerator - writing file /local/out/go/model_pet.go
[main] INFO  o.o.codegen.AbstractGenerator - writing file /local/out/go/docs/Pet.md
[main] INFO  o.o.codegen.AbstractGenerator - writing file /local/out/go/api_default.go
[main] INFO  o.o.codegen.AbstractGenerator - writing file /local/out/go/docs/DefaultApi.md
[main] INFO  o.o.codegen.AbstractGenerator - writing file /local/out/go/api/openapi.yaml
[main] INFO  o.o.codegen.AbstractGenerator - writing file /local/out/go/README.md
[main] INFO  o.o.codegen.AbstractGenerator - writing file /local/out/go/git_push.sh
[main] INFO  o.o.codegen.AbstractGenerator - writing file /local/out/go/.gitignore
[main] INFO  o.o.codegen.AbstractGenerator - writing file /local/out/go/configuration.go
[main] INFO  o.o.codegen.AbstractGenerator - writing file /local/out/go/client.go
[main] INFO  o.o.codegen.AbstractGenerator - writing file /local/out/go/response.go
[main] INFO  o.o.codegen.DefaultGenerator - writing file /local/out/go/.travis.yml
[main] INFO  o.o.codegen.AbstractGenerator - writing file /local/out/go/.openapi-generator-ignore
[main] INFO  o.o.codegen.AbstractGenerator - writing file /local/out/go/.openapi-generator/VERSION
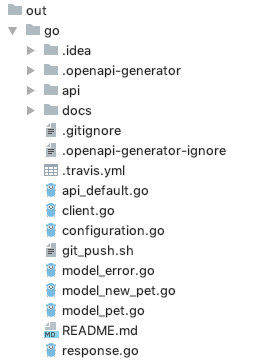
すると、カレントディレクトリ以下に下記のようなディレクトリやファイルが生成されます。
これらをもとに開発を進めていけば定型部分がだいぶ自動生成されているので、開発工数を削減できるはずです。
上記で実行したopenapitools/openapi-generator-cliイメージのgenerateコマンドのオプションは以下です。
- g: 生成コードの種類の指定(言語やFWなど)
- i: yamlファイルの指定
- o: 出力パスの指定
また、gオプションで指定できるクライアントとサーバーのgeneratorの種類は以下です。
$ docker run --rm openapitools/openapi-generator-cli:v3.3.4 list
The following generators are available:

CLIENT generators:
    - ada
    - android
    - apex
    - bash
    - c
    - clojure
    - cpp-qt5
    - cpp-restsdk
    - cpp-tizen
    - csharp
    - csharp-dotnet2
    - csharp-refactor
    - dart
    - dart-jaguar
    - eiffel
    - elixir
    - elm
    - erlang-client
    - erlang-proper
    - flash
    - go
    - groovy
    - haskell-http-client
    - java
    - javascript
    - javascript-closure-angular
    - javascript-flowtyped
    - jaxrs-cxf-client
    - jmeter
    - kotlin
    - lua
    - objc
    - perl
    - php
    - powershell
    - python
    - r
    - ruby
    - rust
    - scala-akka
    - scala-gatling
    - scala-httpclient
    - scalaz
    - swift2-deprecated
    - swift3
    - swift4
    - typescript-angular
    - typescript-angularjs
    - typescript-aurelia
    - typescript-axios
    - typescript-fetch
    - typescript-inversify
    - typescript-jquery
    - typescript-node


SERVER generators:
    - ada-server
    - aspnetcore
    - cpp-pistache-server
    - cpp-qt5-qhttpengine-server
    - cpp-restbed-server
    - csharp-nancyfx
    - erlang-server
    - go-gin-server
    - go-server
    - haskell
    - java-inflector
    - java-msf4j
    - java-pkmst
    - java-play-framework
    - java-undertow-server
    - java-vertx
    - jaxrs-cxf
    - jaxrs-cxf-cdi
    - jaxrs-jersey
    - jaxrs-resteasy
    - jaxrs-resteasy-eap
    - jaxrs-spec
    - kotlin-server
    - kotlin-spring
    - nodejs-server
    - php-laravel
    - php-lumen
    - php-silex
    - php-slim
    - php-symfony
    - php-ze-ph
    - python-flask
    - ruby-on-rails
    - ruby-sinatra
    - rust-server
    - scala-finch
    - scala-lagom-server
    - scalatra
    - spring

(以下省略)
スタブサーバー
APIクライアント同様に、スタブサーバー(Go言語)を生成します。
gオプションで指定するものが違うだけですね。
$ docker run -v ${PWD}:/local openapitools/openapi-generator-cli:v3.3.4 generate -i /local/petstore-expanded.yaml -g go-server -o /local/out/go
[main] WARN  o.o.c.ignore.CodegenIgnoreProcessor - Output directory does not exist, or is inaccessible. No file (.openapi-generator-ignore) will be evaluated.
[main] INFO  o.o.c.languages.AbstractGoCodegen - Environment variable GO_POST_PROCESS_FILE not defined so Go code may not be properly formatted. To define it, try `export GO_POST_PROCESS_FILE="/usr/local/bin/gofmt -w"` (Linux/Mac)
[main] INFO  o.o.c.languages.AbstractGoCodegen - NOTE: To enable file post-processing, 'enablePostProcessFile' must be set to `true` (--enable-post-process-file for CLI).
[main] INFO  o.o.codegen.AbstractGenerator - writing file /local/out/go/go/model_error.go
[main] INFO  o.o.codegen.AbstractGenerator - writing file /local/out/go/go/model_new_pet.go
[main] INFO  o.o.codegen.AbstractGenerator - writing file /local/out/go/go/model_pet.go
[main] INFO  o.o.codegen.AbstractGenerator - writing file /local/out/go/go/api_default.go
[main] INFO  o.o.codegen.AbstractGenerator - writing file /local/out/go/api/openapi.yaml
[main] INFO  o.o.codegen.AbstractGenerator - writing file /local/out/go/main.go
[main] INFO  o.o.codegen.AbstractGenerator - writing file /local/out/go/Dockerfile
[main] INFO  o.o.codegen.AbstractGenerator - writing file /local/out/go/go/routers.go
[main] INFO  o.o.codegen.AbstractGenerator - writing file /local/out/go/go/logger.go
[main] INFO  o.o.codegen.AbstractGenerator - writing file /local/out/go/go/README.md
[main] INFO  o.o.codegen.AbstractGenerator - writing file /local/out/go/.openapi-generator-ignore
[main] INFO  o.o.codegen.AbstractGenerator - writing file /local/out/go/.openapi-generator/VERSION
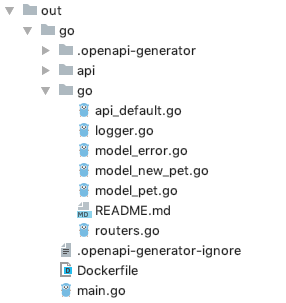
カレントディレクトリ以下に下記のようなディレクトリやファイルが生成されます。
特にスタブとして重要なのは下記ファイルです。
リクエストが来たらStatus.OKを返すようになっています。
当然ながらビジネスロジックは記述されていません。
/*
 * Swagger Petstore
 *
 * A sample API that uses a petstore as an example to demonstrate features in the OpenAPI 3.0 specification
 *
 * API version: 1.0.0
 * Contact: apiteam@swagger.io
 * Generated by: OpenAPI Generator (https://openapi-generator.tech)
 */

package openapi

import (
	"net/http"
)

// AddPet -
func AddPet(w http.ResponseWriter, r *http.Request) {
	w.Header().Set("Content-Type", "application/json; charset=UTF-8")
	w.WriteHeader(http.StatusOK)
}

// DeletePet -
func DeletePet(w http.ResponseWriter, r *http.Request) {
	w.Header().Set("Content-Type", "application/json; charset=UTF-8")
	w.WriteHeader(http.StatusOK)
}

// FindPetById -
func FindPetById(w http.ResponseWriter, r *http.Request) {
	w.Header().Set("Content-Type", "application/json; charset=UTF-8")
	w.WriteHeader(http.StatusOK)
}

// FindPets -
func FindPets(w http.ResponseWriter, r *http.Request) {
	w.Header().Set("Content-Type", "application/json; charset=UTF-8")
	w.WriteHeader(http.StatusOK)
}
サーバー起動します。
$ go run main.go
2019/03/20 21:28:21 Server started
curlリクエストすると200が返ってきました。
$ curl -s http://localhost:8080/api/pets -o /dev/null -w '%{http_code}\n'
200
クライアント開発チーム用にこのスタブを残してスキーマ駆動開発にしたり、サーバーサイド側の開発工数をさげたりできます。
なお、私が所属するプロジェクトでは、一連のコマンドをmakeコマンドで実行できるようにしています。
現場からのTips
ここからは実際の開発で得られたノウハウやつまずいたこと、もう少し良くしたいと考えていることをご紹介したいと思います。
定義したobjcet型のプロパティが自動生成されなかった
以下は実例を簡略化し、一部抜粋したものです。SampleBに関する記述であることに着目してください。
SampleB:
  type: object
  properties:
    status:
      type: integer
      example: 200
    message:
      type: string
      example: successfully
    resource:
      type: object
      properties:
        count:
          type: integer
          example: 1
        results:
              type: array
              items:
                type: string
                example: "1234567890ABCDEFGHIJKLMNOPQRSTUVWXYZ"
以下が自動生成されたモデルです。
Resourceの型に着目してください。なぜか、定義したSampleBでなく別のSampleAのポインタ型のフィールドが宣言されています。
package httpmodel

type SampleB struct {

    Status int32 `json:"status"`

    Message string `json:"message"`

    Resource * SampleAResource `json:"resource,omitempty"` //あれ、なんでAなの?
}
原因は、既にプロパティ名とexample値が同一のobject型のプロパティがあることでした。
どうやら、OpenAPI Generatorはモデル自動生成時に同一のものがある場合は、YAMLファイル上でより上に定義されたものをDRYに生成してくれるようです。
ちなみに、あえてDRYにしたくない場合は、$refを使ったり、exmaple値を異なるものにすることでも回避できます。
array型プロパティを持つモデルが期待通りに生成されなかった
以下のようにtype: arrayを持つスキーマを定義し、モデルを自動生成したところ、期待通りにスライスをプロパティとしてもつモデルを生成できませんでした。
(以下は実例を簡略化し、一部抜粋したものです)
components:
  schemas:
    RequestA:
      description: こちらはサンプルです
      type: array
      items:
        properties:
          sku30:
            description: こちらはサンプルです
            example: 123abc
            type: string
        required:
        - sku30
// RequestA - こちらはサンプルです
type RequestA struct {

	Inner []map[string]interface{} `json:"inner,omitempty"`
}
原因はこちらのPRでしょうか。
トップレベルにarrayかmapのプロパティがあるとgenerateしてくれないようです。
解決策は2通りあります。
1つ目は、.openapi-generator-ignoreファイルに自動生成を無視するファイルを指定し、手動で実装する方法です。これを多用しすぎると自動生成の恩恵を受けられないため、OpenAPIを利用するメリットがかなり薄れてしまいます。
2つ目は、下記のように、type: arrayをtype: objectで包む方法です。モデルが1つ増え、独自型のスライスのプロパティを持つことになります。
components:
  schemas:
    RequestA:
      description: こちらはサンプルです
      type: object
      properties:
        inner:
          type: array
          items:
            properties:
              sku30:
                description: こちらはサンプルです
                example: 1234567890ABCDEFGHIJKLMNOPQRSTUVWXYZ
                type: string
            required:
            - sku30
            type: object
// RequestA - こちらはサンプルです
type RequestA struct {

	Inner [] RequestAInner `json:"inner,omitempty"`
}
type RequestAInner struct {

	// こちらはサンプルです
	Sku30 string `json:"sku30"`
}
命名に気を使う必要がある
スキーマ名やoperationIdフィールド名などは自動生成コードでのstruct名やフィールド名、ファイル名などに反映されるものです。したがって、一意に認識しやすい名前をつける必要があります。
これを怠るとソースコードの可読性低下につながってしまいます。
こちらはOpenAPIならではの悩みです。
バリデーションを手動で実装している
これは、今後改善したいと考えていることです。
現在、ozzo-validaitonというバリデーションのライブラリを使用して、API仕様書の情報を見ながらバリデーションを手動で実装しています。
これは二度手間感がある上、人が実装しているので、バリデーション漏れなどのミスが発生する可能性もあります。
例えば、Rubyであればoas_parserとjson_schemaというgemを組み合わせる方法があります。OpenAPIで定義したファイルのrequiredやtype、example値などの情報を使って自動でバリデーションを自動生成できます。Go言語でも同様のことができるライブラリを探そうと考えています
リクエストパラメータのバリデーションライブラリの選定
go-playground/validatorは、最もポピュラーなGo言語のバリデーションライブラリです。しかし、今回は別のライブラリ(上述)を採用しました。
理由としては、OpenAPIとの相性が悪いと判断したためです。
go-playground/validatorはstructにバリデーション用のタグを記述するスマートな方法です。しかしながら、モデルを自動生成した際に上書きされてタグの記述内容が消失するケースもあります。
自動生成した後にタグを記述し、.openapi-generator-ignoreにファイル名を追記すれば解決するのですが、開発時の運用が複雑になってしまうと判断し、採用を見送りました。ここでの連携ができれば利便性がすごく高いと思います。
API仕様書とソースコードの乖離
開発時にAPIの仕様変更にドキュメントが追従できず、API仕様とソースコードで乖離が発生する経験はありますでしょうか。これは実装者とレビュアが普段の開発で注意し、定期的に乖離の発生状況を確認するべきでしょう。
OpenAPIを有効活用すれば乖離の発生を抑えることができます。
なぜならば、リクエストとレスポンス用のモデルは定義ファイルにしたがって自動生成されるため、レスポンスでの乖離は発生しません。
リクエストに関しては、リクエストパラメータのバリデーションに関して自動生成を導入していないケースでは、乖離が発生し得ます。例えばGo言語などの静的言語で実装しているのであれば、型の確認は可能ですが、ビジネスロジック面でのチェック(値の範囲など)まではできません。
まとめ
今回はOpenAPIの基本記法と、実際の開発現場で得られたつまずきやTipsをいくつかご紹介しました。
OpenAPIは単にAPI定義をスマートに記述できるだけでなく、そこからある程度まで自動生成してくれます。
良さそうだなと感じたら、OpenAPIを使ってみてください。


