概要
先日、こちらの記事
を参考にさせていただき、通知機能を実装いたしました。
私のポートフォリオの中で、ある宣言(announcement)を行う機能があります。その宣言を、「フォロワー全員」に通知する機能を実装しました。
自分の勉強の一環として、アウトプットさせていただいております。
ER図
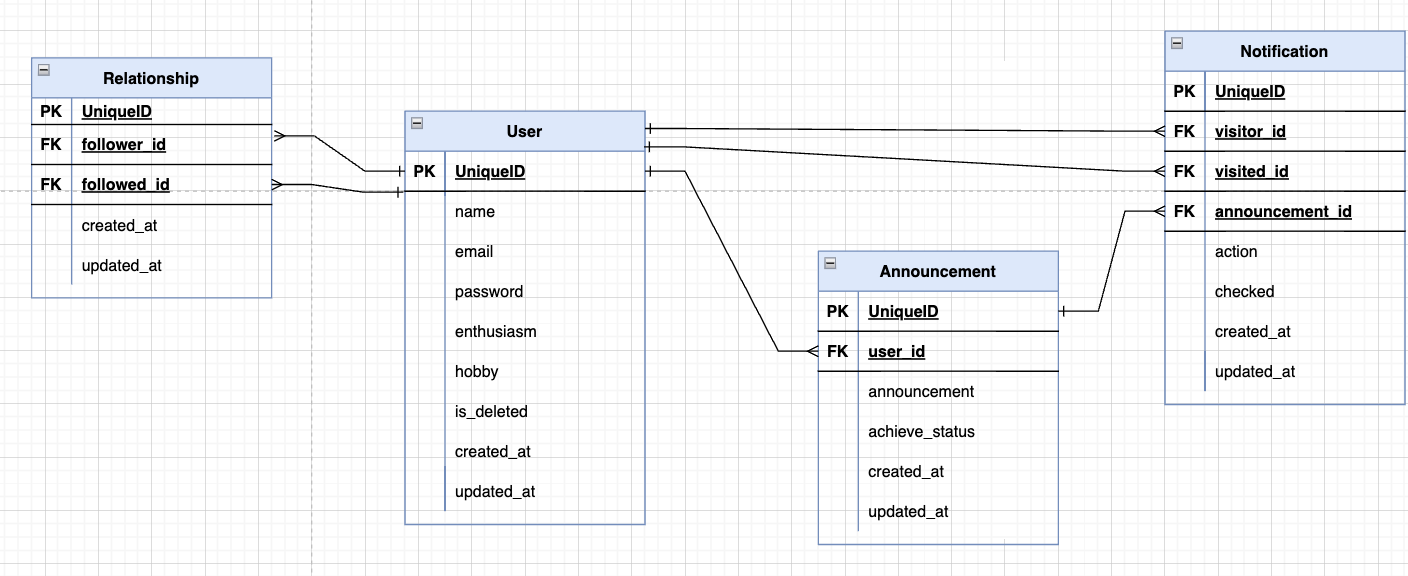
Announcementが、私のポートフォリオで実装した宣言機能のためのモデルになります。
通知モデルの作成
まず、Notificationモデルを作成します。
$ rails g model Notification
続いて、マイグレーションファイルを記述します。
class CreateNotifications < ActiveRecord::Migration[6.1]
  def change
    create_table :notifications do |t|
      #通知をする人
      t.integer :visitor_id, null: false
      #通知される人
      t.integer :visited_id, null: false
      t.integer :announcement_id
      t.string :action, default: '', null: false
      t.boolean :checked, default: false, null: false

      t.timestamps
    end

    add_index :notifications, :visitor_id
    add_index :notifications, :visited_id
    add_index :notifications, :announcement_id
  end
end
$ rails db:migrate
アソシエーションの記述
NotificationモデルとUserモデル、Announcementモデルとの関連づけを行います。
UserとNotification
  #自分からの通知
  has_many :active_notifications, class_name: 'Notification', foreign_key: 'visitor_id', dependent: :destroy
  #相手から受け取った通知
  has_many :passive_notifications, class_name: 'Notification', foreign_key: 'visited_id', dependent: :destroy

  has_many :relationships, class_name: "Relationship", foreign_key: "follower_id", dependent: :destroy
  has_many :followings, through: :relationships, source: :followed

  has_many :reverse_of_relationships, class_name: "Relationship", foreign_key: "followed_id", dependent: :destroy
  #今回使用する、フォロワーを取得するための記述
  has_many :followers, through: :reverse_of_relationships, source: :follower
  #自分からの通知
  has_many :active_notifications, class_name: 'Notification', foreign_key: 'visitor_id', dependent: :destroy
上記の記述で、has_many :active_notificationsのみでは、実在しない、active_notificationsテーブルを参照しに行ってしまいます。class_name: 'Notification'とすることで、notificationsテーブルを参照しに行ってくれるようになります。
また、上記の記述は、active_notifivations、つまり通知を送る側からのhas_manyなので、foreign_key: 'visitor_id'とすることで、「通知を送る側からのhas_manyである」という意味合いにすることができます。
また、今回、フォロワーを取得するための記述をhas_many :followersとしています。
  default_scope -> { order(created_at: :desc) }
  belongs_to :announcement, optional: true
  belongs_to :visitor, class_name: 'User', foreign_key: 'visitor_id', optional: true
  belongs_to :visited, class_name: 'User', foreign_key: 'visited_id', optional: true
通知から各モデルへのアソシエーションです。
AnnouncementとNotification
class Announcement < ApplicationRecord
  #省略
  has_many :notifications, dependent: :destroy
  #省略
end
今回、一つの宣言に対して多くの通知をするということになるので、has_many :notificationsとなります。
宣言通知のメソッド作成
今回、Userモデルにメソッドを記述していきます。
def create_notification_announcement!(current_user, announcement_id)
  #ここで、current_userのfollowerのidを全て取得してきます。
  temp_ids = current_user.followers.select(:id)
  unless temp_ids.blank?
    temp_ids.each do |temp_id|
      #先ほどのtemp_id(フォロワーのid)を、実引数としてsave_notification_announcement!メソッドに渡します。
      save_notification_announcement!(current_user, announcement_id, temp_id['id'])
    end
  end
end

def save_notification_announcement!(current_user, announcement_id, visited_id)
  notification = current_user.active_notifications.new(
    announcement_id: announcement_id,
    visited_id: visited_id,
    action: 'announcement'
  )
  notification.save if notification.valid?
end
通知を送る人(宣言する人)はcurrent_userで、通知を送りたい人(フォロワー全員)を以下の記述で取得してきます。
temp_ids = current_user.followers.select(:id)
宣言通知メソッドの呼び出し
宣言した時に通知を作成したいため、announcements_controller.rbのcreateに記述します。
  def create
    @user = User.find(params[:user_id])
    @announcement = Announcement.new(announcement_params)
    @announcement.user_id = @user.id
    if @announcement.save
      redirect_to user_path(@user, "tab" => "tab2"), notice: "宣言に成功しました"
      #ここで呼び出す
      @user.create_notification_announcement!(current_user, @announcement.id)
    else
      render 'new'
    end
  end
通知一覧画面の作成(追記)
コントローラを作成します。
$ rails g controller notifications
次にルーティングを記載します。
resources :notifications, only: [:index, :update]
通知の既読を、通知レコードごとに更新するため、indexに加えて、updateアクションを追加します。
updateアクションを追加して通知を一つずつ既読にする方法に関しては、こちらの記事を参考にさせていただきました。
次にコントローラを記述していきます。
updateアクションでは、通知レコードを一つ取得してきて、checkedをtrue(既読)にする処理を行っています。
   def index
    @notifications = current_user.passive_notifications.page(params[:page]).per(20)
  end

  def update
    notification = Notification.find(params[:id])
    if notification.update(checked: true)
      redirect_to request.referer
    end
  end
続いて、通知の一覧画面を作成します。
<% notifications = @notifications.where(checked: false).where.not(visitor_id: current_user.id) %>
  <% if notifications.exists? %>
    <%= render notifications %>
  <% else %>
    <p class="d-flex align-items-center justify-content-center">通知はありません</p>
  <% end %>
まず、冒頭に下記の記述で、
<% notifications = @notifications.where(checked: false).where.not(visitor_id: current_user.id) %>
where(checked: false)として、未読の通知のみ取得するように記述しています。
最後に、<%= render notifications %>で呼び出すための部分テンプレートを記述します。
<% visitor = notification.visitor %>
<% visited = notification.visited %>
<!--省略-->
<% case notification.action %>
<% when 'announcement' then %>
  <%= link_to user_path(visitor.id, "tab" => "tab2"),data: {"turbolinks"=>false} do %>
    <%= image_tag notification.announcement.user.get_profile_image(30, 30) %>
    <<%= notification.announcement.announcement %>>
  <% end %>
  宣言しました!
  <%= link_to '既読にする', notification_path(notification.id), method: :patch %>
<% end %>
<!--省略-->
<%= link_to '既読にする', notification_path(notification.id), method: :patch %>
この記述で、先ほど作成したupdateアクションで既読にできるようにしています。
これで、自分のフォロワーに対する、宣言の通知を作成することができました!
参考にさせていただいた記事