Reactでの非同期通信処理の方法
Reduxのミドルウェアを使って実装します
※ Reactのコンポーネント内で処理する方法もありますが、コンポーネントと通信処理が密結合になってコンポーネントのソースが複雑になり、可読性が下がるなどの理由で採用されるケースはあまりないためこの方法はとりません
redux-sagaとredux-thunkの比較
非同期通信処理の代表である redux-sagaとredux-thunkについて比較してみます
redux-thunk
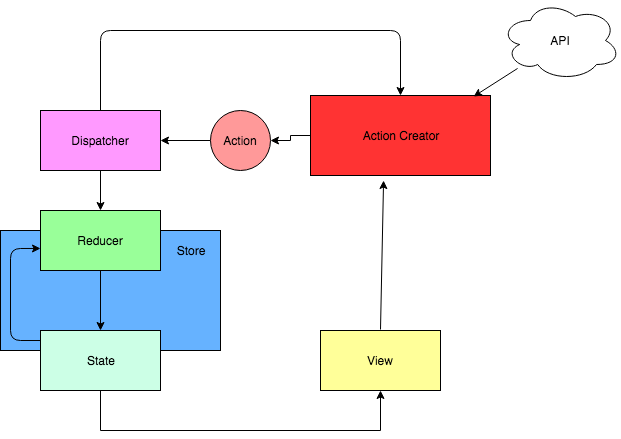
上図のように、redux-thunkを導入すると、action creatorの中に非同期通信処理を書いたり、action creatorからさらに別のaction creatorをcallすることができるようになります。
そのため、本来の reduxのアーキテクチャの形から逸脱することになり、記述の自由度が上がり開発者各々が書くことでソースコードの可読性が下がってしまいます。
redux-saga

・Actionが発行→ DispatcherはStoreとSagaのスレッドにActionを渡す
・非同期処理をTaskとして登録しておく。このTaskはアプリ起動時からスレッドのように実行待ちになる
・Actionが渡されるとWatch TaskはそれをキャッチしTaskを実行。実行結果をAction Creatorに渡す
ポイントは Reduxとは独立して動く
また、テストも書きやすくなっています。

【↑ Redux-Sagaのロゴ。Reduxのロゴと独立していることを示している】
| redux-saga | redux-thunk | |
|---|---|---|
| サイズ | 14KB | 352B |
| Githubスター数 | 18,450 | 12,778 |
| 記述量 | 多い | 少ない |
| Action Creator | 入れ子にならない | 入れ子になるためコールバックが連なり可読性が下がる |
redux-sagaの実装例
reduxの公式サンプルの counterを改造してボタンが押されてから1秒後にカウントを追加する非同期処理を実装していきます
参考
・redux-saga official beginner tutorial
・ソース
sagaを実行するために以下を実装します
- MiddleWareを作成
- 作成したMiddlewareを ReduxのStoreとconnectする
例)main.js
import React from 'react'
import ReactDOM from 'react-dom'
import { createStore, applyMiddleware } from 'redux'
import createSagaMiddleware from 'redux-saga'

import Counter from './Counter'
import reducer from './reducers'
import { helloSaga } from './sagas'

// sagaMiddlewareを作成
const sagaMiddleware = createSagaMiddleware()
// SagaMiddlewareをStoreとconnect
const store = createStore(
  reducer,
  applyMiddleware(sagaMiddleware)
)
// SagaMiddlewareを実行
sagaMiddleware.run(helloSaga)

const action = type => store.dispatch({type})
・・・
こちらが実行するSaga(helloSaga)。 SagaMiddleware実行時に引数に渡しています
saga.js
export function* helloSaga() {
  console.log('Hello Sagas!')
}
非同期通信処理
クリックしてから1秒後に1カウントする処理を実行するボタンを追加
Counter.js
const Counter = ({ value, onIncrement, onDecrement, onIncrementAsync }) =>
  <div>
    <button onClick={onIncrementAsync}>
      Increment after 1 second
    </button>
    {' '}
   ...
  </div>
onIncrementAsync をStoreのactionにをconnectします
main.js
function render() {
  ReactDOM.render(
    <Counter
      value={store.getState()}
      onIncrement={() => action('INCREMENT')}
      onDecrement={() => action('DECREMENT')}
      onIncrementAsync={() => action('INCREMENT_ASYNC')} />,
    document.getElementById('root')
  )
}
非同期通信をするために、 Taskと TaskWatcherを定義します
import { put, takeEvery } from 'redux-saga/effects'

const delay = (ms) => new Promise(res => setTimeout(res, ms))

// ...

// worker Saga: 非同期のincrement taskを実行します
export function* incrementAsync() {
  yield delay(1000) // Generatorをとめる働きをします。
  yield put({ type: 'INCREMENT' })
}

// TaskWatcher: INCREMENT_ASYNCのたびにincrementAsync taskを新たに作成します
export function* watchIncrementAsync() {
  yield takeEvery('INCREMENT_ASYNC', incrementAsync)
}
actionのtypeが INCREMENT_ASYNC の場合に incrementAsync()を実行します
Effect API
put: Action Creatorを実行してActionをdispatchします
他にも、select, join, callなどがあります
参考:https://redux-saga.js.org/docs/api/
複数のSagaを同時に実行
sagas.js
export default function* rootSaga() {
  yield all([
    helloSaga(),
    watchIncrementAsync()
  ])
}
上で定義した rootSagaをmiddleware実行時に引数に渡すことで
それぞれのsagaが平行に実行されます
main.js
// ...
import rootSaga from './sagas'

const sagaMiddleware = createSagaMiddleware()
const store = ...
sagaMiddleware.run(rootSaga)

// ...
まとめ
reduxのアーキテクチャーをそのままに独立したものとして非同期処理を実装でき、redux-thunkと違い書き方が統一されるため、redux-sagaで非同期処理を実装するのがいいと思います。
参考
redux-saga officai doc
redux-saga official github
redux-saga README_ja