はじめに
OmniAuthの公式のwikiを読んで学習した内容を備忘録としてこちらに投稿します。
OmniAuthって?
Deviseのバージョン1.2から追加された、OAuthに関するモジュールのこと。
このモジュールを利用すれば、twitterやfacebookといったプロバイダーに登録されている情報でユーザー認証を行うことができます。
Before you start
config.omniauthは、アプリケーションにomniauth プロバイダーのミドルウェアを追加します。これは、config/initializers/omniauth.rbにconfig.omniauthを記述するべきではないことを意味します。なぜなら、そうしてしまうとお互いのomniauth プロバイダーのミドルウェアが衝突し、認証ができない事態に陥ってしまうからです。
config/initializers/devise.rbにだけ、config.omniauthを記述するようにしましょう。
Facebook example
まずは、以下のgemをGemfileに追加してください。
1. gemの追加
gem 'omniauth-facebook'
gem 'omniauth-rails_csrf_protection'
gem 'omniauth-facebook'
facebookのomniauth機能を追加するためのgem
"omniauth-#{provider}"の形で各プロバイダーのomniauthのgemが提供されている。
各プロバイダーについてはこちらから確認してください。
gem 'omniauth-rails_csrf_protection'
OmniAuth2.0から
CSRF脆弱性 CVE-2015-9284の対応のためにインストールが必要なgem
これがないと「Not found. Authentication passthru.」と表示され認証が失敗します。
参考:OmniAuth - Rails CSRF Protection
バージョン1系からの変更点については、こちらでご確認ください。
変更点について簡単に紹介しておくと、
- サービスプロバイダーのサービス認可画面へリダイレクトするエンドポイントはデフォルトでGET/POSTどちらも有効でしたが、2.0からPOSTのみに変更となりました。
- gem omniauth-rails_csrf_protection'のようなCSRF用validatorを使用すること
これらの変更は、1系でCSRF脆弱性がみつかったため、それに対応するためのものとのことです。
1.について、どうしてgetメソッドがダメなのか調べてみたところ、どうやらgetメソッドはCSRFtokenの漏洩リスクが高いようです。
参考:Cross-Site Request Forgery Prevention Cheat Sheet
2.検索用カラムの追加
Deviseは、uidとproviderの情報を使って、DBからデータを検索するので、テーブルに存在していない場合追加する必要があります。
rails g migration AddOmniauthToUsers provider:string uid:string
rake db:migrate
3.認証用プロバイダーの宣言
deviseが認証で利用するプロバイダーを識別できるように、config/initializers/devise.rbに以下のように追記します。
config.omniauth :facebook, "APP_ID", "APP_SECRET"
“Invalid credentials”等の理由でFacebookで認証ができなかった場合は、token_params: { parse: :json }を追記してください。
config.omniauth :facebook, "APP_ID", "APP_SECRET", token_params: { parse: :json }
4.モデルの設定
deviseにOmniAuthのプロバイダーを識別させるためには、config/initializers/devise.rbへの設定と別にモデルへの設定も必要です。以下のように記述してください。
devise :omniauthable, omniauth_providers: %i[facebook]
ここまで、できたら変更をdeviseに知らせるためにrailsをリスタートさせましょう。
認証に複数のプロバイダーを利用したい場合は、こちらを参照してください。
5.Deviseのurlメソッドについて
Rails.application.routes.draw do
  devise_for :users
  # For details on the DSL available within this file, see https://guides.rubyonrails.org/routing.html
end
devise :omniauthable, omniauth_providers: %i[facebook]
Userモデルでomniauthable、routes.rbでdevise_for :users の設定ができたらdeviseは以下2つのurlメソッドを作成します。この時、*_urlというメソッドは作成されません。
- user_{provider}_omniauth_authorize_path
- user_{provider}_omniauth_callback_path
OmniAuth 2.0+からは、HTTP GETは許可されておらず、HTTP POSTを使う必要があります。button_toヘルパーを使用するか、link_toヘルパーを使用する際は、method: :postの記述を入れるようにしましょう。
<%= link_to "Sign in with Facebook", user_facebook_omniauth_authorize_path, method: :post %>

# you can also switch to using `button_to`, which doesn't require rails-ujs for performing POST requests:
<%= button_to "Sign in with Facebook", user_facebook_omniauth_authorize_path %>
HTTP GETは、CSRF脆弱性をついた攻撃を受ける可能性があるようです。
参考:possibility of CSRF attacks.
6.Omniauth callbacksの設定
1. routes.rbの設定
link_to,button_toがクリックされると、ユーザーは、Facebookのページにリダイレクトされ、そこから認証情報を取得します。
認証情報の取得後に、元のアプリケーションにリダイレクトバックする必要があるため、config/routes.rb以下のように編集します。
devise_for :users, controllers: { omniauth_callbacks: 'users/omniauth_callbacks' }
これで、Deviseは、Devise側のOmniauthCallbacksControllerではなく、自身のusersフォルダー配下のOmniauthCallbacksControllerを参照するようになります。
2.omniauth_callbacks_controller.rbの設定
以下のファイルを作成します。
class Users::OmniauthCallbacksController < Devise::OmniauthCallbacksController
end
Devise::OmniauthCallbacksControllerをUsers::OmniauthCallbacksControllerが継承しています。これで、devise側のコントローラーをオーバーライドできます。
3.OmniauthCallbacksControllerのオーバーライド
コールバックコントローラーには、OmniAuthで利用するプロバイダーと同名のアクション(メソッド)を定義する必要があります。今回は、Facebookを利用しているので以下のように編集します。
class Users::OmniauthCallbacksController < Devise::OmniauthCallbacksController
  # See https://github.com/omniauth/omniauth/wiki/FAQ#rails-session-is-clobbered-after-callback-on-developer-strategy
  skip_before_action :verify_authenticity_token, only: :facebook

  def facebook
    # You need to implement the method below in your model (e.g. app/models/user.rb)
    @user = User.from_omniauth(request.env["omniauth.auth"])

    if @user.persisted?
      sign_in_and_redirect @user, event: :authentication # this will throw if @user is not activated
      set_flash_message(:notice, :success, kind: "Facebook") if is_navigational_format?
    else
      session["devise.facebook_data"] = request.env["omniauth.auth"].except(:extra) # Removing extra as it can overflow some session stores
      redirect_to new_user_registration_url
    end
  end

  def failure
    redirect_to root_path
  end
end
1.facebookアクションについて特筆すべき点
- OmniAuthで取得した、Facebookの全ての情報は、request.env["omniauth.auth"]に格納され、ハッシュとして利用できます。request.env["omniauth.auth"]の中身についてはこちらで確認ください。
- Userモデルに既にユーザーが登録されていた場合は、sign_in もしくは sign_in_and_redirectのいずれかでサインインさせます。Warden callbacks.を利用したい場合は、:event => :authenticationオプションを使います。
- あなた次第ですが、flashメッセージについては、deviseのデフォルトのものを使用することができます。
- Userモデルにユーザーが登録されていなかった場合は、sessionにOmniAuthで取得したFacebookの全ての情報を保存します。この時、sessionのキーを"devise."で始まるように命名していれば、ユーザーのサインイン後に自動でこのsession情報を削除してくれます。そして最終的には、ユーザーをregistration formにリダイレクトさせます。
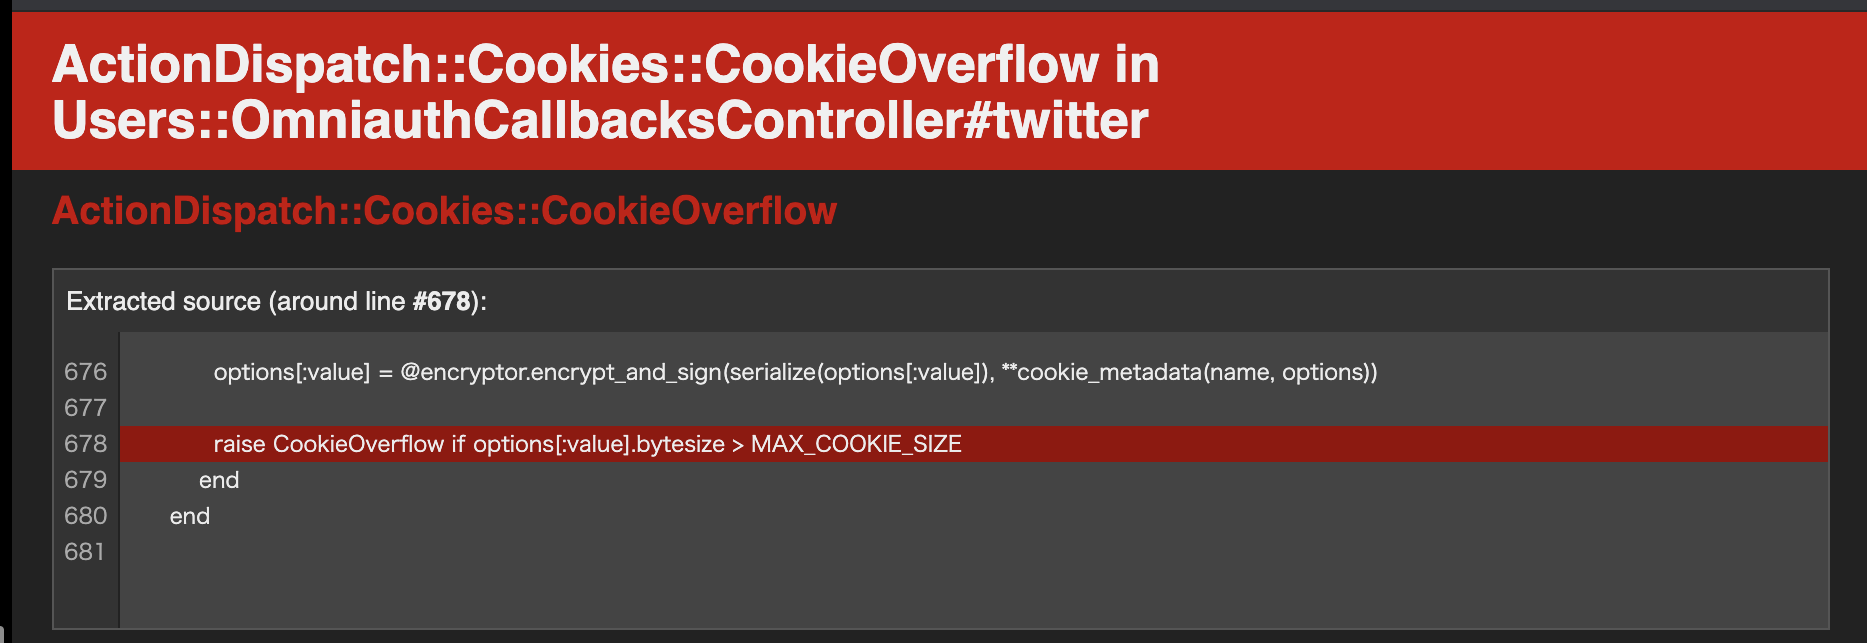
2.CookieOverflow
ちなみに、以下の部分を実行した際にエラーが発生しました。
session["devise.facebook_data"] = request.env["omniauth.auth"].except(:extra) # Removing extra as it can overflow some session stores
こんなエラーが発生します。#twitterとなっているのは、私が、twitterOmniAuthの実装をしていたからです。facebookでも同様のエラーが起きます。

エラー原因について
railsのデフォルトのsession storeは、cookieベースとなっています。
cookieの場合、約4KB(4,096byts)がデータを保存できる限界容量となっています。限界容量を超えてしまうとオーバーフローしてしまいます。
今回は、request.env["omniauth.auth"].except(:extra)の情報がcookieの限界容量を超えたため、オーバーフローによるエラーが発生してしまいました。
オーバーフローしないようにデータ容量の大きい(:extra)の部分をexceptしていますが、cookieではそれでも限界容量を超えてしまうようです。
参考:ActionDispatch::Session::CookieStore
cookieオーバーフローの解決策としては、session storeをより容量のあるストアに変更することです。
Active Recordを用いてデータベースに保存する 方法が一番いいかと思います。(activerecord-session_store gemが必要)これについては、別記事に載せる予定です。
詳細については、以下でご確認ください。
参考:Ruby on Rails ガイド
7.self.from_omniauth(auth)メソッドの定義
コントローラーの設定完了後、app/models/user.rbにfacebookアクションで登場した、self.from_omniauth(auth)メソッドを定義します。
def self.from_omniauth(auth)
  where(provider: auth.provider, uid: auth.uid).first_or_create do |user|
    user.email = auth.info.email
    user.password = Devise.friendly_token[0, 20]
    user.name = auth.info.name   # assuming the user model has a name
    user.image = auth.info.image # assuming the user model has an image
    # If you are using confirmable and the provider(s) you use validate emails,
    # uncomment the line below to skip the confirmation emails.
    # user.skip_confirmation!
  end
end
このメソッドは、providerとuidの情報で、Userモデルからユーザーを探します。
もし、ユーザーが見つからなかった場合、ランダムなパスワードと、その他の情報を持った新たなユーザを作成します。
注意するべき点として、first_or_createメソッドは新たにユーザーを作成する場合、providerとuidの情報を以下のように自動で登録してくれます。
user.provider=auth.provider
user.uid=auth.uid
first_or_create! メソッドは、first_or_createメソッドと同様に動作しますが、ユーザーレコードがバリデーションに引っかかる等で正常に登録できない場合は、例外エラーを発生させます。
加えて、first_or_createメソッドについて注意するべき点としては、ユーザーが見つかった場合、そのユーザーのプロバイダーから取得したデータが前回登録時から更新されていたとしても、そのデータを更新できないということです。このことについては、こちらでご確認ください。
実は、今回紹介した、first_or_createメソッドは、railsの過去のパブリックAPIには載っているのですが、最新のパブリックAPIには、載っていないんです。代わりに、最新のパブリックAPIには、find_or_create_byが載っています。
このことについて、調べたところ、first_or_createメソッドは、where句を伴わないと期待する動作にならず、分かりずらいのが原因ではないかとのことでした。
参考:Rails first_or_create vs find_or_create_by on ActiveRecord
参考:first_or_create vs find_or_create_by
以上を踏まえて、今風にself.from_omniauthメソッドを定義すると以下のようになるかと思います。
def self.from_omniauth(auth)
    find_or_create_by(provider: auth.provider, uid: auth.uid) do |user|
      user.email = auth.info.email
      user.password = Devise.friendly_token[0, 20]
      user.name = auth.info.name   # assuming the user model has a name
      user.image = auth.info.image # assuming the
      user model has an image
    # If you are using confirmable and the provider(s) you use validate emails,
    # uncomment the line below to skip the confirmation emails.
    # user.skip_confirmation!
    end
end
8.new_with_sessionについて
DeviseのRegistrationsControllerは、デフォルトの挙動として、リソースをビルドする前にUser.new_with_sessionを実行します。これは、次のことを意味します。
サインアップ前に常にユーザーは初期化されてしまいます。そのため、セッションからデータをコピーしておく必要がある場合は、ユーザーモデルにnew_with_sessionメソッドを定義する必要があります。
class User < ApplicationRecord
  def self.new_with_session(params, session)
    super.tap do |user|
      if data = session["devise.facebook_data"] && session["devise.facebook_data"]["extra"]["raw_info"]
        user.email = data["email"] if user.email.blank?
      end
    end
  end
end
このコードを理解するためには、以下の二つのメソッドを理解する必要があります。
- super
- tap
1.superについて
superクラスとは、オーバーライドされる前のメソッドを呼び出すことができるメソッドです。言い換えれば、継承元のメソッドを出力することが可能です。
引用:superクラスとは
2.tapについて
tap {|x| ... } -> self
self を引数としてブロックを評価し、self を返します。
メソッドチェインの途中で直ちに操作結果を表示するためにメソッドチェインに "入り込む" ことが、このメソッドの主目的です。
hash = {}
#  => {}
hash.tap{ |h| h[:value] = 42 }
#  => {:value=>42}
hash
#  => {:value=>42}
tap の場合は、ブロックの内容にかかわらずレシーバー自身が返り
引用:Ruby: Object#tap、Object#then を使ってみよう
super.tapで継承元のself.new_with_sessionメソッドの内容を上書きしているようです。
参考:What does self.new_with_session(params, session) do in this case
ここまでを理解したうえで、もう一度コードを見てみましょう。
class User < ApplicationRecord
  def self.new_with_session(params, session)
    super.tap do |user|
      if data = session["devise.facebook_data"] && session["devise.facebook_data"]["extra"]["raw_info"]
        user.email = data["email"] if user.email.blank?
      end
    end
  end
end
まず、superについて、
User>ApplicationRecord
Userモデルは、ApplocationRecordモデルを継承しています。
ApplicationRecordは、deviseインストール時に、deviseのモジュールをインクルードしています。
つまり、
superとはdevise/lib/devise/models/registerable.rbで定義された以下のnew_with_sessionメソッドのことを表しています。
 # A convenience method that receives both parameters and session to
        # initialize a user. This can be used by OAuth, for example, to send
        # in the user token and be stored on initialization.
        #
        # By default discards all information sent by the session by calling
        # new with params.
        def new_with_session(params, session)
          new(params)
        end
次に、tap以下の処理について、
tapメソッドの処理に当てはめると、、、
super を引数としてブロックを評価し、super を返します。
このtapメソッドの戻り値は、以下のブロック処理の中身となります。
if data = session["devise.facebook_data"] && session["devise.facebook_data"]["extra"]["raw_info"]
        user.email = data["email"] if user.email.blank?
ここまで来れば、以下のメソッドの意味がわかりますね。
class User < ApplicationRecord
  def self.new_with_session(params, session)
    super.tap do |user|
      if data = session["devise.facebook_data"] && session["devise.facebook_data"]["extra"]["raw_info"]
        user.email = data["email"] if user.email.blank?
      end
    end
  end
end
つまり、devise/lib/devise/models/registerable.rbで定義されたnew_with_sessionメソッドの内容をブロック処理の内容で上書きするということになります。
メソッドの挙動としては、サインアップページにリダイレクトバック後に、フォームをemail入力部が空白であった場合、session["devise.facebook_data"]内のemailの情報を補完するというもの。
自動入力が実現できます。
9.Facebook認証でのサインアップを取消す設定
ユーザーにFacebook認証でのサインアップをキャンセルすることを許可したい場合は、cancel_user_registration_pathにリダイレクトさせるようにします。そうすることで、"devise."で始まるsessionの情報を削除することができ、それ以降new_with_sessionメソッドが呼び出されることはなくなります。
10.Logout linksの設定
ログアウト用のリンクを設定します。
devise_scope :user do
  delete 'sign_out', :to => 'devise/sessions#destroy', :as => :destroy_user_session
end
これで、お終いです!お疲れ様でした!
実装がうまくいっていることができれば、次は、実装テストに移りましょう。
https://github.com/omniauth/omniauth/wiki/Integration-Testing